- Capabilities
- Getting started
- Architecture center
- Platform updates
User-attributed SAP writeback with OAuth 2.0
This page contains instructions for setting up the OAuth 2.0 server in SAP and setting up the OAuth 2.0 client in Foundry.
Setting up the OAuth 2.0 server in SAP
Prerequisites
- SP21 or above of the Palantir Foundry Connector 2.0 for SAP Applications ("Connector")
- The Foundry technical user in SAP should be a
SYSTEMuser /PALANTIR/OAUTH_CLIENTshould be assigned to the Foundry technical user and any end users wishing to write back to SAP from Foundry/PALANTIR/CONTENT_FUNCTION_ALLshould be assigned to end user- All services under the
/sap/public/bcnode to be activated (for OAuth 2.0 configuration)/sap/bc/sec/oauth2*/default_host/sap/bc/webdynpro/sap/oauth2_authority
- SAP Gateway is active
- SAP_BASIS (the technical component version, applicable to both SAP NetWeaver and SAP S/4HANA systems) 7.4 SP09 or above (support for OAuth 2.0 and OData)
Reference
- Note 1688545 - OAuth 2.0 Server in AS ABAP troubleshooting ↗ (SAP login required)
- Help: OAuth 2.0 Server for AS ABAP ↗
OAuth 2.0 configuration
- Run the
SOAUTH2transaction. - Select Create....
- Enter the username of the Foundry technical user as the OAuth 2.0 Client ID.
- Select Next >.
- Enter the username of the Foundry technical user as the User ID.
- Ensure Client User ID and Password and SSL Client Certificate are both checked.
- Select Next >.
- Set the Redirect URI as
https://<FOUNDRY_DOMAIN>/workspace/oauth2-clients/callback. - Select Next >.
- Add a Scope Assignment with an OAuth 2.0 Scope ID of
/PALANTIR/SRV_0001and a description such asPalantir Foundry writeback using SAP functions. - Select Next > and then Finish.
OData configuration
- In the Maintain service page within SAP, follow the hierarchy of services to find opu > odata > palantir.
- Right-click on palantir and select Activate Service.
- Select Yes when prompted.
- On the Create/Change a Service tab, select GUI Configuration under Interactive Options.
- Add parameter with name
~CHECK_CSRF_TOKENand value0(zero). - Disable CSRF_TOKEN validation as outlined here: https://help.sap.com/doc/saphelp\_hba/1.0/de-DE/e6/cae27d5e8d4996add4067280c8714e/content.htm
- Run the
/IWFND/MAINT_SERVICEtransaction. - Select Add System Alias under System Aliases.
- Add a system alias with the following values:
- Service Doc. Identifier:
/PALANTIR/SRV_0001 - User Role: blank
- Host Name: blank
- SAP System Alias:
LOCAL - Metadata Default: unchecked
- Default System: checked
- Tech. Svc. Name:
/PALANTIR/SRV - Ext. Service Name:
ODATA_SRV - Version:
1 - User Name: blank
- Service Doc. Identifier:
Setting up the OAuth 2.0 client in Foundry
This follows the general approach outlined in Configure outbound applications but has been tailored specifically to SAP systems.
Choose the setup that matches your SAP connection:
- If your SAP ERP source uses SAP Data Accelerator, follow Outbound application setup with SAP Data Accelerator.
- For connections using an agent proxy egress policy, follow Outbound application setup.
Outbound application setup
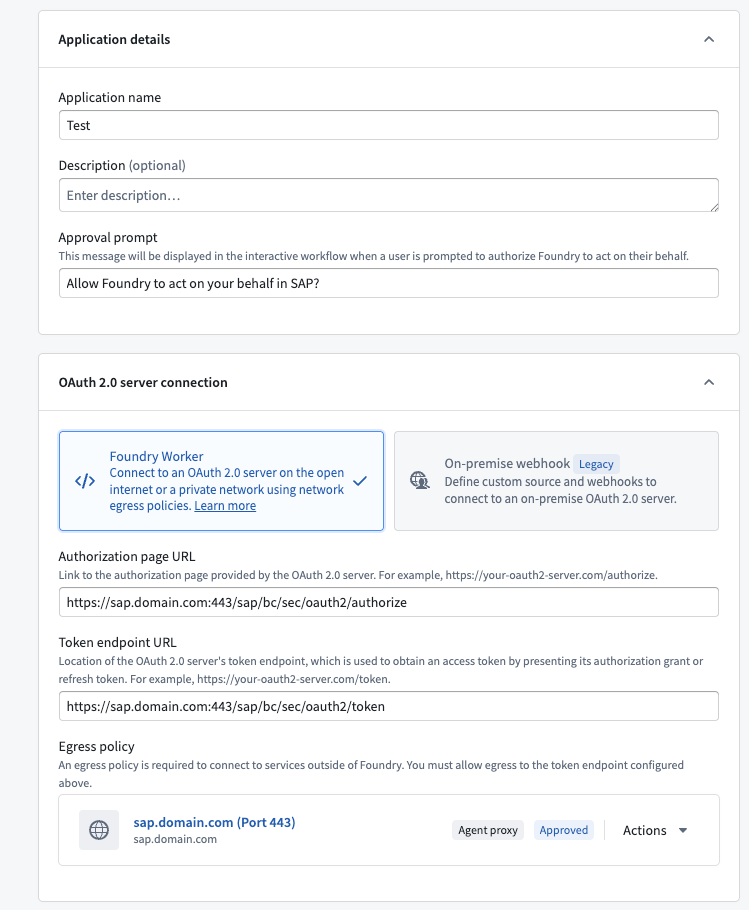
- Navigate to Control Panel and select Outbound applications under Organization settings.
- Select New application.
- Provide an Application name, for example, the name of your SAP system.
- Set the Approval prompt to describe the authorization action, for example,
Allow Foundry to act on your behalf in SAP?. - Under OAuth 2.0 server connection, select the Foundry Worker option.
- Set the Authorization page URL to the SAP OAuth 2.0 authorization endpoint, including the SAP HTTPS port. Replace
<SAP_DOMAIN>with your SAP hostname and<SAP_PORT>with its HTTPS port:
https://<SAP_DOMAIN>:<SAP_PORT>/sap/bc/sec/oauth2/authorize
- Set the Token endpoint URL to the SAP OAuth 2.0 token endpoint, including the SAP HTTPS port:
https://<SAP_DOMAIN>:<SAP_PORT>/sap/bc/sec/oauth2/token
- Under Egress policy, select an agent proxy egress policy that routes traffic through a Data Connection agent installed in your network with access to the SAP system.
- Under OAuth 2.0 settings, set the Client ID to the client ID from the SAP OAuth 2.0 server configuration. Under Scopes, add
/PALANTIR/SRV_0001. - Save the outbound application.
- This outbound application can now be used when creating an SAP webhook.
For more details on outbound application configuration options, see Configure outbound applications.
Outbound application setup with SAP Data Accelerator
User-attributed writeback through SAP Data Accelerator is in the beta phase of development and may not be available on your enrollment. This includes the get token and refresh token webhooks, outbound application setup, and BAPI writeback described below. Functionality may change during active development.
To enable user-attributed writeback through SAP Data Accelerator, create two webhooks on your SAP ERP source: a get token webhook and a refresh token webhook. Then, select both webhooks in an outbound application. These webhooks use the source's authentication and SAP Data Accelerator connection settings to exchange and refresh tokens.
Before you begin, complete the SAP OAuth 2.0 server setup and configure your SAP ERP source to use SAP Data Accelerator. You also need permission to manage outbound applications.
Create the get token and refresh token webhooks
When creating the get token webhook and the refresh token webhook, turn off Function configuration. If this setting is enabled, the webhooks are published as functions and cannot be used in outbound applications.
Use Insert example for each webhook after selecting its Task type. It automatically fills the task body template and creates the input and output parameters, including their types and mappings to response fields. Use the parameter tables below to check the generated configuration.
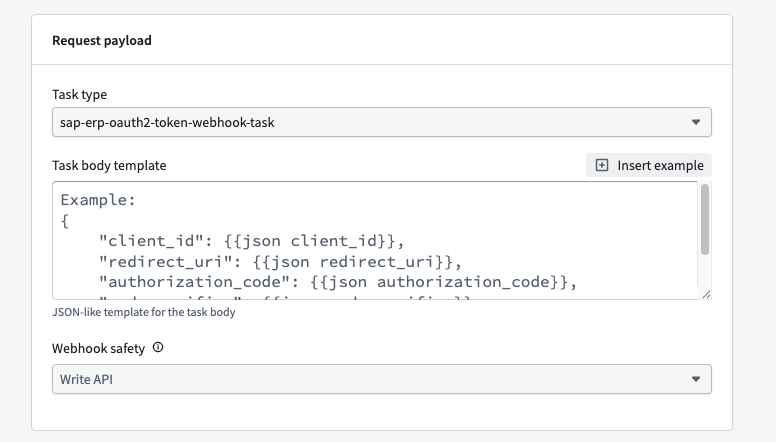
For both webhooks, leave Outbound application set to Not selected under Request configuration > Authorization. They use the SAP source's authentication to obtain and refresh tokens for the outbound application. Selecting that application here would create a circular dependency.
For both webhooks, leave Webhook safety set to the default Write API.
Follow the instructions below to create two webhooks on the same SAP ERP source:
- First, create the get token webhook. Open the source in Data Connection and select Create webhook.
- Enter a name for the webhook, such as
Get OAuth Token, and turn off Function configuration. - Set Task type to
sap-erp-oauth2-token-webhook-taskin Request configuration, - Select Insert example beside the empty Task body template to generate the get token webhook configuration. Check the generated parameters against the reference below, then save the webhook.
- Next, create the refresh token webhook on the same source. Enter a name, such as
Refresh OAuth Token. - Turn off Function configuration and set Task type to
sap-erp-oauth2-refresh-webhook-task. - Select Insert example to generate the refresh token webhook configuration. Check the generated parameters against the reference below, then save the webhook.
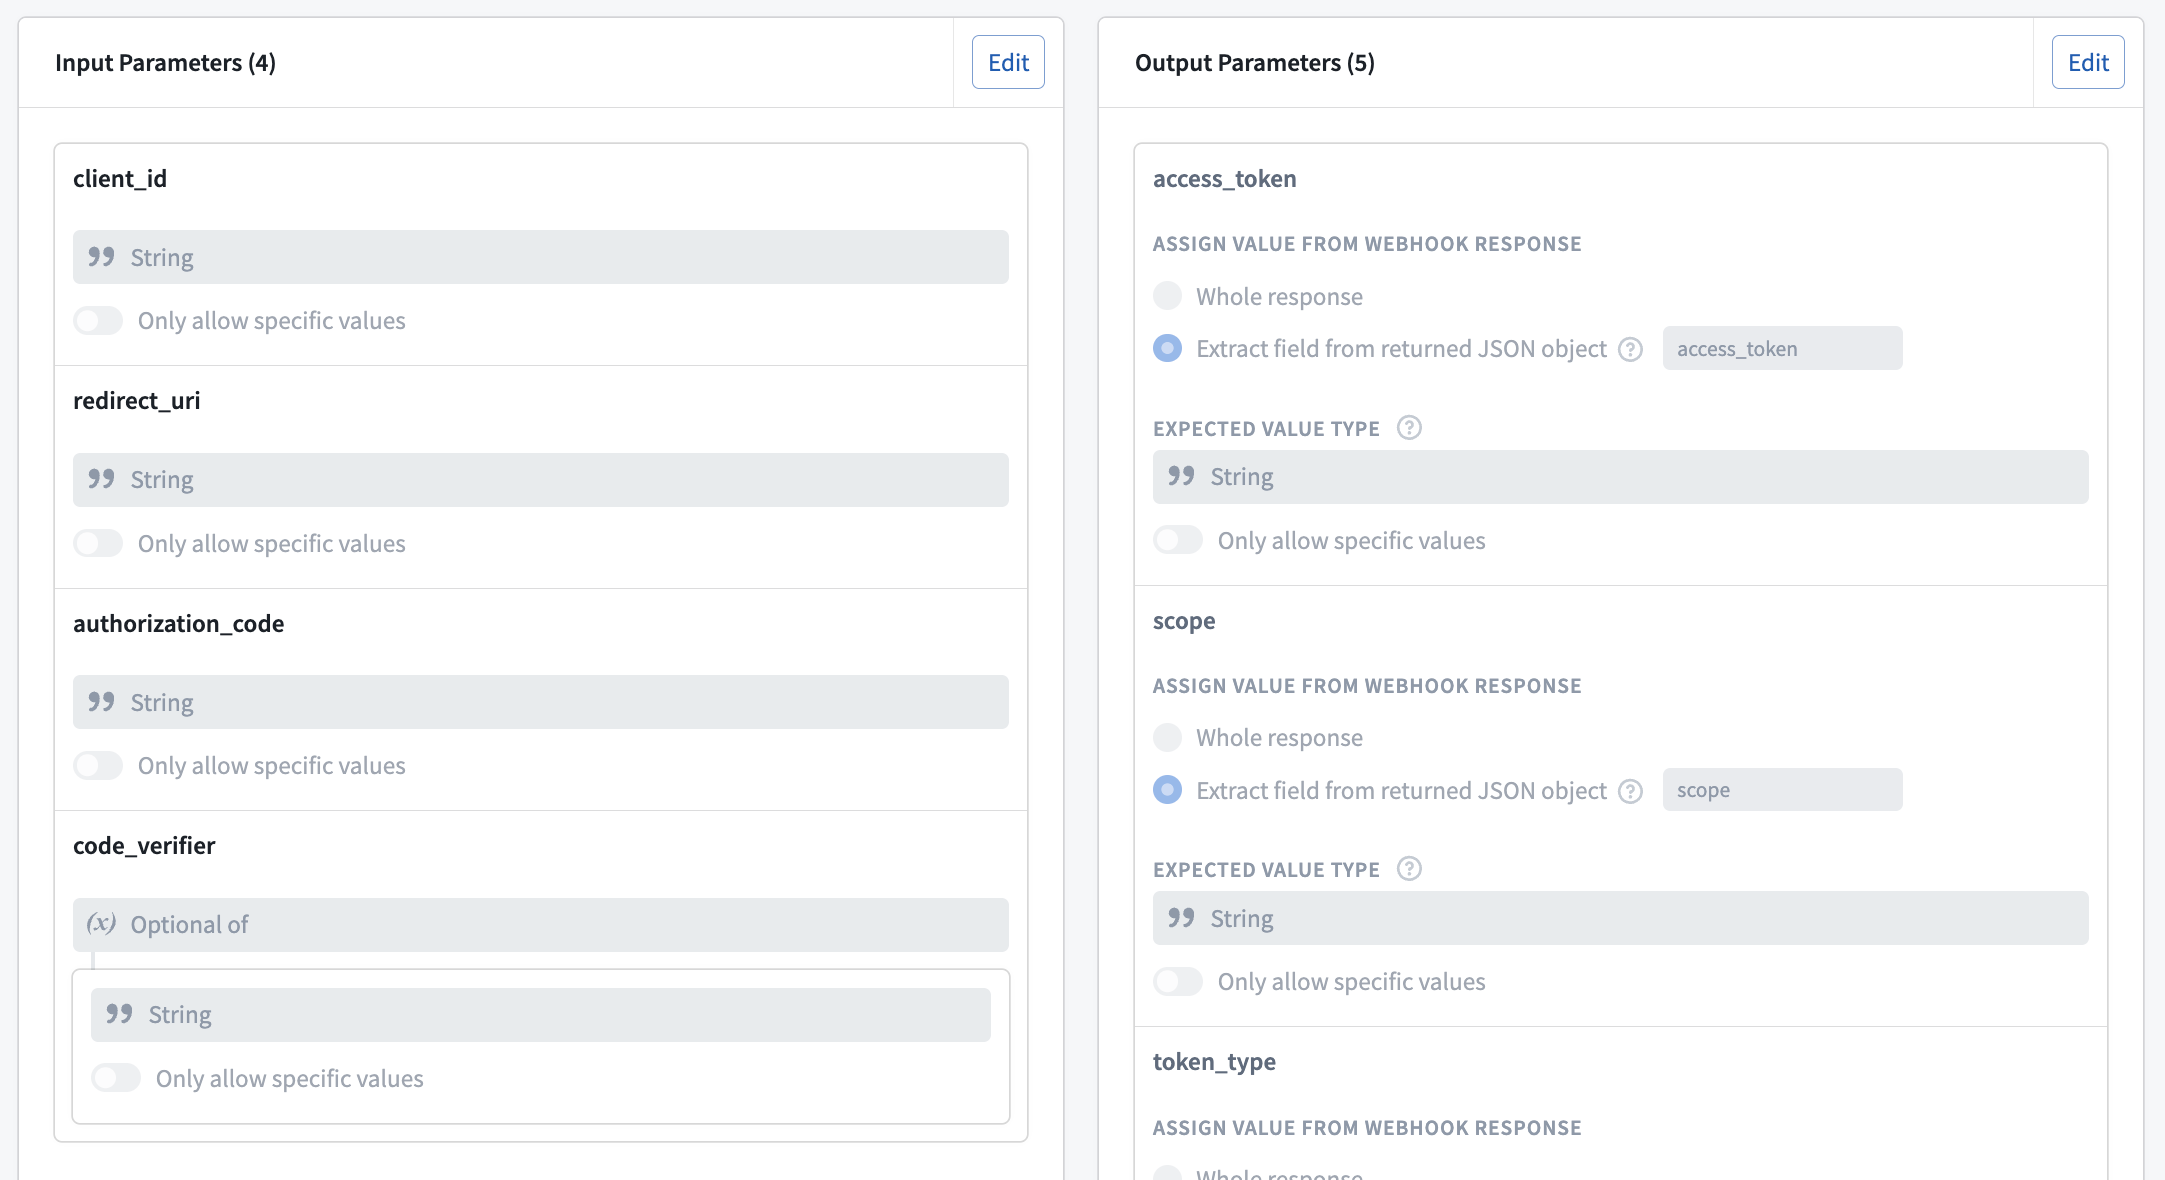
The get token webhook expects the following input parameters:
| Input parameter | Type | Required |
|---|---|---|
client_id | String | Yes |
redirect_uri | String | Yes |
authorization_code | String | Yes |
code_verifier | Optional string | Required when Enable PKCE is turned on in the outbound application. |
The generated task body maps these inputs as follows:
Copied!1 2 3 4 5 6{ "client_id": {{json client_id}}, "redirect_uri": {{json redirect_uri}}, "authorization_code": {{json authorization_code}}, "code_verifier": {{json code_verifier}} }
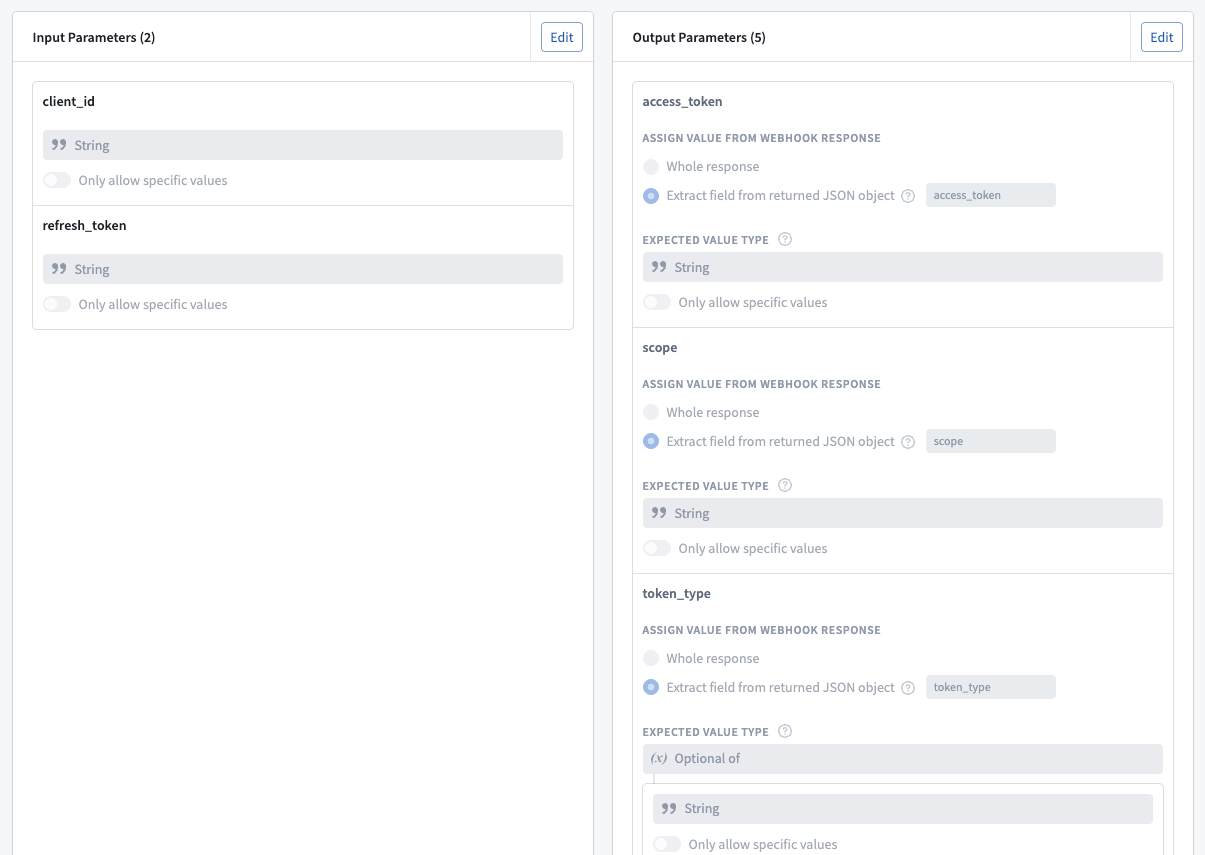
The refresh token webhook expects the following input parameters:
| Input parameter | Type | Required |
|---|---|---|
client_id | String | Yes |
refresh_token | String | Yes |
The generated task body maps these inputs as follows:
Copied!1 2 3 4{ "client_id": {{json client_id}}, "refresh_token": {{json refresh_token}} }
Foundry supplies these input values during authorization and token refresh. Keep the parameter references in the task bodies so each request receives the appropriate values.
Insert example also creates the following output parameters for both webhooks. In Responses, verify that each variable has its own output parameter with the specified name, type, and response key. If configuring a webhook manually, create one output parameter for each row and map it to the matching response key as outlined in the table below:
| Output parameter | Type | Response key |
|---|---|---|
access_token | String | access_token |
scope | String | scope |
token_type | Optional string | token_type |
expires_in | Optional string | expires_in |
refresh_token | Optional string | refresh_token |
The following example shows the configured inputs and output mappings for the get token webhook:
The refresh token webhook uses the same output mappings with its two input parameters:
Configure the outbound application
Follow the instructions below to use the two saved webhooks to configure the OAuth 2.0 connection:
- In Control Panel, open Organization settings > Outbound applications and select New application.
- Provide an Application name and an Approval prompt, such as
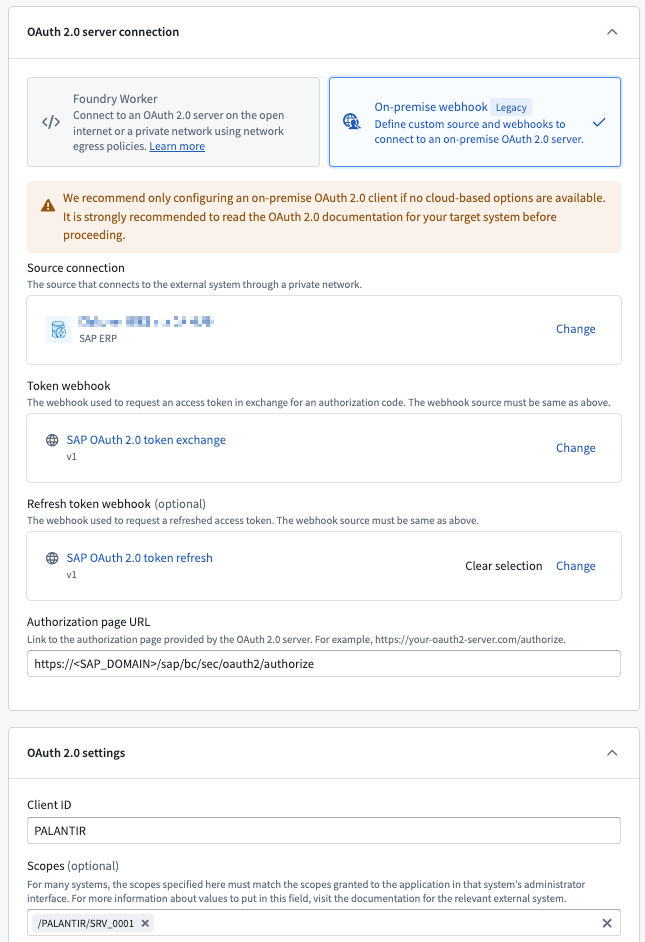
Allow Foundry to act on your behalf in SAP?. - Under OAuth 2.0 server connection, select On-premise webhook, which is marked Legacy. This option lets the outbound application use the SAP source's Data Accelerator connection. The source itself continues to run on a Foundry worker.
- Under Source connection, select the SAP ERP source on which you created the webhooks.
- Set Token webhook to the webhook using
sap-erp-oauth2-token-webhook-taskand Refresh token webhook to the webhook usingsap-erp-oauth2-refresh-webhook-task. - Set Authorization page URL to
https://<SAP_DOMAIN>/sap/bc/sec/oauth2/authorize. Use an SAP URL that users can reach from their browsers. This interactive authorization step requires access from the user's computer even though token exchange and refresh use SAP Data Accelerator. - Under OAuth 2.0 settings, set Client ID to the OAuth 2.0 Client ID created in the SAP OAuth 2.0 configuration. Following those instructions, this is the Foundry technical user's SAP username.
- Add
/PALANTIR/SRV_0001under Scopes. - Save the outbound application.
Use the outbound application for writeback
On the same SAP ERP source, create or edit the webhook that invokes your BAPI. For this BAPI webhook, select the saved application under Request configuration > Authorization > Outbound application. When a user runs the writeback workflow, Foundry prompts them to authorize access to SAP if they do not already have a valid token. The writeback then uses that user's SAP authorization, and the refresh token webhook obtains a new access token when needed.
(Legacy) Webhook-based OAuth 2.0 configuration
The REST API webhook configuration described below is in the legacy phase of development and no additional development is expected. For new configurations, choose the matching connection setup under Setting up the OAuth 2.0 client in Foundry. For more information on the legacy approach, see (Legacy) Custom webhook-based OAuth 2.0 handshakes.
Previously, configuring OAuth 2.0 for SAP required creating a dedicated REST API source with webhooks to handle the token and refresh flows manually. If your existing SAP integration uses this approach, it will continue to work.
Source connection setup
Ensure that the SAP source URL is using HTTPS, or webhooks will fail when using an OAuth flow.
- Create a new REST API source.
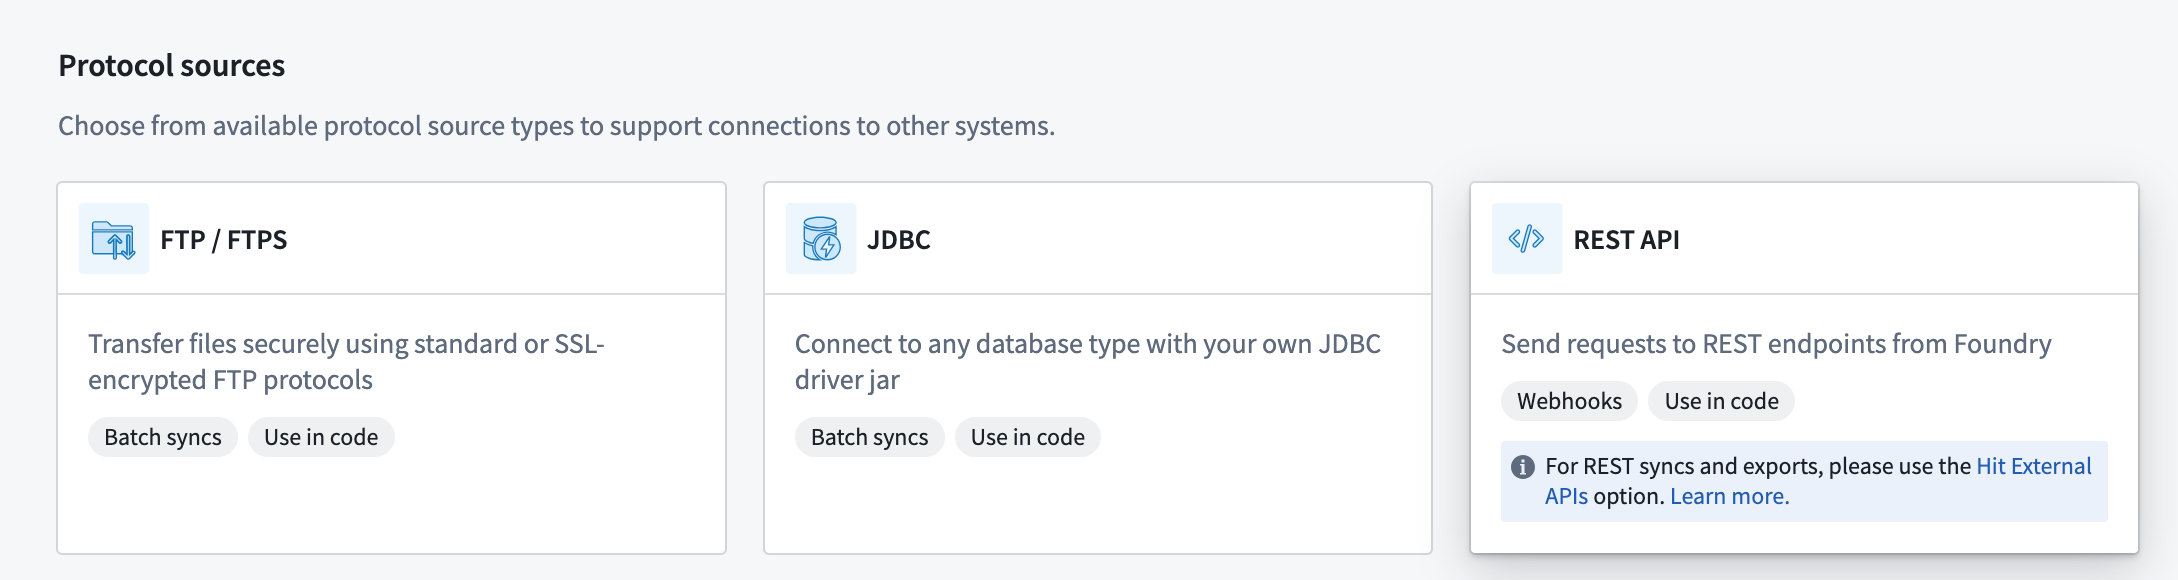
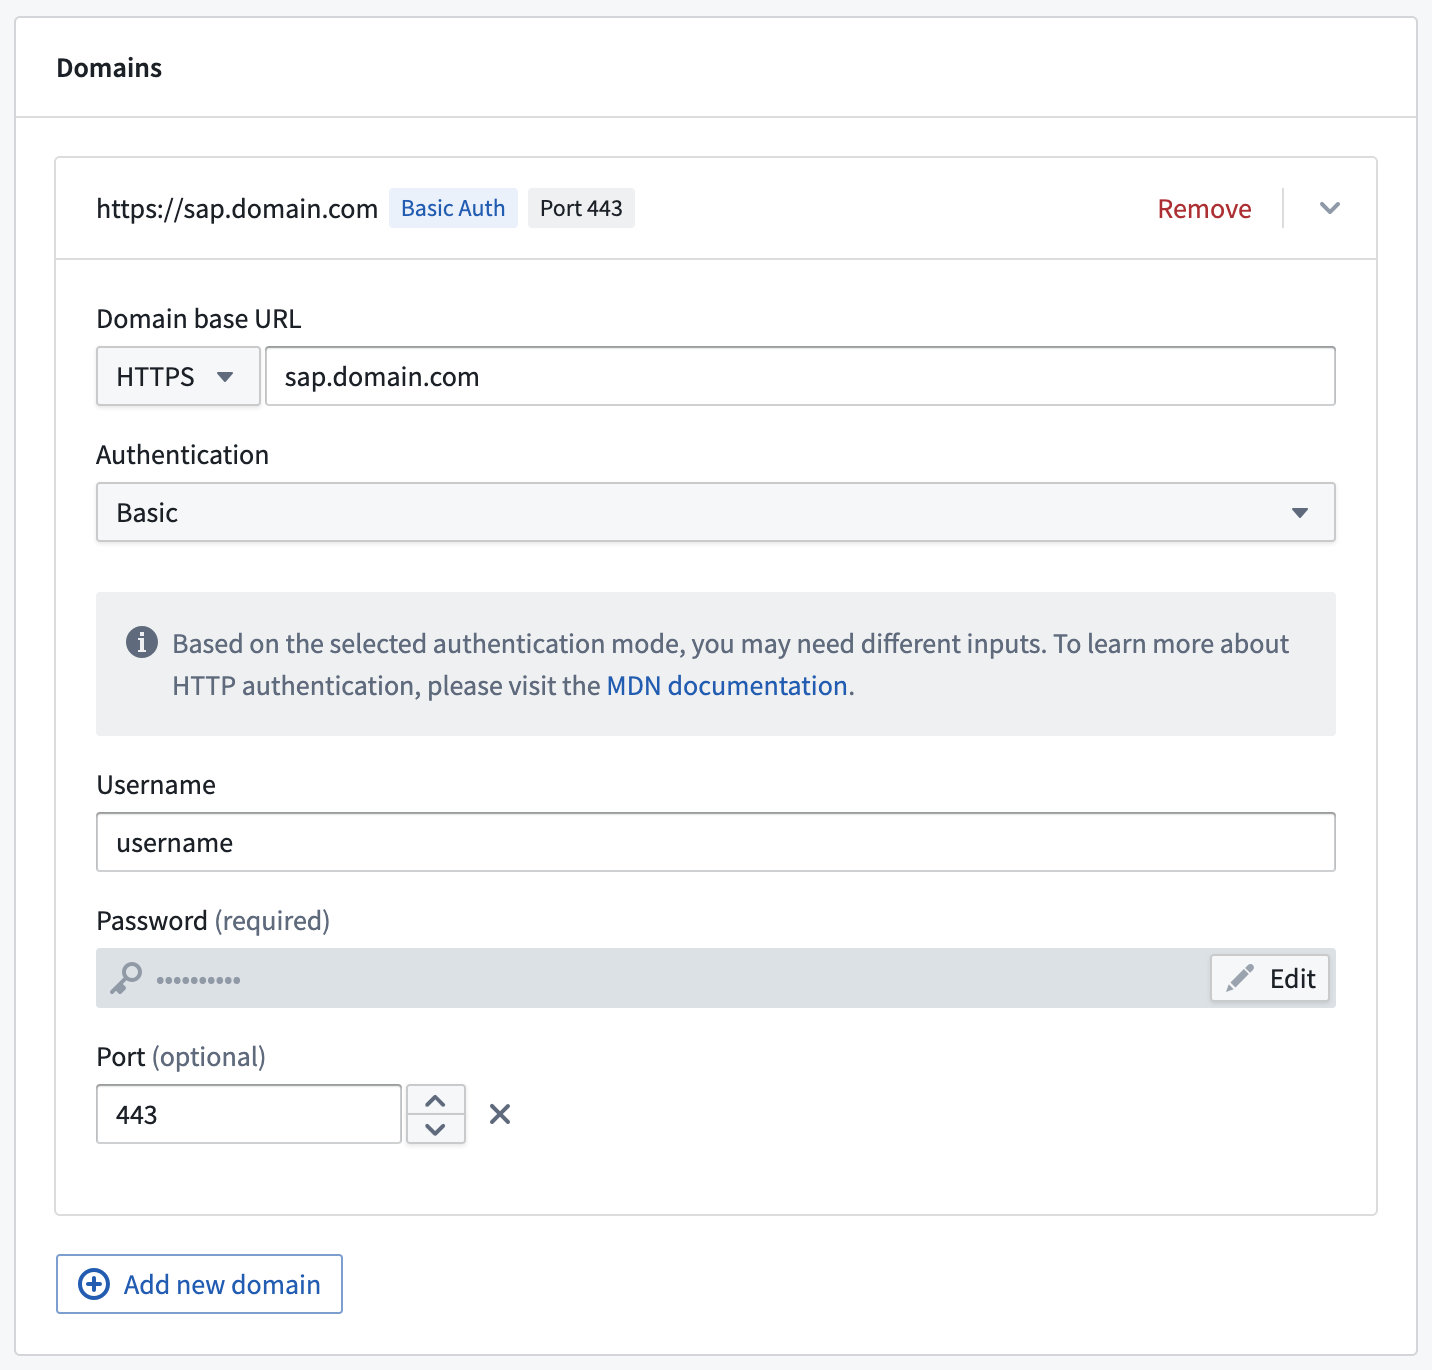
- Configure the source with the base domain URL and port used for the SAP source.
- Select Basic authentication and add the username and password used to connect to SAP.
- Save the source.
OAuth 2.0 authorization flow webhook setup
Webhooks published as functions cannot be used in legacy custom webhook-based OAuth 2.0 outbound applications. When creating your token and refresh webhooks, ensure function publishing is disabled.
-
On the overview page of the new REST API source, select Create webhook.
-
Give the webhook a name (such as
SAP OAuth2 authorization code flow webhook). Ensure that Function Configuration is toggled off. -
Advance to the Request configuration step.
-
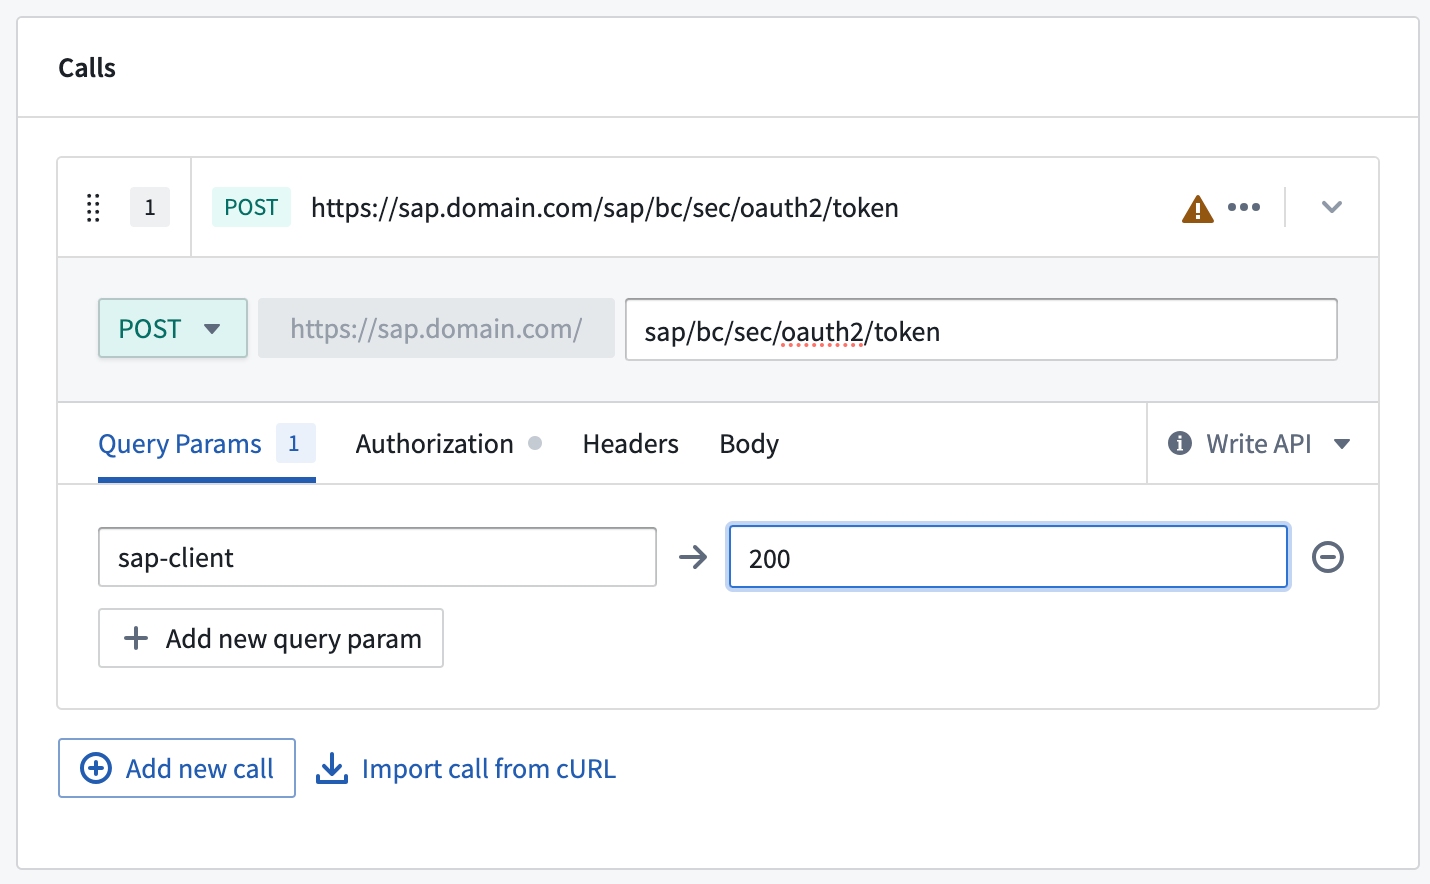
Under Calls, select POST as the request type and enter
sap/bc/sec/oauth2/tokenas the path. -
Under Query Params,
sap-clientmight have to be set if the client used is not the default client.
- Scroll down to Input Parameters and add the following three parameters (all string type):
redirect_uriclient_idauthorization_code
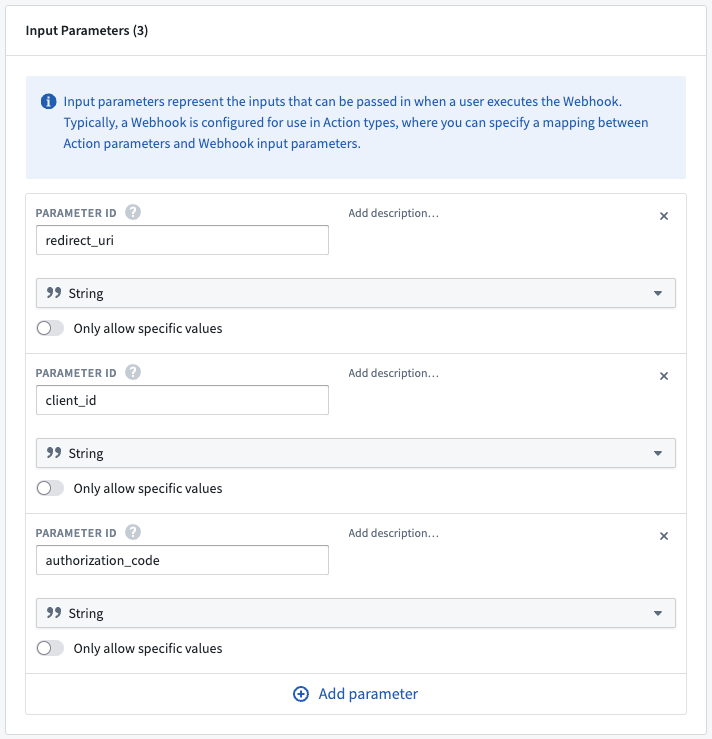
- Scroll back up to Calls and select the Body tab.
- Choose Form URL Encoded and add the following four entries:
grant_type→authorization_coderedirect_uri→ Mapped to theredirect_uriinput parameter (see below for how to do this)client_id→ Mapped to theclient_idinput parametercode→ Mapped to theauthorization_codeinput parameter
- To map an input parameter, type @ into the field and then select Input Parameter. Find the relevant parameter, select it and then select Add beneath.
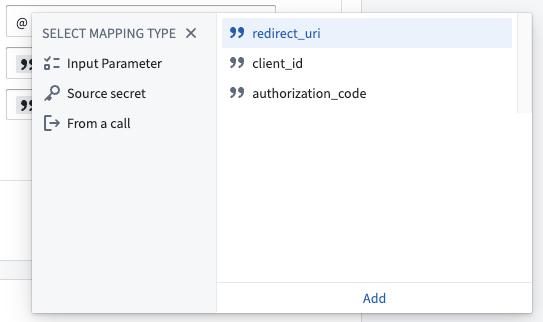
- The finished Body configuration should look like this:
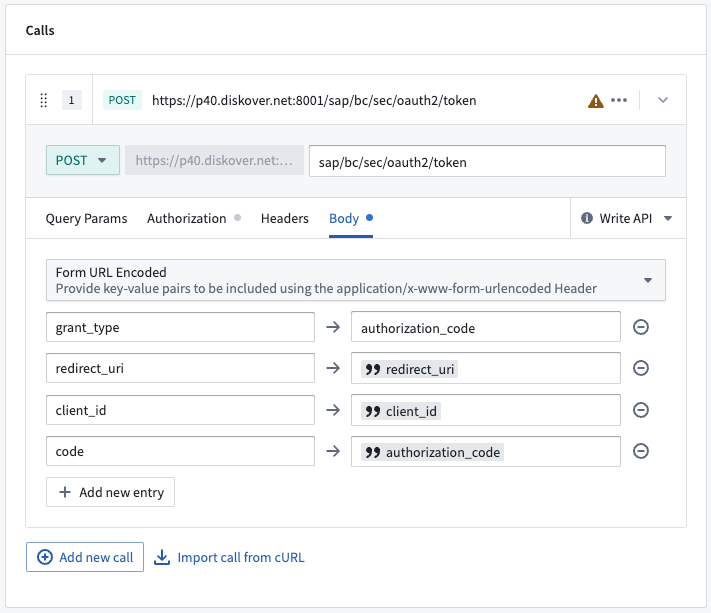
- Advance to the Responses step.
- Create the following five Output Parameters. All should be of type string and should be extracted by key from the response.
access_tokentoken_typeexpires_inrefresh_tokenscope
This is an example for creating access_token. All output parameters should follow this pattern.
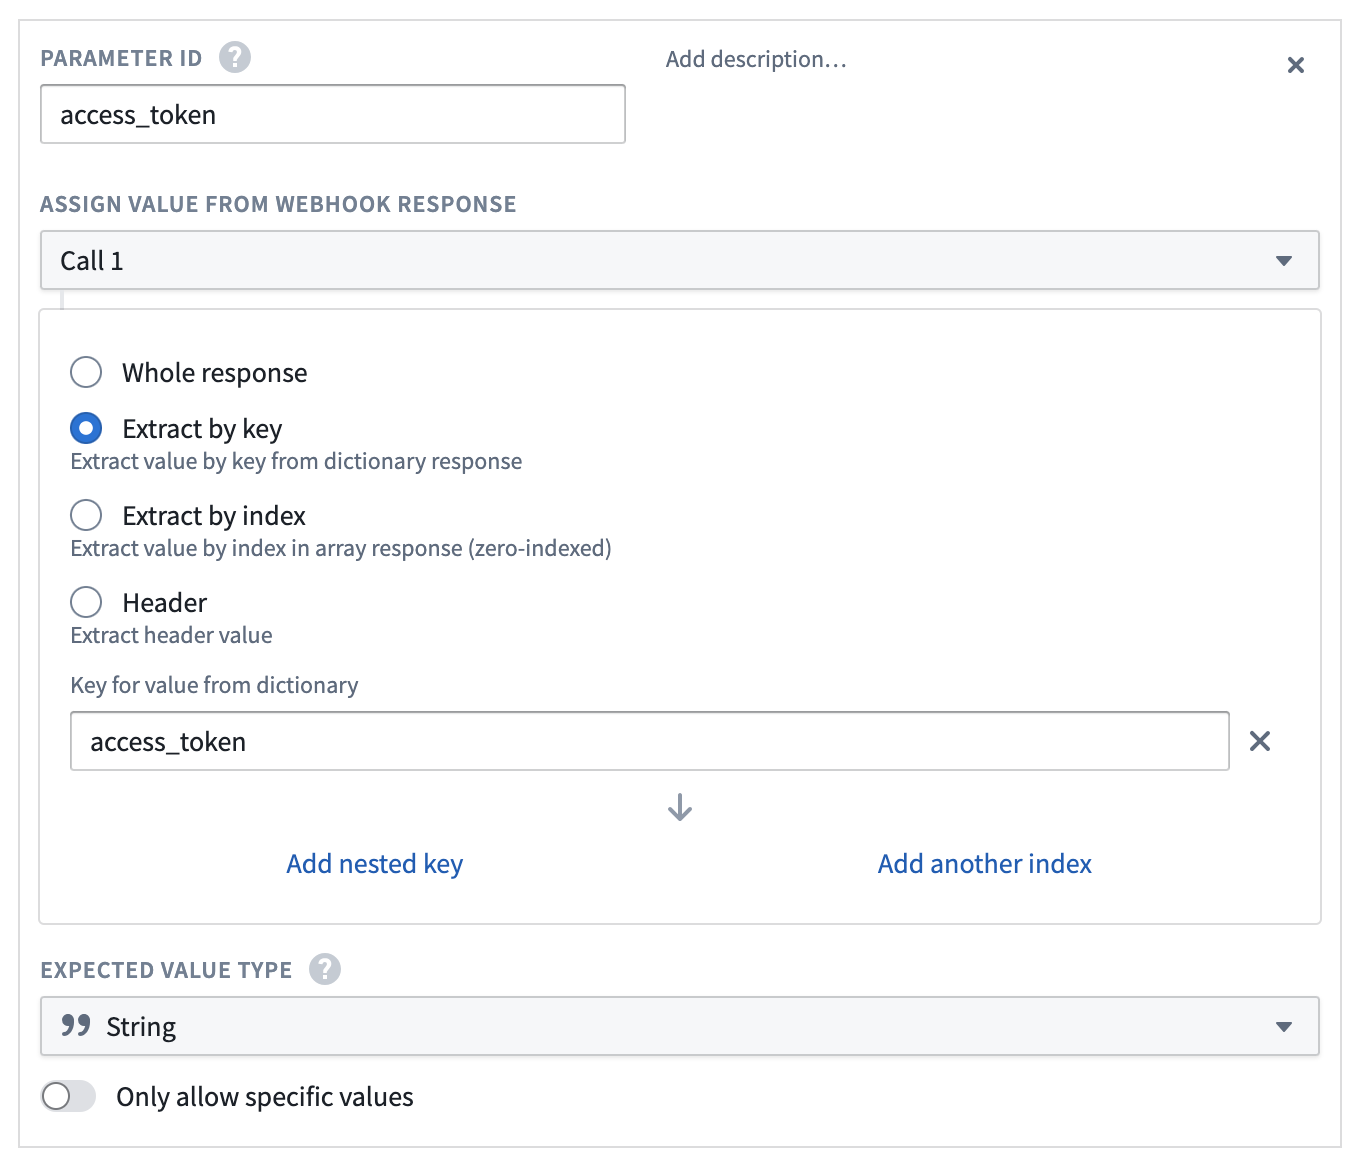
- Save the webhook by selecting Create webhook and continue.
OAuth 2.0 refresh flow webhook setup
- Create a new webhook from the REST API source.
- Give the webhook a distinct name (such as
SAP OAuth2 refresh flow webhook). Ensure that Function Configuration is toggled off. - The request method should again be set to POST and the same path (
sap/bc/sec/oauth2/token) should be used. - As with the previous webhook, set
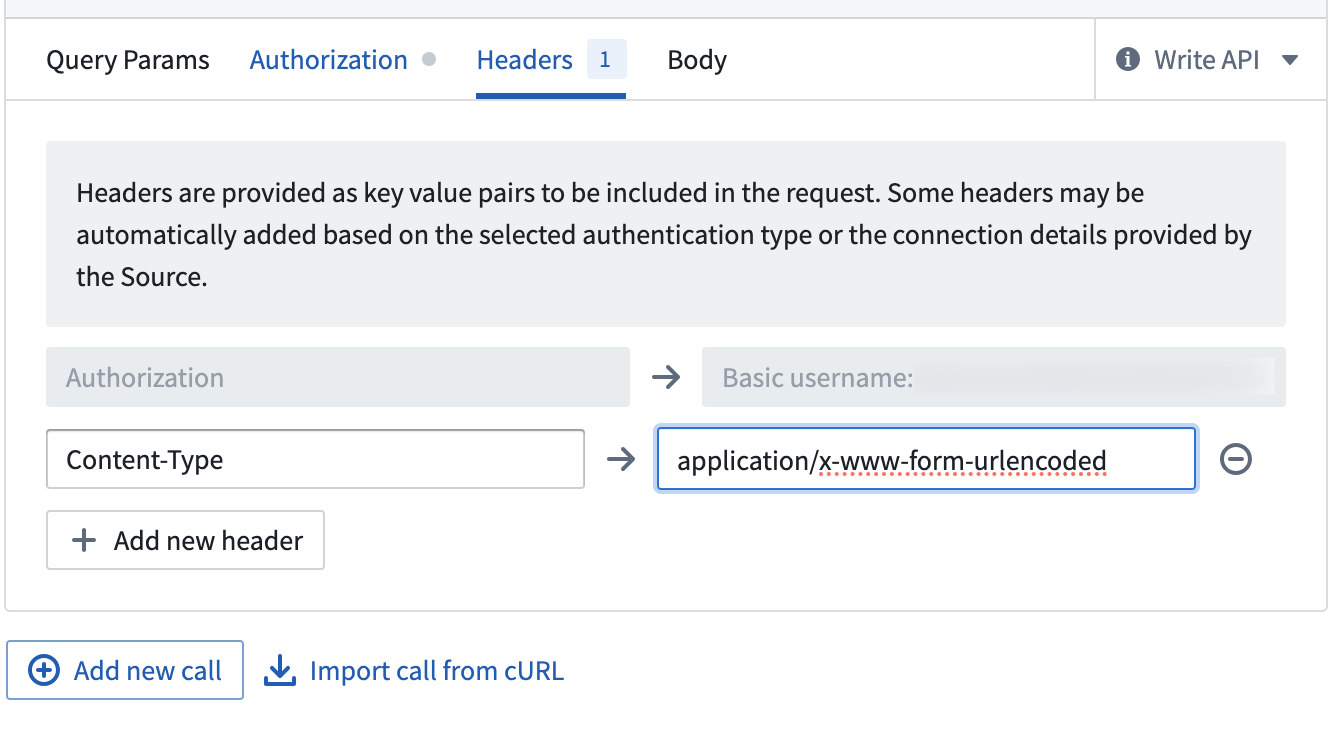
sap-clientas a Query Param if needed. - On the Headers tab, add the following header:
Content-Type→application/x-www-form-urlencoded
- Set up these two Input Parameters (both strings):
client_idrefresh_token
- Then under the Body tab, add these three entries:
grant_type→refresh_tokenclient_id→ Mapped to theclient_idinput parameterrefresh_token→ Mapped to therefresh_tokeninput parameter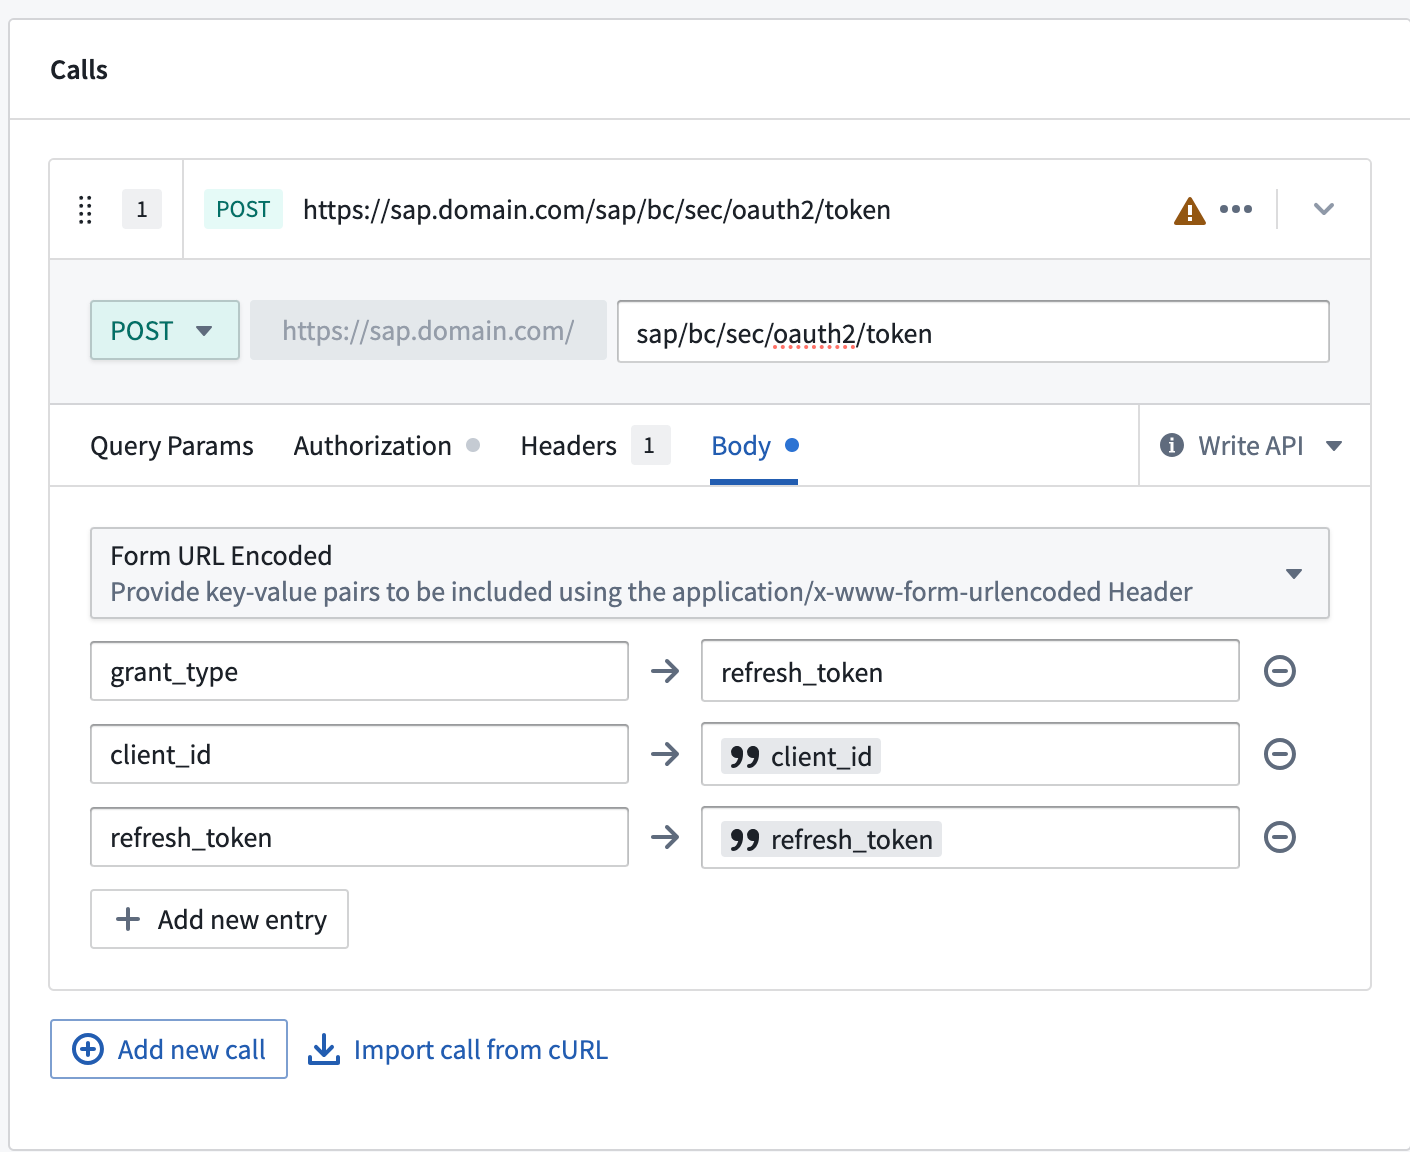
- Create exactly the same five Output Parameters as for the authorization code flow webhook. All should be of type string and should be extracted by key from the response.
access_tokentoken_typeexpires_inrefresh_tokenscope
- Save the webhook by selecting Create webhook and continue.
Legacy outbound application setup
- Navigate to the Foundry Control Panel and select Outbound applications.
- Give the application a name then follow the steps outlined under (Legacy) Custom webhook-based OAuth 2.0 handshakes.
- The two webhooks created earlier should be used as the Token webhook and Refresh token webhook respectively.
- The Authorization page URL should be of the form:
https://<SAP_DOMAIN>/sap/bc/sec/oauth2/authorize
- Under OAuth 2.0 settings, the Client ID should be set to the client ID from the SAP OAuth 2.0 server configuration. Under Scopes, add
/PALANTIR/SRV_0001. - Save the outbound application.
- This outbound application can now be used when creating an SAP webhook.