- Capabilities
- Getting started
- Architecture center
- Platform updates
Peer profiles
Peer profiles are in the beta phase of development and may not be available on your enrollment. Functionality may change during active development. Contact Palantir Support with questions about enabling peer profiles.
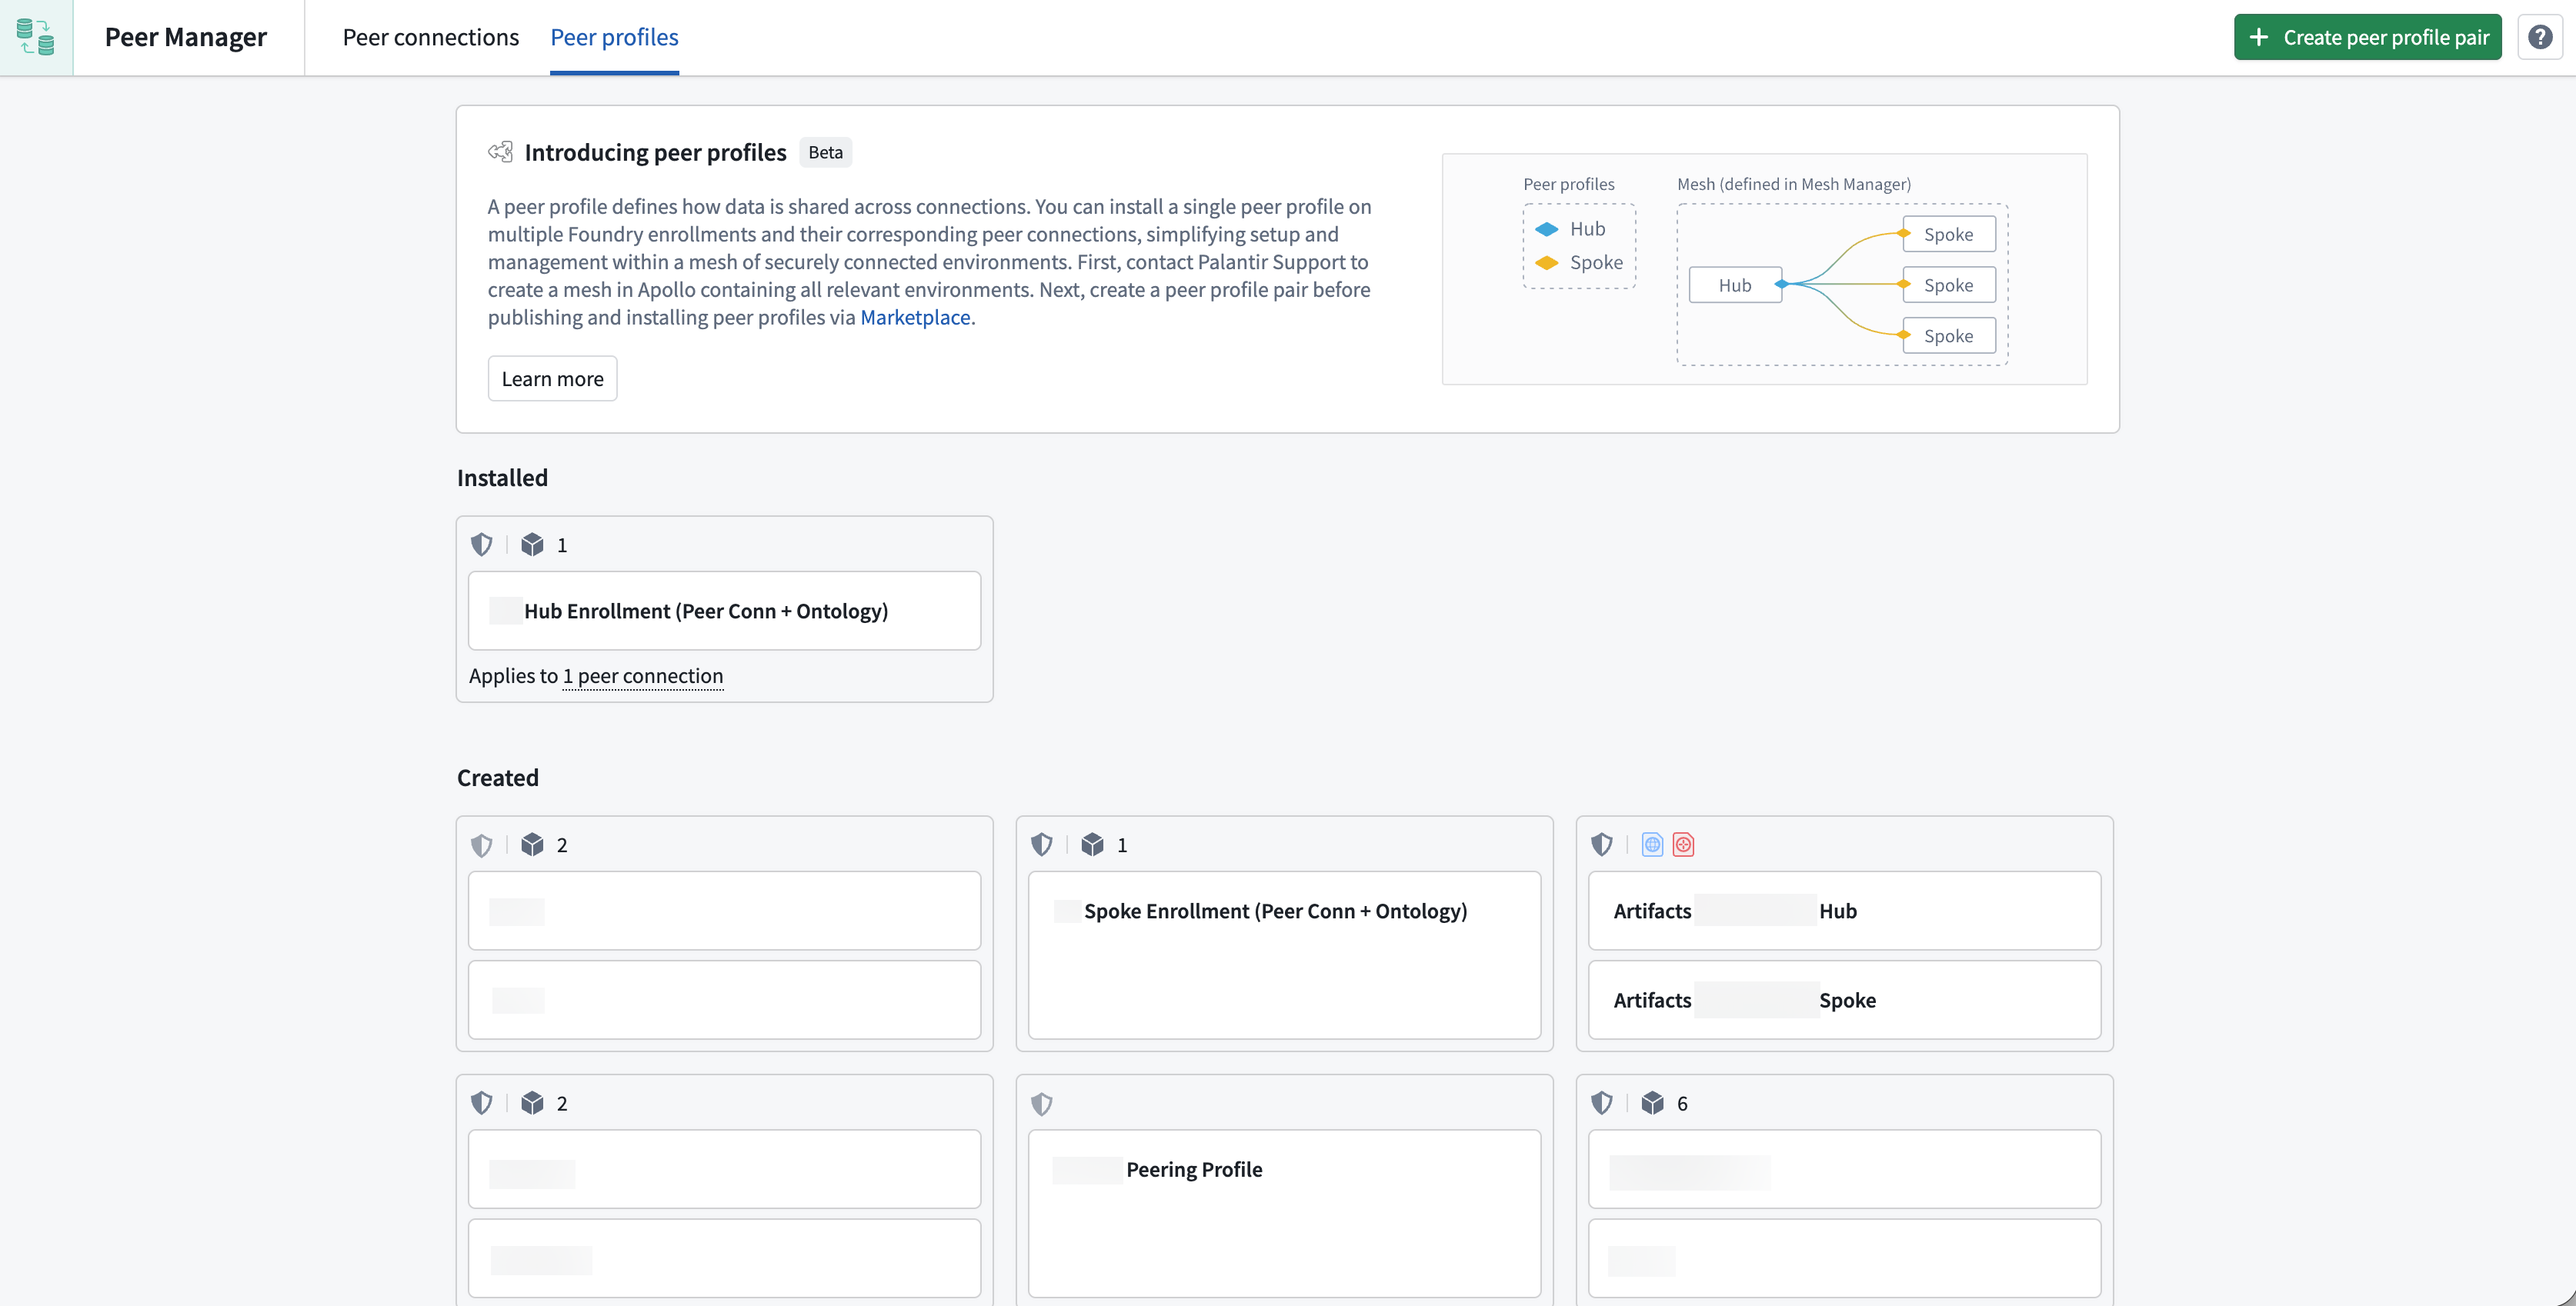
A peer profile defines how data is shared between Foundry enrollments across peer connections and serves as a reusable template: you define your peer configuration once, and then Foundry applies that configuration consistently across many connections at once.
Use peer profiles to streamline authorized data sharing across peer connections
Peer profiles simplify the configuration and management of authorized data sharing through Ontology and file peering across multiple peer connections within a network of Foundry enrollments, particularly when many enrollments require the same peering configuration.
While you can configure each peer connection one at a time, you should use peer profiles to define your peering configuration once and apply it everywhere it is needed across a mesh of enrollments, such as a central hub connected to many edge enrollments.
Additionally, peer profiles streamline data sharing across many peer connections by enabling you to:
- Automatically create and configure peer connections: Use peer profiles to automatically create peer connections, share data from your ontology, and configure file peering.
- Future-proof your mesh of connections: New enrollments that join the mesh automatically receive the correct configuration without any manual setup steps.
- Enforce consistent configuration: Every enrollment using the same profile receives the same data sharing setup, reducing the risk of mismatches or errors.
- Distribute peer profiles via Marketplace: Profiles can be published to Marketplace, making them easy to install on target enrollments through a familiar self-service workflow.
Key concepts
Mesh
A mesh is a secure network of connected Apollo environments that automatically enables data sharing across multiple peer connections defined by a peer profile.
Before you create a peer profile, contact Palantir Support to create a mesh for you that contains all environments you plan to connect through the peer profile.
Profile pairs
You will create a profile pair for each peer profile you configure in Peer Manager, with one profile for each side of the peer connection. These two profiles mirror each other automatically.
For example, consider a setup with a hub and multiple spoke enrollments, where the:
- Hub is the central or primary enrollment.
- Spokes are enrollments that connect to the hub.
If the hub profile is configured to export a certain object type, the corresponding spoke profile is automatically set to import that same object type. When creating a peer profile, you only need to configure one side of that profile pair, as Peer Manager generates the counterpart profile for you.
Remote strategy
When installing a profile, you choose which remote enrollments it applies to. The available options include:
- All: Apply to all available remote enrollments.
- Specific enrollment: Apply to a single, named enrollment.
- Mesh: Apply to all enrollments within a mesh created by Palantir Support.
- Mesh node labels: Apply to enrollments in a mesh that have specific labels. This option is useful for targeting subsets of a larger network.
Peer profile configurations
Use a single peer profile to bundle configuration for peer connections to share ontology resources and files.
Peer connections
Peer profiles can automatically create and manage peer connections, including:
- Connection security: Define which classification markings and security labels are permitted to flow across connections. Data must satisfy these requirements to be shared. Review the connection security documentation for more information.
- Allowed data types: Share ontology resources and files and specify their direction (export, import, or both).
Ontology peering
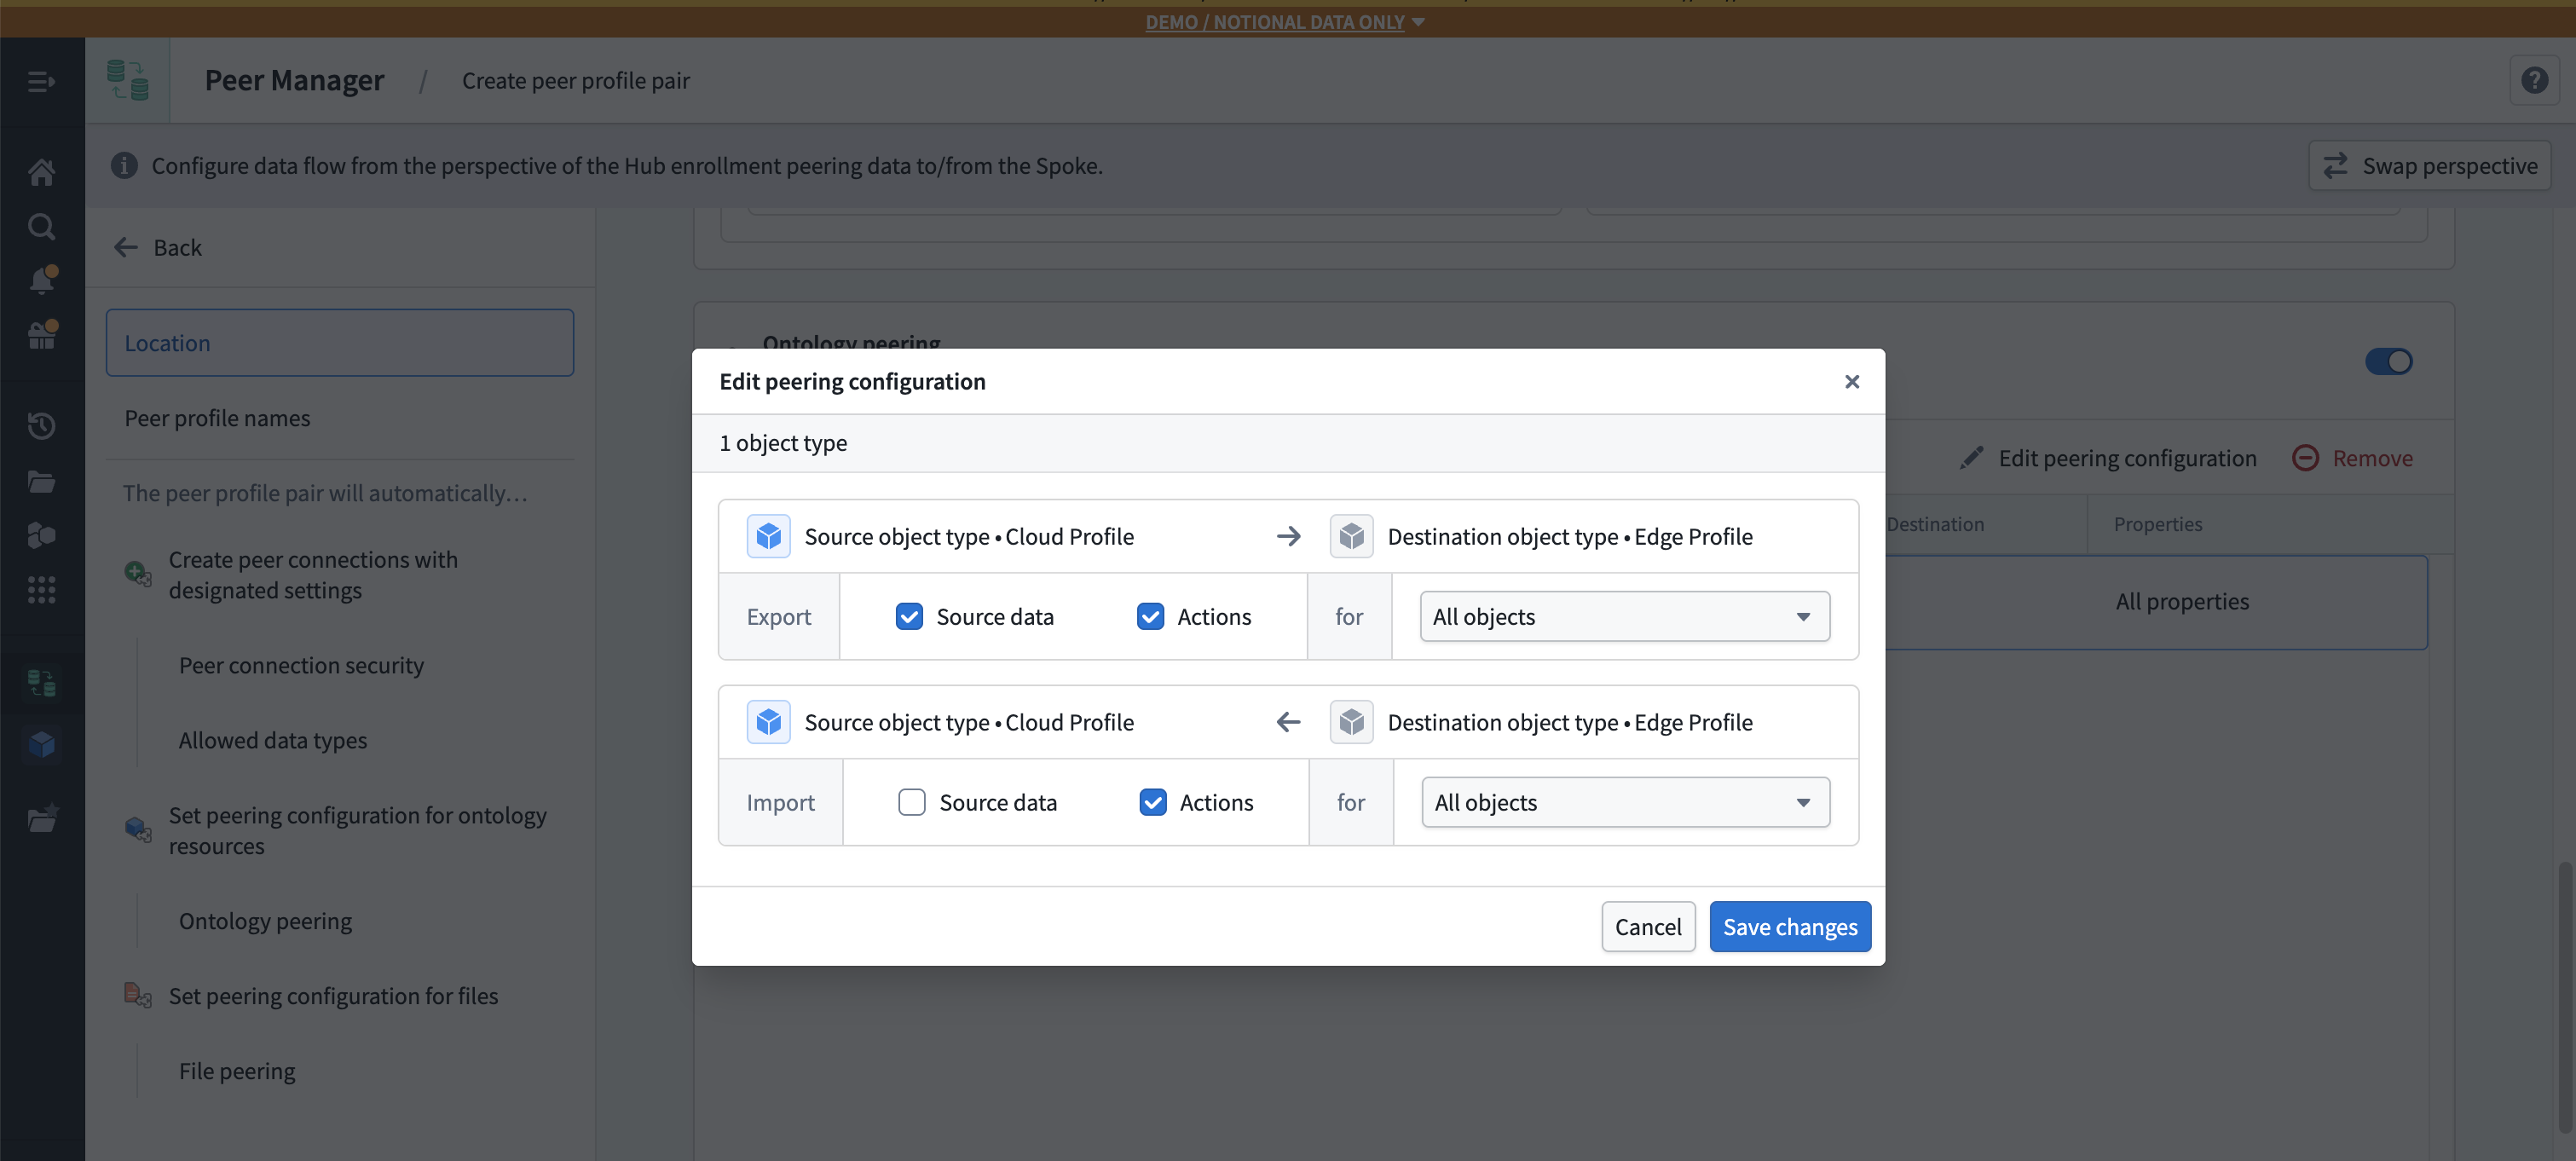
Ontology peering synchronizes object types and link types between enrollments. Within a peer profile, you can specify:
- Which object types to share.
- Which direction each object type flows (export from hub, import to spokes, or both).
- Which link types to include.
This enables cross-enrollment object synchronization, including real-time action peering so user edits on one enrollment flow to others.
File peering
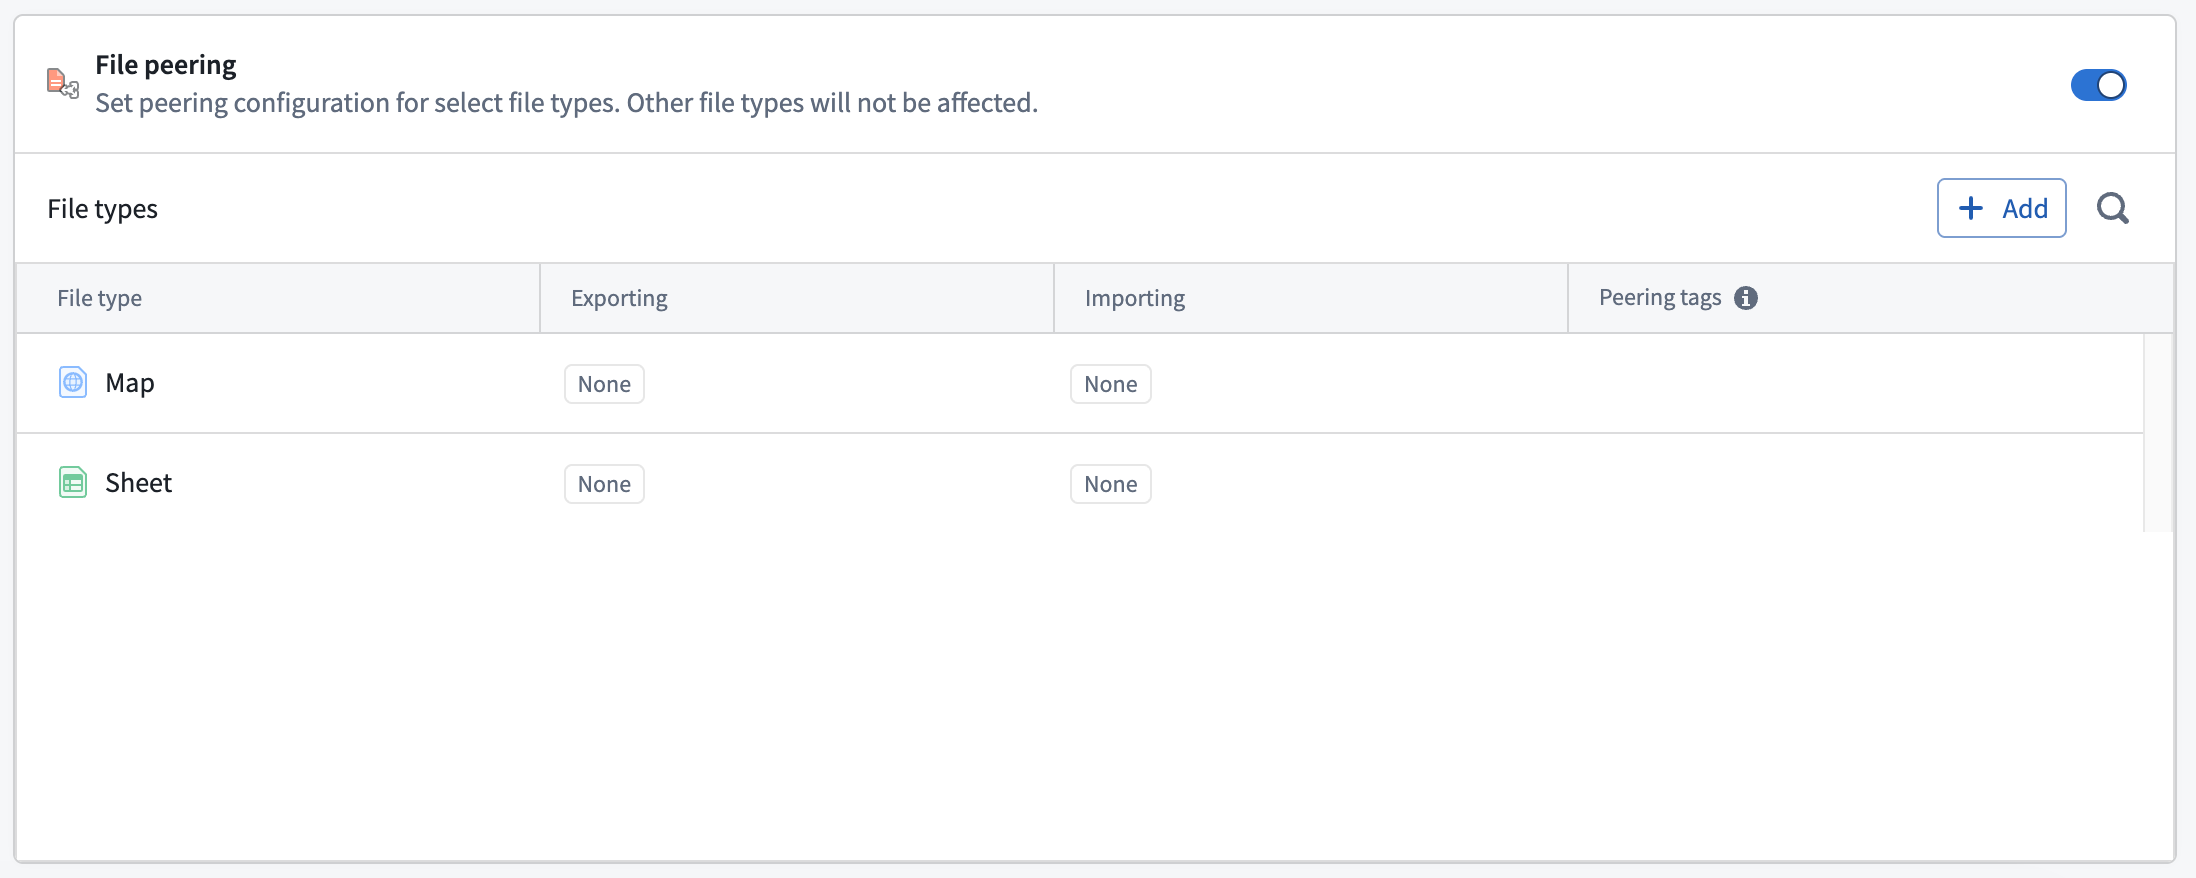
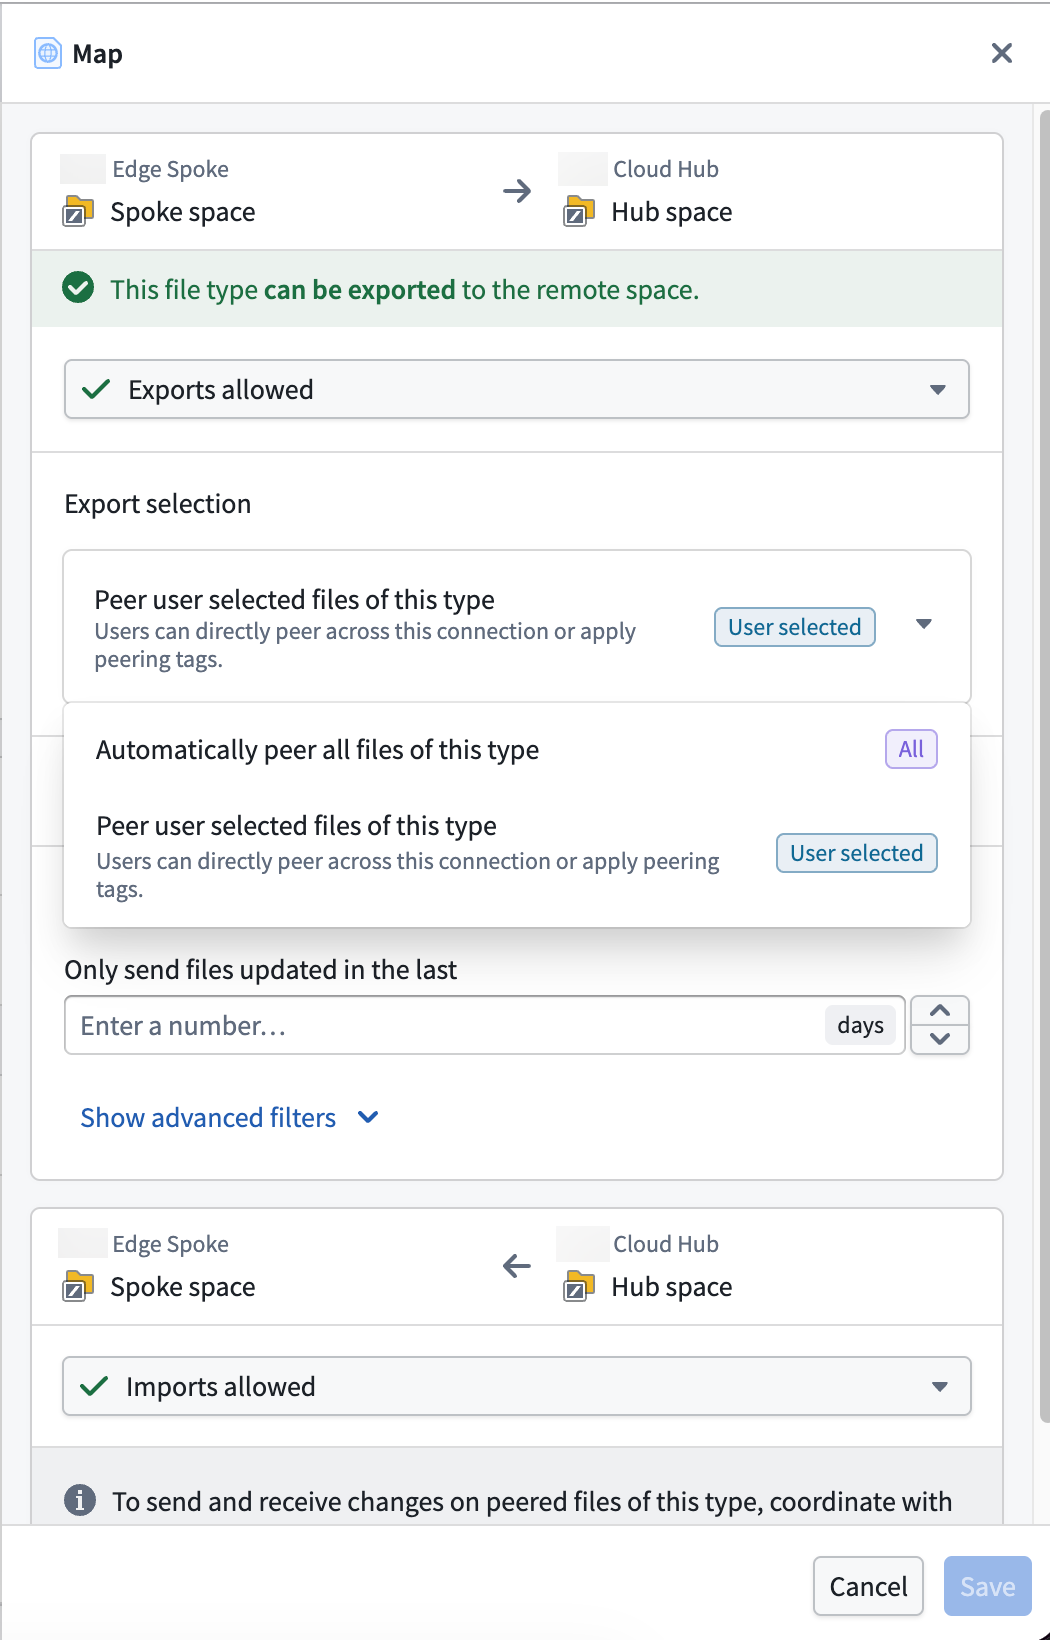
File peering synchronizes Gotham files, such as Gaia maps, between enrollments. Within a peer profile, you can specify:
- Which file types to include.
- The peering direction for each file type.
- The peering tags that users should see to initiate file peering.
File types not included in the profile are unaffected.
How to create and use peer profiles
Step 1: Create a peer profile pair
- Open Peer Manager and navigate to the Peer profiles tab.
- Select Create peer profile pair.
- Select Change in the Set location section and choose a Project where you will save the peer profiles.
- Enter names for the Hub profile and Spoke profile in the Name the pair section. The terms
HubandSpokeare placeholders for each side of your peer connection.
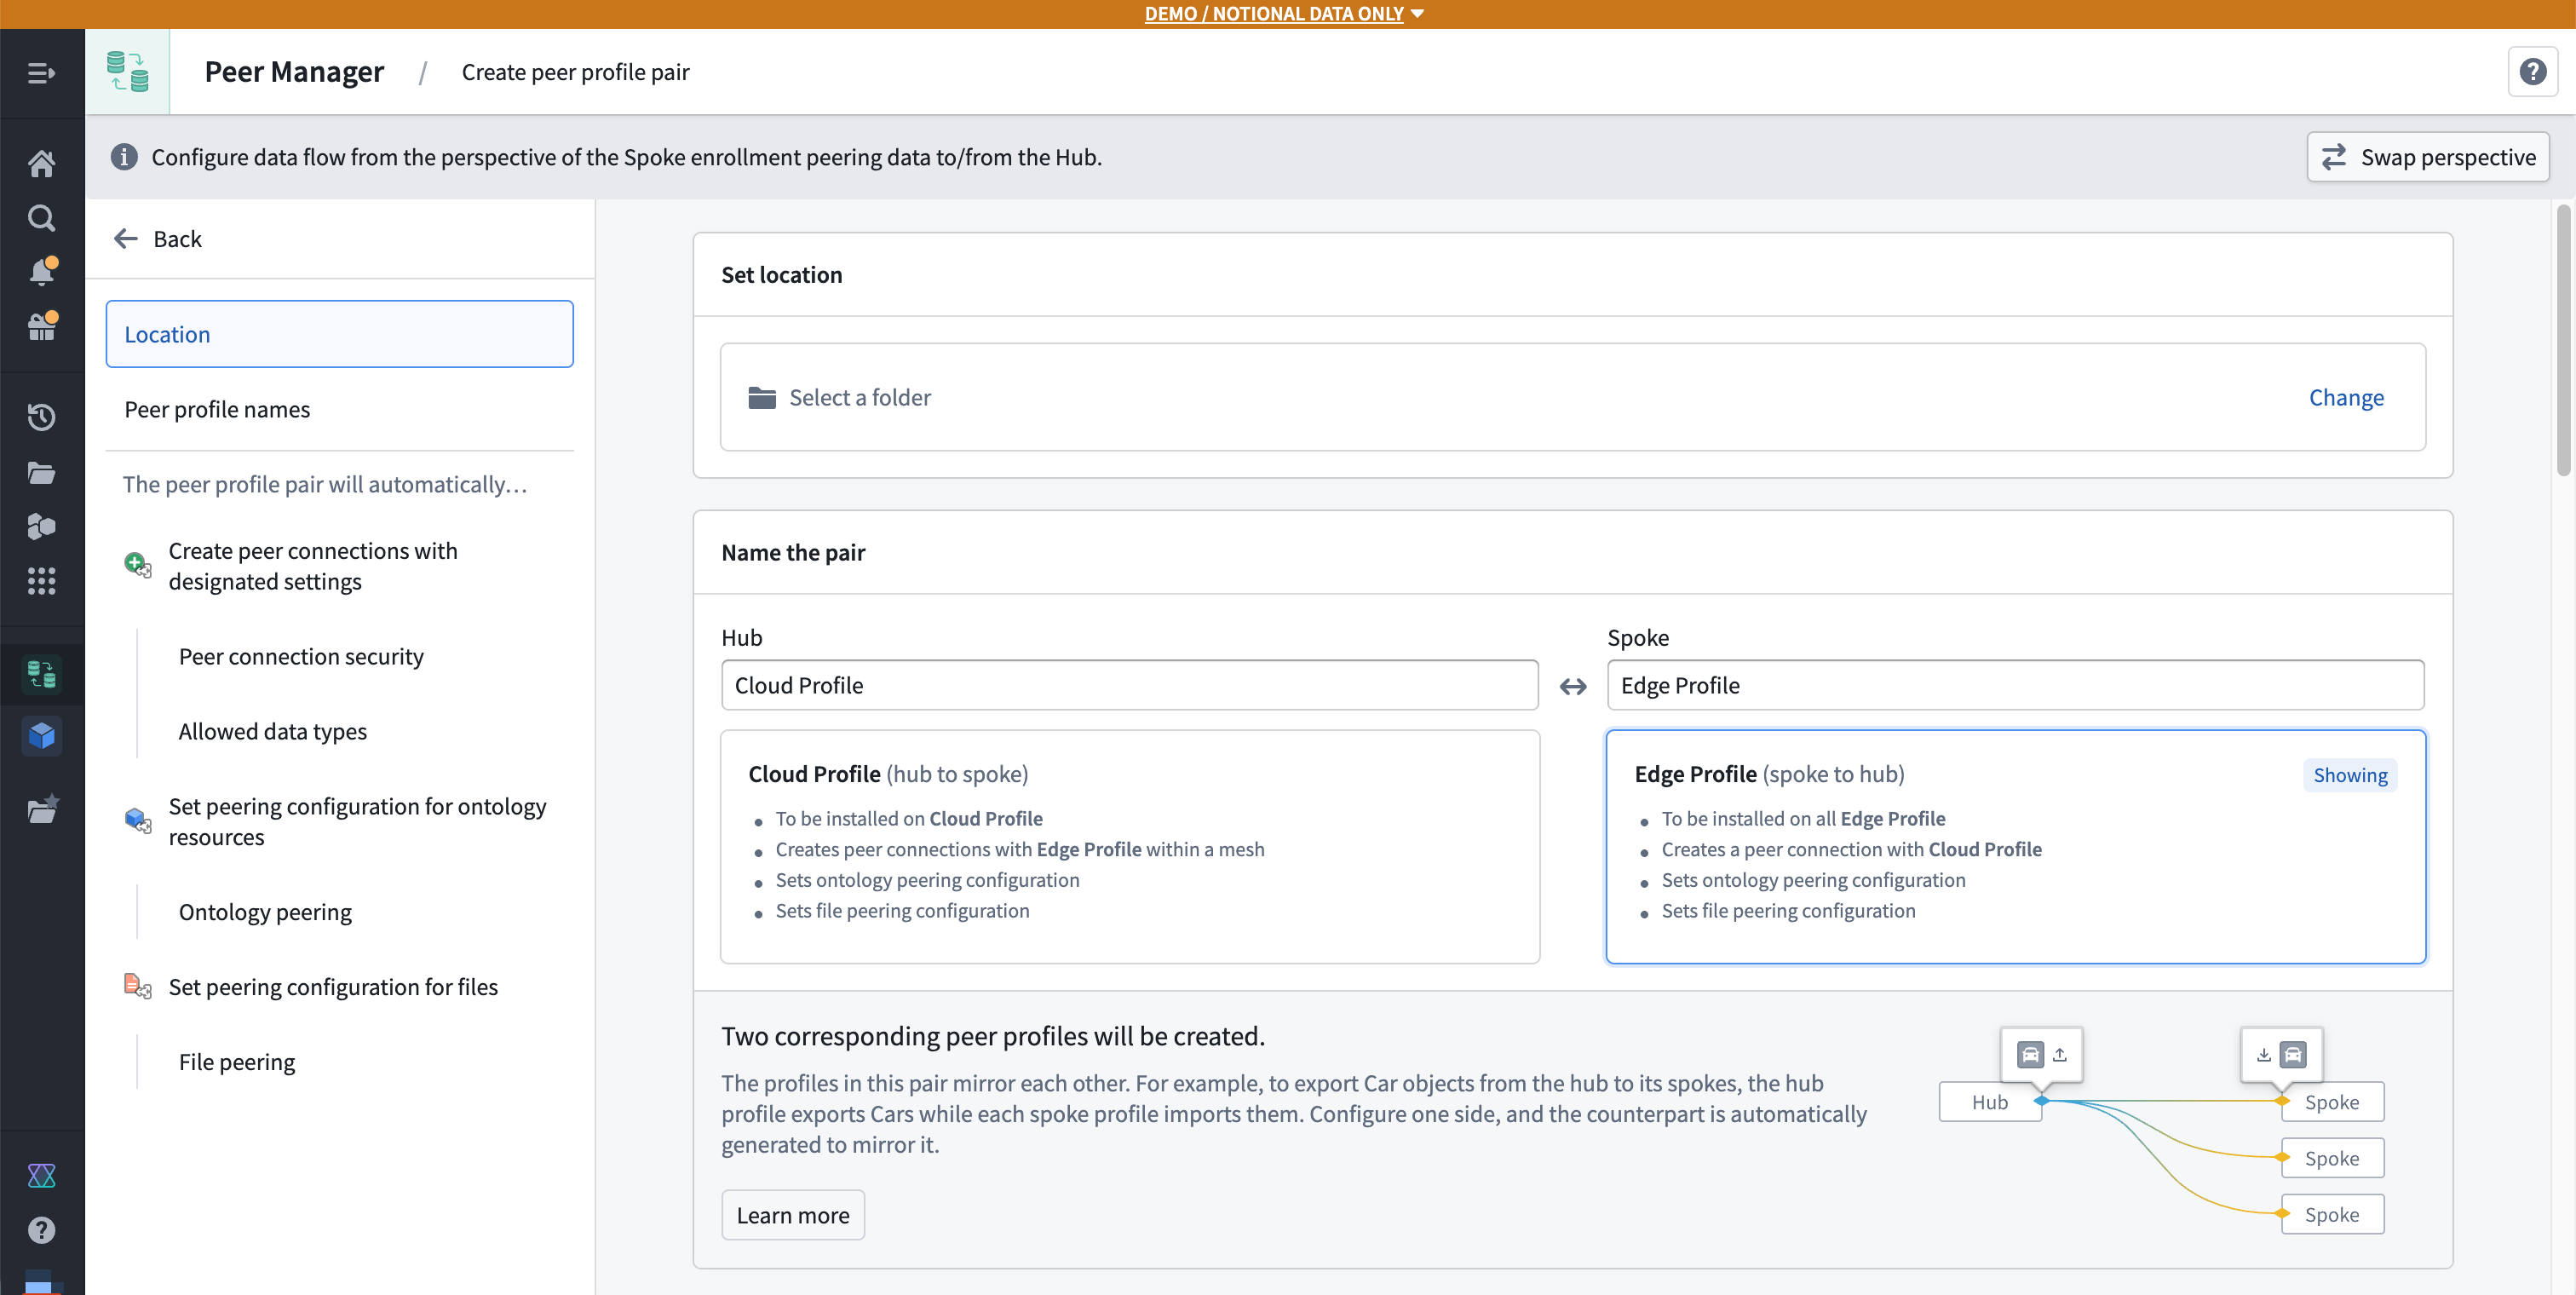
Select Swap perspective to toggle between the hub and spoke perspectives while configuring a peer profile. Peer Manager automatically mirrors changes to one side on the other.
- Optionally enable automatic peer connection creation at the top of the Creation and settings section.
- Set the Peer connection security by selecting the relevant Classification markings and Other markings.
- Select the governance strategy for ontology resources by setting their sharing direction in the Ontology section.
- Select the governance strategy for files by setting their sharing direction in the Files section.
- Add all object and link types to peer in the Ontology peering section and configure their sharing direction.
Next, follow the instructions below to set the peering configuration for your selected file types in the File peering section:
- Select Add and choose the relevant file types before selecting Add [N] file types.
- Choose a file type from the File types list to display the type's peering configuration drawer on the right side of your screen.
- Choose your desired Export selection configuration to peer all files of the type or enable users to select which files to peer by applying a peering tag.
- Optionally create a peering tag by selecting Add > Create new peering tag in the Peering tags section to launch the Create new peering tag modal.
- Provide a user-facing Name and Description for the peering tag before entering a unique ID.
- Select Create to close the modal and add the tag back in the Peering tags section.
- Optionally Filter files to only send files over the peer connection that have been updated in a given time window.
- Select Save.
Now that you have configured file peering for the peer profile, select Create peer profile, and Peer Manager will create two draft peer profiles: one for each side of the peer connection.
Step 2: Publish to Marketplace
Review the Marketplace and DevOps documentation before proceeding to learn more about creating, publishing, and installing products via the Marketplace storefront on your Foundry enrollment.
After you select Create peer profile, Peer Manager loads the Next steps needed to publish each profile in your pair to Marketplace and make them available for installation on the hub and spoke enrollments. Peer Manager provides checklist boxes for you to track your progress.
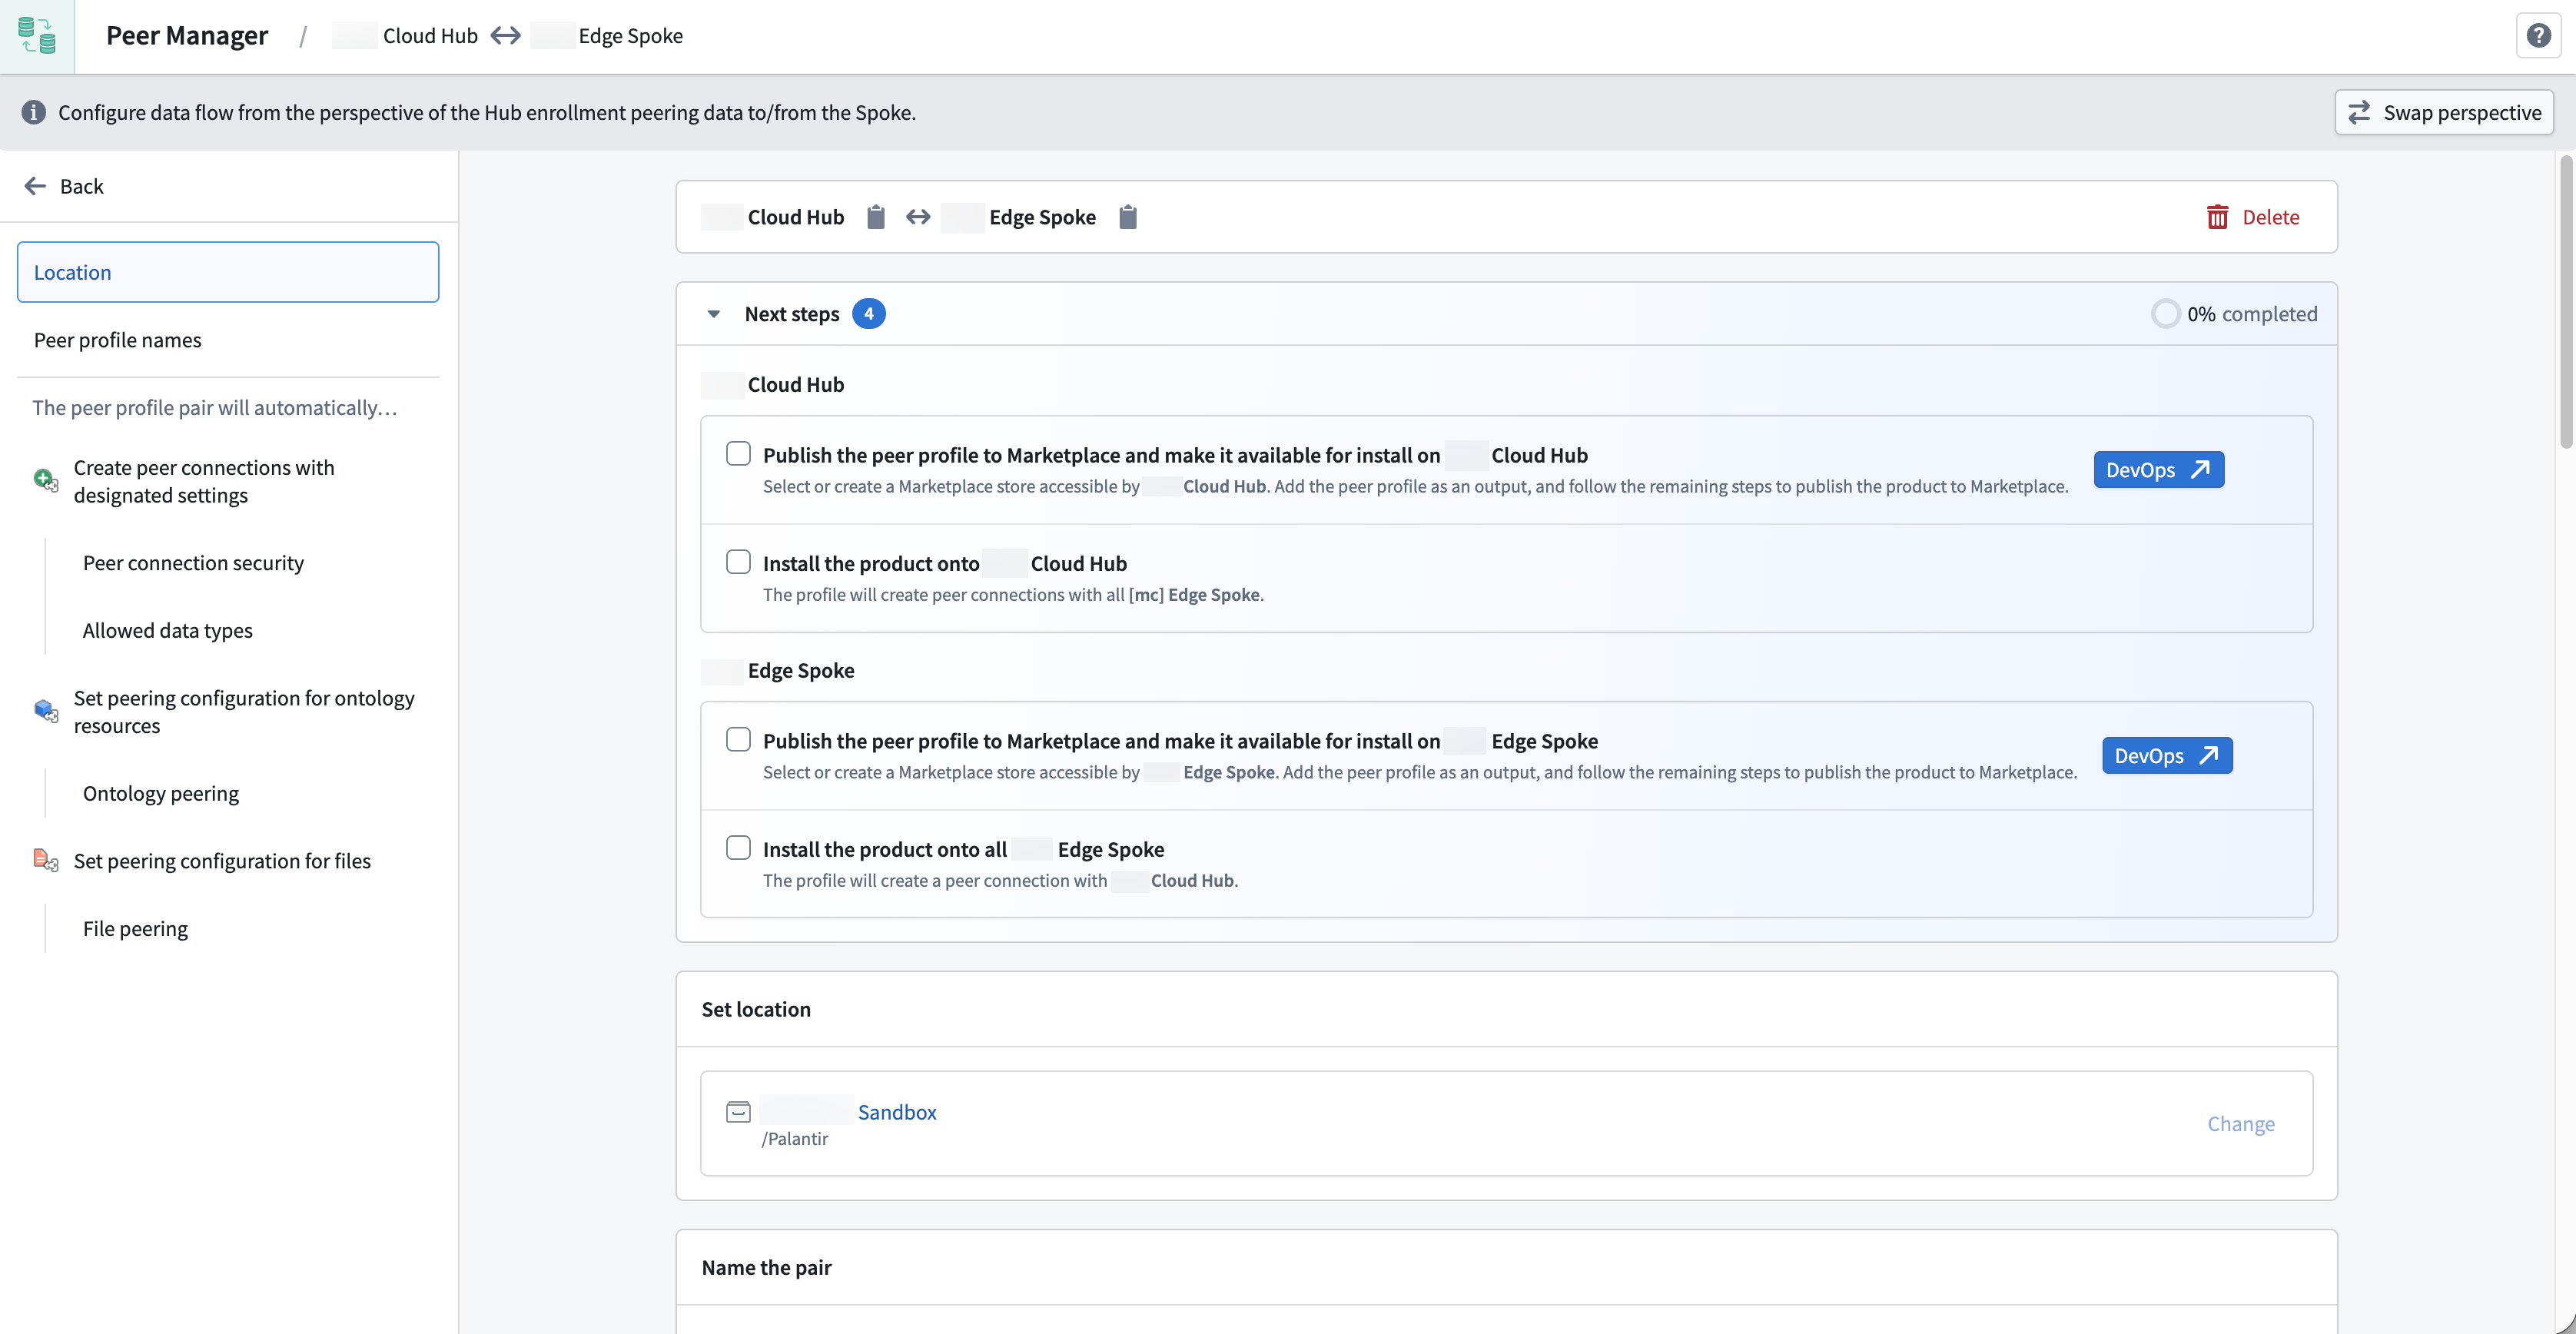
Select DevOps ↗ to open each profile as a pre-configured product draft in DevOps.
Step 3: Install on target enrollments
Use Marketplace to install the published profile on each target enrollment. During installation, select:
- The local space on the enrollment.
- The remote strategy, which determines which remote enrollments this profile should connect to.
Once installed, the profile automatically creates or configures the appropriate peer connections and begins sharing data according to your peer connection's settings.
Learn more about installations in Marketplace.
You cannot edit a peer profile after installation. Uninstall the peer profile, make and save your changes, then reinstall it on the target enrollment.
Step 4: Monitor and manage your peer profiles
After you install the peer profile on each target enrollment, you can select it from the Installed section of the Peer profiles page to view its:
- Connection status, which displays each peer connection's health and troubleshooting information if the connection is not healthy, such as a network path not found, a security mismatch, or an indication that the remote side has not installed its corresponding profile yet.
- Ontology mapping progress, which quantifies the number of ontology resources successfully mapped on each connection.
FAQs
What happens when I install a peer profile?
Peer connections within the mesh are automatically created with the configuration defined in the profile. If a peer connection already exists, the profile's configuration is applied to the existing connection.
Do peer profiles handle new enrollments that join the mesh later?
Yes, depending on the remote strategy that the installed peer profile uses. For example, if the peer profile uses a Mesh remote strategy, the peer profile applies to any current and future peer connections that are part of the specified mesh.
What if the remote side of a peer connection has not installed its peer profile yet?
The connection will show a status indicating that the remote system does not have a matching installed configuration. Once the remote side installs the corresponding hub or spoke profile, the connection will become healthy.