Set up a batch sync
The batch sync capability enables syncing data from an external system into a Foundry dataset. Batch sync is the most widely supported capability and is available on almost all connectors. Batch syncs allow syncing tabular data with a schema as well as raw files without a schema.
Creating a batch sync will also create a new Foundry dataset where synced data will be written. Once the sync is configured, you can either manually run it or set up a schedule to trigger the build that will read data from the external system and write it to the output dataset.
Follow the steps below to set up a batch sync. This setup guide assumes you have already successfully configured a source connection that supports the batch sync capability.
Create a new batch sync
First, navigate to your source connection in the Data Connection application, then select New batch sync from the overview page. If this is a newly configured source, you should see the available capabilities as shown below, and select Create next to the batch sync option.
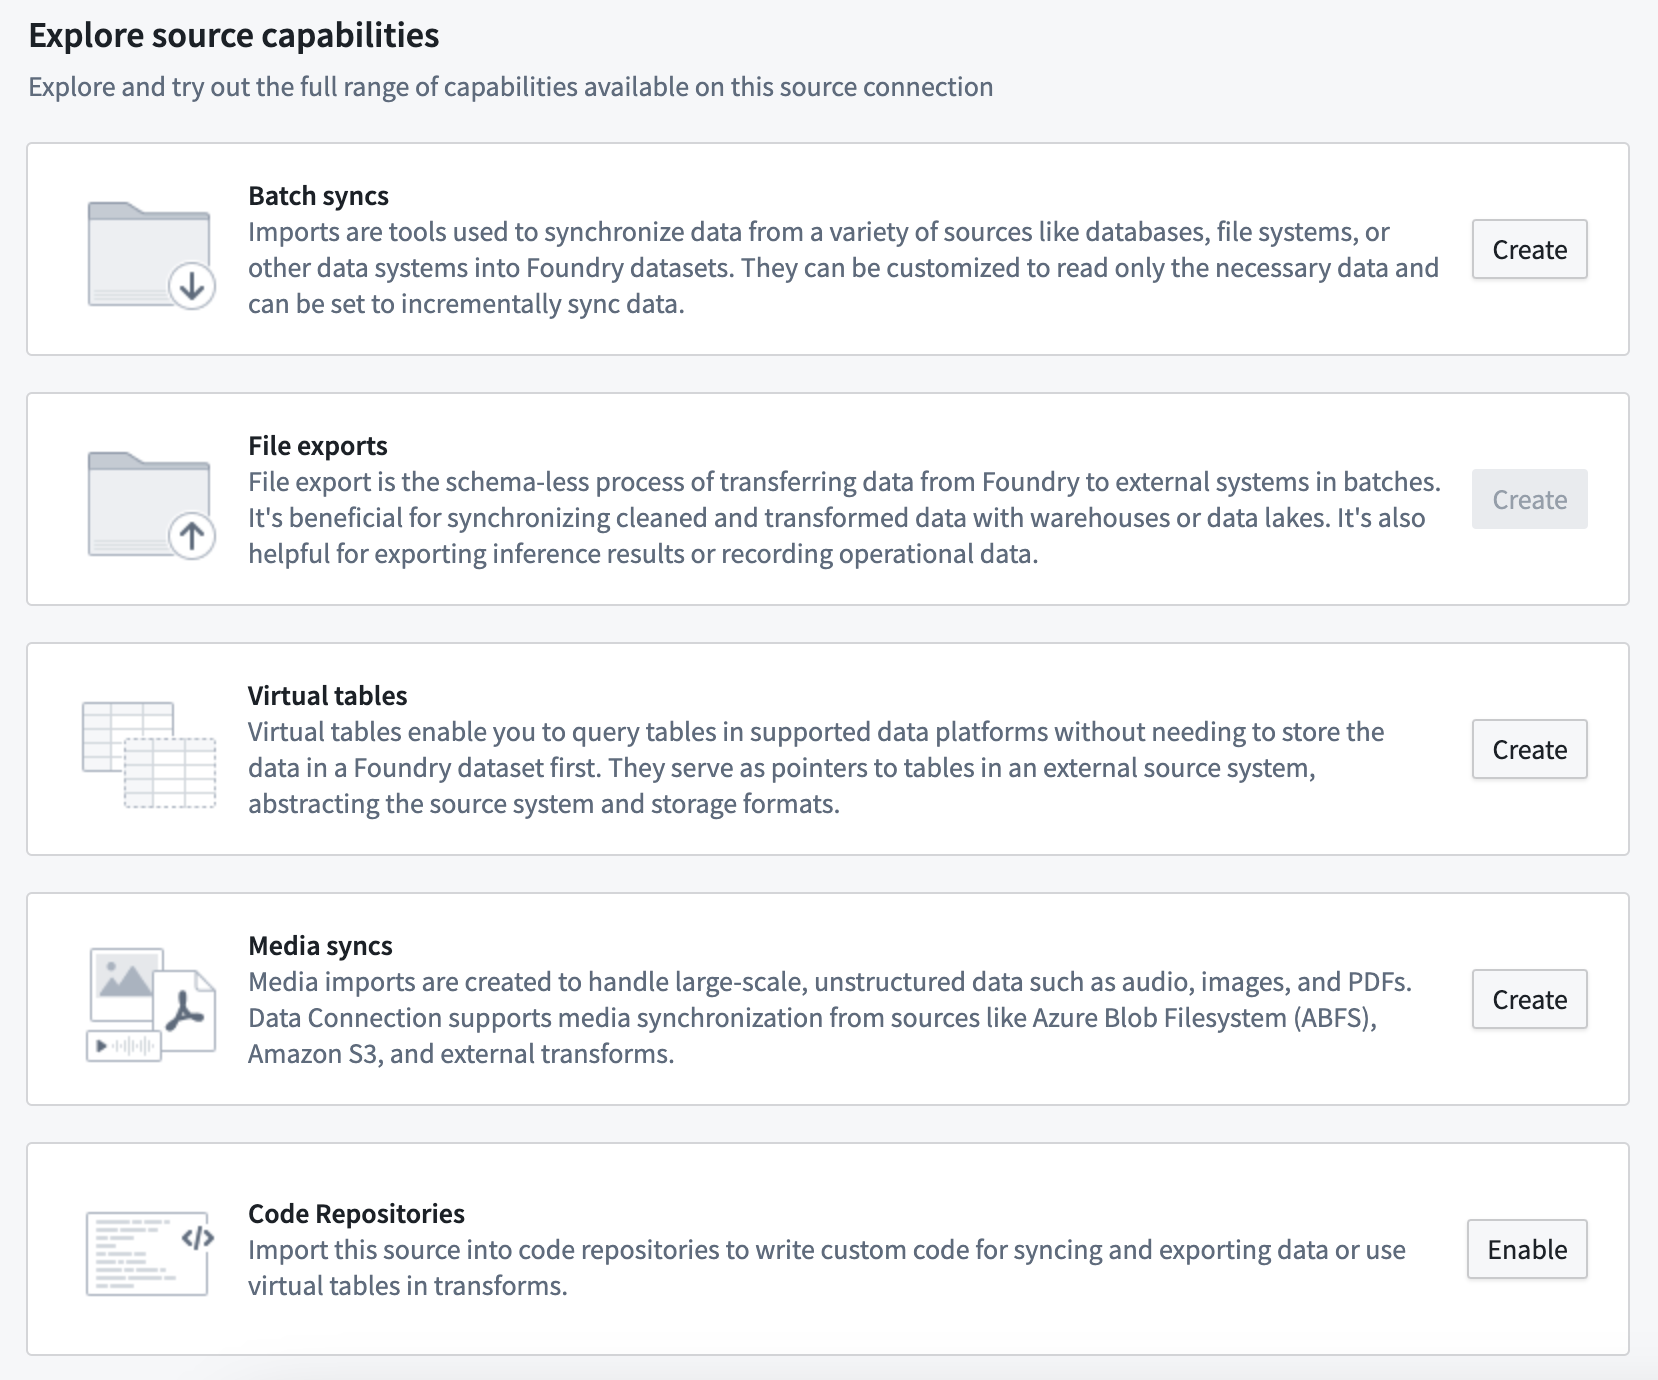
If your connector supports source exploration, you can also select Explore and create syncs to explore your data source and begin creating syncs directly from the exploration view. Refer to the source exploration documentation for details.
Specify output location
The output location defines where the dataset of synced data will be created and will determine who has permission to access the resulting data, based on Project-level permissions. A default output folder may be specified for the source, which can be overridden for each sync if desired.
The recommended best practice when creating a sync dataset is to save it alongside the connector. This enables the pattern of uniformly permissioning all data from a given connector, which is helpful when creating data pipelines. Learn more about the recommended Project structure for data pipelines.

Syncing to an existing dataset is supported but not recommended, since syncs may overwrite any data already in the selected dataset.
Configure batch sync
On the same page as the destination, you will see various settings for configuring your batch sync.
Depending on the source, different options may be available. The two most common types of batch syncs are:
- File batch syncs, where files are synced to a dataset without a schema.
- Table batch syncs, where a table with a schema is synced.
Most systems support either file or table batch syncs, but some systems may support both.
File batch sync example
The below example shows the configuration for a file batch sync from S3 that does a SNAPSHOT update on each build. You may optionally specify a subdirectory and filters to narrow down the set of files to be synced to the output dataset. Our example does not specify a subdirectory or filters, meaning all files found under the root directory that was chosen when setting up the source connection will be synced.
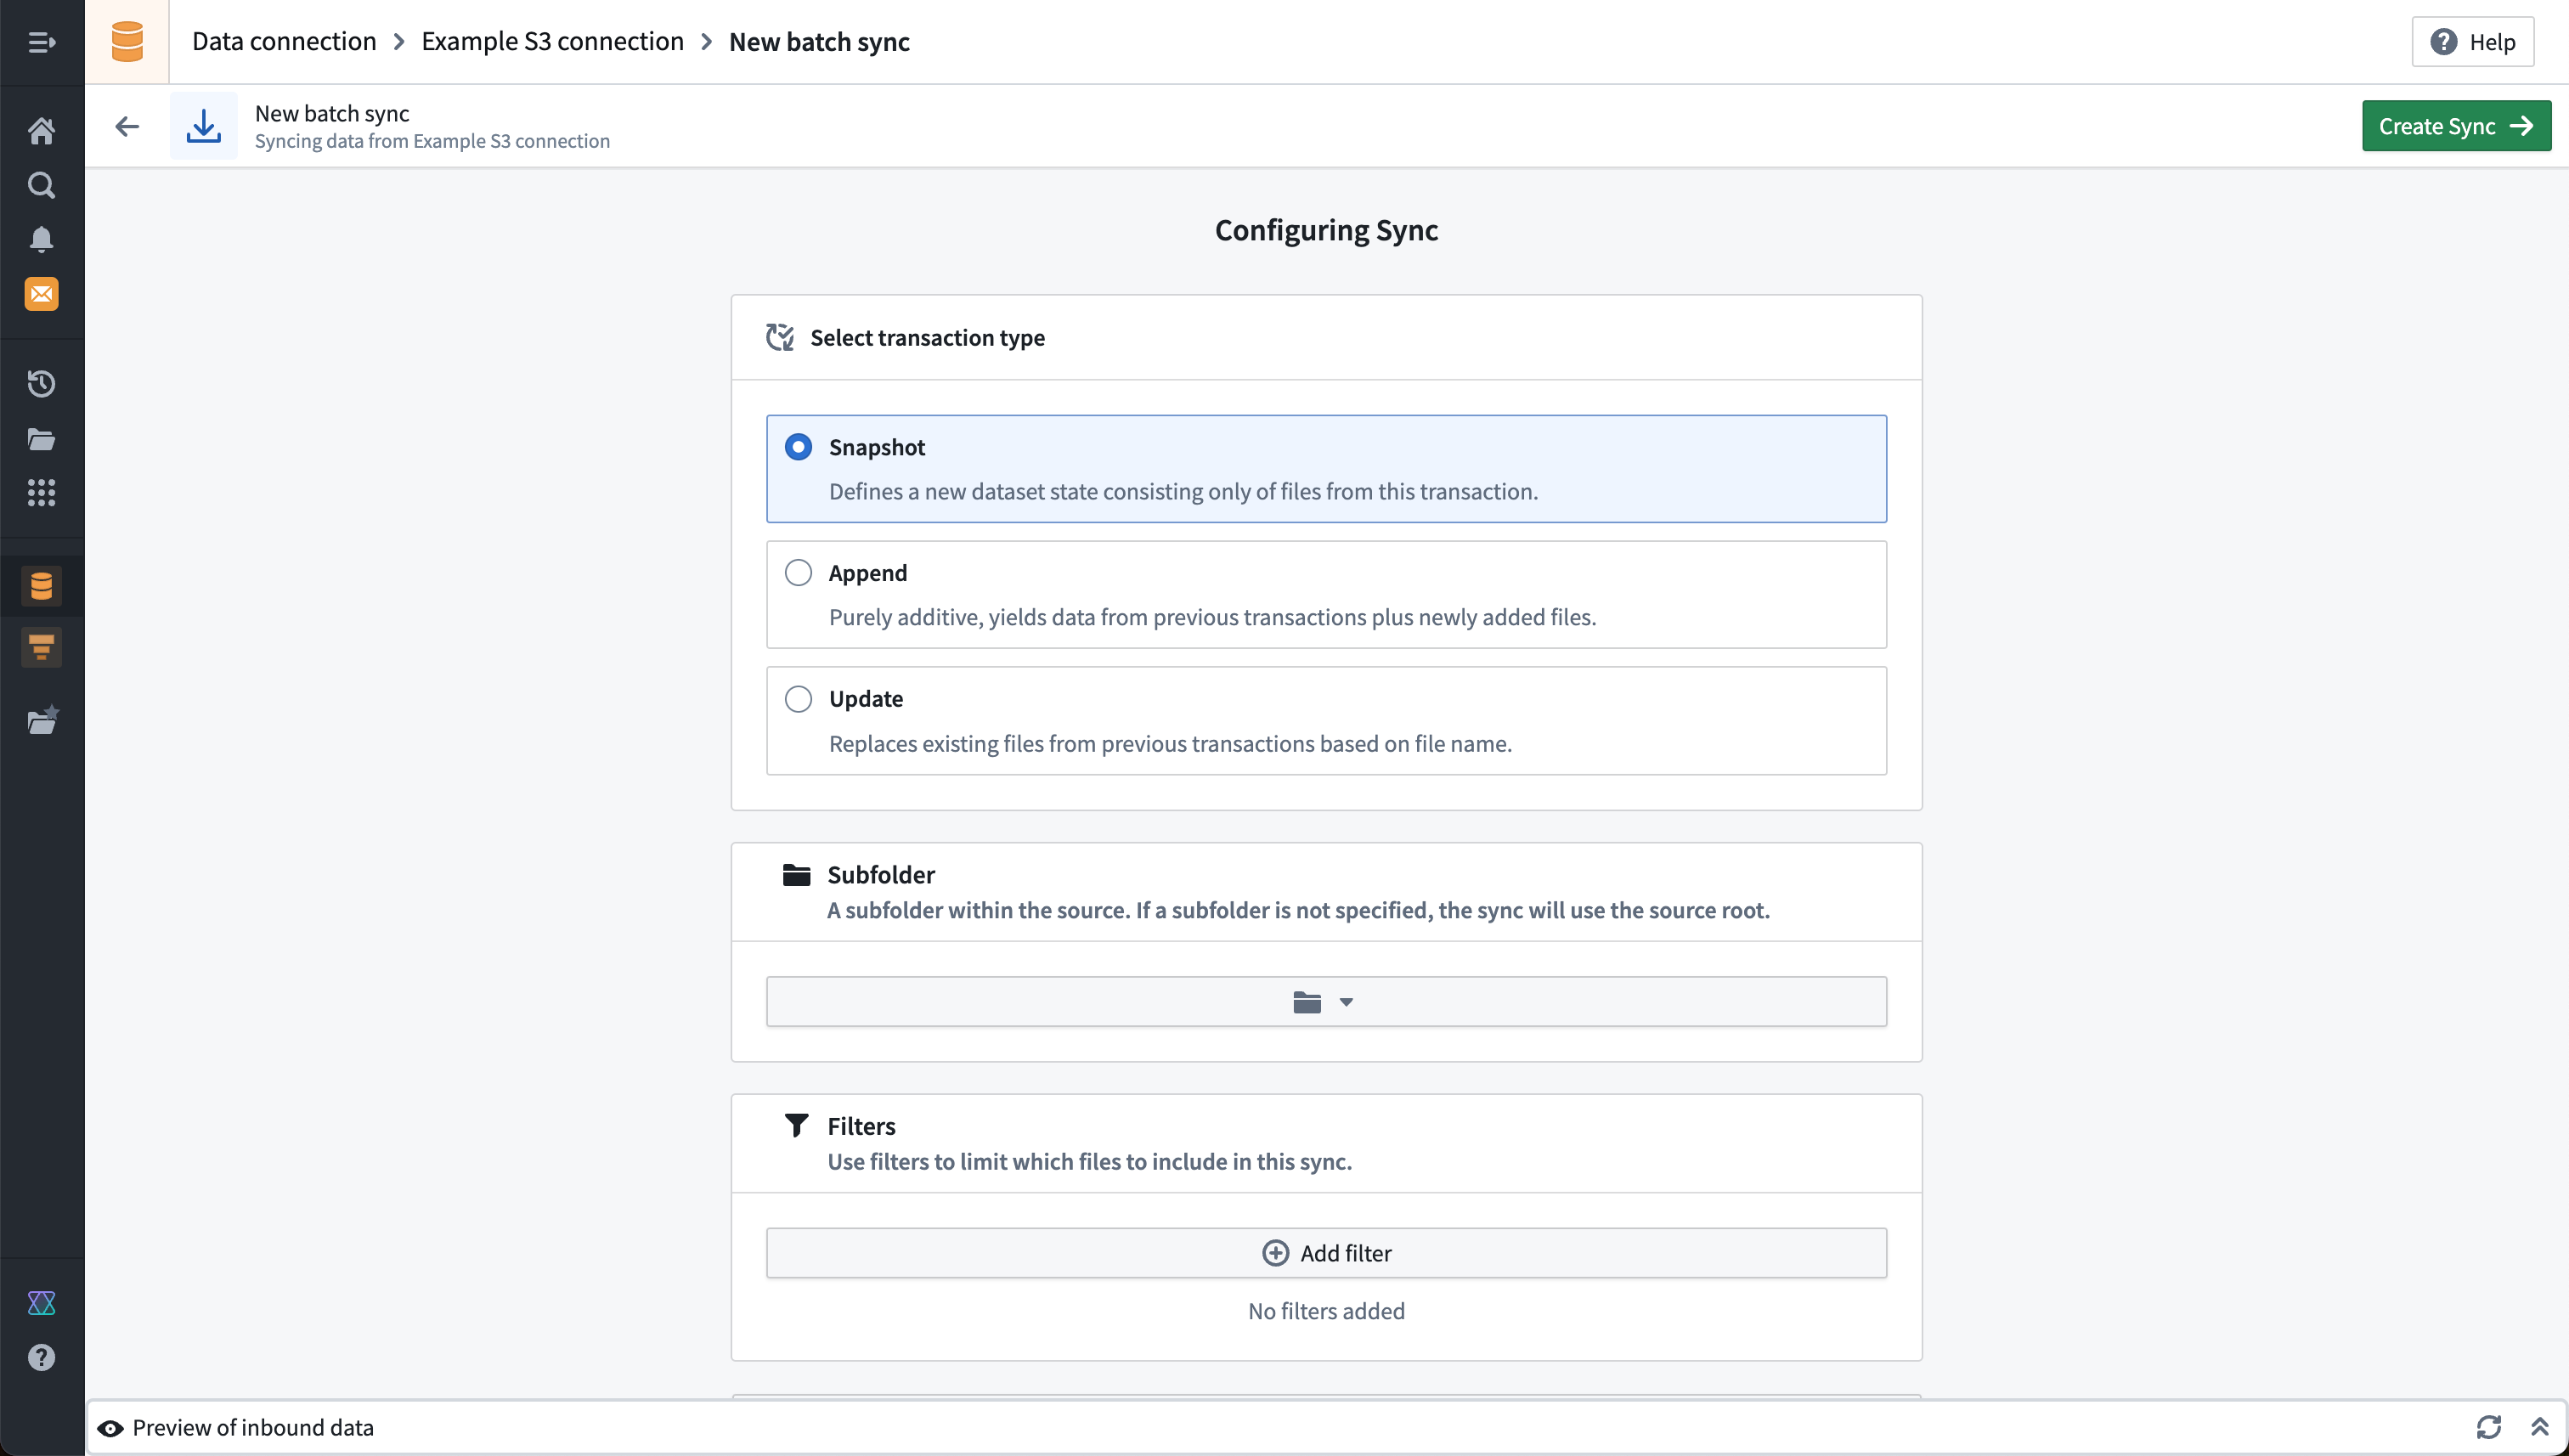
Additional settings for file batch syncs are described in the reference documentation for file batch syncs, including detailed documentation for the available filters.
Table batch sync example
This example shows the configuration for a table batch sync from Microsoft SQL Server. A query defines which data will be pulled from the target system. In this case, the incremental batch sync setting is also enabled, which allows data to be incrementally updated based on a monotonically increasing column.
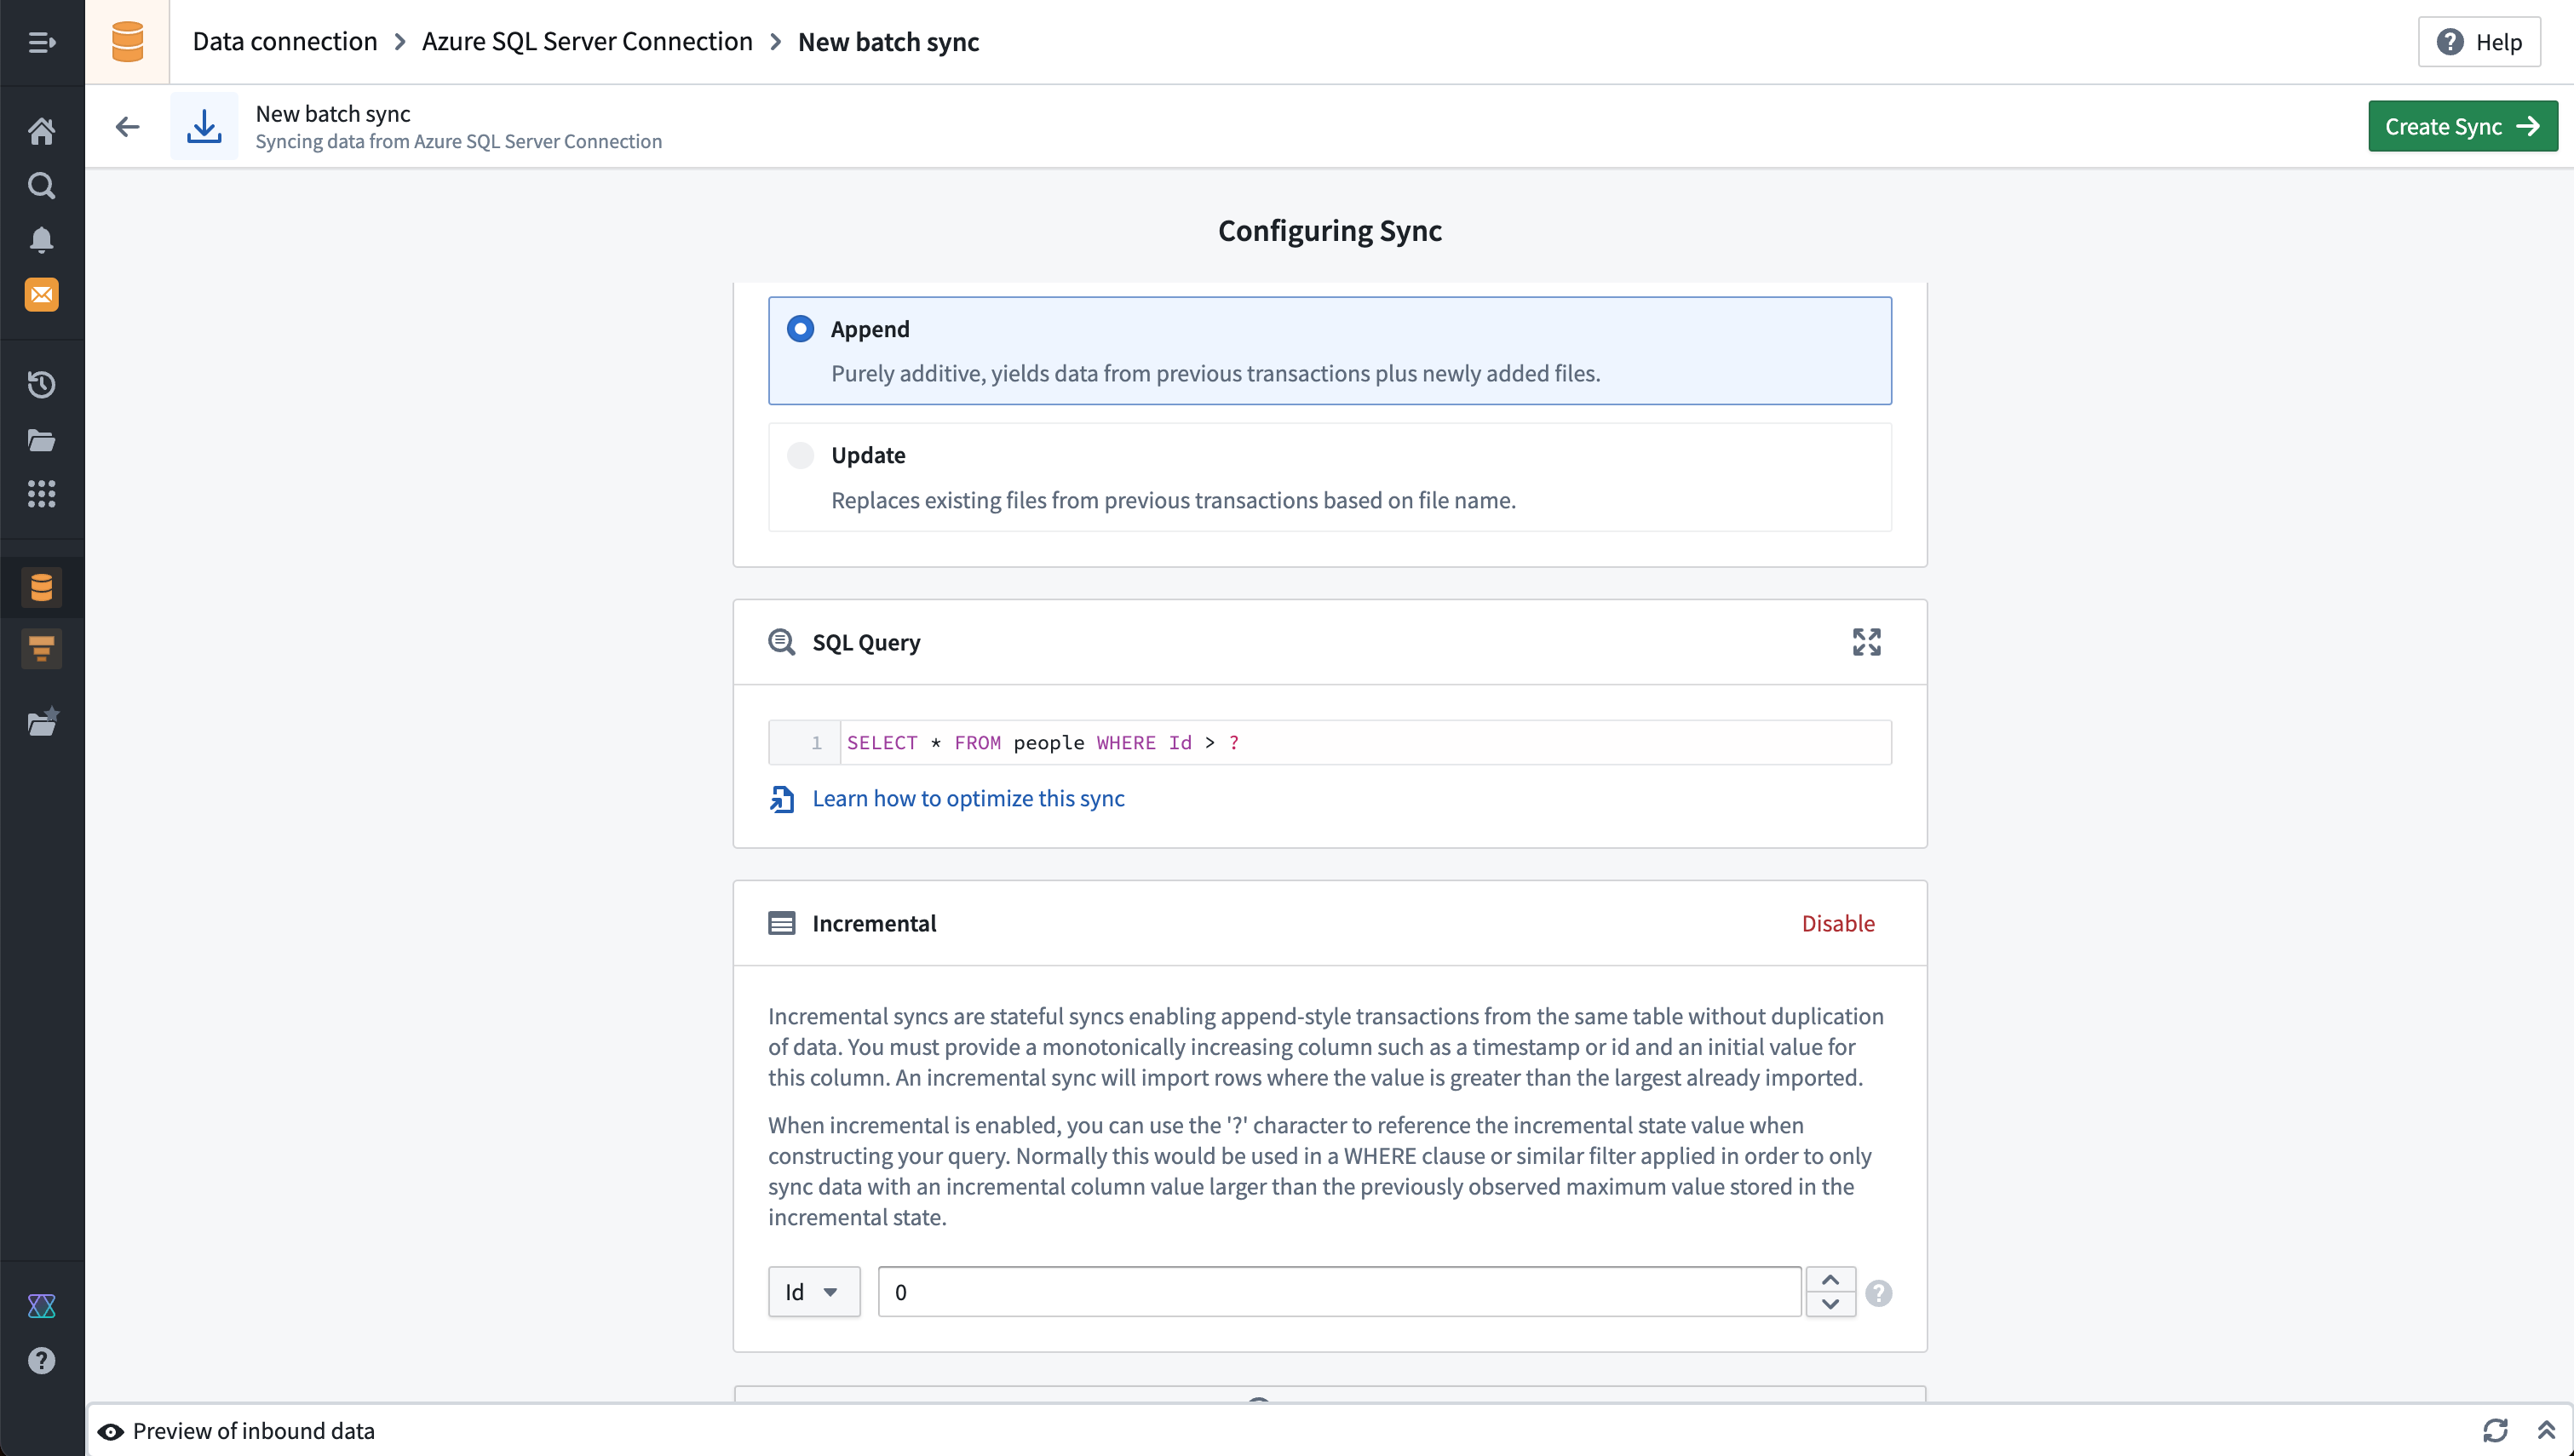
Although you cannot visualize SQL stored procedures on the Explore source tab, you can run a SQL stored procedure by running the EXEC command followed by the corresponding procedure in the SQL Query field.
Additional options
A number of other options are available for most batch syncs and may vary depending on the connector. Some examples of widely available configuration options for batch syncs are listed below:
- The transaction type determines whether ingested data overwrites previously ingested data (
SNAPSHOT) or whether it is added incrementally (APPEND). Learn more about incremental syncs. - Schedules allow you to configure how often data should be synced using Foundry's build system. We recommended setting up a schedule for your newly created sync. Learn more about scheduling best practices.
- A build policy allows you to restrict when a sync is allowed to run, regardless of the configured schedule.
- Maximum duration allows you to automatically cancel syncs that run over a specified time limit. All syncs will be cancelled automatically if they run longer than approximately 48 hours.
The following options are available for table batch syncs only:
- Timestamp without timezone settings allow you to customize how timestamp data without a timezone is handled when syncing into Foundry. By default, timestamps without timezones are synced as strings, but you may choose to sync as a
timestampwith a manually specified timezone, or as along. - Allow schema changes. This setting allows you to prevent batch syncs from running if there is a schema change in the external system. By default, schema changes are not allowed.
Preview your sync output
Before proceeding, you can run a preview of the data that will be synced based on the settings you have configured. You should use this to verify that your sync is configured as expected.
- For file batch syncs, the preview will show a list of files.
- For table batch syncs, the preview will show the selected table results, limited to the first 20 rows.
Below, we show an example preview for an S3 file batch sync, with a filter to a subfolder called csv_files:
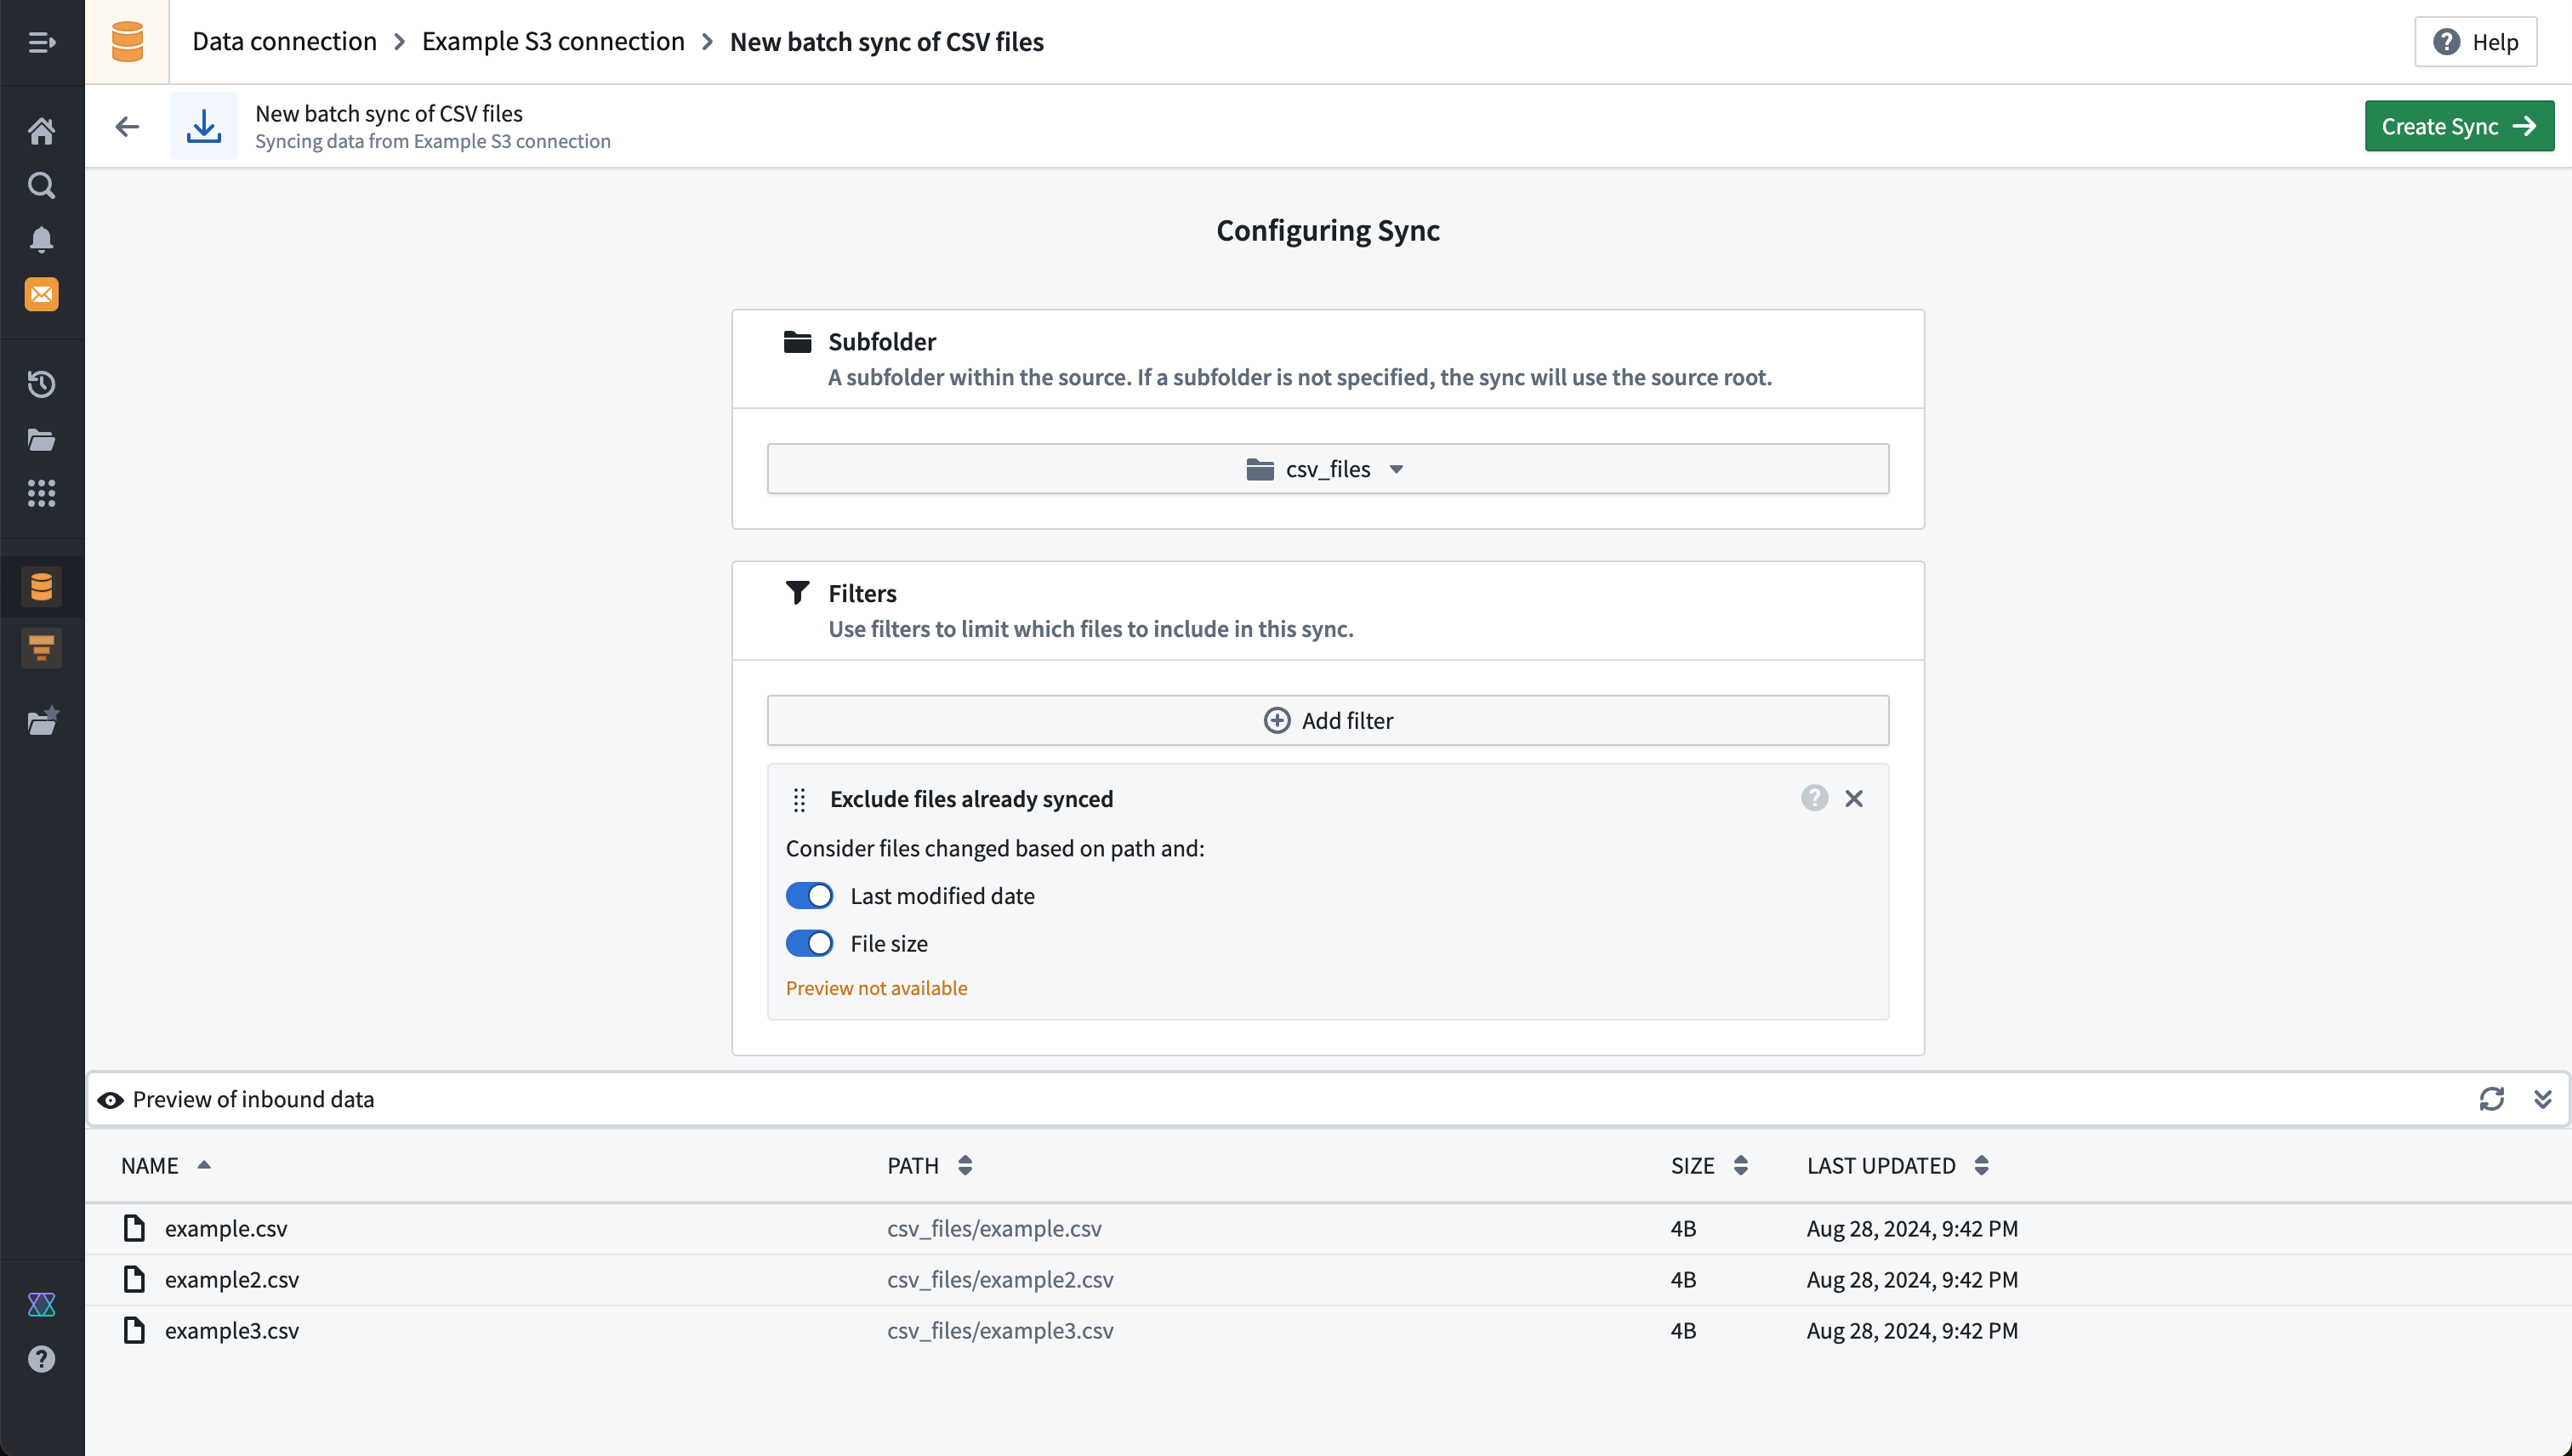
The example above shows a warning Preview not available when using the Exclude files already synced filter. This is because this filter is not reflected in the preview results shown and will only be applied once the sync is scheduled or run manually.
Build or schedule your batch sync
After saving your batch sync, you can choose when and how you want to run it.
Run your batch sync manually using the Run button shown on the overview page for the sync:

Configure a build schedule to trigger the batch sync to run on a regular schedule:
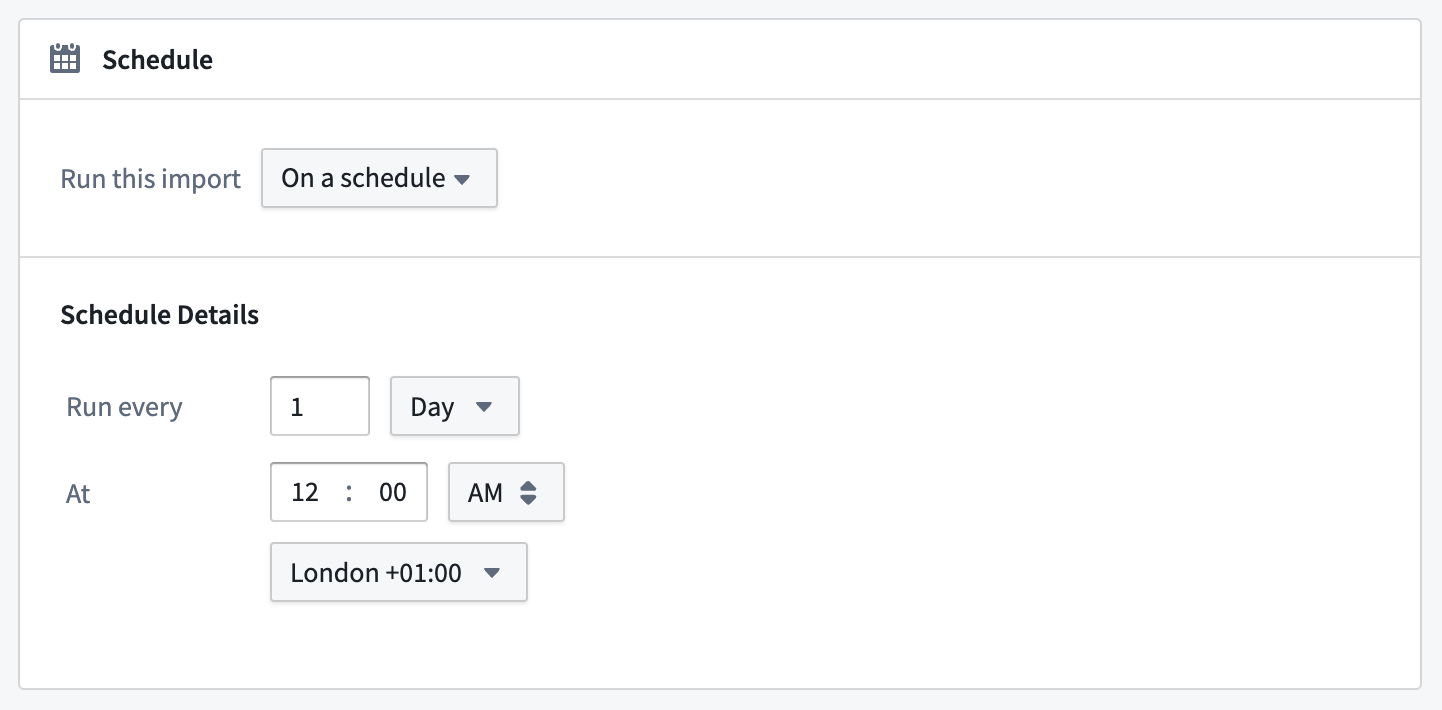
Use the Data Lineage application to set up a schedule for multiple syncs at the same time.
Schedules should not be configured from both Data Connection and Data Lineage for the same batch sync. Schedules configured from Data Lineage should always use the Force build option when building Data Connection syncs.
Next steps
In this setup guide, you learned how to create a batch sync to bring data from a connector into a Foundry dataset. Here are some additional resources we recommend:
- Learn more about other capabilities including change data capture syncs, exports, and media set syncs.
- Refer to Building pipelines to learn about transforming datasets in Foundry.
- Browse the Source types reference to learn more about the configuration options for each connector type.