- Capabilities
- Getting started
- Architecture center
- Platform updates
Configuration reference
This page documents the detailed configuration options and permissions associated with Webhooks in Data Connection.
Configuring inputs and outputs
Each webhook can be configured flexibly to map input parameters into the request that will be made to the external system. Then, the response from the system can be captured as output parameters that can then be used elsewhere in Palantir Foundry.
Input parameters
Input parameters represent the inputs that can be passed in when a user executes the Webhook. Typically, a Webhook is configured for use in Action types, where you can specify a mapping between Action parameters and Webhook input parameters.
There are many data types and constraints available for Webhook input parameters:
- Boolean parameters can be
trueorfalse. - Integer, Long, and Double parameters represent numeric values.
- String parameters represent text values, and can be constrained to only allow specific values.
- Date and Timestamp parameters represent time-based data.
In addition to these basic types, several collection types are available:
- List parameters represent an ordered collection of inputs of a specific type.
- Record parameters enable passing in key/value pairs, and can be constrained to require specific keys with values of a specific type.
- Optional parameters represent inputs that may or may not be present.
If you want to use Functions on Objects to map from Action parameters to webhook inputs, you can also conditionally not fire the webhook at all if your function to map inputs returns undefined. For example, WebhookInput | undefined."
Finally, an Attachment type may be used to pass a file that has been uploaded in an Action form. Note that this feature is not supported for agent worker sources.
Output parameters
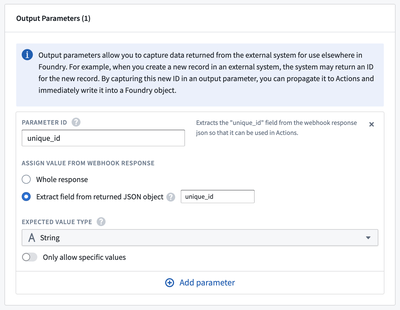
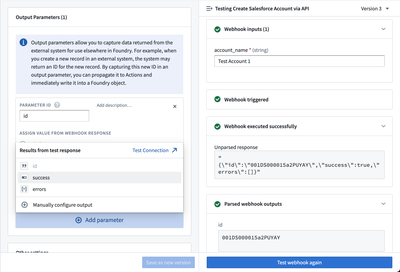
Output parameters allow you to capture data returned from the external system for use elsewhere in Foundry. For example, when you create a new record in an external system, the system may return an ID for the new record. By capturing this new ID in an output parameter, you can propagate it to Actions and immediately write it into a Foundry object.
An example configuration for a single output parameter called unique_id is shown below in the Webhook setup wizard:
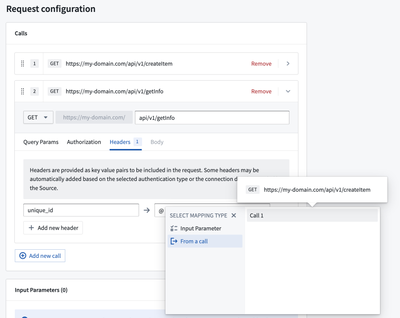
Alternatively, output parameters can also be directly accessed in the Webhook configuration step. An example is shown below where a webhook call uses a value from the response of the previous call. The first webhook call returns a response that looks like this:
{
  "results": {
    "unique_id": "ID4567"
  }
}
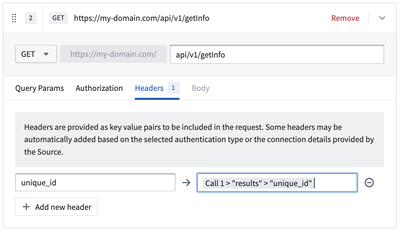
Configure the second webhook call. In the Headers tab, you can create inline references by typing @ that opens a menu where you can reference values from the response of the previous call.
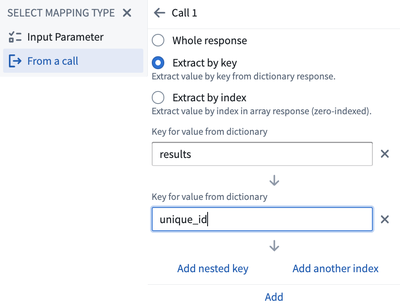
Choose From a call and select the previous call that has the response to parse. There are three options available to extract the necessary value from the response:
- Whole response: Extract the whole response as string.
- Extract by key: Extract the required value using the keys in the response.
- Extract by index: Extract the required value from array response using index positions (zero-indexed).
As in the example below, select Extract by key and configure the keys: results followed by unique_id using the Add nested key option.
Select Add and you will be able to see the reference displayed in the header value field.
The output parameters that are captured depend on the task type you are using.
For convenience, the result of a Webhook task is automatically converted into an appropriate output parameter type in certain cases:
- If a String output parameter is configured and the Webhook task result is not a string, then the result will be converted to a JSON string.
- If a Record output parameter is configured and the Webhook task result is a string, then the Webhooks service will attempt to parse the string into JSON.
- If a Double output parameter is configured, then Webhook task results which are Integers or Longs will be converted automatically.
Output parameters may be configured using a response received from a request made via the "Test Connection" side panel. Once a successful test request has been made, suggested outputs parsed from the response will be automatically displayed when adding a new output parameter.
Task body
Some webhooks are implemented as Tasks. For these webhooks, the Task body represents the data that will be sent to the Task when the webhook is executed.
The structure of what each Task expects depends on the specific Task type that will be listed, if relevant, under the entry for that webhook type. A Task body should be defined using Handlebars ↗ syntax. Within the Task body, you can refer to any of the input parameters that you have defined for the webhook as documented above.
Webhook types
Each type of webhook supports different configuration options. This section documents the options available for various webhook types, and provides basic examples to help you get started.
REST API
The most common use of webhooks is to make HTTP requests to REST APIs. After configuring a REST API source, you can use the request builder interface to construct the request you wish to make.
Available options for the REST API source include:
| Option | Required | Description |
|---|---|---|
| Method | Yes | The HTTP method for the request. |
| Relative path | No | Specify the relative path for the request endpoint. This should be relative to one of the domains configured in the REST API source. |
| Query Params | No | Provide key-value pairs for any query params to be included in the request. Some query params may be included at runtime based on the source configuration. Those will be displayed here as read-only. |
| Authorization | No | Authorization details are based on the source configuration. Any edits should be done by navigating back to the source. |
| Headers | No | Provide key-value pairs for any headers to be included in the request. Some query params may be included at runtime based on the source configuration. Those will be displayed here as read-only. |
| Body | No | For requests that accept a body, you may include a body from the available types. These types include Raw JSON, Form Data, Form URL Encoded, binary File, XML, Plain Text, and HTML. |
Multiple requests
A single webhook may contain multiple requests. Requests may be chained together, with response values from a previous call referenced in subsequent calls.
REST API (legacy)
The legacy REST API options documented here and using the magritte-rest-v2 plugin are for historical reference only. New workflows should be implemented using the REST API source.
After setting up a magritte-rest-v2 Source, you can create REST Webhooks using the generic-rest-webhook-task.
For a REST Webhook, the structure of the Task body must be an array of calls, each representing a REST request that will be made to the external system.
The only supported type of call for webhooks is magritte-rest-call.
Below is an example of a basic Task body template for a REST Webhook, representing a single HTTP call:
Copied!1 2 3 4 5 6 7 8 9 10 11{ "calls": [ { "type": "magritte-rest-call", "method": "POST", "requestMimeType": "application/json", "path": "your/request/path", "body": { "text": {{json message}} } } ] }
This Task body template will make a POST request to the your/request/path endpoint with a request body of { text: <message> }, where <message> is a String input parameter in the Webhook.
Extracting output parameters
There are two main ways to extract output parameters from a REST Webhook: 1) capturing top-level fields from a JSON response by name, 2) defining JSON extractors for more customized extraction logic, and explicitly listing which fields you want to output.
You may also choose to extract the full response JSON as a string output. This provides additional flexibility to traverse the response when performing subsequent edits or notification rendering using functions.
The REST plugin supports a wide variety of extractor types including JSON, XML, HTML, HTTP Status, and more. Webhooks require an external endpoint that returns JSON, so only the json extractor may be used in a webhook task configuration.
For capturing top-level fields, suppose you've configured a REST call which returns the following response:
Copied!1 2 3{ "id": "c52fd6e4-6eb5-4da1-8908-4845e51c801b" }
You can define output parameters with the same IDs as keys in your JSON response to capture them. In this example, you can add a string output parameter with a parameter ID of id, and this field will be captured from the response.
If you need to capture a nested field from the response, you can extract values by specifying extractors. Extracted values can be also used in subsequent calls to chain calls together. If you need to capture the full response, you can extract the entire response by specifying extractors with the root path as target: "result": "/".
Below is an example of a Task body template that makes two requests: one to a GET endpoint to retrieve some data, then one to a POST endpoint using data from the previous call.
Copied!1 2 3 4 5 6 7 8 9 10 11 12 13 14 15 16 17 18 19 20 21 22 23 24 25 26 27 28 29 30 31 32{ "calls": [ { "type": "magritte-rest-call", "method": "GET", "path": "path/to/fetchData", "extractor": [ { "type": "json", "assign": { "request_output": "/json/path/to/output" } } ] }, { "type": "magritte-rest-call", "method": "POST", "path": "your/request/path", "body": { "text": {%request_output%} }, "extractor": [ { "type": "json", "assign": { "result": "/json/path/to/result" } } ] } ], "output": ["result"] }
The first call makes a GET request to the endpoint at path/to/fetchData, then extracts data from the JSON Path of /json/path/to/output into a state variable called request_output. Then, the request_output state is used in the body of the second call. From the second call, we extract another field from the JSON response into a state variable called result. Finally, the "output" field in the configuration defines which extracted fields should be returned as output parameters.
Other options
In addition to specifying the calls and output, there are a few additional configuration options available for REST Webhook Tasks:
- If you are making multiple calls in a REST Webhook, only one call is allowed to use an unsafe HTTP method. An unsafe call is one which may modify state in an external system. By default, only
GET,OPTIONS, andHEADrequests are considered safe. You can override the safety of a different type of call (such asPOSTorPUT) by specifying"isHttpMethodSafe": trueas a field of the call. This can be useful if you are making multiple requests where one of the earlier requests is aPOST, and you are using its response in a subsequent request. - You can specify an array of
retryable-status-codeswhich represents HTTP status codes that can be retried.- For example, you could configure the Webhook to retry the external request when it receives a 503 response from the server. This option defaults to an empty list.
- You can specify an array of
external-system-not-changed-status-codesindicating that the server you are connecting to did not change any data despite a failing request.- This option defaults to all status codes from 400 to 431.
- When a Webhook is executed and fails, the indication of whether the external system may have been changed is captured to enable debugging of write failures.
Salesforce
We recommend using the REST API source to configure webhooks that interact with Salesforce. The legacy task-based webhook options described below are for historical reference only. Legacy Salesforce sources should be migrated to use the new configuration options.
The following task types are available for Salesforce webhooks:
create-record-salesforce-webhook-task: Creates a Salesforce record of the given type.update-record-salesforce-webhook-task: Updates a Salesforce record of the given type.delete-record-salesforce-webhook-task: Deletes a Salesforce record.composite-salesforce-webhook-task: Modifies Salesforce records by using a Salesforce composite request ↗.
Below are examples of the Task body for each Task type.
create-record-salesforce-webhook-task
This Task type corresponds to this Salesforce API ↗.
Copied!1 2 3 4 5 6 7 8{ "record-type-name": "Account", "data": { "Name": {{json name}}, "Industry": {{json industry}}, "BillingCountry": {{json country}} } }
update-record-salesforce-webhook-task
This Task type corresponds to this Salesforce API ↗.
Copied!1 2 3 4 5 6 7 8 9{ "record-type-name": "Account", "record-id": {{json record-id}}, "data": { "Name": {{json name}}, "Industry": {{json industry}}, "BillingCountry": {{json country}} } }
delete-record-salesforce-webhook-task
This Task type corresponds to this Salesforce API ↗.
Copied!1 2 3 4{ "record-type-name": "Account", "record-id": {{json record-id}} }
composite-salesforce-webhook-task
Information about the collateSubrequests option is available in the Salesforce documentation ↗.
In the example below, we use "@{createAccount.id}" to refer to the ID of the record created in the first subrequest. Learn more about dependent requests in the Salesforce documentation ↗.
Copied!1 2 3 4 5 6 7 8 9 10 11 12 13 14 15 16 17 18 19 20 21 22 23 24 25 26{ "request": { "collateSubrequests": true, "compositeRequest": { "createAccount": { "type": "createRecord", "createRecord": { "recordTypeName": "Account", "data": { "Name": {{json name}} } } }, "updateId": { "type": "updateRecord", "updateRecord": { "recordTypeName": "Account", "data": { "Industry": {{json industry}} }, "recordId": "@{createAccount.id}" } } } } }
SAP
The SAP Plugin allows you to connect to your enterprise SAP environment and invoke Business APIs ↗ (BAPIs) to modify SAP Business Objects. After setting up an SAP Source, you can create SAP Webhooks that call into specific BAPIs.
Currently, the only Task type available in the SAP Plugin is sap-run-function-webhook-task-v0. Below is an example of the Task body for this Task type.
Copied!1 2 3 4 5 6 7 8 9 10 11 12 13 14 15 16 17{ "function-name": "BAPI_SALESORDER_CHANGE", "inputs": { "SALESDOCUMENT": {{json sales-doc-id}}, "ORDER_HEADER_IN": { "PURCH_DATE": {{json purchase-date}} }, "ORDER_HEADER_INX": { "UPDATEFLAG": "U", "PURCH_DATE": "X" } }, "output": "RETURN", "remote": { "context": SAP_CONTEXT_NAME (Optional) } }
The above Task invokes a BAPI called BAPI_SALESORDER_CHANGE, which modifies the purchase date for a given sales document. You can also optionally specify an SAP context for the webhook.
Limits
For each Webhook, you can set three types of limits that constrain how the Webhook can be executed: time limits, concurrency limits, and rate limits.
A time limit allows you to set the maximum duration a Webhook should execute for. This enables you to ensure that end-user applications remain responsive and show a timeout error when the external system to which you are connecting is taking too long to respond. The default timeout is 20 seconds if no value is provided. The maximum allowed timeout value is 180 seconds.
A concurrency limit specifies the maximum number of Webhook executions that run at a single time. This can be defined to avoid overwhelming an external system with too many concurrent requests.
A rate limit restricts how many times a Webhook can be executed within a time window that you specify. If you want to guarantee that a Webhook will only execute a specific number of times every second, minute, hour, or day, you can enable this type of limit.
Permissions
Permissions to create, configure, and delete webhooks extend from the permissions on the associated source.
Learn more about Data Connection permissions and see more details about Webhook permissions.
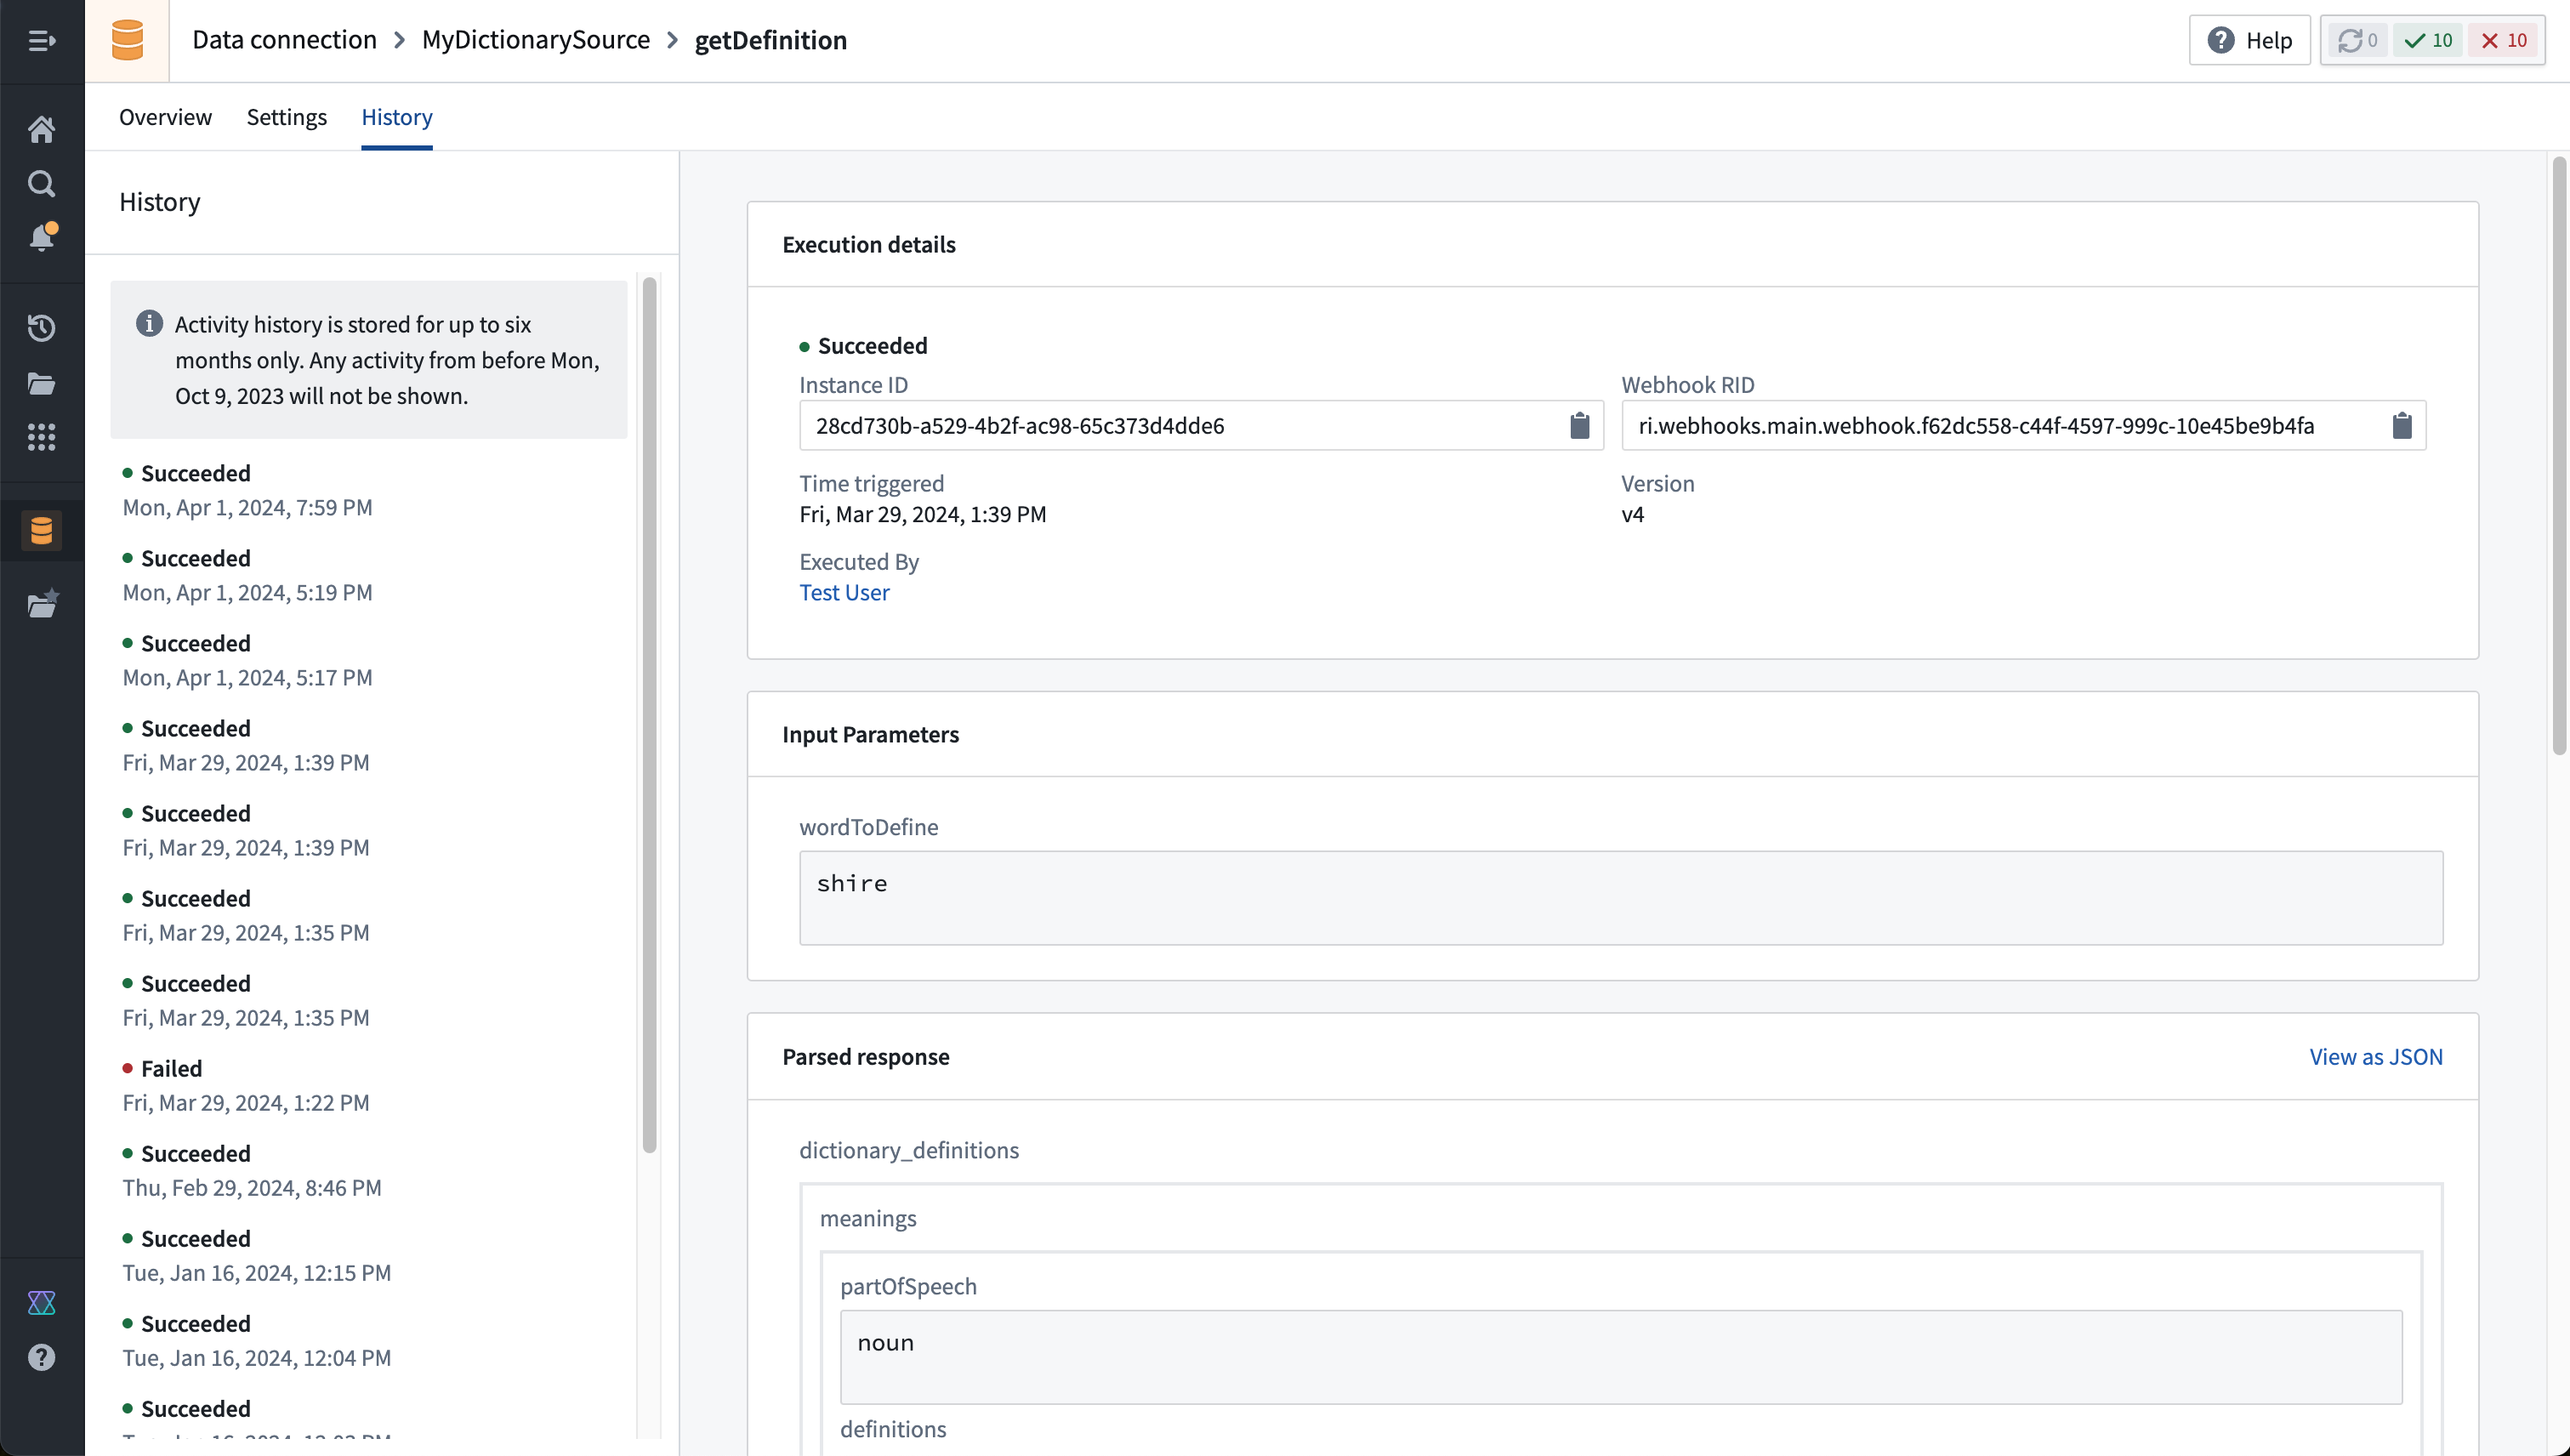
Webhook history
The webhook history displays a timeline of when webhooks were triggered. The history metadata will always include the user ID who triggered the webhook, a timestamp, and the success or failure status of the execution, as shown below:
By default, inputs passed to the webhook and the full response will only be visible to the user who called the webhook. This protects any sensitive data passed in or returned from the webhook call. The webhooks:read-privileged-data permission will allow access to the full history, and is not granted to any users by default. A custom role with this permission is required to access the full history for a webhook.
Other options
Store responses
By default, webhook responses will be stored and displayed in the history view for six months. The full response will only be visible to the user who executed the webhook and any admin with the webhooks:read-privileged-data permission.
This option may be disabled entirely for a webhook that is known to return sensitive information that should not be stored in the webhook history.
OAuth 2.0 with Webhooks
Authorization code grant
Palantir Webhooks support calling endpoints using an OAuth 2.0 authorization code grant flow. This requires using an outbound application to define the interaction with the OAuth 2.0 server. Once configured, an outbound application may be used as the authentication for a REST API Webhook and will prompt individual users to authenticate with the OAuth server when attempting to execute the Webhook.
Client credentials grant
Webhooks may be used to perform an OAuth flow using client credentials. The client credentials grant flow normally uses a long-lived secret to retrieve a short-lived access token that may be used to perform actions against the target system. REST API Webhooks support chaining multiple API calls in a row and can be used to perform the client credentials handshake followed by the desired request as a single execution.
The following walkthrough explains how to configure a client credentials grant flow against a notional example system.
To proceed, you need the following information:
- The OAuth 2.0 server domain and path to the token endpoint. The token endpoint is used to retrieve a valid token for making a request to the resource domain.
- In many cases, the OAuth 2.0 server domain and resource domain are identical. For example, this is the case for the Foundry API when authenticating using a third-party application.
- The resource domain and path to the desired endpoint you wish to call using an Authorization header containing the bearer token retrieved from the OAuth 2.0 server.
- The client ID for the OAuth 2.0 server.
- The client secret for the OAuth 2.0 server.
Not all OAuth 2.0 servers adhere precisely to the OAuth 2.0 standard. The Webhooks request builder interface is intended to be flexible enough to accommodate any non-standard configuration you may need to do to successfully authenticate. We recommend reviewing the documentation for the system you are connecting to before attempting to follow this tutorial.
Create a REST API source
First, choose to create a + New source in the Data Connection application, and select REST API as the source type. Learn more about the REST API source type.
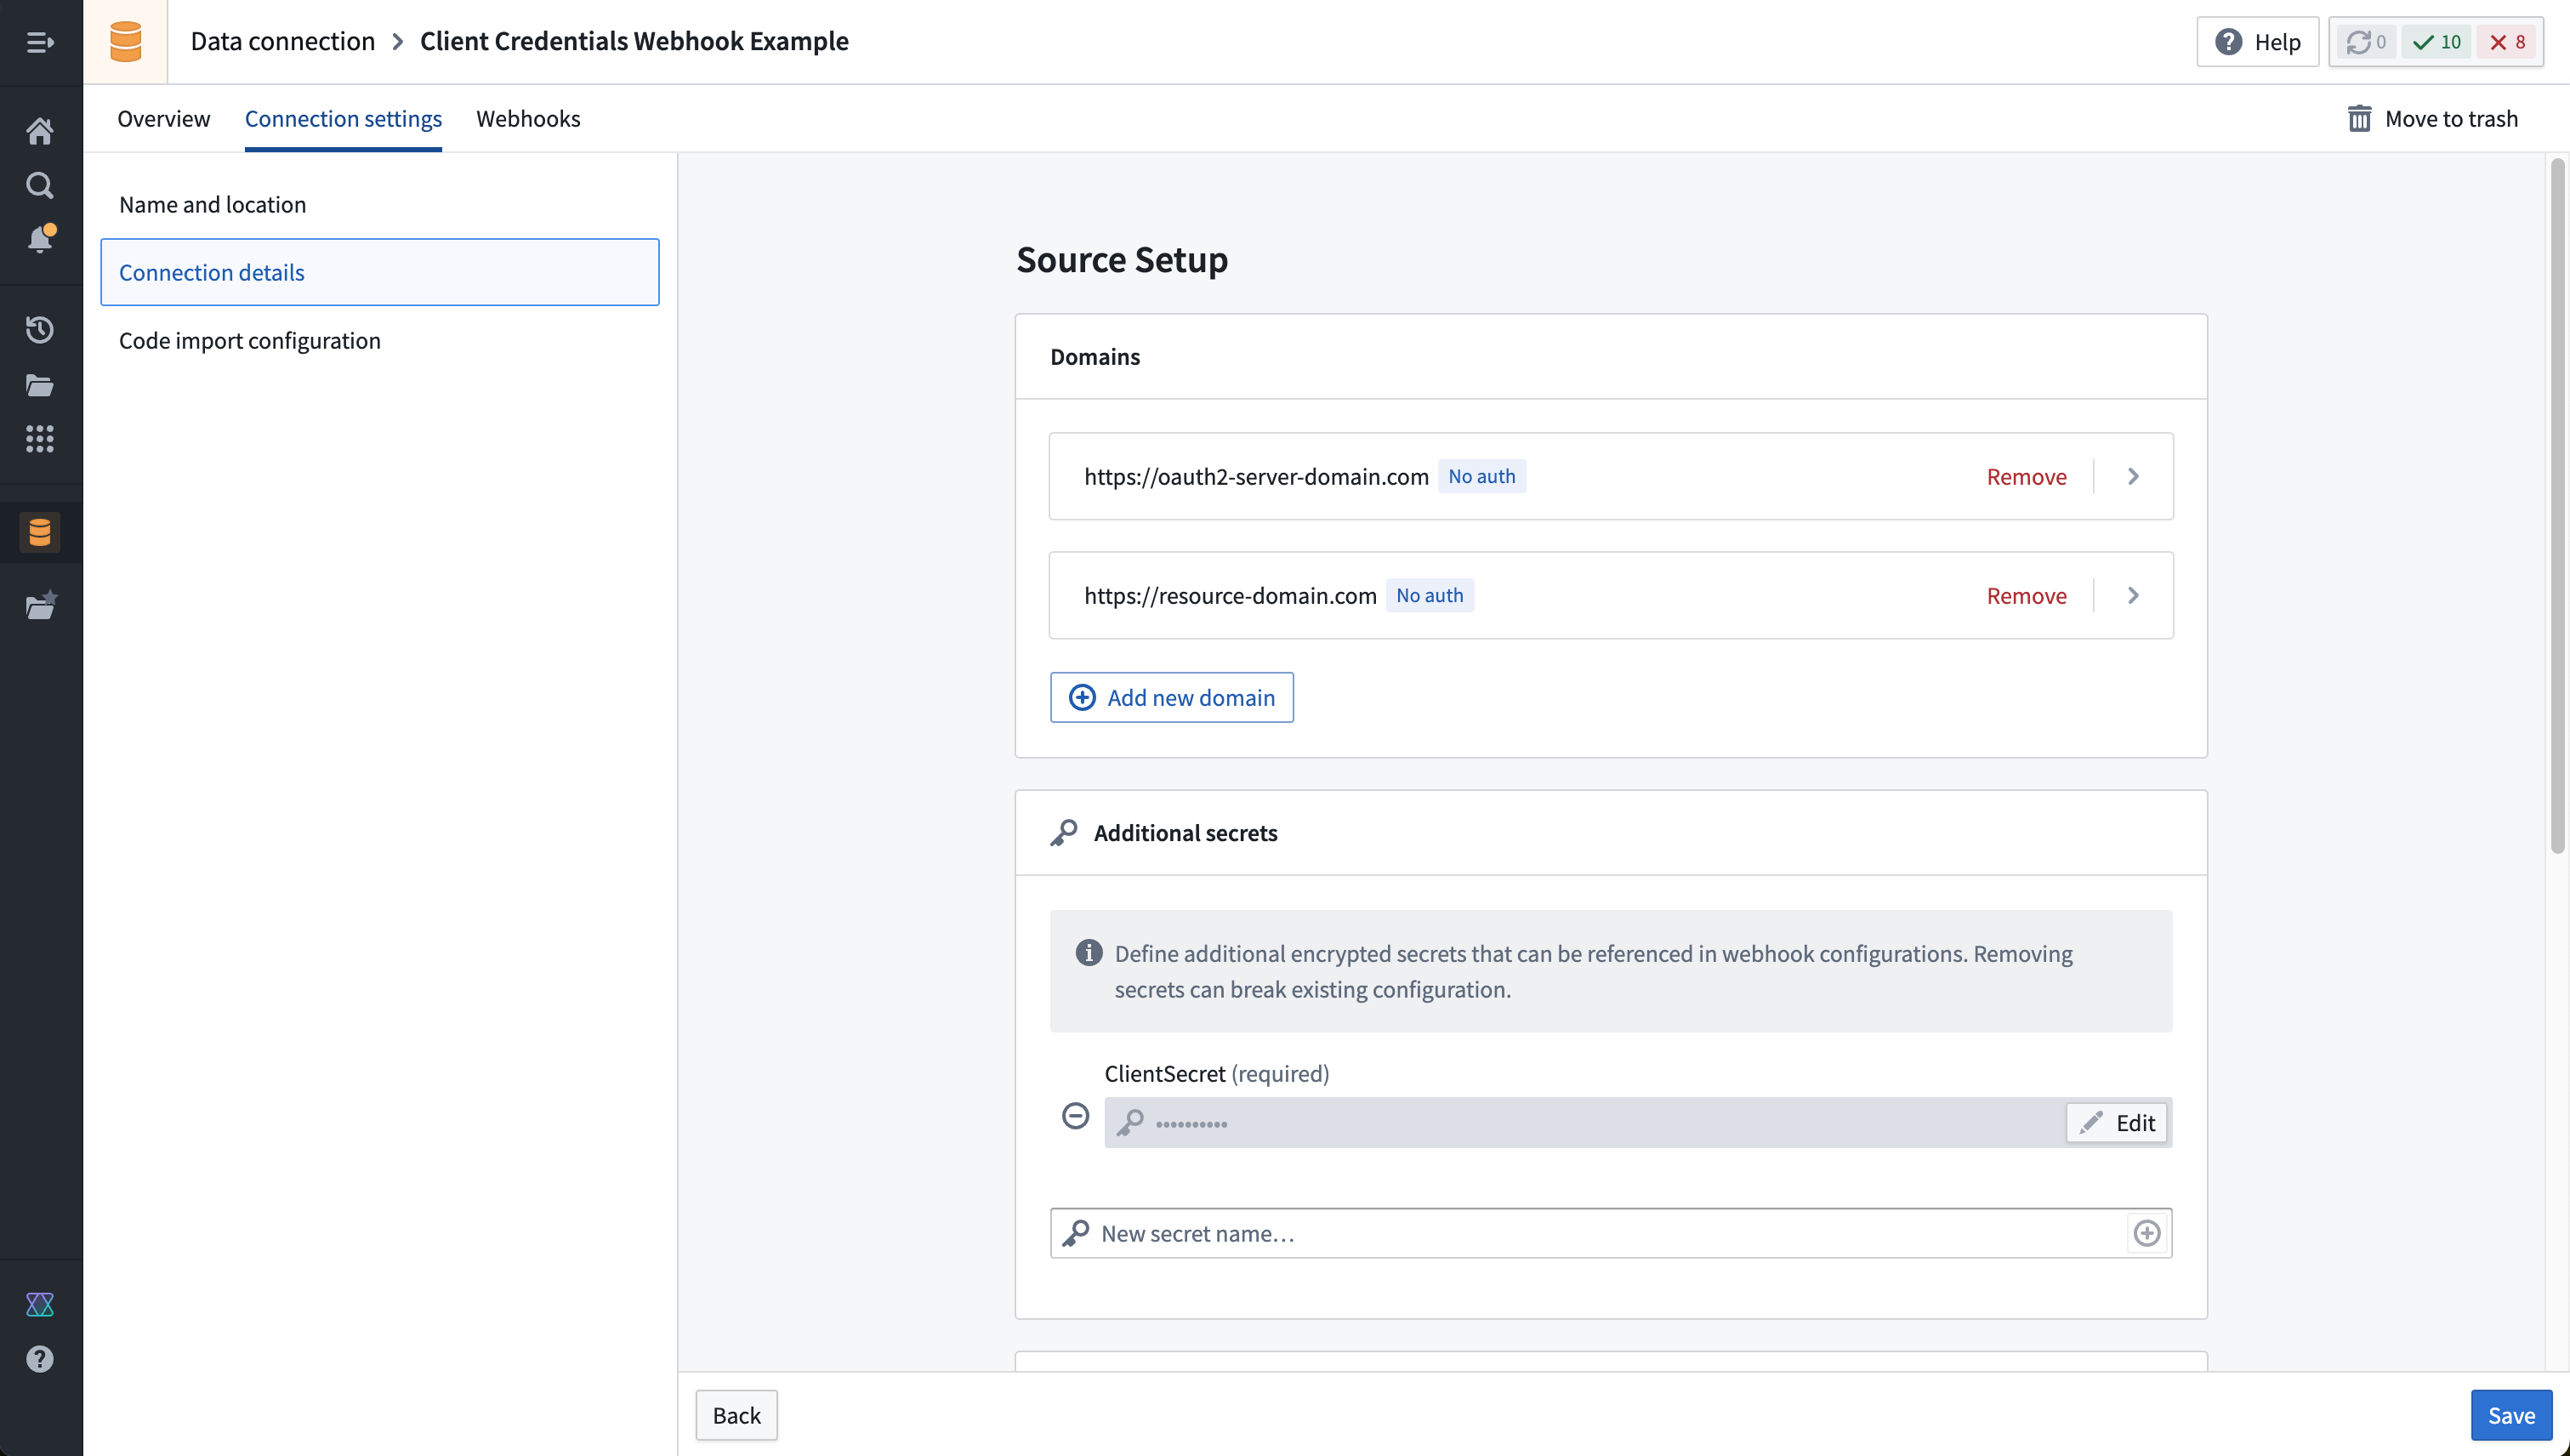
When configuring the source, add both the OAuth 2.0 server domain and the resource domain as shown below. Do not select any authentication option, since we will be manually performing the OAuth 2.0 handshake directly within the sequence of webhook calls.
In the section for Additional secrets, add a new secret and enter the ClientSecret that will be included when making requests to the token endpoint. We will reference this value when constructing our Webhook call; when entered here, the ClientSecret will be encrypted and never exposed, even to other editors or owners of the source in Foundry.
Build a Webhook that performs the client credentials handshake
Once the source is created, select the option to create a new Webhook.
The Webhook will consist of two chained calls:
- An initial call to the token endpoint to retrieve a valid bearer token
- A subsequent call that includes the parsed bearer token in a request to the desired endpoint on the resource domain.
An example of how to configure the first call is shown below:
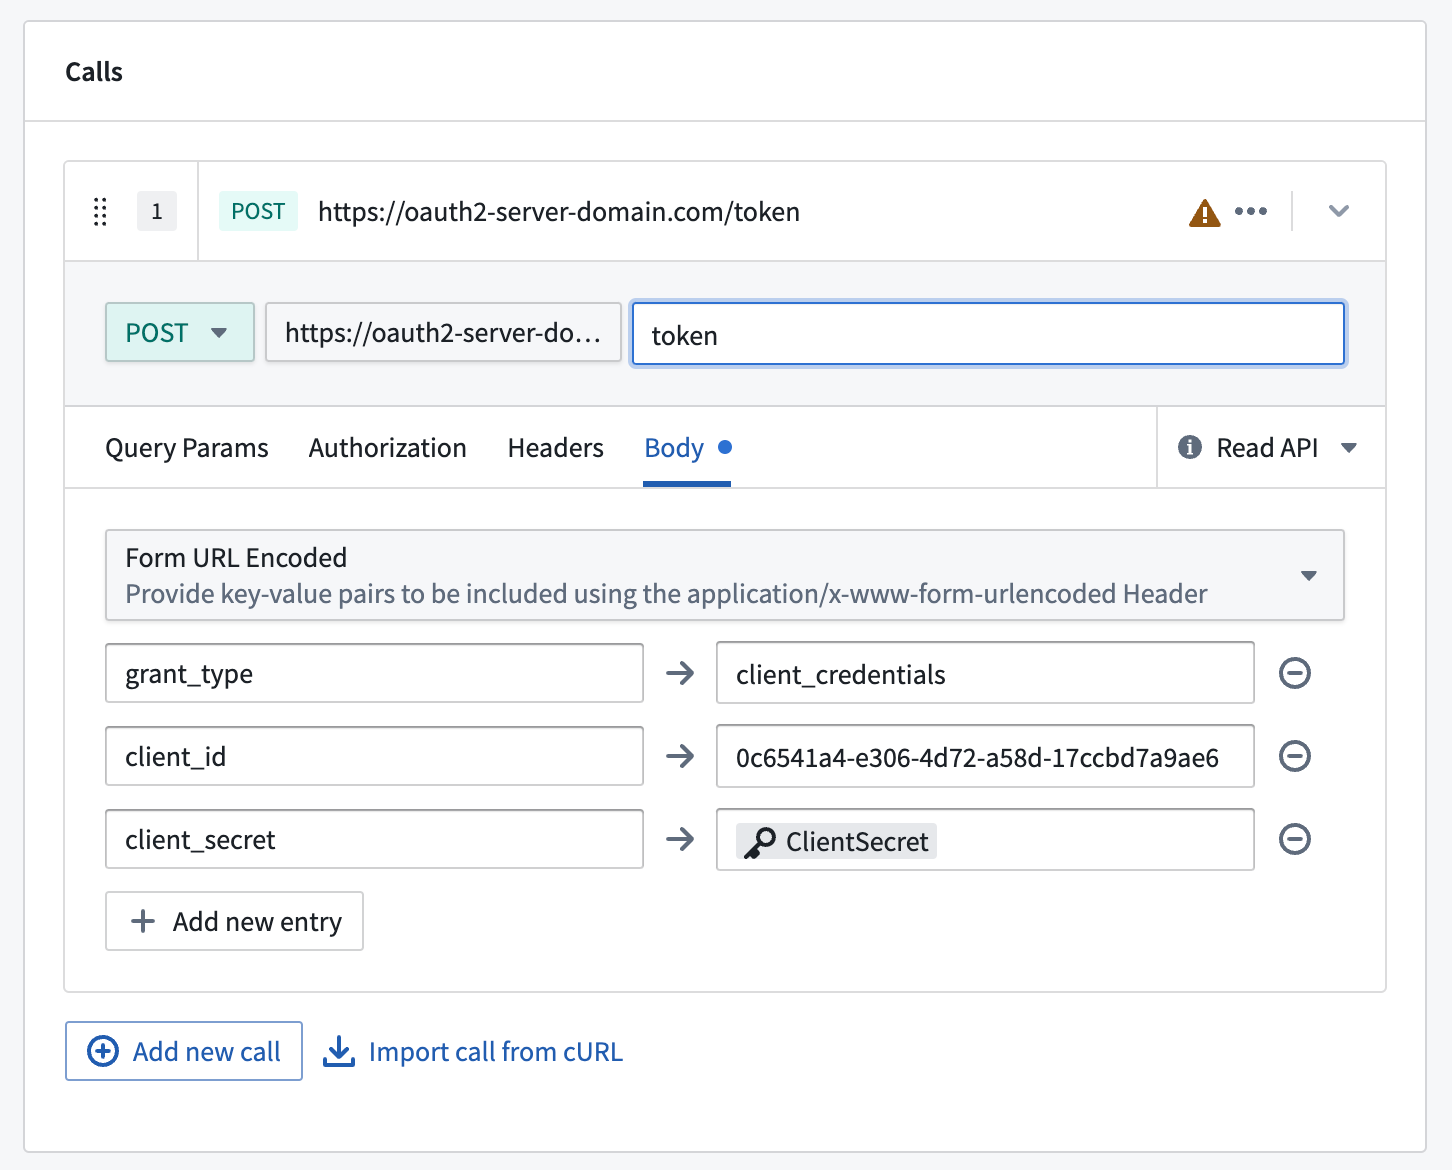
The parameters shown above in the call to the token endpoint are standard for many systems that use OAuth 2.0. However, the names of the fields may vary, and other fields may be required. Consult the documentation of the system you are connecting to and construct a request that is compatible with the token endpoint provided by that system.
Often, the request type will need to be POST, which defaults to being a "write API" call. In fact, it is usually safe to perform repeated calls to the token endpoint, and you can mark this call as a "read API" call instead using the dropdown selector on the right side of the configuration block for that call. In general, Webhooks that perform multiple write API calls are not allowed, since transactionality across multiple requests cannot be guaranteed.
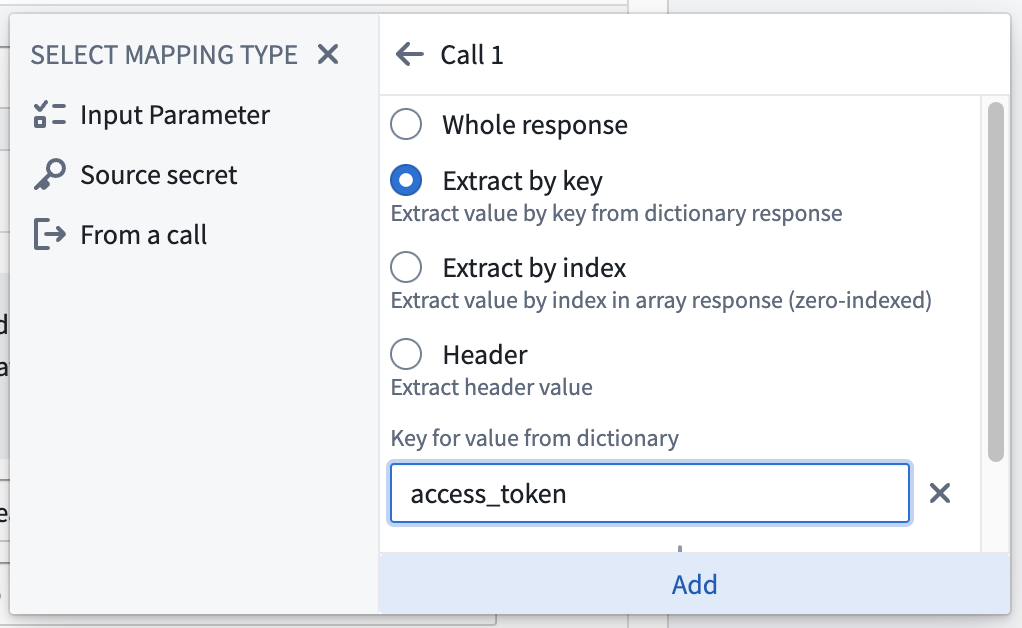
In the second call, build the desired request using the available configuration options. To inject the bearer token into an authorization header, go to the Headers section of the call configuration and add a header as shown in the example below . You can use @ to reference values from the previous call. Most OAuth 2.0 servers will return a JSON parameter called access_token or similar. Choose the option to add a value From a call, then select Extract by key and enter the value of the key you wish to extract from the response to the first call you made.
An example of how to select the bearer token from the first call is shown in the screenshot below:
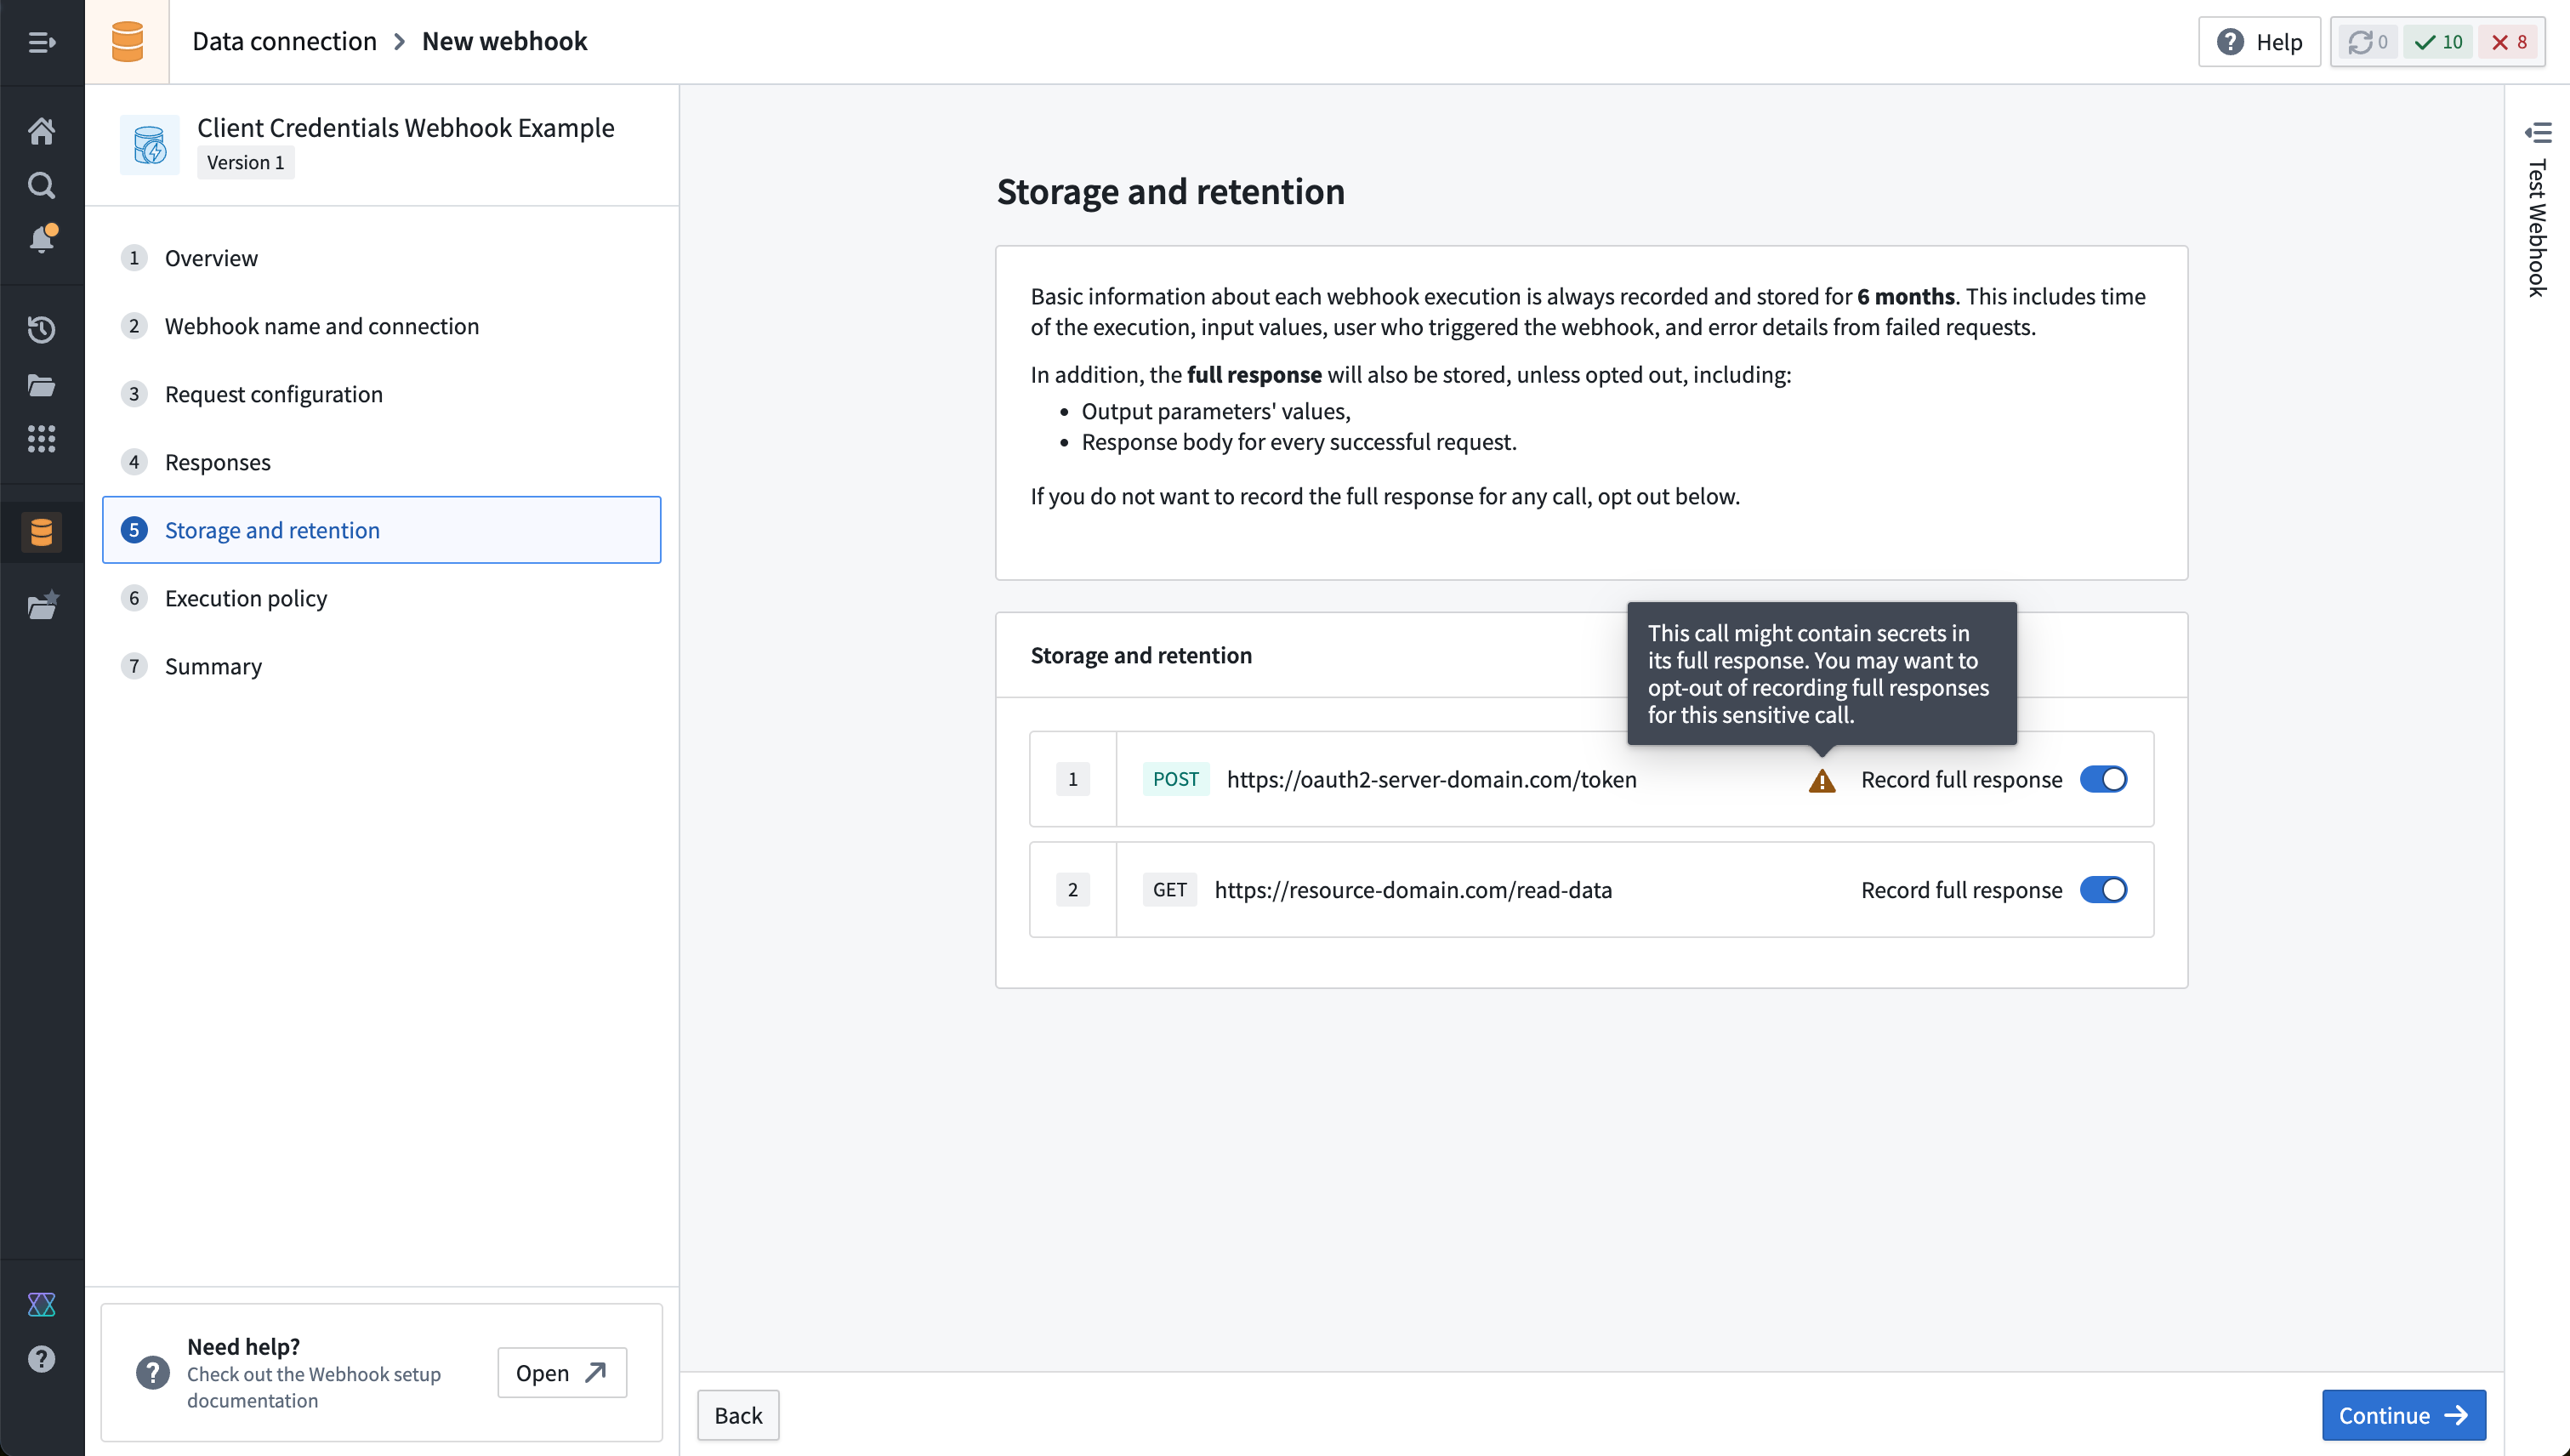
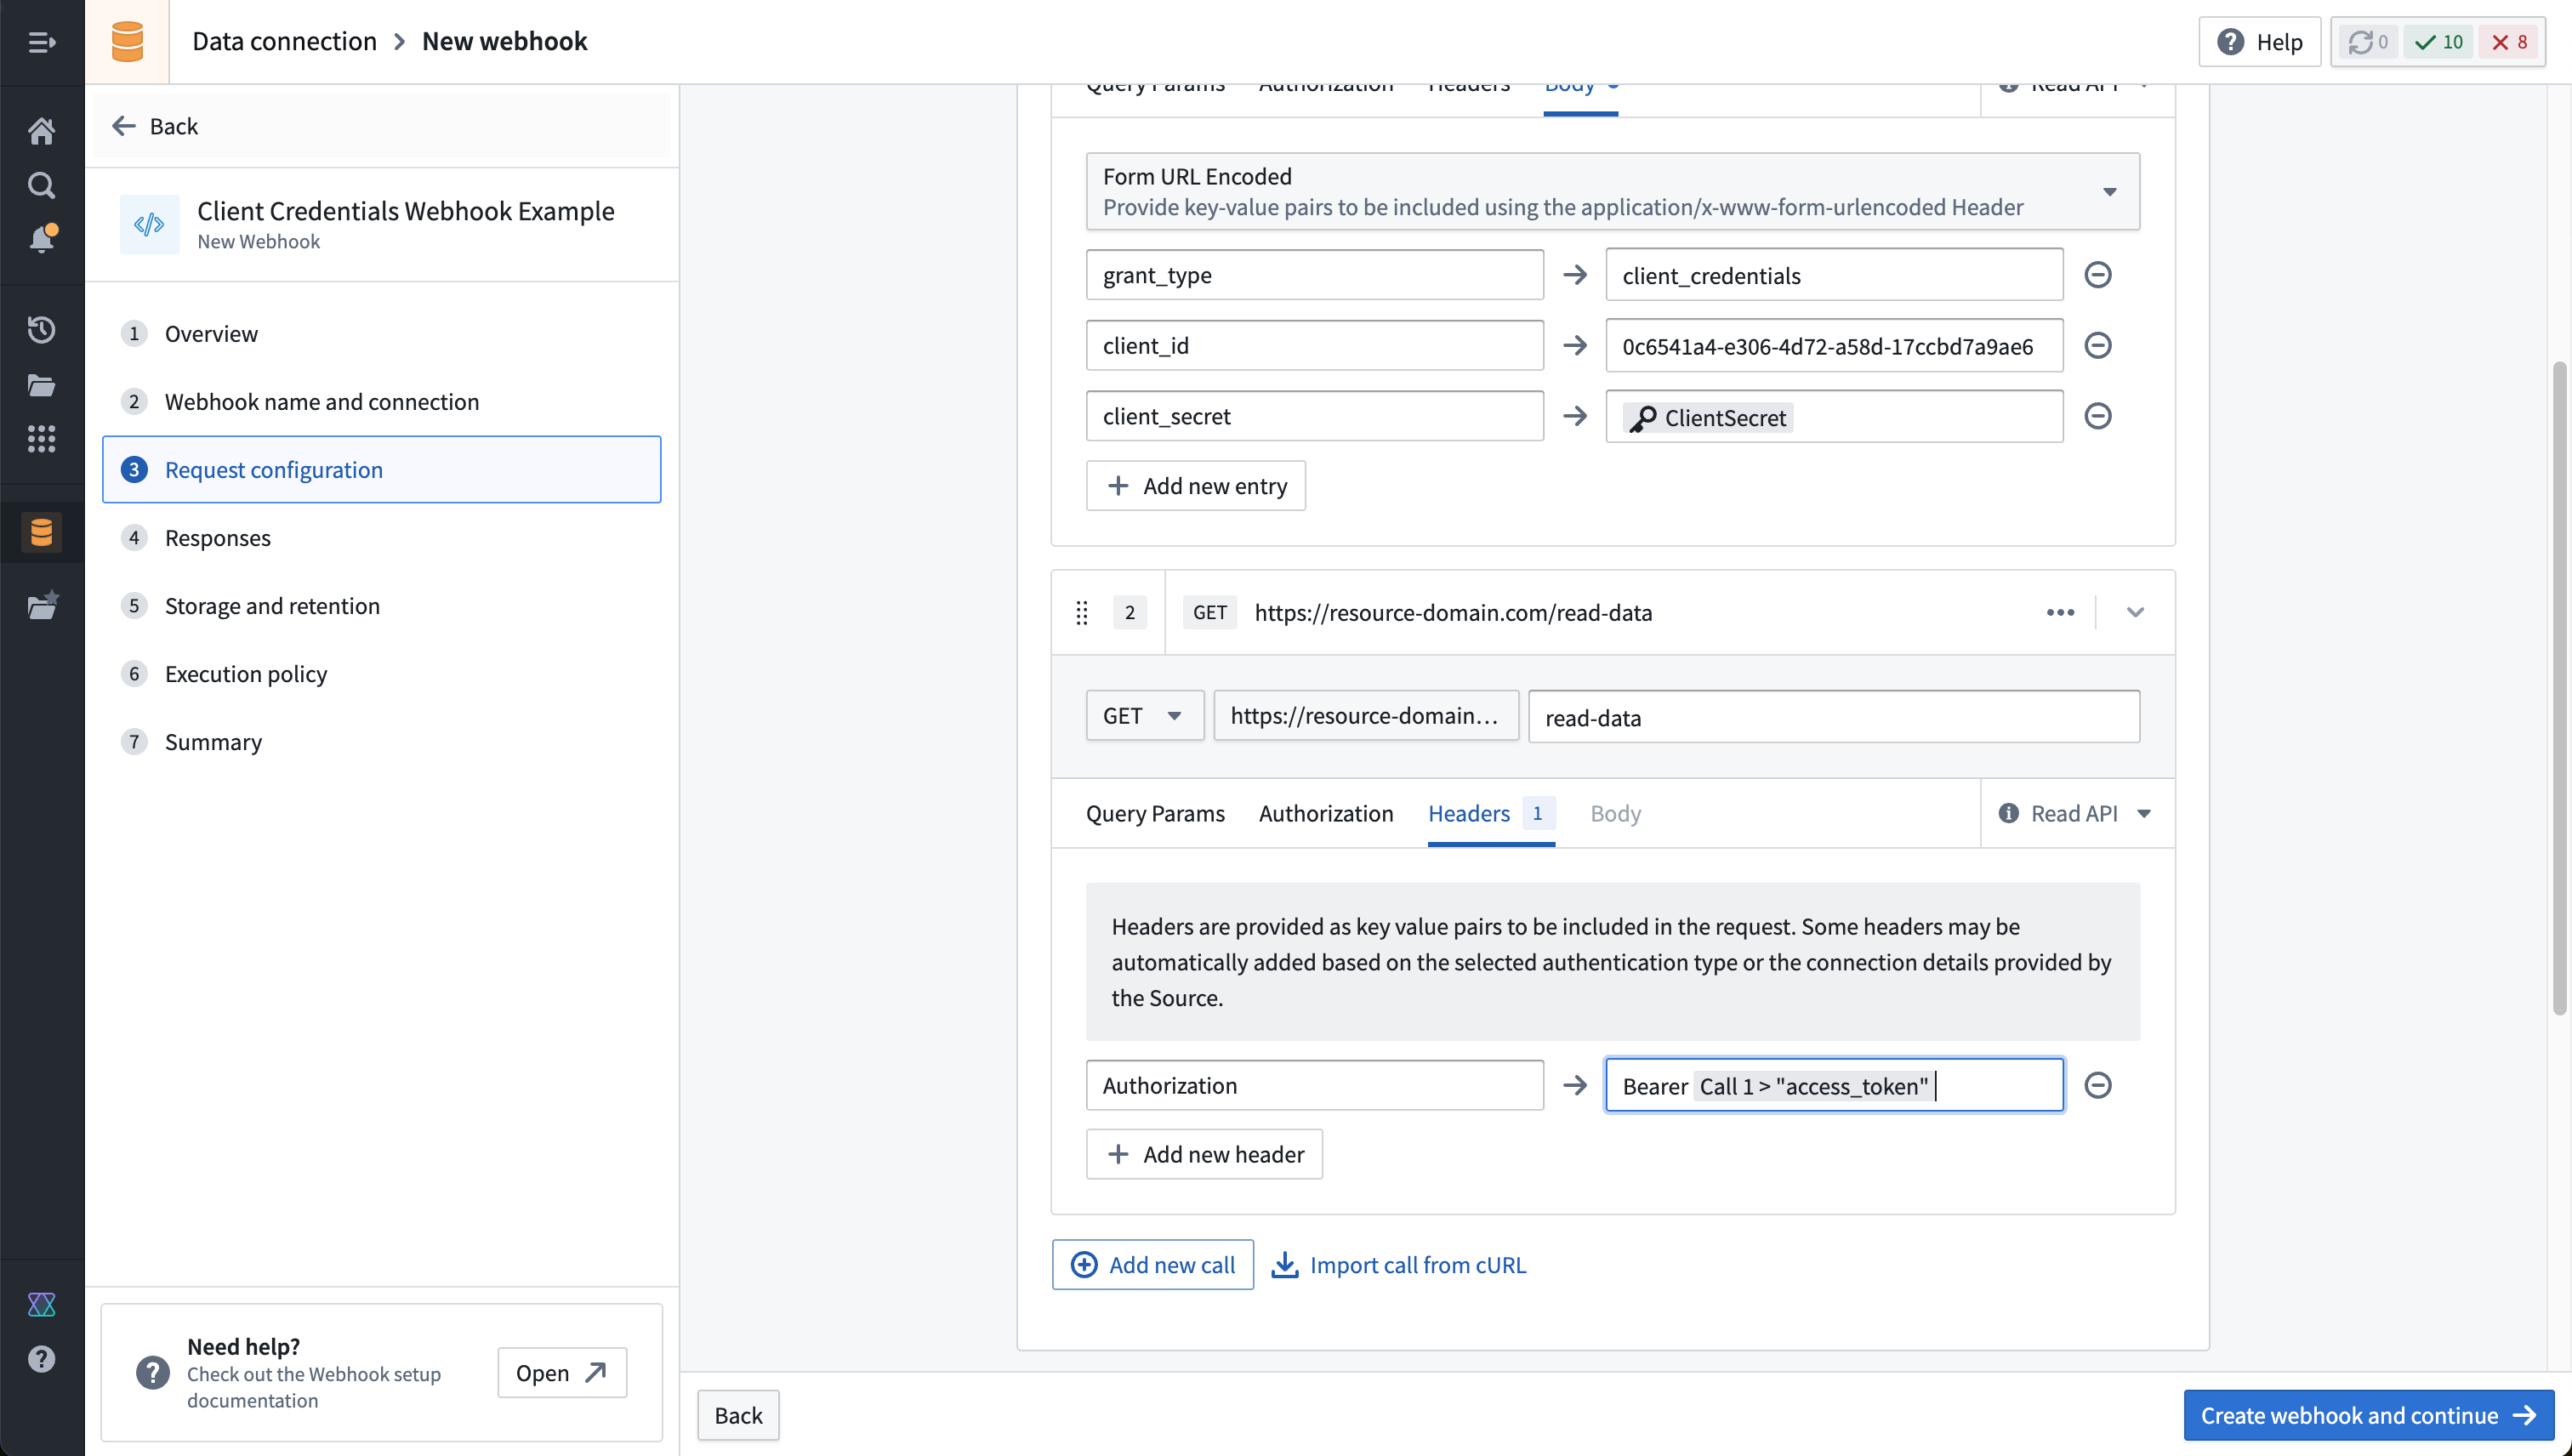
Once configured, your completed Webhook with two chained calls should look similar to this example:
Finally, we highly recommended disabling storing full responses from the first call of the Webhook. If responses are stored, the bearer tokens contained in them may be visible to other users with permission to view full Webhook history. An automatic prompt will usually appear on the Storage and retention page of the Webhook configuration to disable storing history for requests to a token endpoint, as shown below: