Understanding workflows and usage
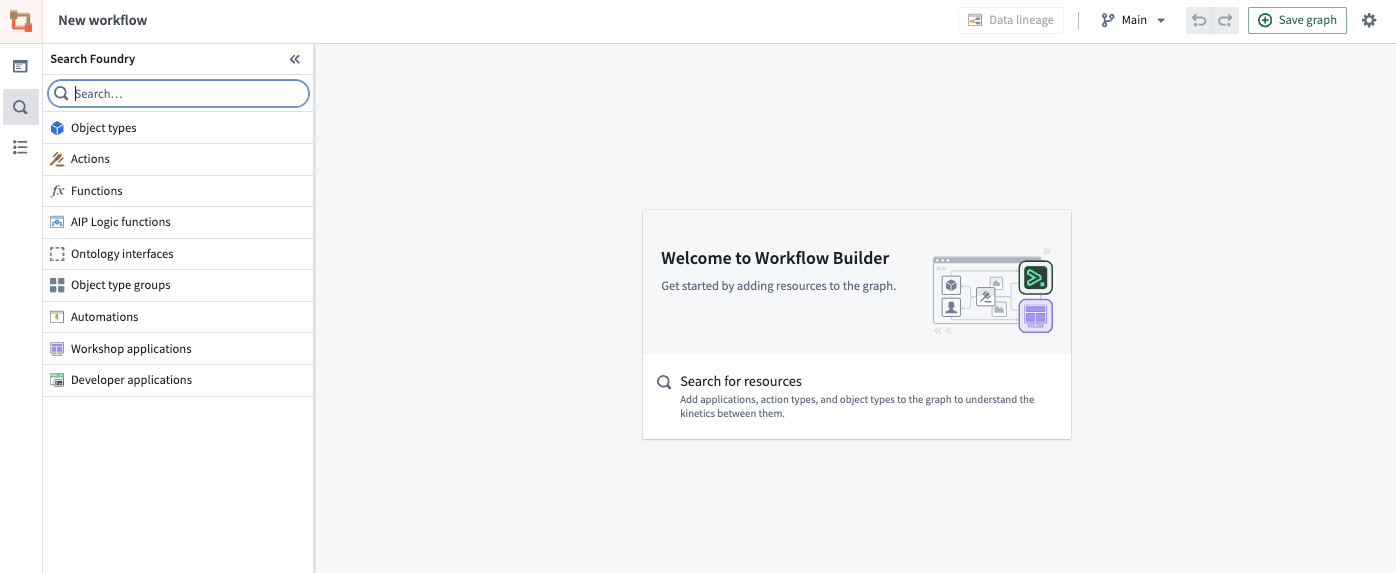
To start using Workflow Builder, open a Workshop application or Functions repository and use the keyboard shortcut Command + I (macOS) or Ctrl + I (Windows) to view the relevant Workflow Builder graph depicting the objects, Actions, and Functions that back the application.
You can also navigate directly to the Workflow Builder application and manually add resources to the graph.
Interface
Workflow Builder's interface consists of the two main components, as seen in the following notional screenshot:
- Graph panel: An interactive graphical view of the entities backing your workflow and the relationships between them.
- Workshop panel: An interactive view of the selected Workshop applications.
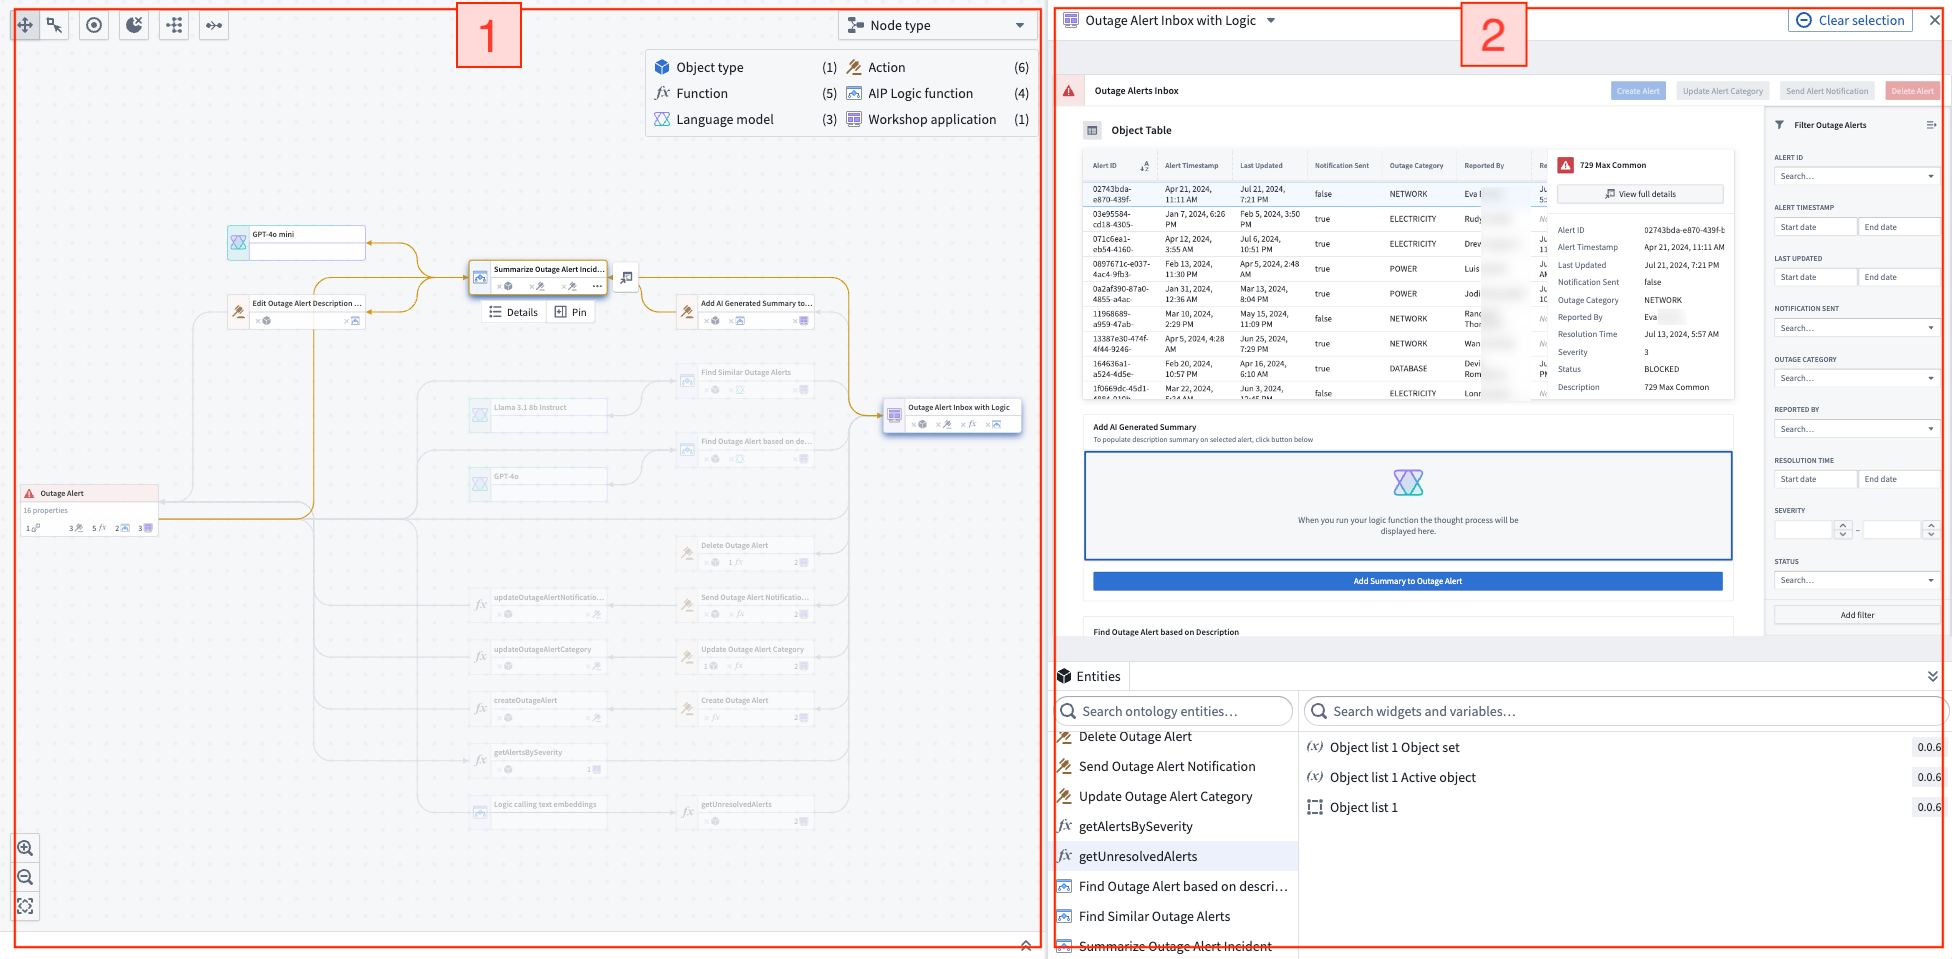
Graph panel
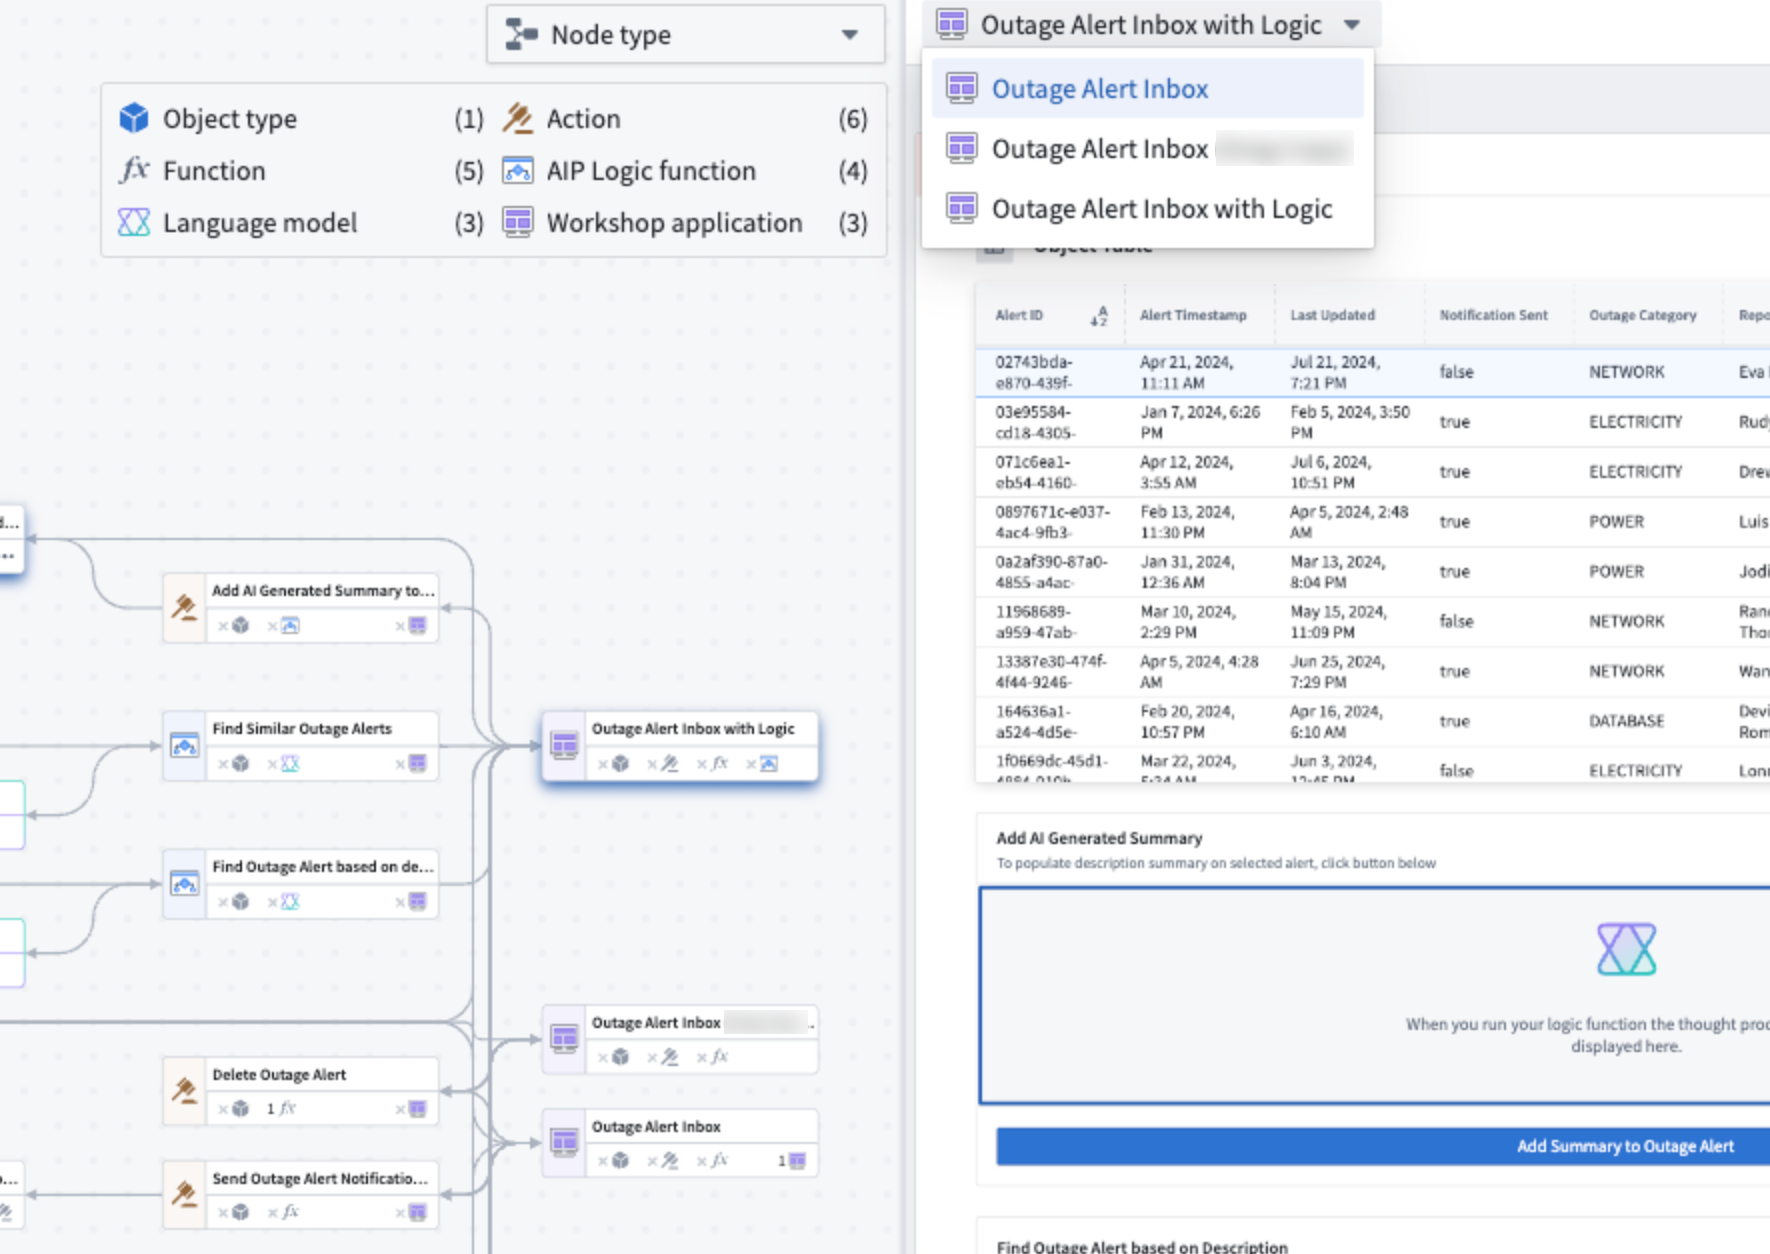
When you select nodes on the graph panel, you can see the corresponding Workshop components highlighted on the Workshop panel. This makes it easy to see the exact places that are using specific nodes and can help show you where specific objects are being used.
When you select a specific node on the graph, you can use the Pin option to pin it to the left sidebar or view more details about the node.
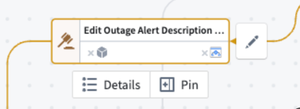
To see all linked dependencies for a particular node, select the icon corresponding to the input type you want to see on the graph.
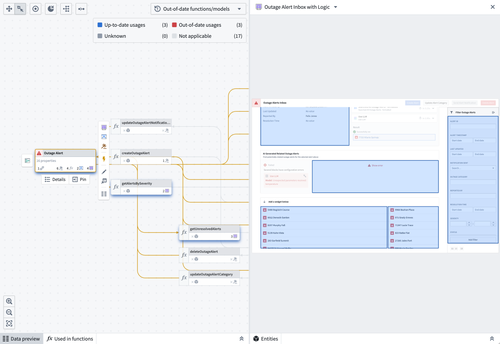
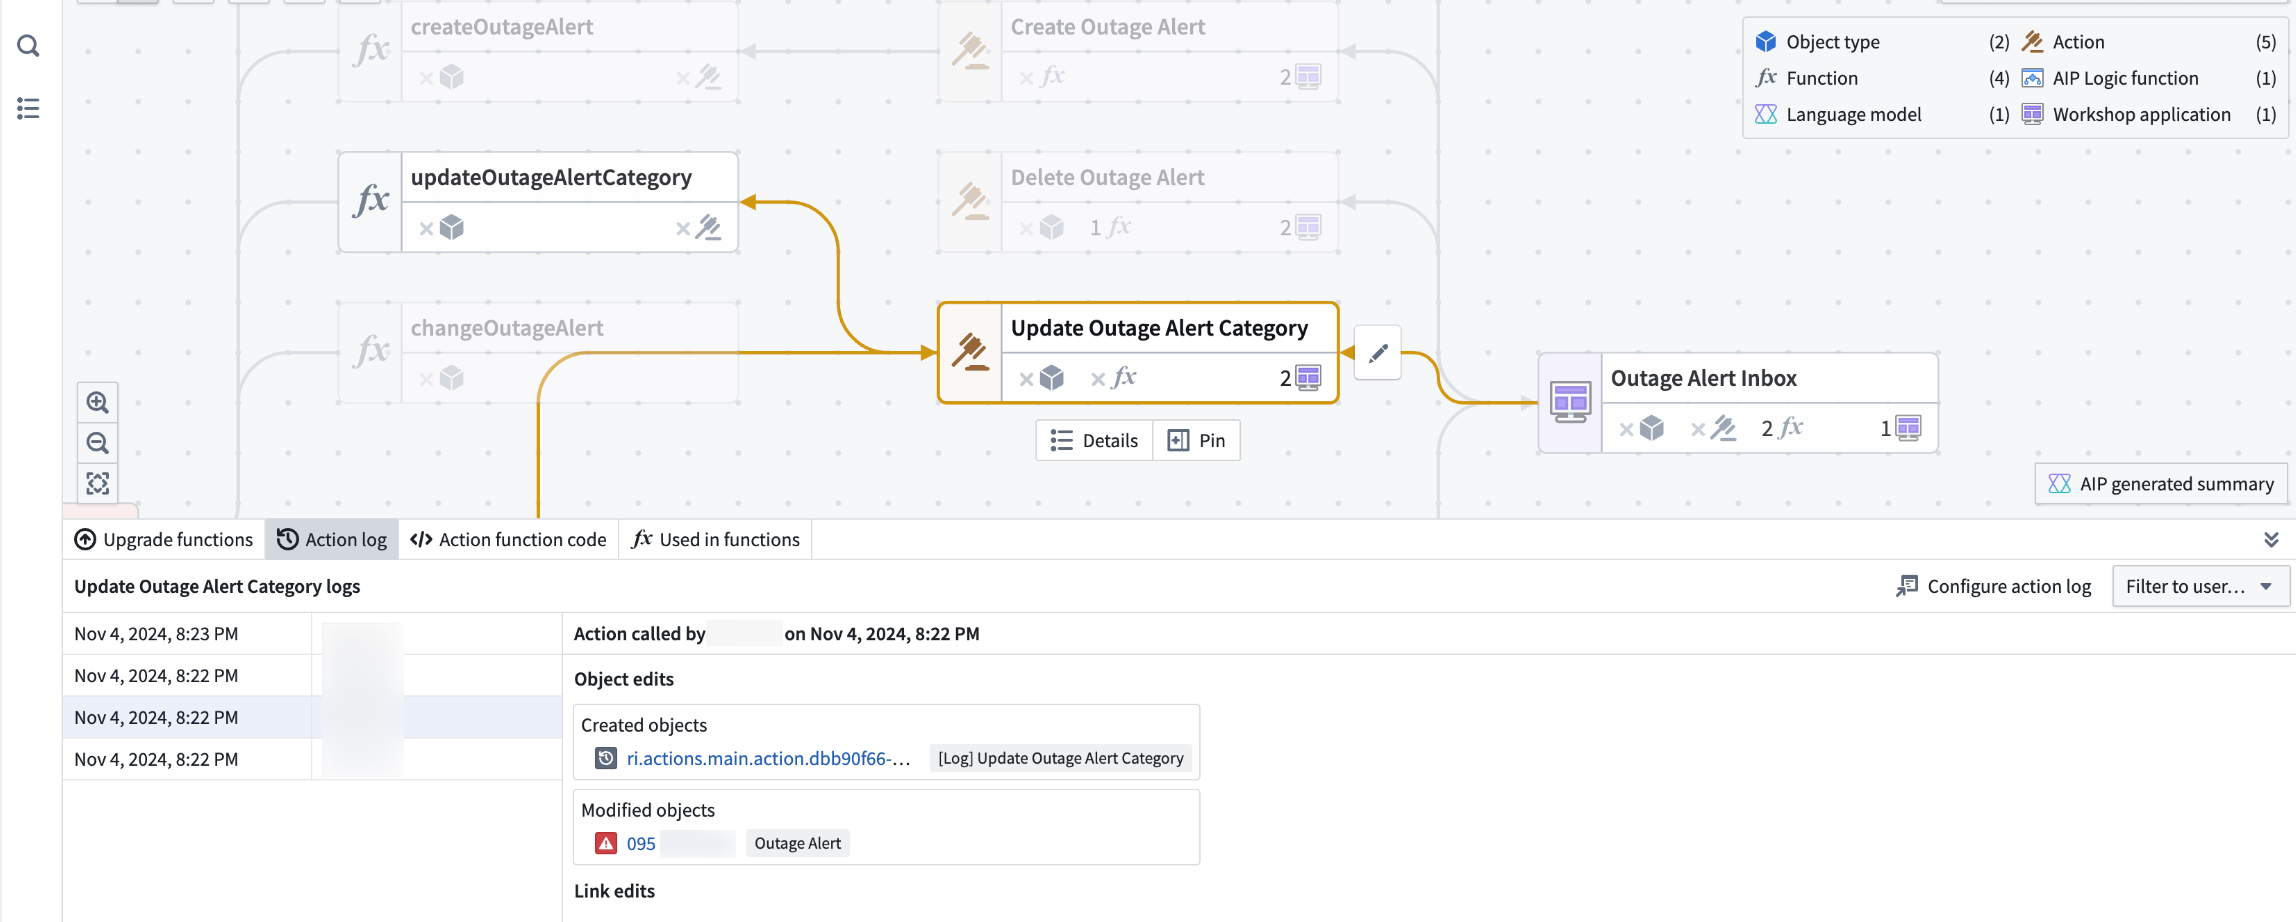
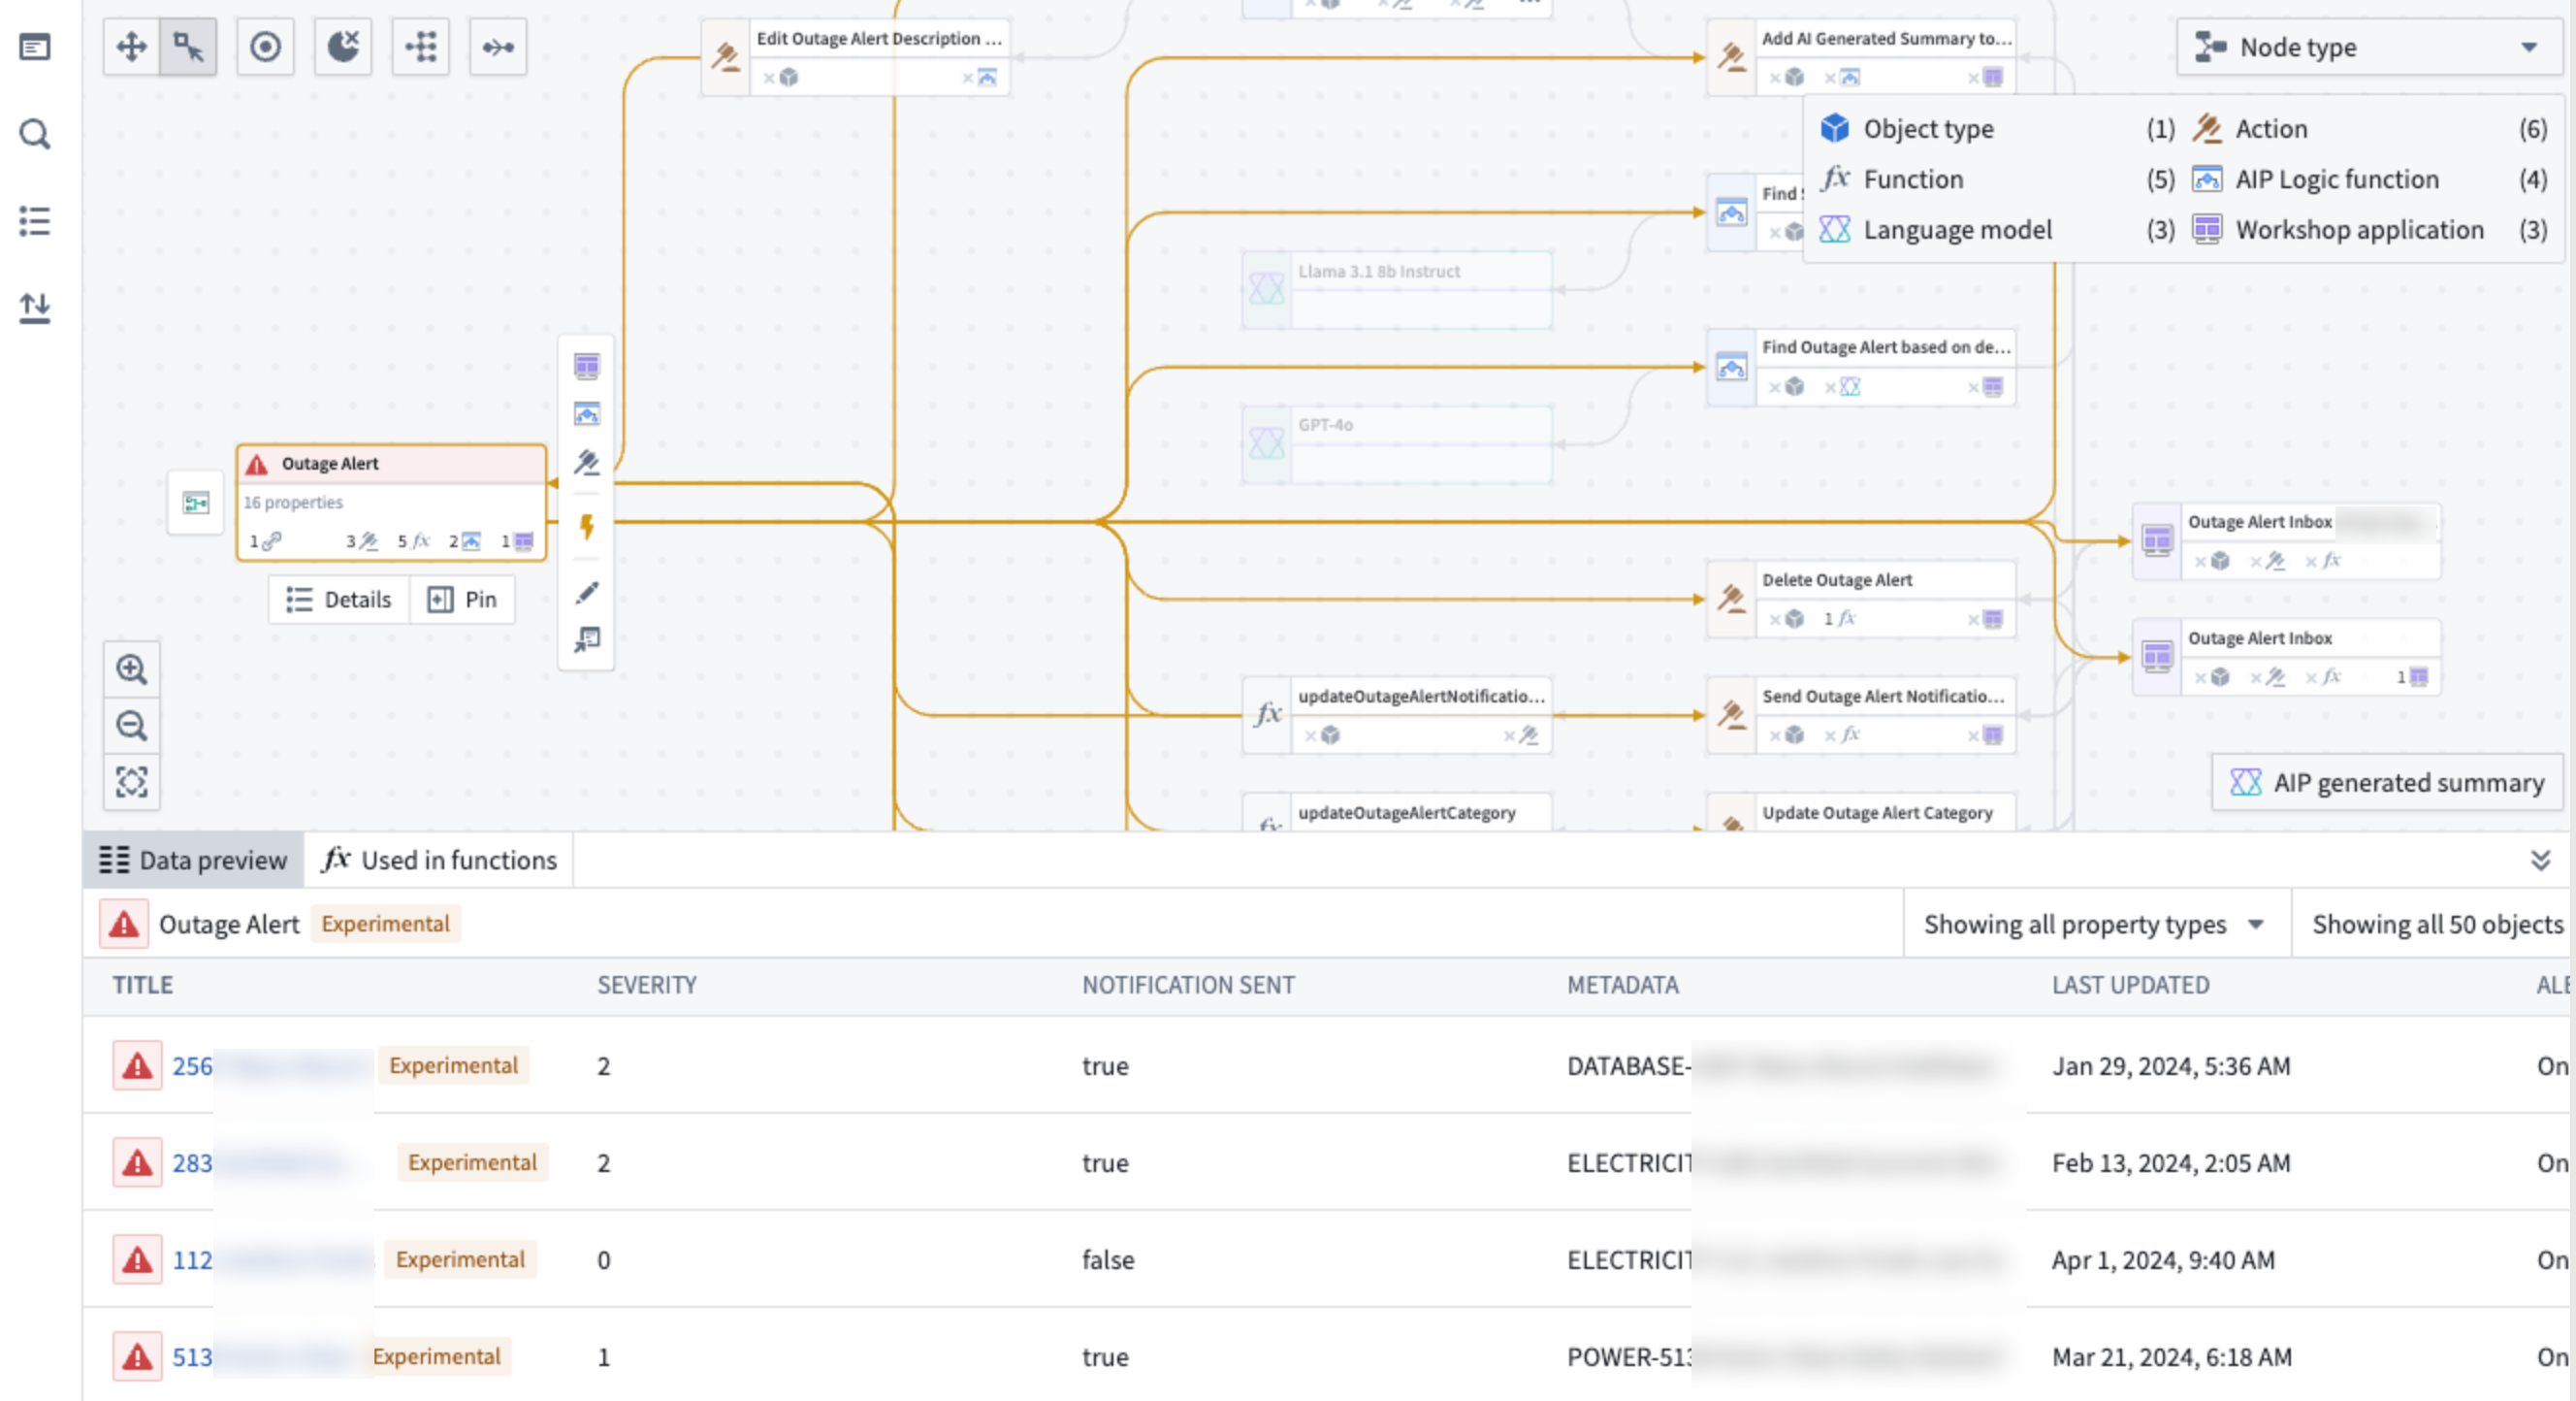
You can view the icons of each node type in the legend at the top right of the graph panel. Object type nodes are represented using the icon specified in the Ontology.
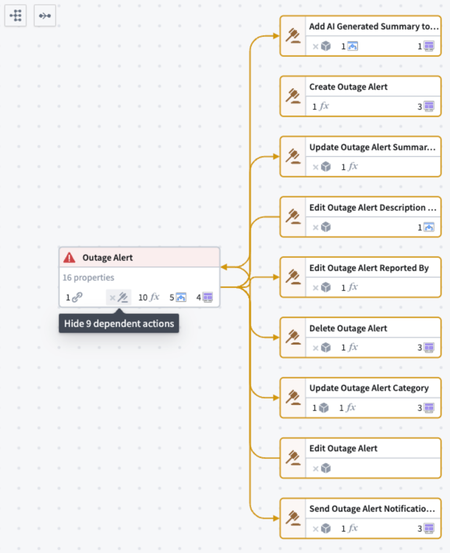
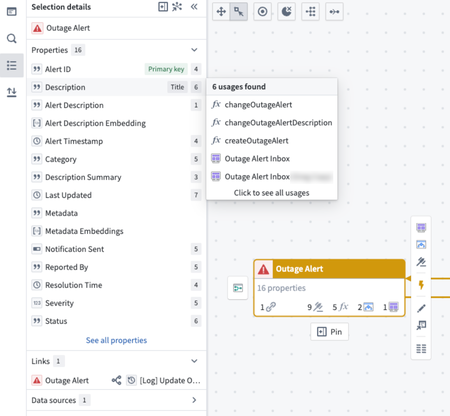
In the example below, we want to see the nine Actions dependent on the Outage Alert object. Select the same icon location inline on the object to show and hide those dependencies from view.
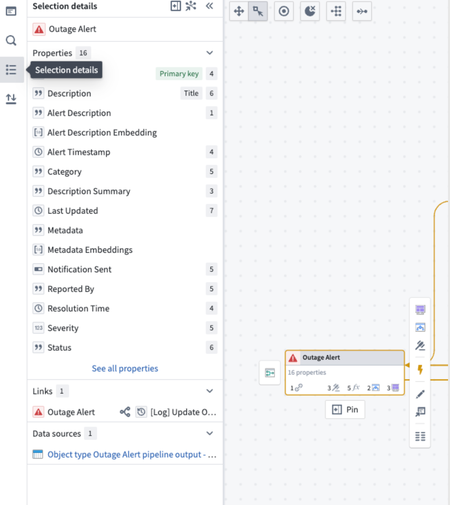
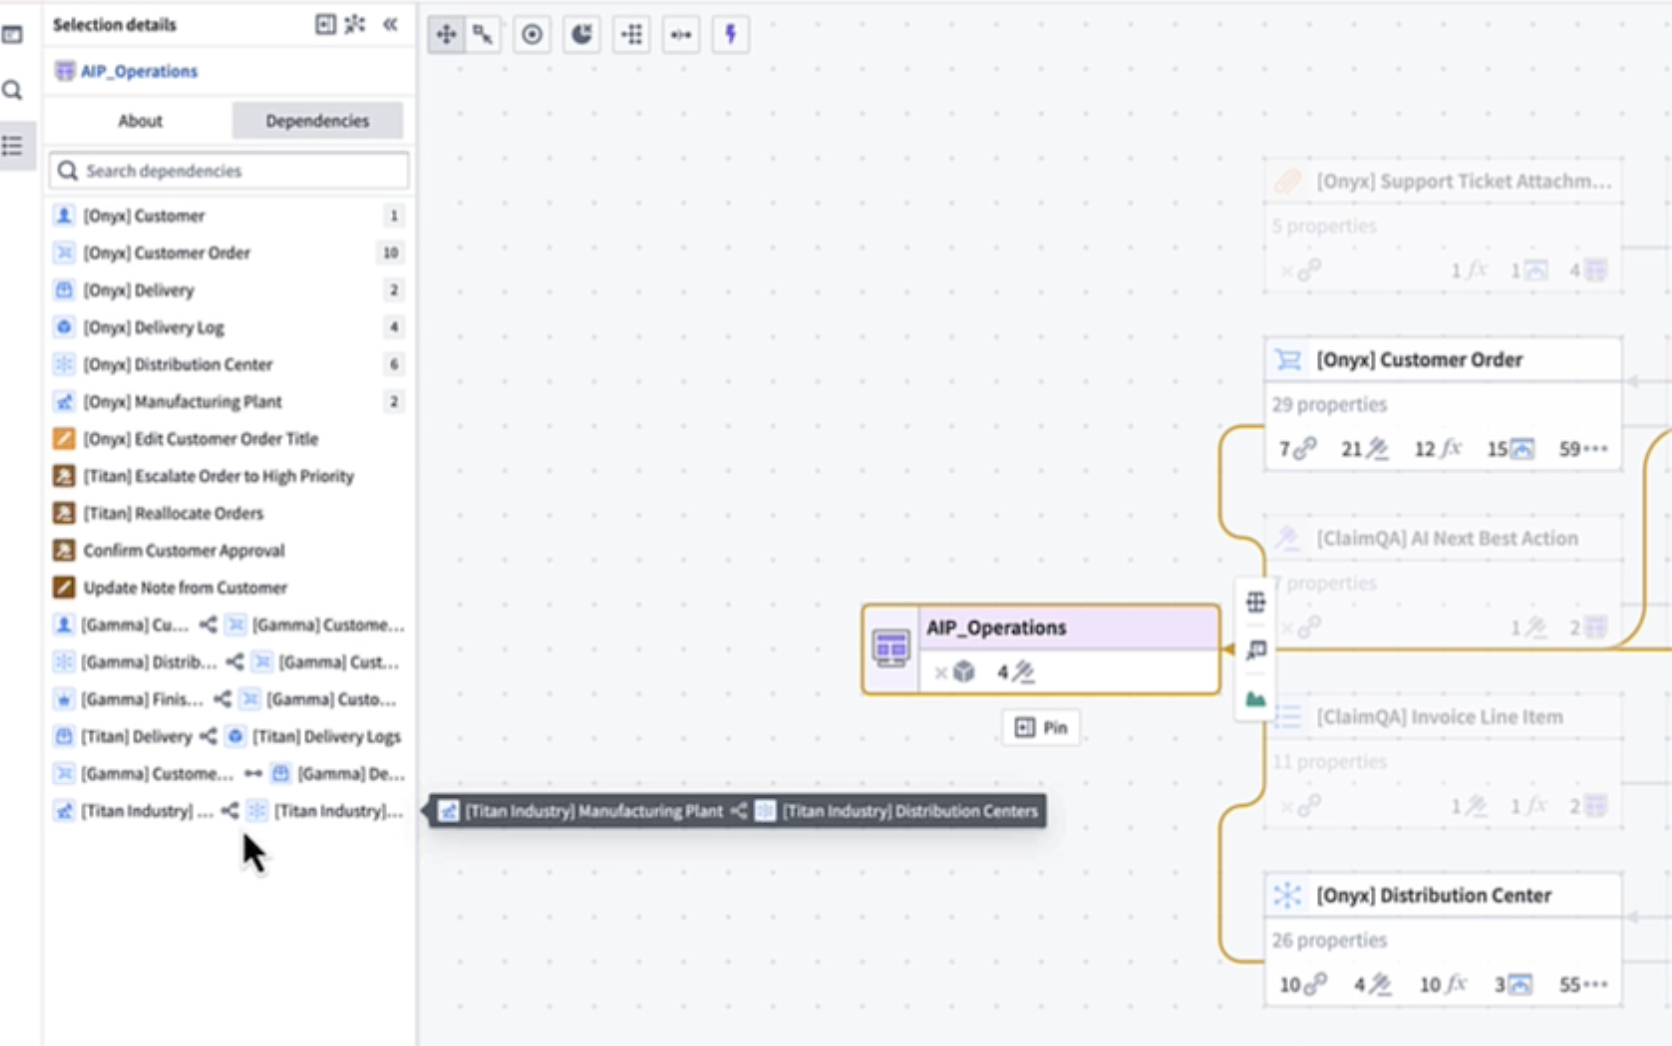
Review details of a specific node by selecting the node and then opening the selection details panel on the left side of the screen. Details displayed vary depending on the type of node selected. The following is a list of sample details that can be found for each resource:
- Objects: A list of properties and where those properties are used throughout the workflow (see property provenance linked below), linkages, backing data source, and so on.
- Object links: Resource usage by objects, Functions, Actions, Workshop applications, and more.
- Functions: Inputs, outputs, dependencies, repository, and other relevant metadata.
- Actions: API, RID, input data, Ontology edits, and submission criteria.
- AIP Logic Function: Dependencies, automations, and metadata about creation details.
- Language models: Model descriptions and metadata on model creator and context windows.
- Workshop applications: Metadata about creation and Action, Function, and object dependencies.
Additional details
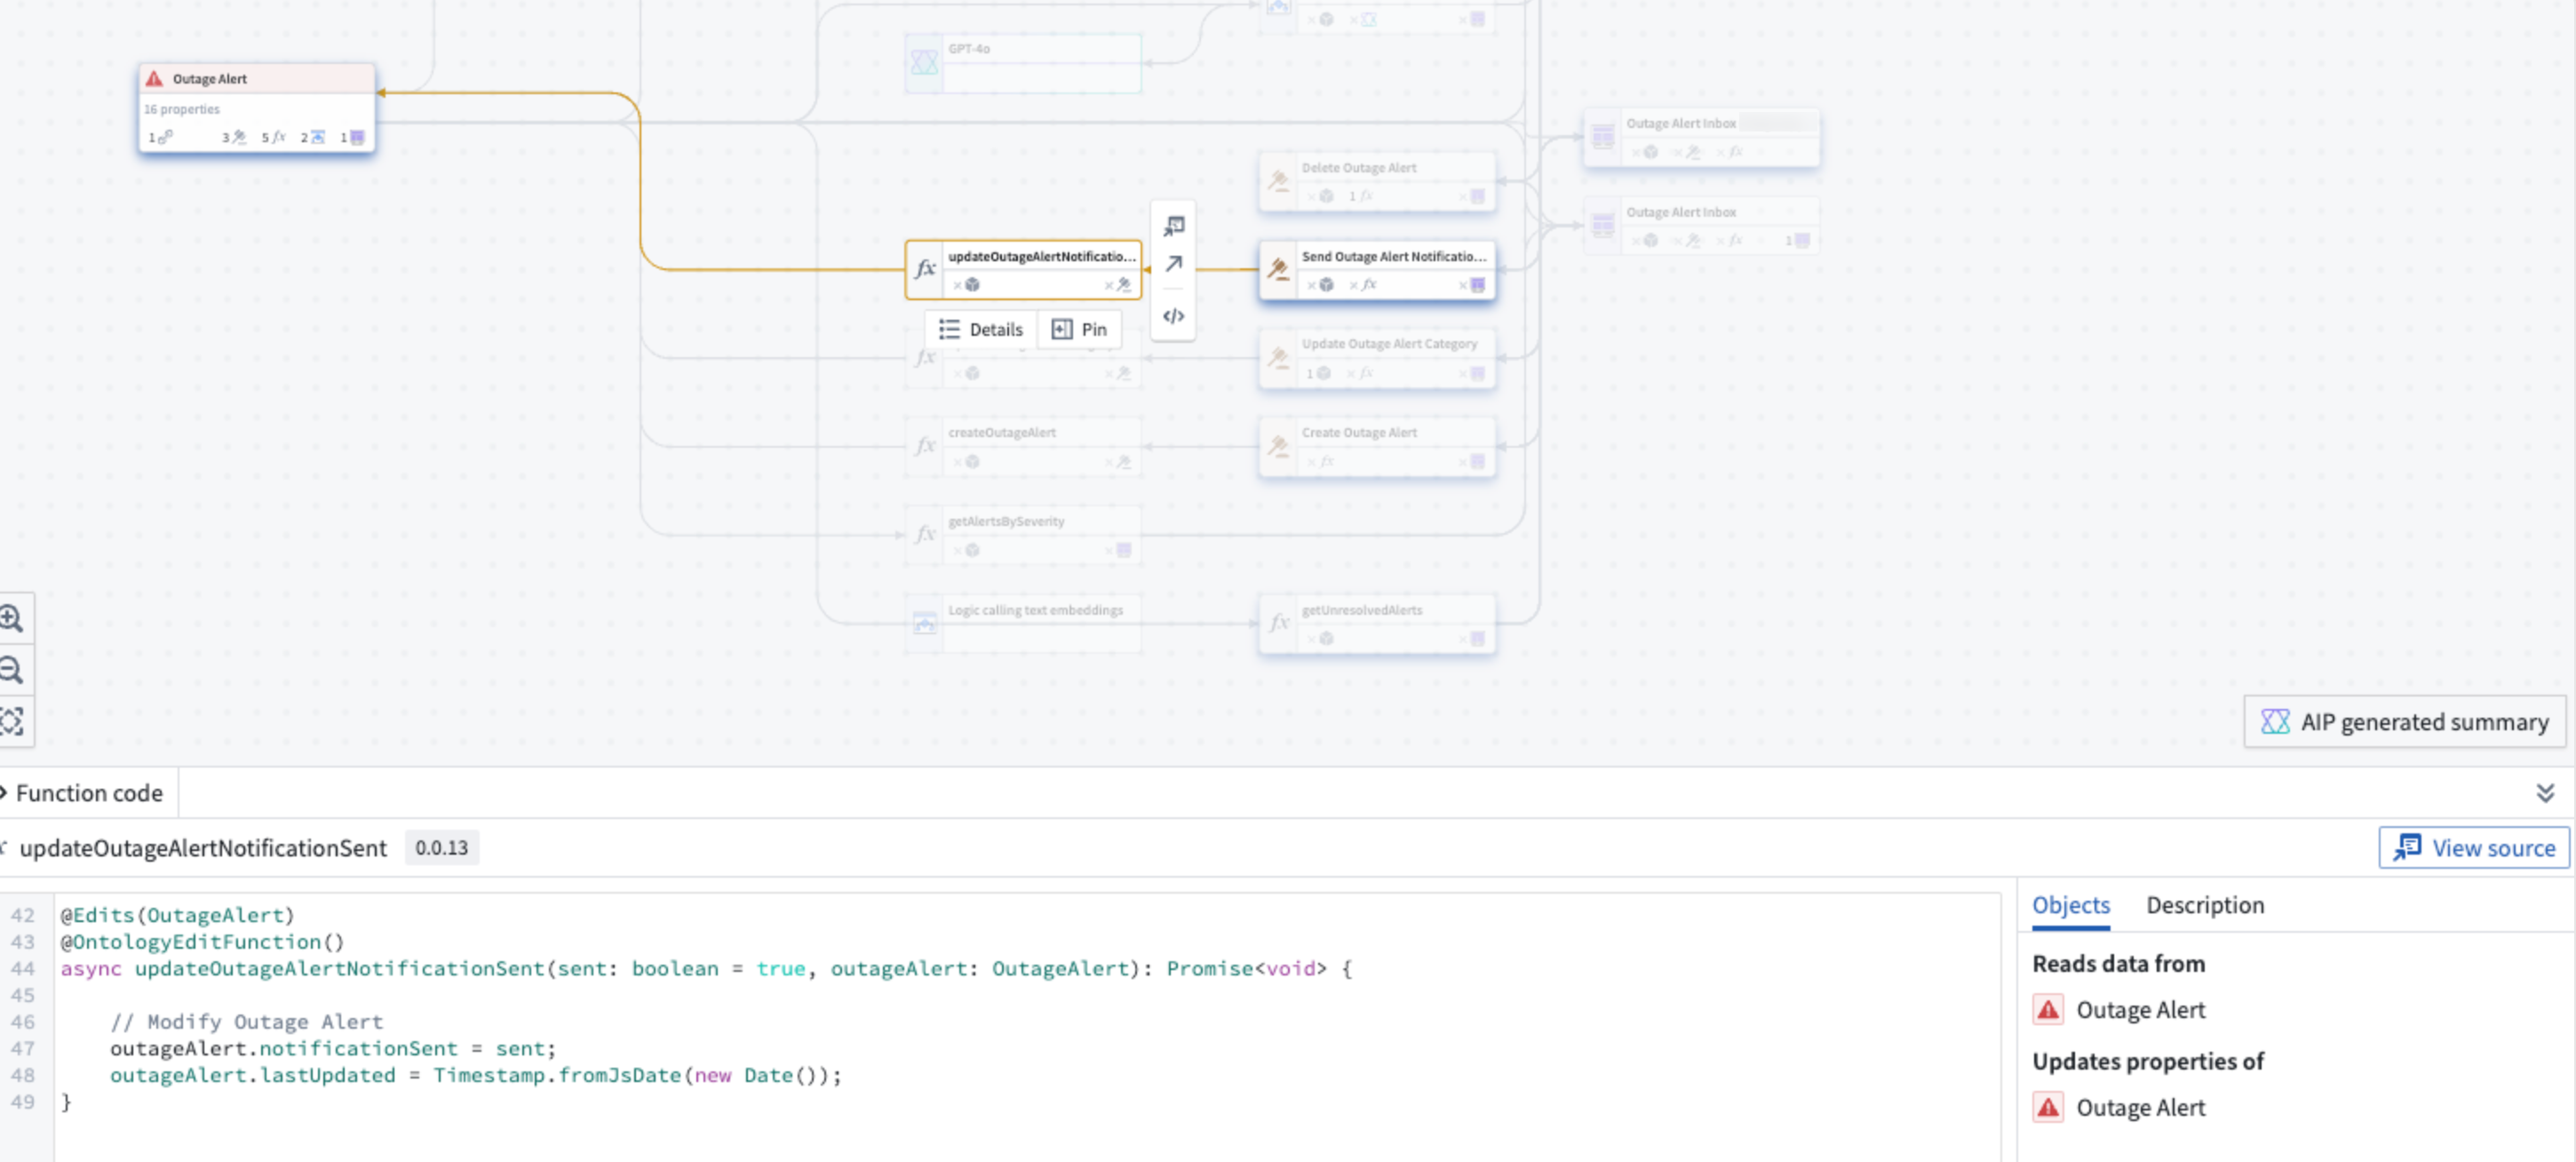
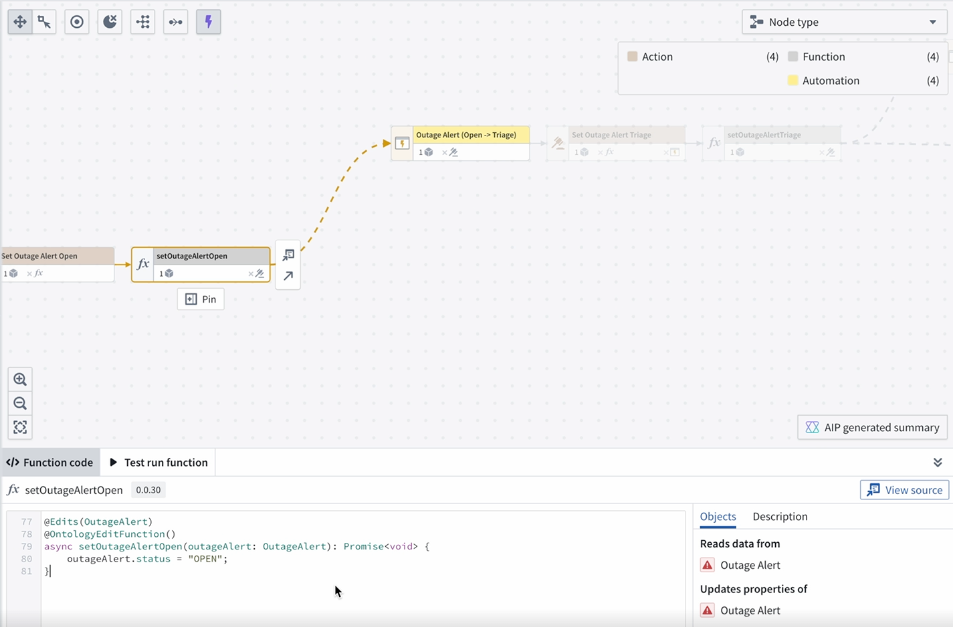
For Functions, you can view the code when you select the node. This includes the objects from which your Function reads and a description of the logic. You can also bulk upgrade Functions used in Workshop applications.
For Actions, you can view the Action function code, the Action log, and the option to upgrade the Action. You can also bulk update the submission criteria on Actions and bulk delete Actions and objects.
For objects, you can view a preview of the object data. You can also bulk delete Actions and objects.
By default, the lines denoting object links and objects that are inputs to Actions are not shown on the graph. To see these relationships, select the object nodes. You can use Cmd + A on macOS and Ctrl + A on Windows as a shortcut to select all nodes.
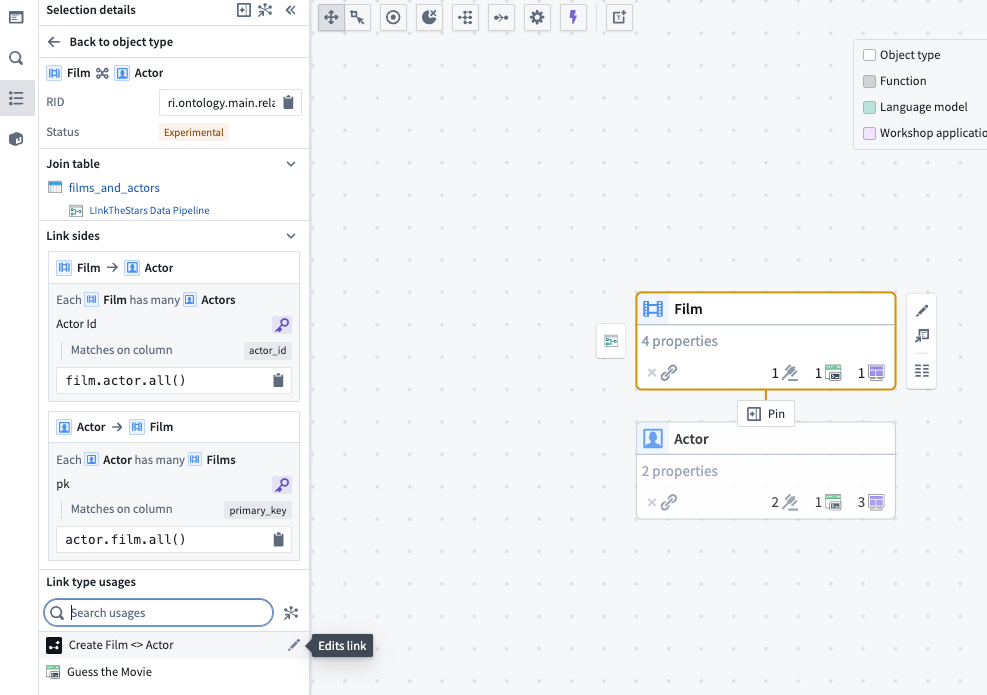
You can also view object links under the Links section of the Selection details panel. Hover over each object link to show a preview of all usages.

Select the link to view full details. If the link is being edited, a pen icon will appear next to the corresponding usage.
These links will also show up as dependencies in downstream resources.
For Automations, you can view property usages and dependencies in the Selection details sidebar. Under Condition ontology dependencies, you can see a breakdown of the specific object properties on which the automate's condition depends. Hover over the number to view the exact property.
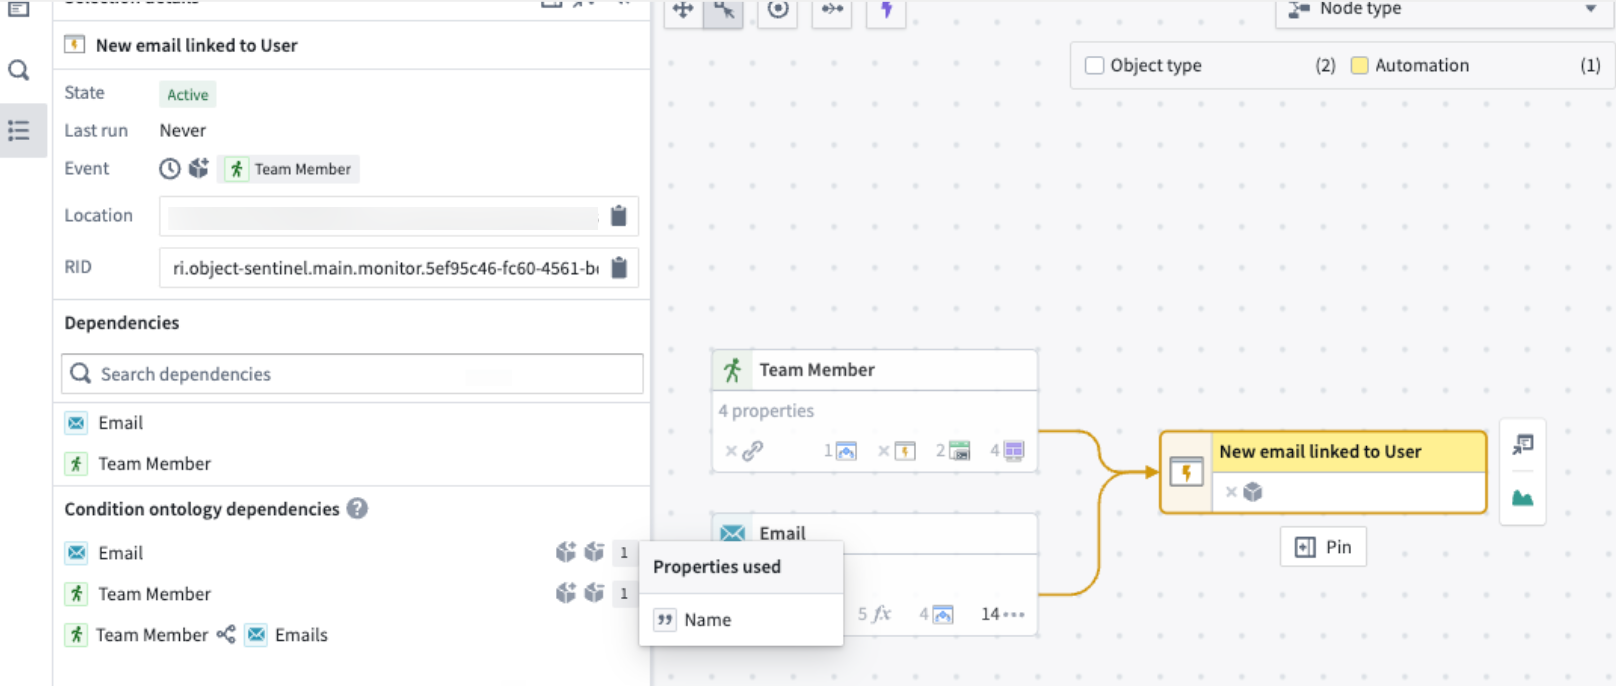
You can also toggle the purple lightning bolt button at the top left of the graph to view the Actions and Functions that trigger the automation.
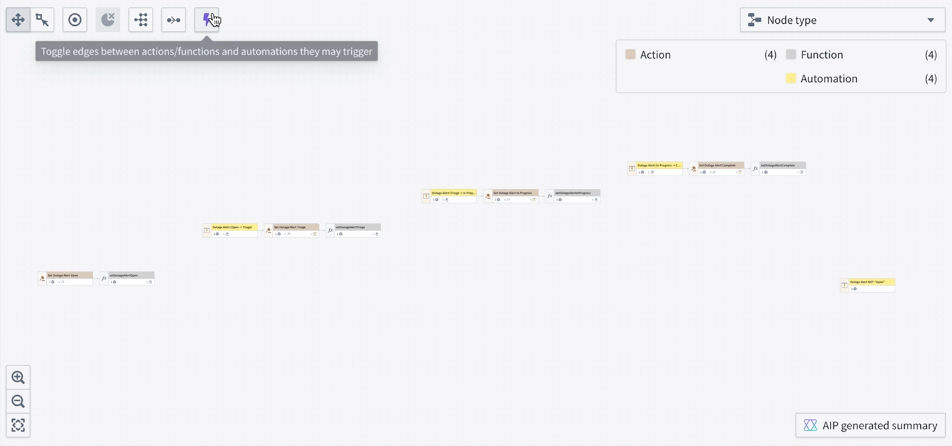
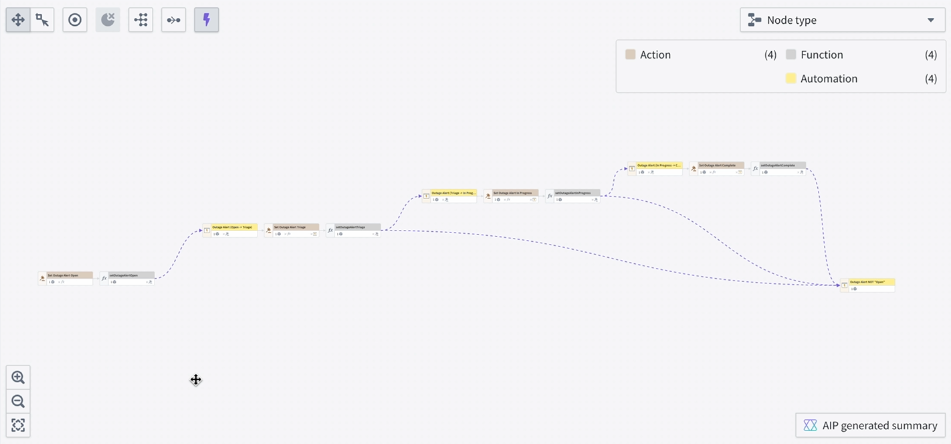
If you have an automation that triggers when a property is a specific value, Workflow Builder will find the Actions or Functions that edit that property to that value and link them to the automation.
Workshop panel
On the Workshop panel, you can select different components and view the corresponding nodes highlighted on the Workflow Builder graph.
At the bottom of the Workshop panel, the Entities section shows all backing objects and Actions used in the application. When you select a specific entity, you can view exactly where the entity is used throughout the Workshop application.
If you have multiple Workshop applications on your graph, you can use the dropdown menu at the top to toggle between Workshop application views.
To reopen the Workshop panel, select any Workshop application on the graph and press I, or double-click on the node.
Color legend
Workflow Builder provides a color legend system to help manage security and view metadata about specific applications. Examples of color legends are below:
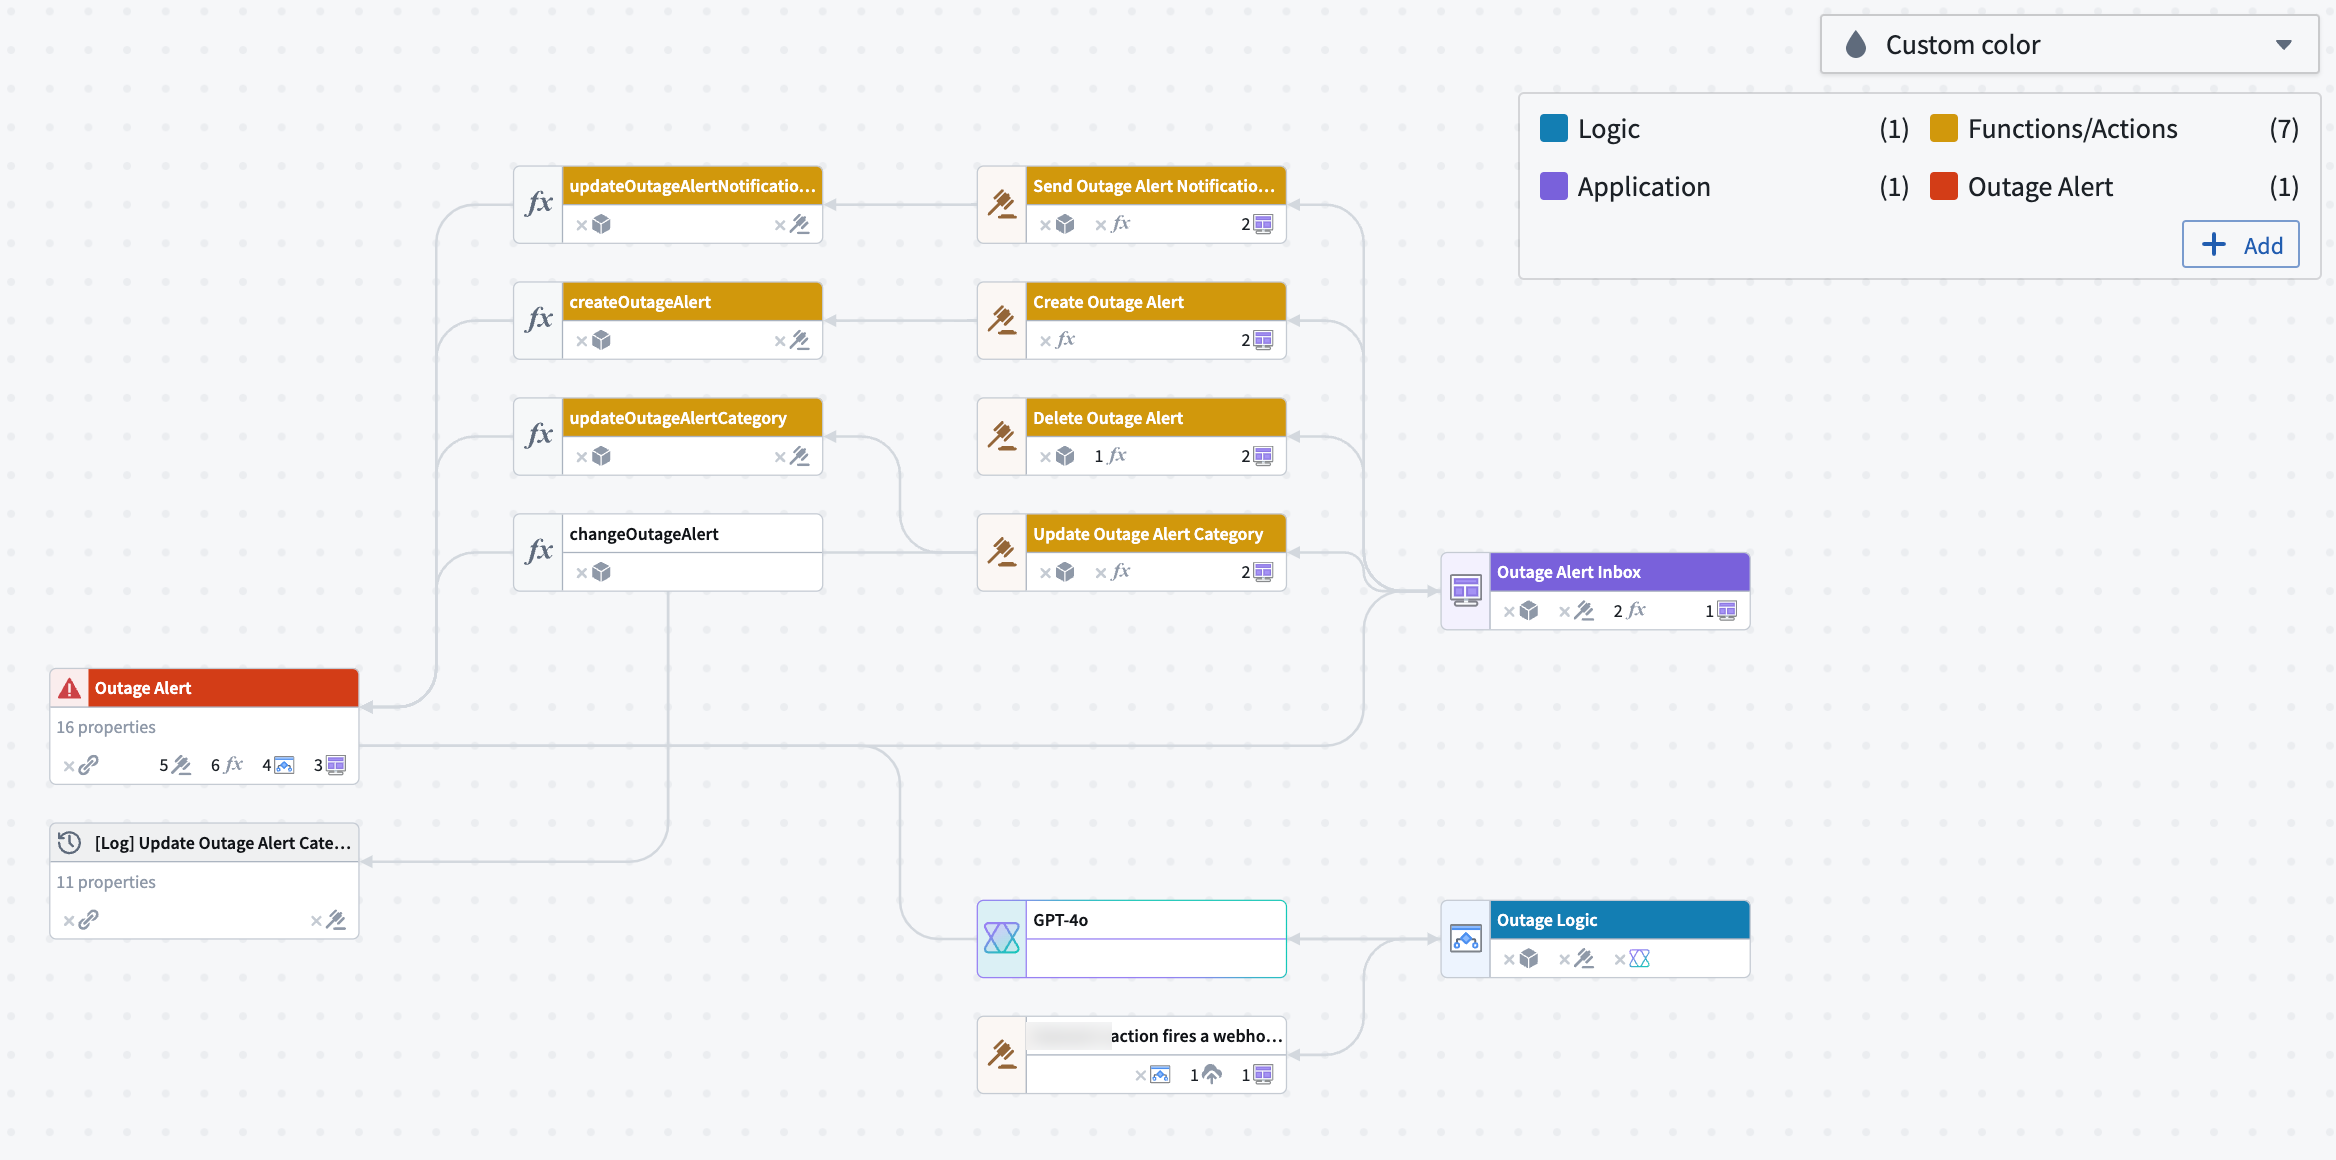
- Node type: Shows the type of resource that each node represents on your graph.
- Custom color: Adds colors into the legend by right-clicking nodes to create a new color group, selecting an existing one, or dragging colors from the legend onto nodes.
- Ontology permissions: Review the Managing security section.
- Resource permissions: Review the Managing security section.
- Application views: Colors the Workshop applications based on how many views that application had over the past four weeks, in both view and edit mode.
- Out of date functions: Review the Action-backed Function upgrades section.
- Ontology status: Colors nodes based on
Active,Experimental,Deprecated,Example, andEndorsedstatuses. - Folder: Colors the nodes based on the folder each node lives in.
- Functions repository: Colors the Function nodes based on the Functions repository each node lives in.
- Model usage: Review the AIP usage metrics section.
Managing security
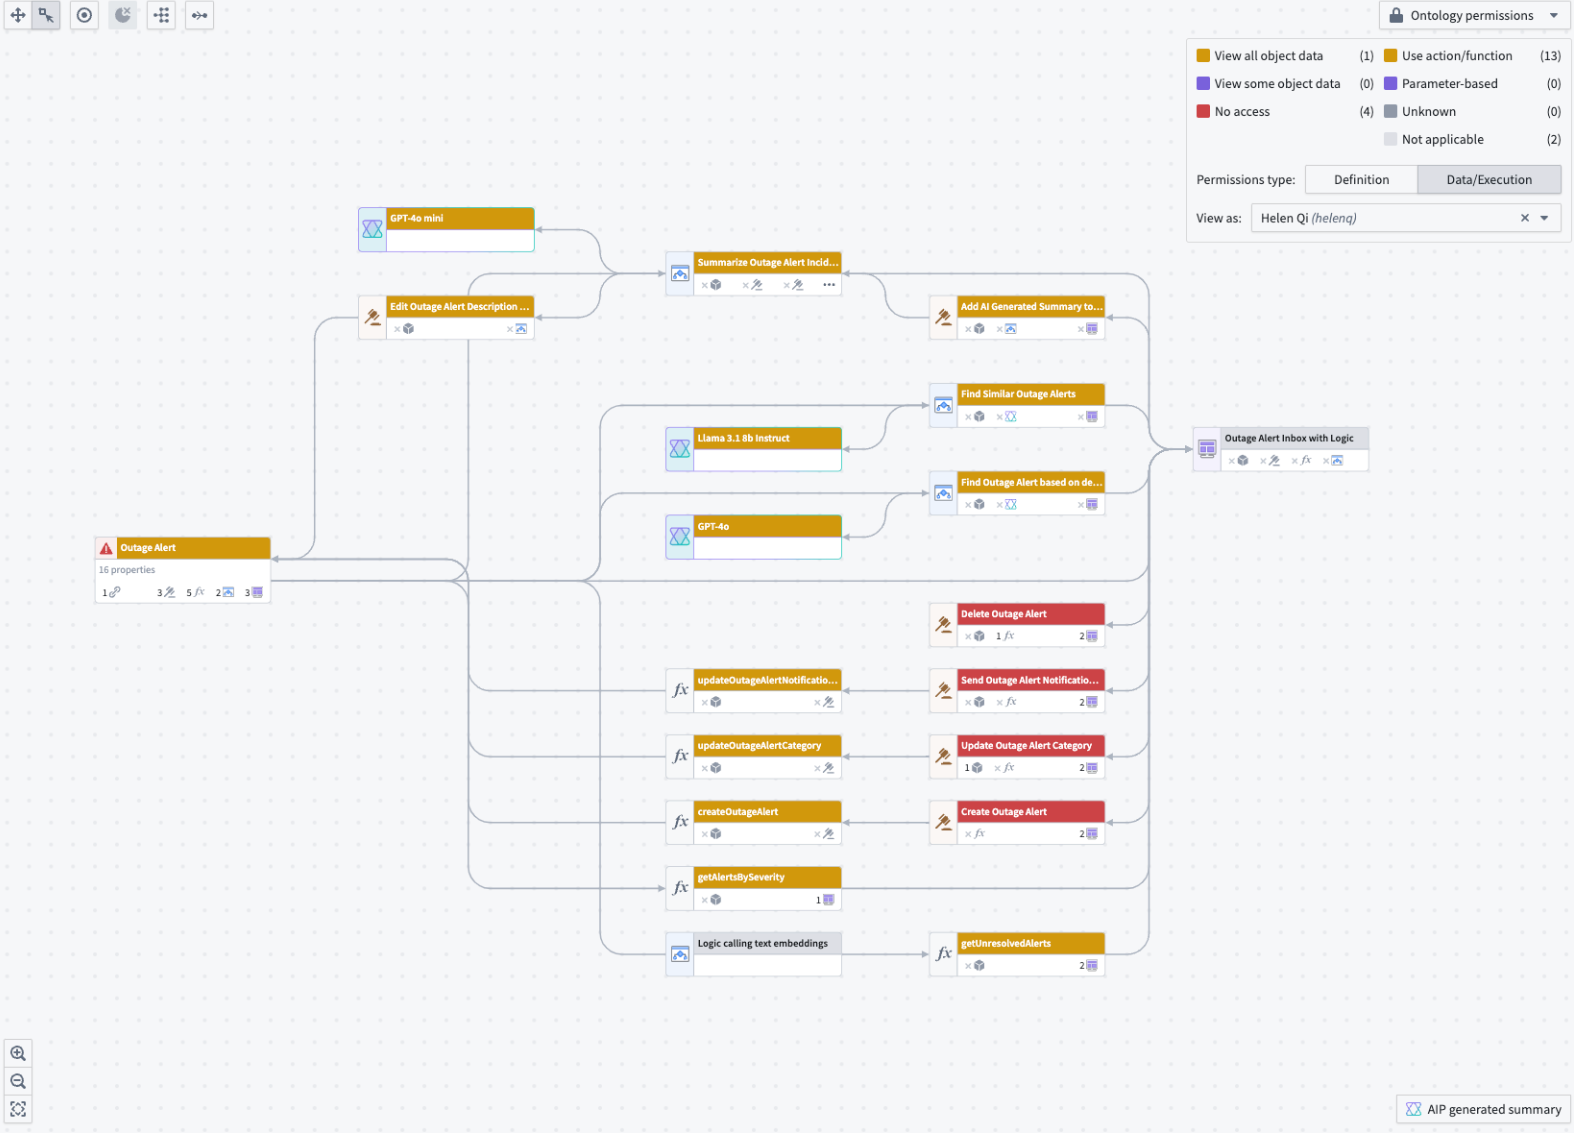
The color legend allows you to view both Ontology and resource permissions. There are two types of Ontology permissions:
- Definition: Whether or not the specified user can view or edit entity definitions.
- Data and execution: Whether or not the specified user can view object data or execute Actions.
To understand the access permissions of a specific user, you can input their username into the View as dropdown menu for a preview.
Bulk update Ontology roles on resources
Additionally, you can bulk edit ontology role permissions on objects and actions by following the steps below:
- Navigate to a resource and right-click on it, then select Edit permissions from the context menu.

This will bring you to the Edit ontology resource permissions window, displaying the selected resources.

- In the Ontology roles to grant section, search for the group that you want to add. After selecting the role, you should see it displayed next to the selected group.

-
Confirm the action by selecting Grant roles in the bottom right. A dialog will appear with the prompt,
Are you sure you want to share these resources?. -
Select Yes, share to proceed. Note that this action is immediate and cannot be undone.

AIP usage metrics
Model usage coloring
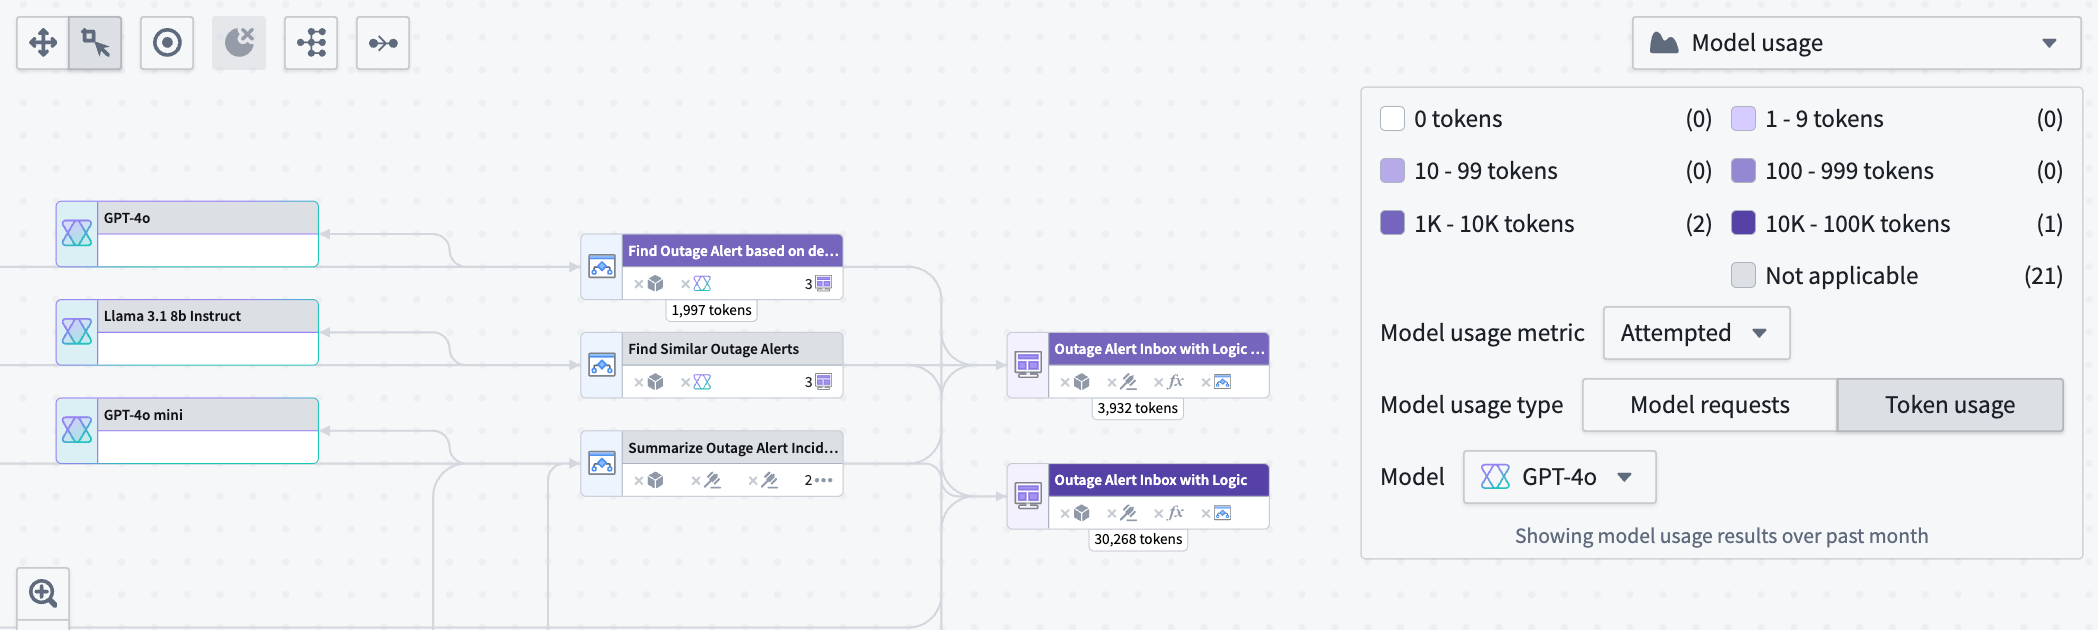
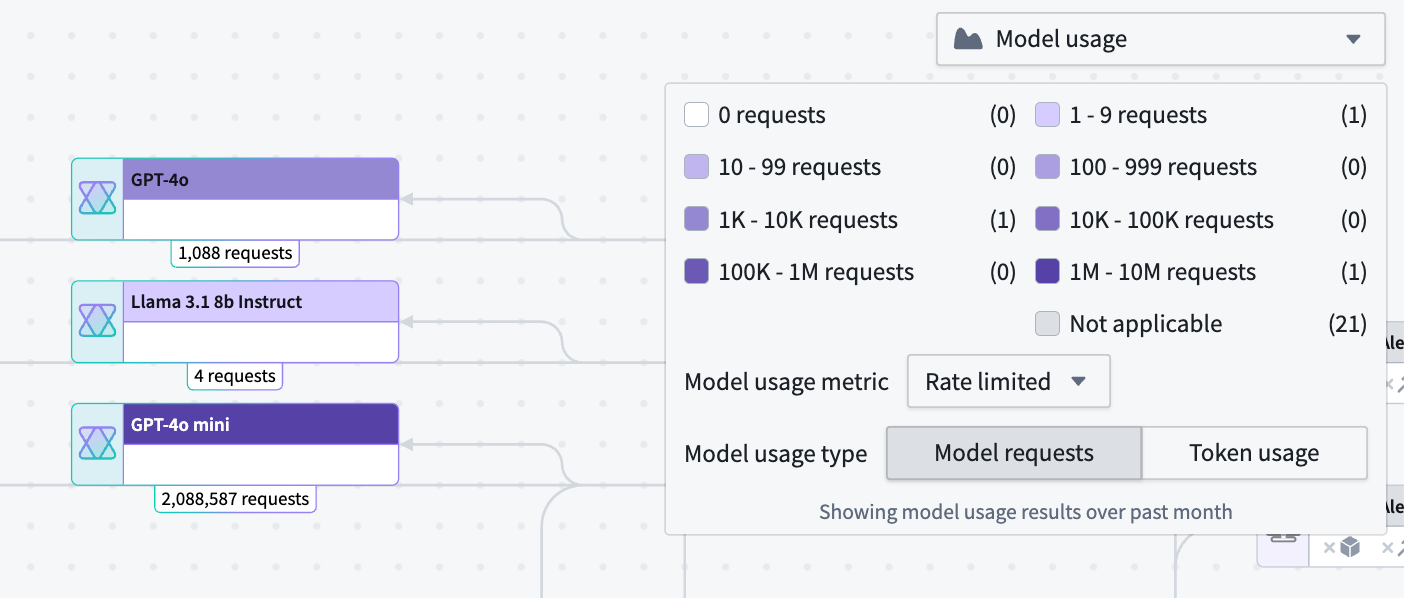
Workflow Builder also allows you to view model metrics for model requests and token usage. There are three types of model usage metrics:
- Successful: Total successful model requests or tokens used in attempts made by the specified model.
- Attempted: Total attempts made by the model, including successful and rate-limited attempts.
- Rate-limited: Total rate-limited attempts made.
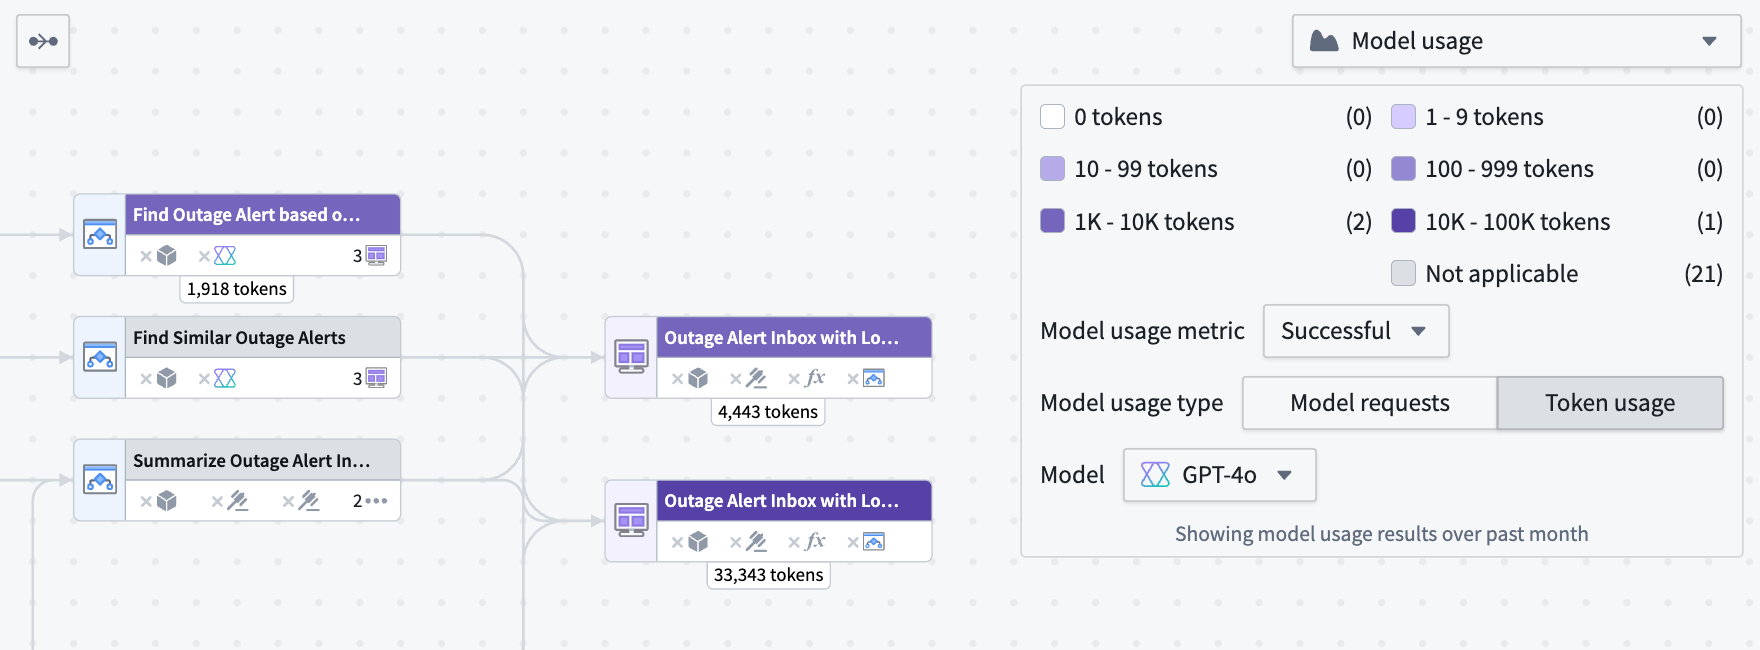
Under Model usage, specify whether you want to view Model requests or Token usage metrics.
Model requests shows the total number of specified requests on model nodes in your Workflow Builder.
Token usage shows the number of tokens used for Workshop applications, Automations, or third-party OSDK applications. Token counts on Logic nodes are the token counts used in the Logic application debugger.
Model usage charts
You can view the token usage or model requests over time for Workshop applications, Automations, and third-party applications (Ontology SDK applications) over time in a line chart by selecting the nodes and opening the Model usage charts panel at the bottom.
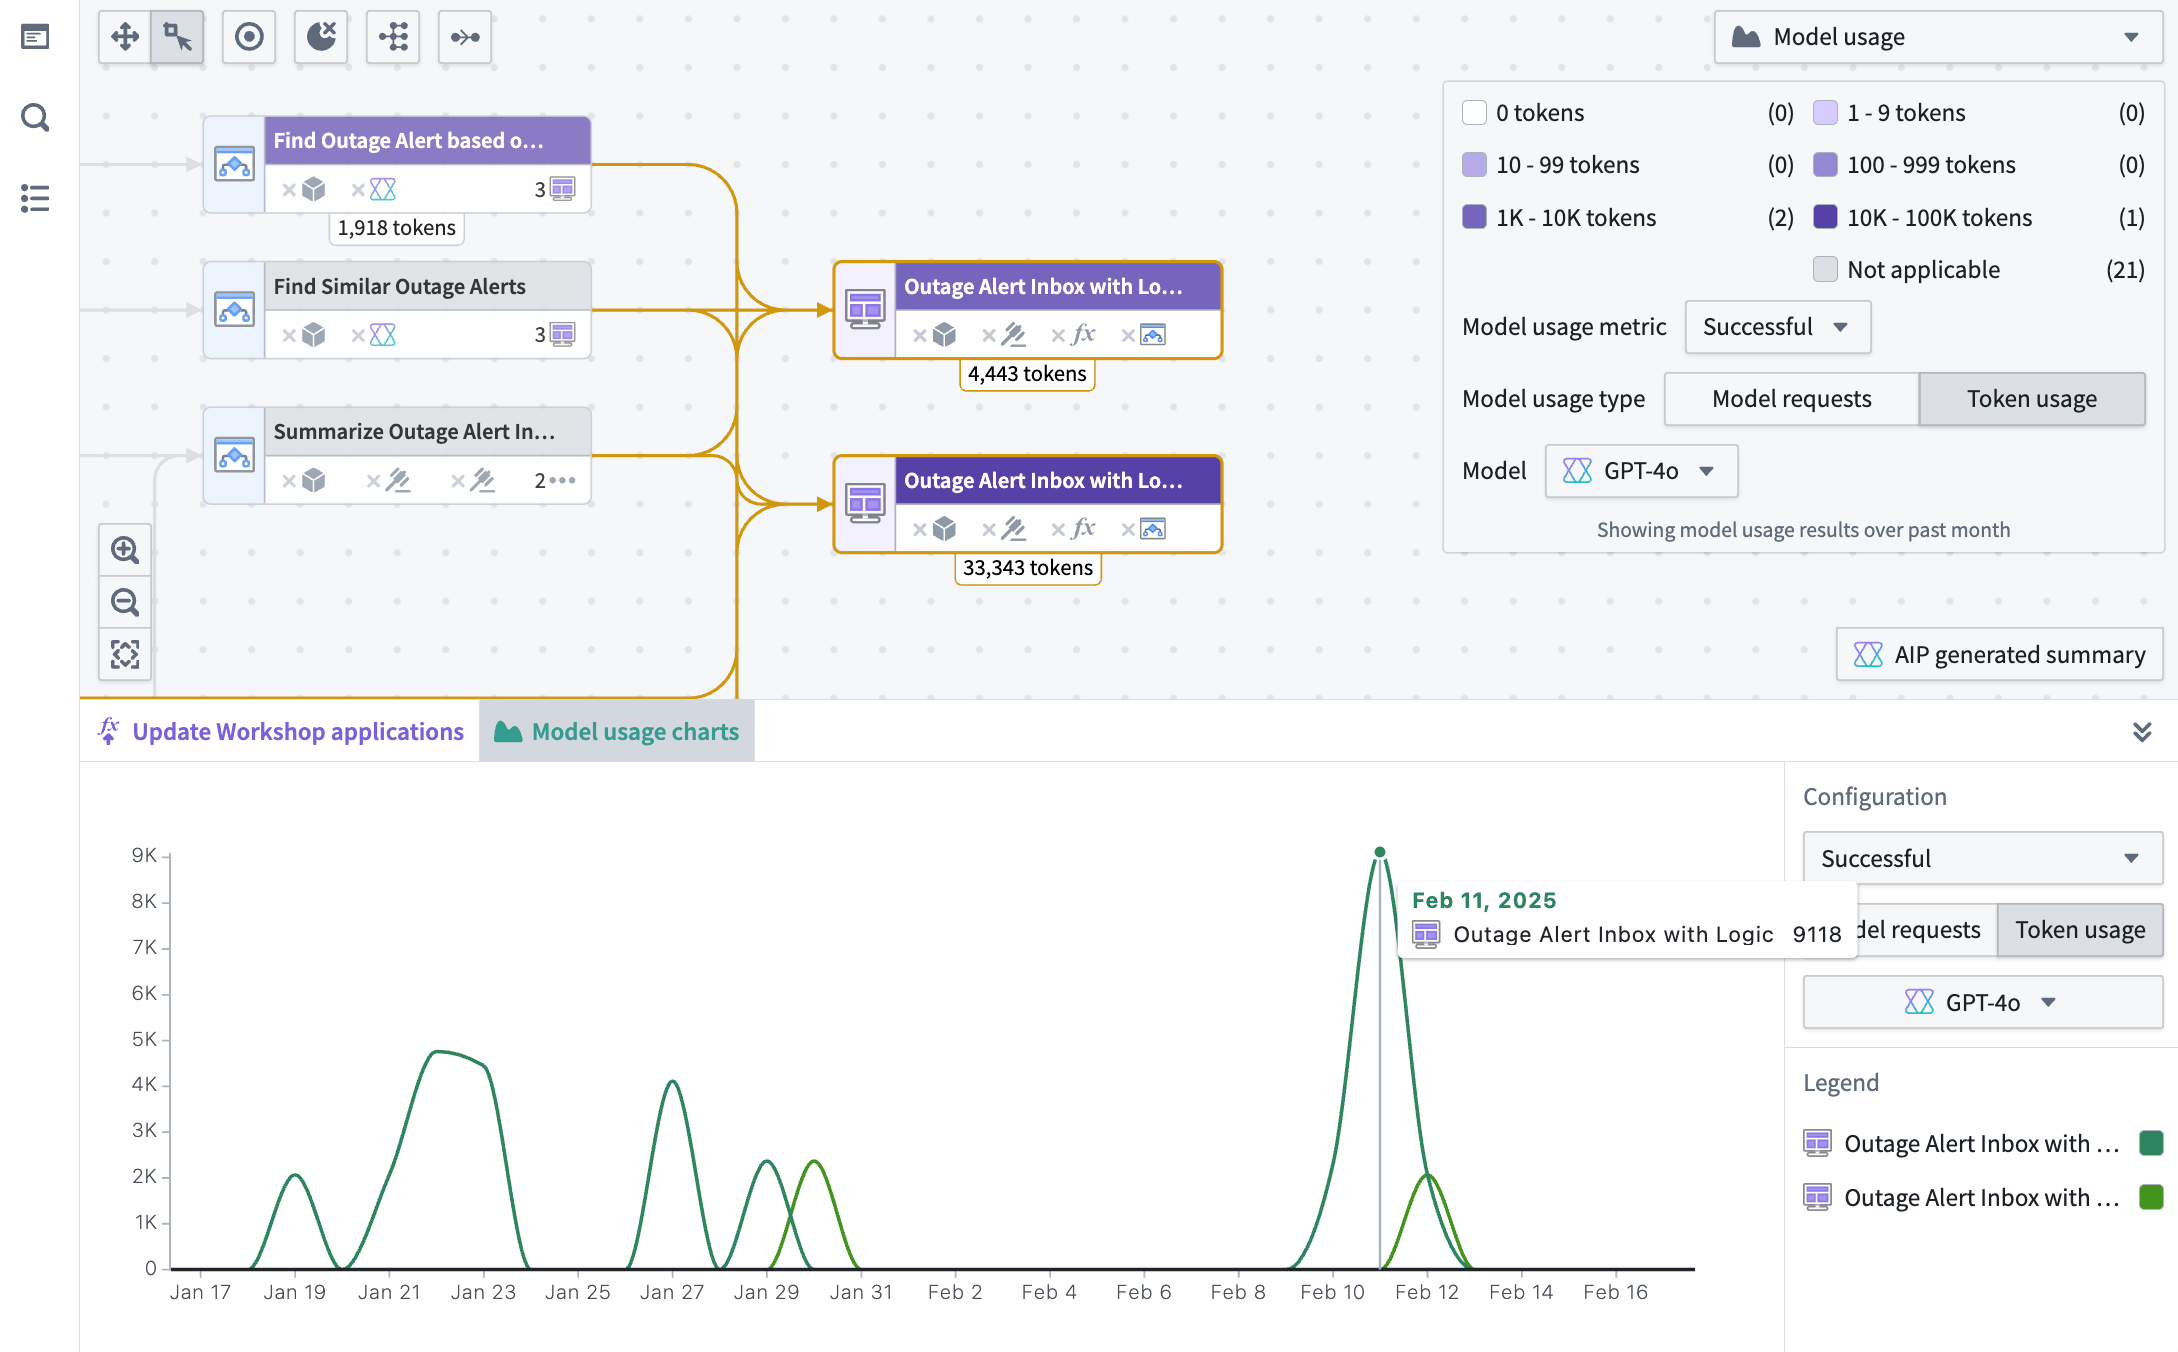
To view the specific value for a particular resource, hover over the graph itself. The same filters that are used in the color legend explained above also appear in the charts panel.
AIP Observability
Workflow Builder provides observability features to help you monitor and debug your AIP workflows. You can track execution history, visualize distributed traces, access detailed logs, and analyze performance metrics for your Functions, Actions, Language Models, and Automations.
For detailed information about AIP Observability features, see the AIP Observability documentation.
Perform refactors and understand your workflows
To help you understand and easily perform refactors in your workflow, Workflow Builder provides a simple way for you to understand attached properties, update outdated variables and Action-backed Functions, or bulk edit submission criteria on Actions.
Property provenance
You can track the usage of each property within any object throughout your entire workflow. Select the object on the graph, and view the Selection details panel on the left to see where each property is being used.
The number shown next to each property refers to the amount of functions, Actions, linkages, Workshop applications, and more depending on the context.
Function-backed Action upgrades
To identify and upgrade outdated function-backed Actions, begin by navigating to the color legend. From there, select the Out-of-date functions option. This Action will highlight all the outdated functions in red, giving you a clear visual indication. Next, choose the specific Actions for which you wish to upgrade the backing function. Upon selection, any outdated Actions related to your choice will appear in the panel located at the bottom of the screen for further action.
If an Action is configured with an Action log and the new Function version edits a new object type, that Action cannot be updated in Workflow Builder and must be upgraded in Ontology Manager.
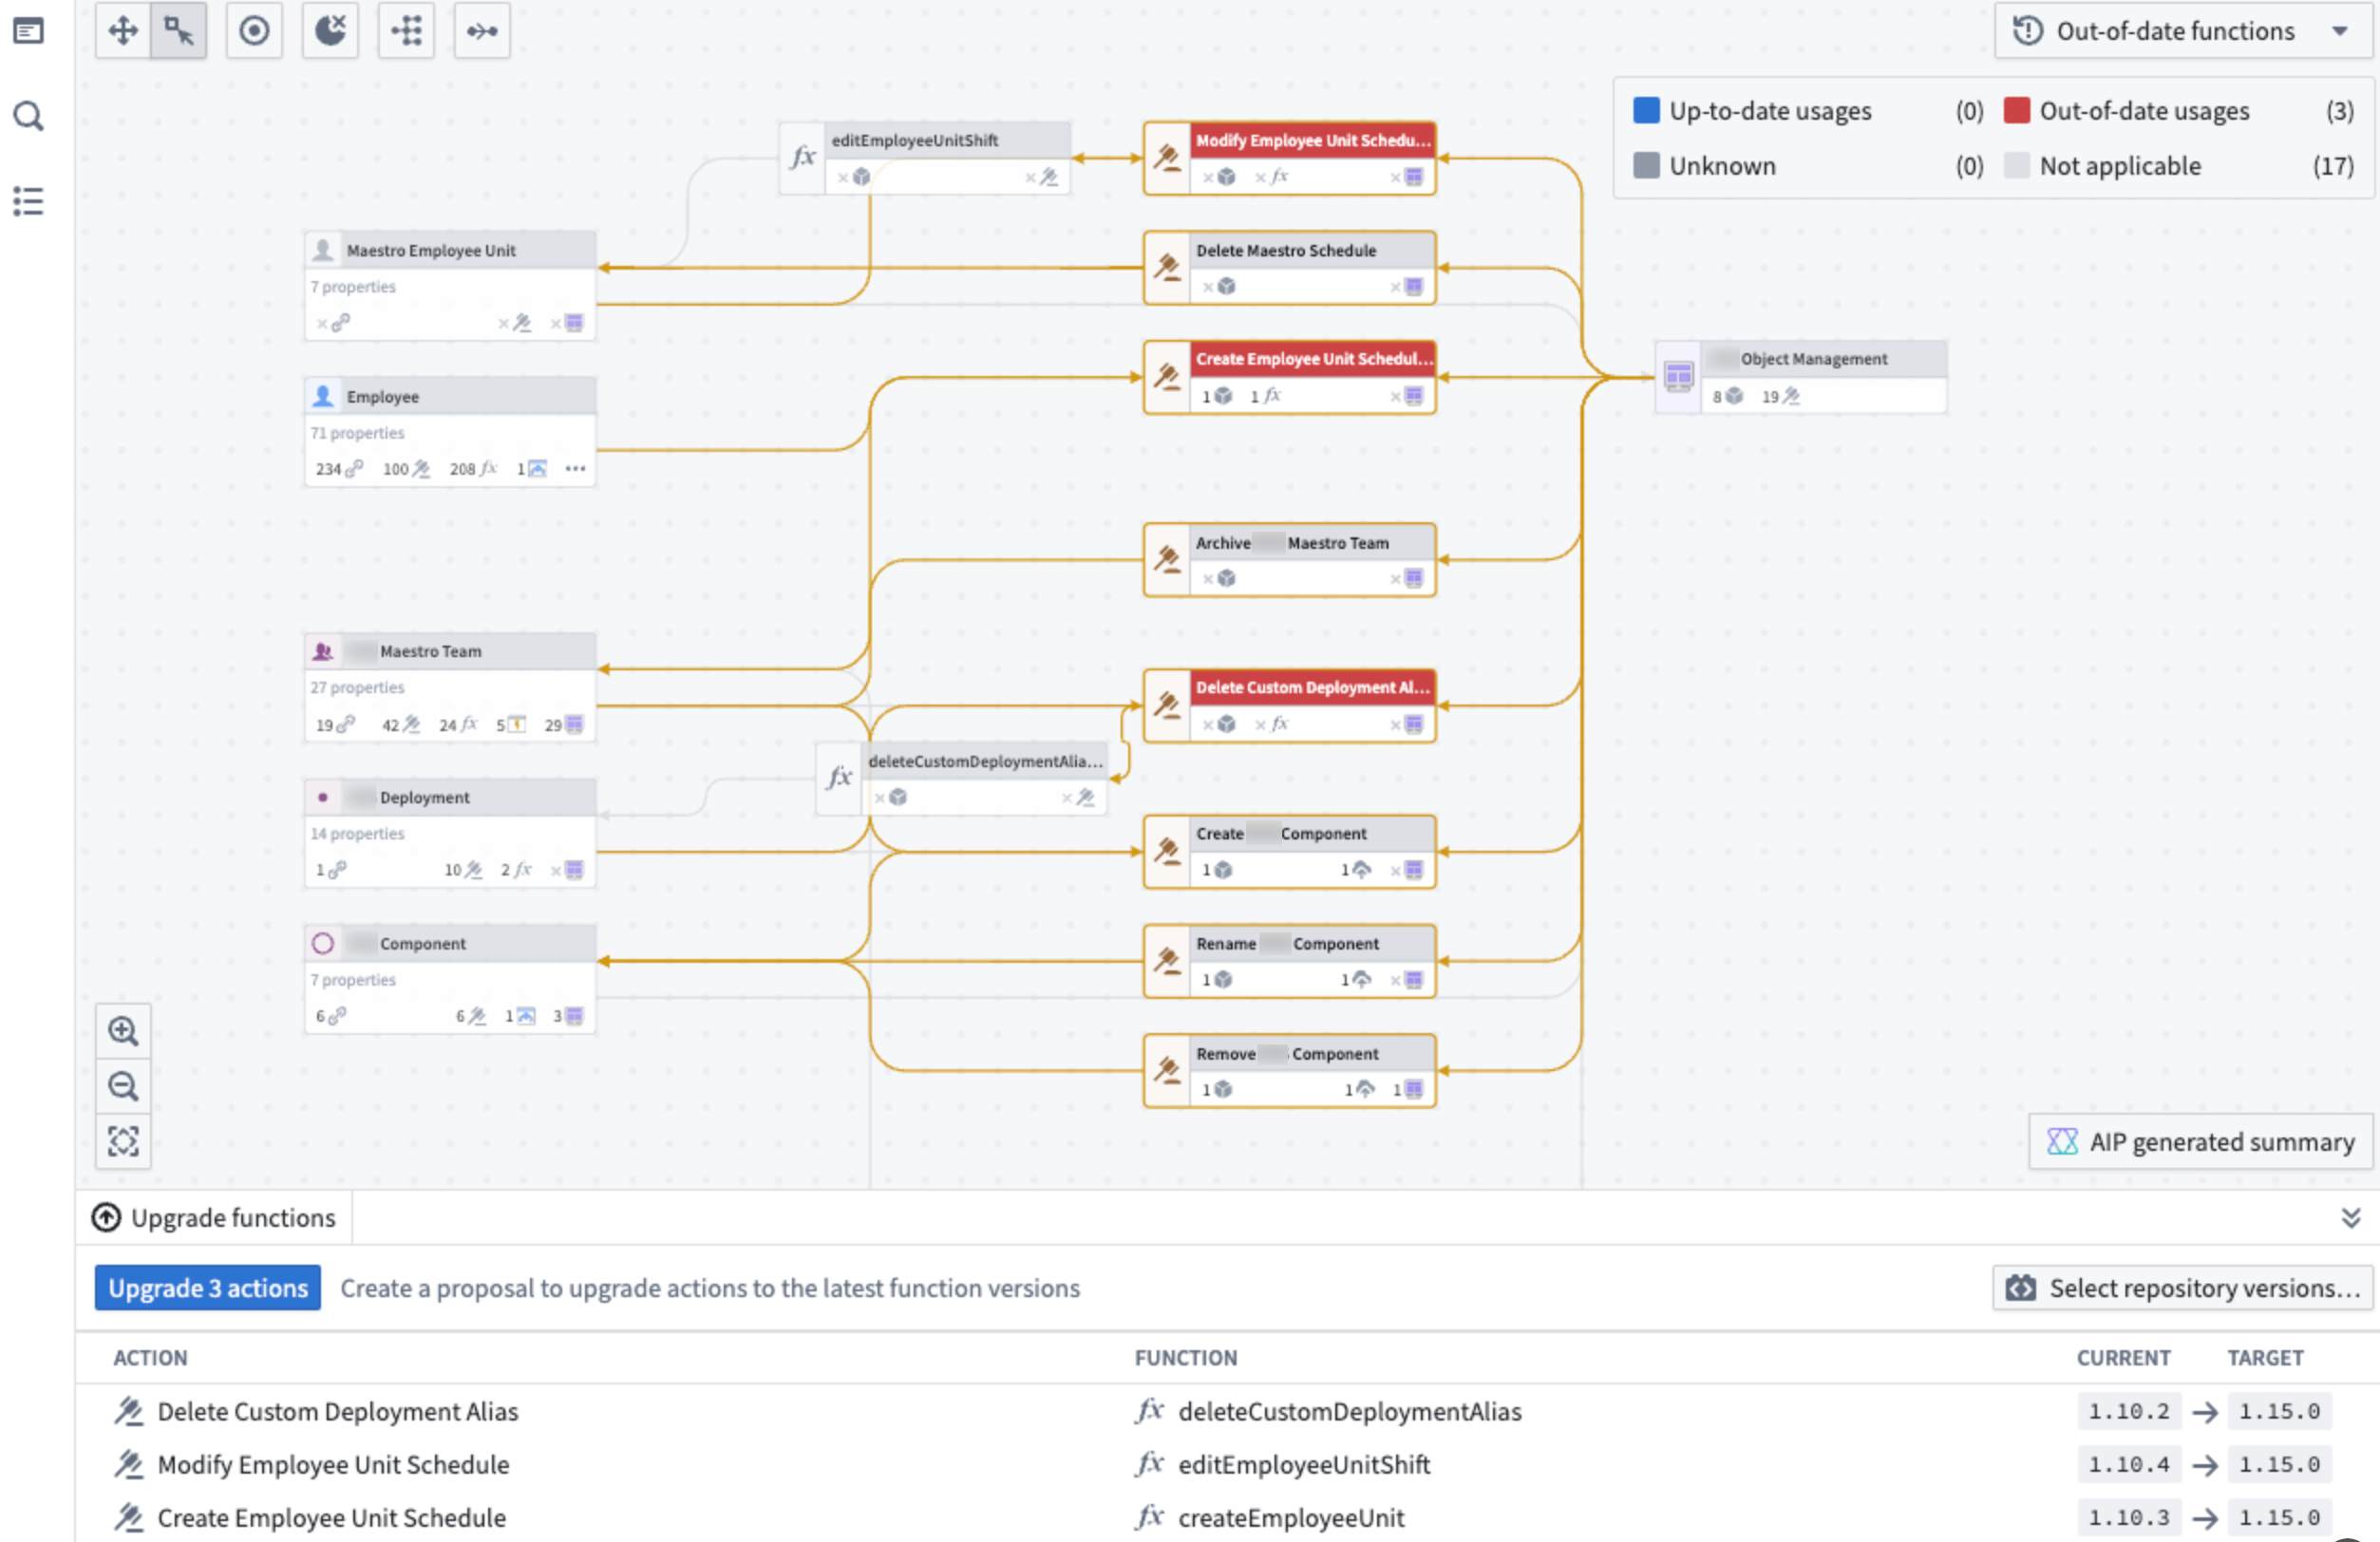
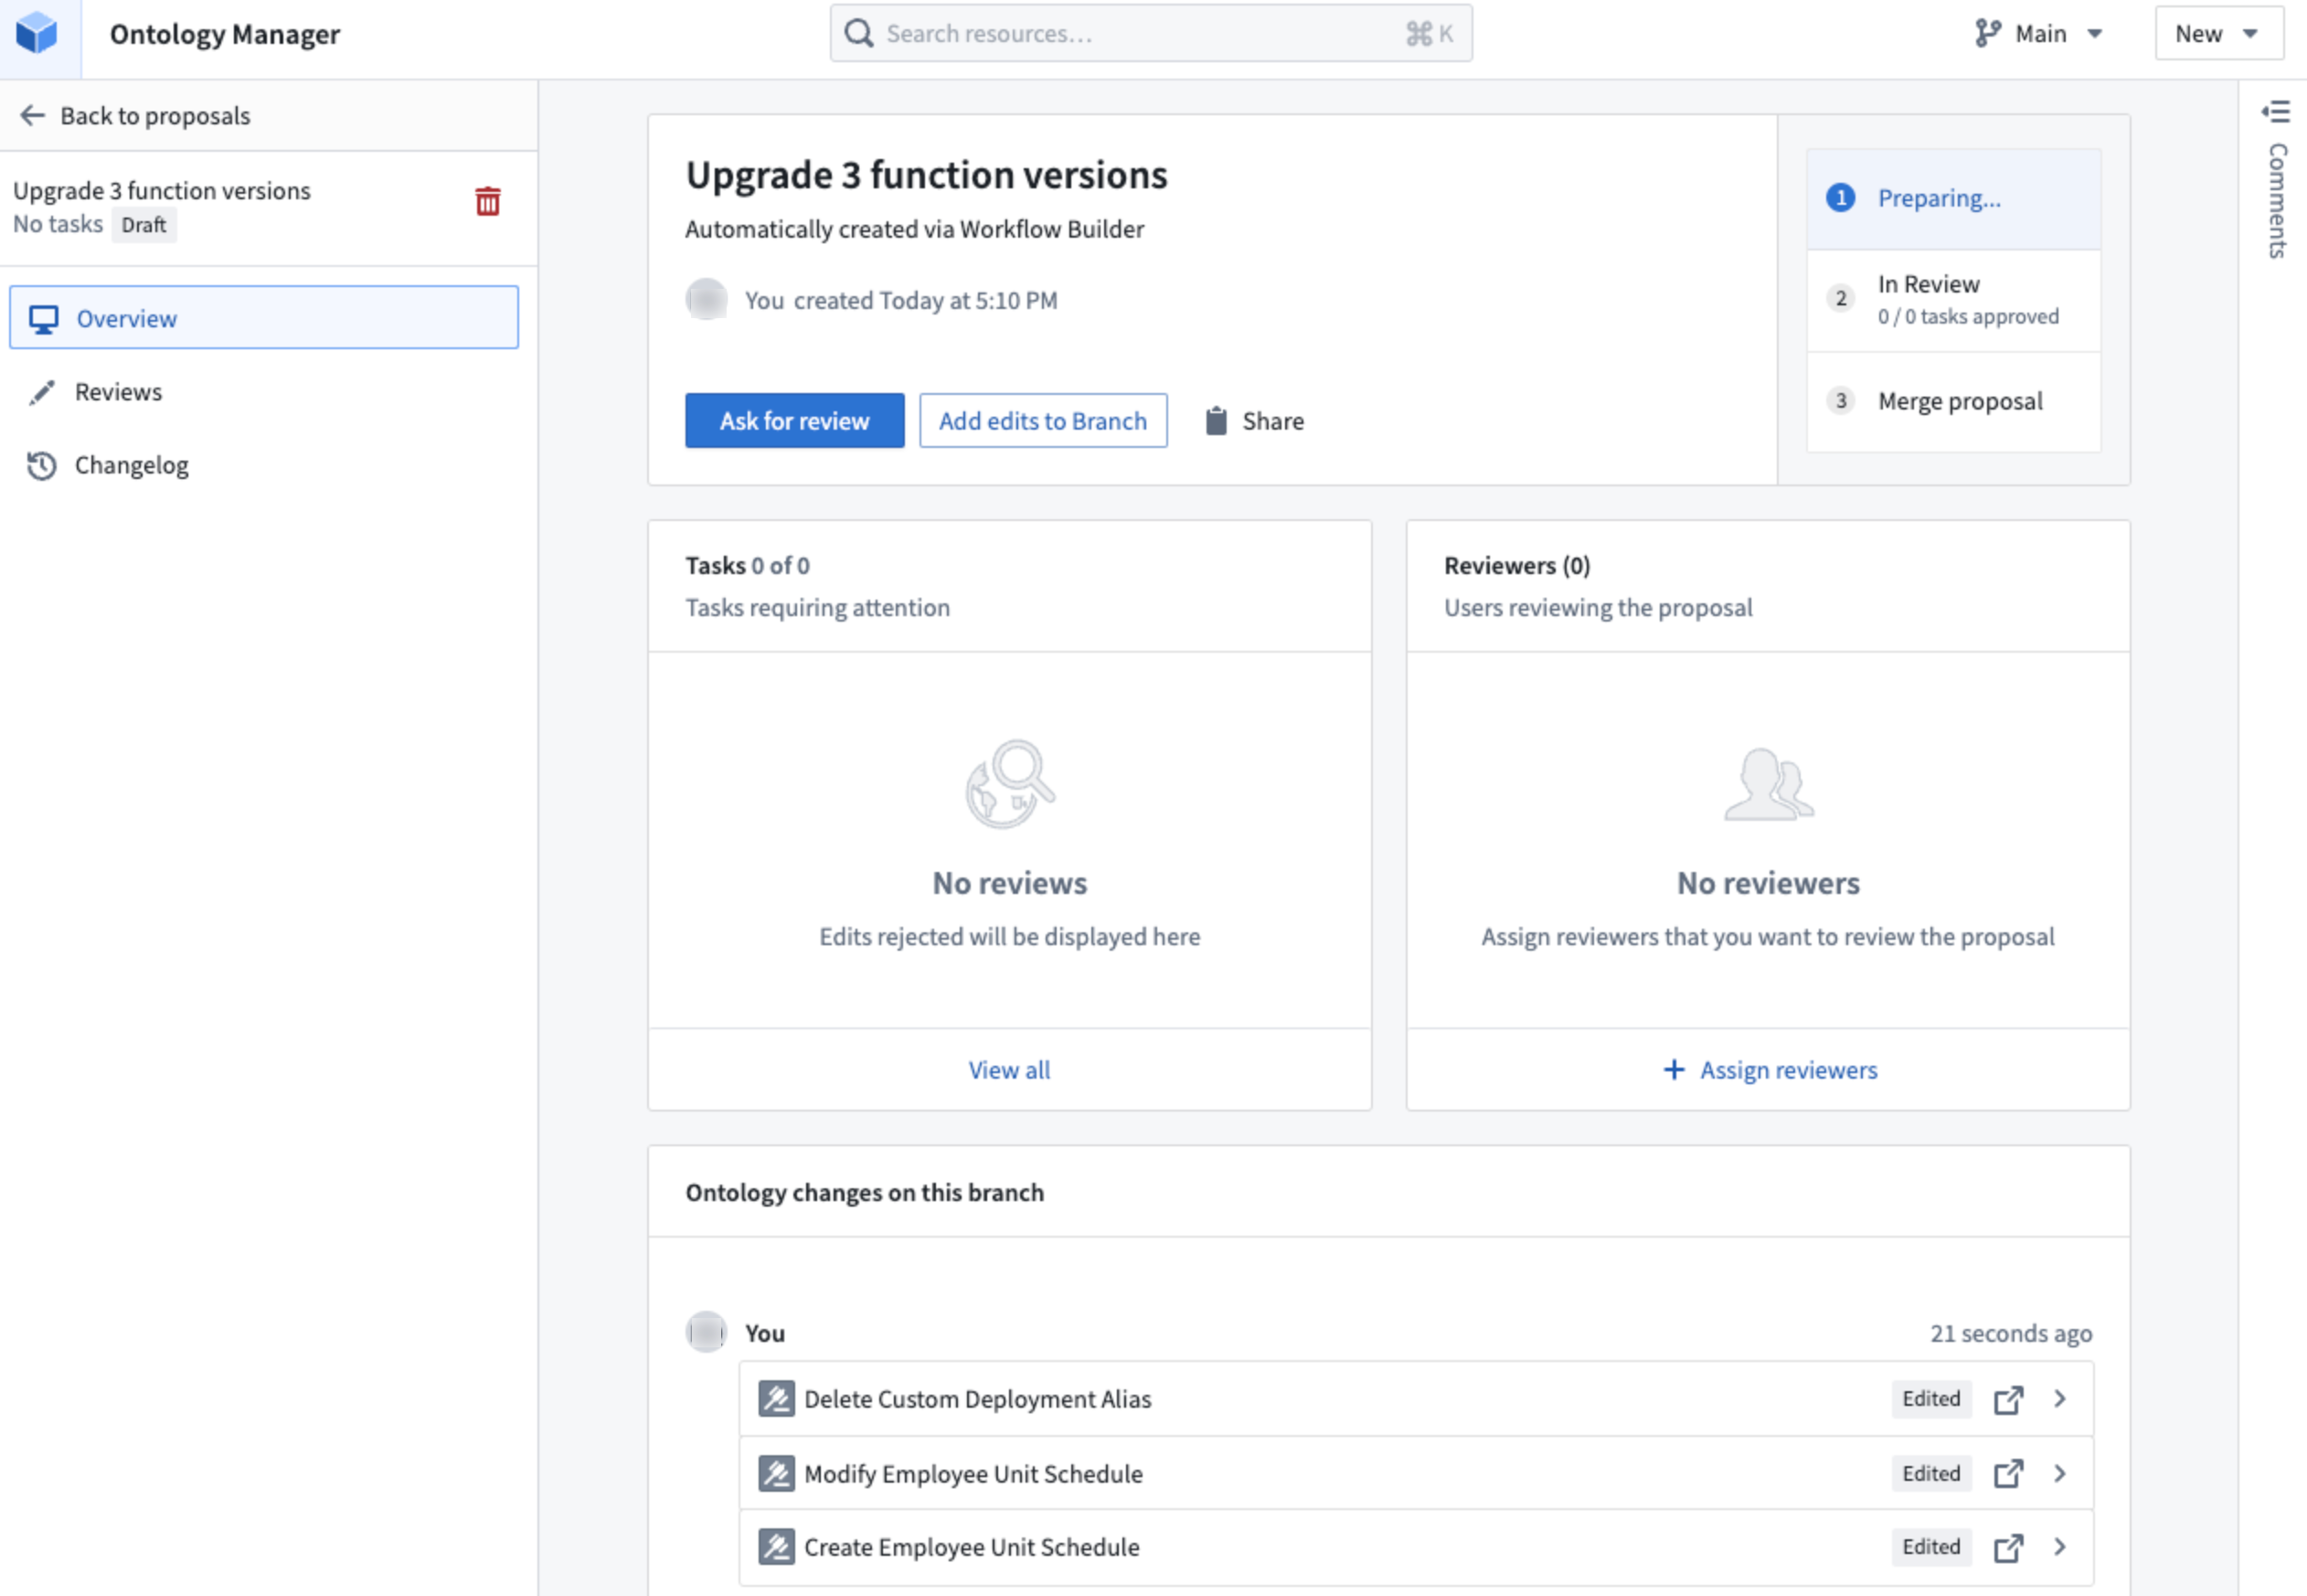
After you upgrade your Actions, a proposal will be created in Ontology Manager. Here, you can ask for a review of the changes (for example, the function upgrades) and once approved, you will be able to merge the proposal.
Function-backed Workshop application upgrades
To upgrade functions used in Workshop applications, select the Workshop node and open Update Workshop applications on the bottom panel.
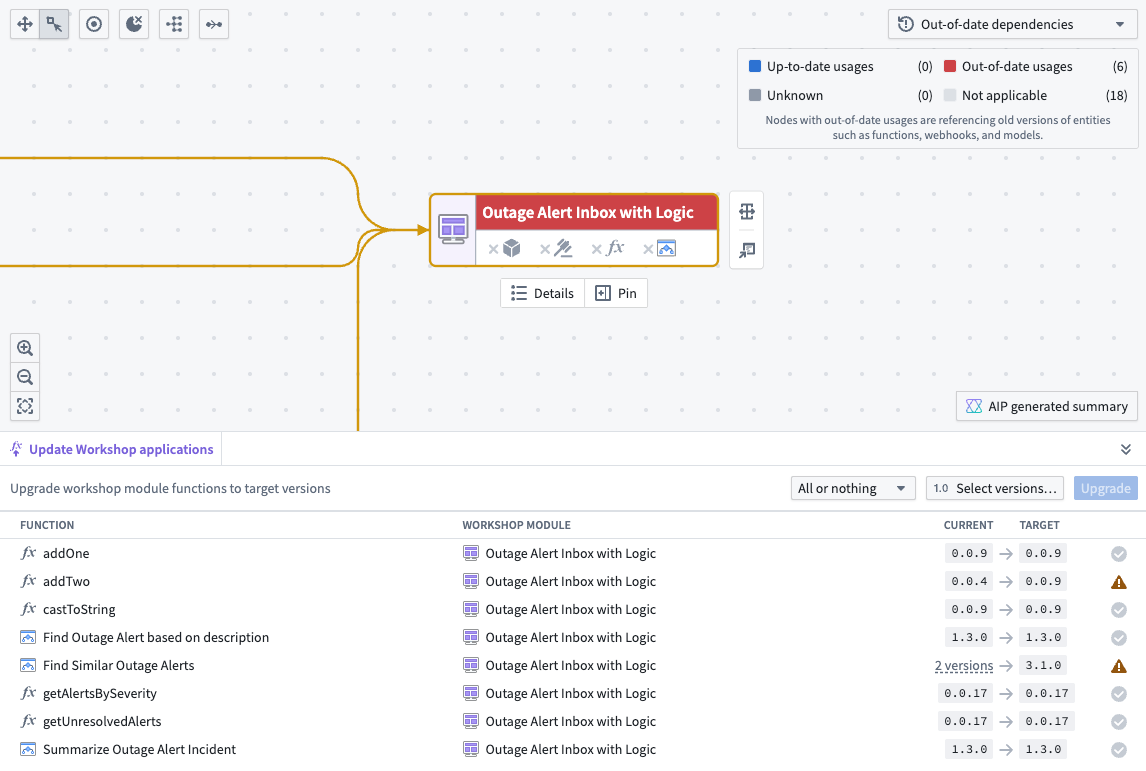
There are two upgrade options:
- All or nothing: Upgrade the functions in the workshop only if all of them can upgrade without breaking changes. If there are any breaking changes, nothing will be upgraded.
- Partial: Upgrade only the functions without breaking changes. Functions that would cause breaking changes will not be upgraded.
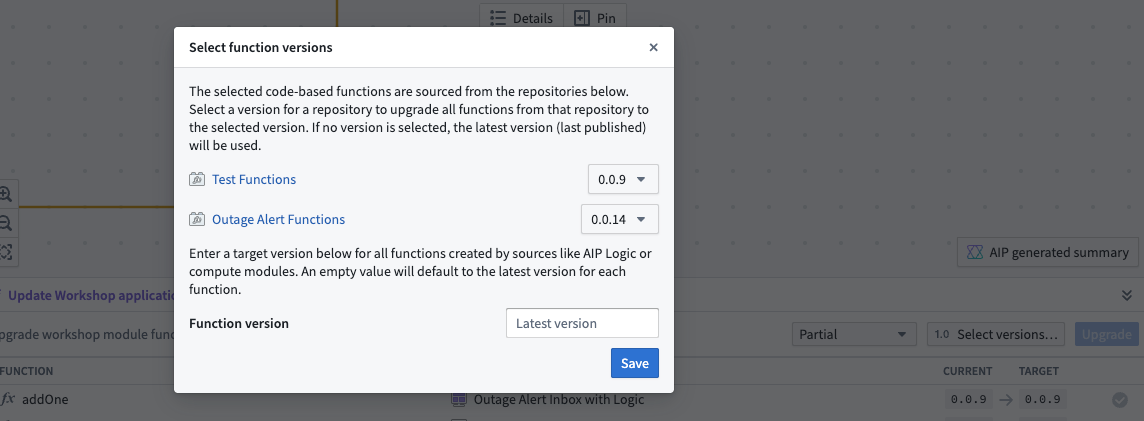
To select the desired version of the functions to be upgraded, select Select versions.... This will open up a pop up where you can select the desired version for each function repository as well as the version for all functions created by AIP Logic or compute modules. If nothing is specified, it will automatically take the repository's latest version.
When a function cannot be upgraded, a yellow warning icon will appear next to that function.
When a function is already up-to-date, a gray check mark icon will appear next to that function.
If a function can be successfully updated, a green check mark icon will appear.
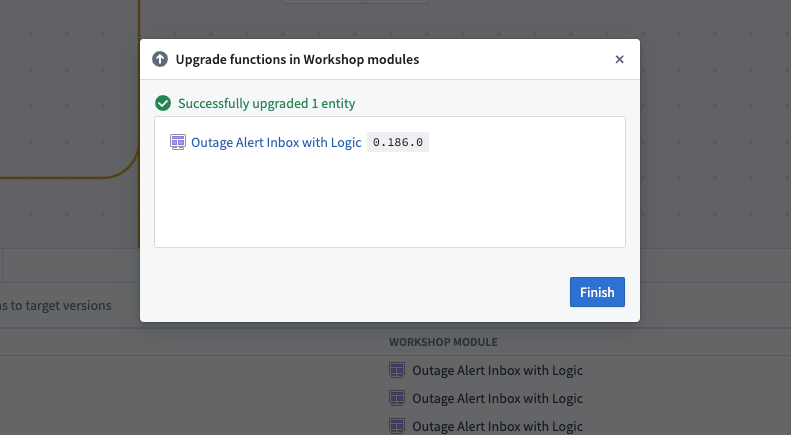
Select the blue Upgrade option to upgrade your Workshop module function to the target versions. This will open a pop up listing which Workshop modules will be upgraded.
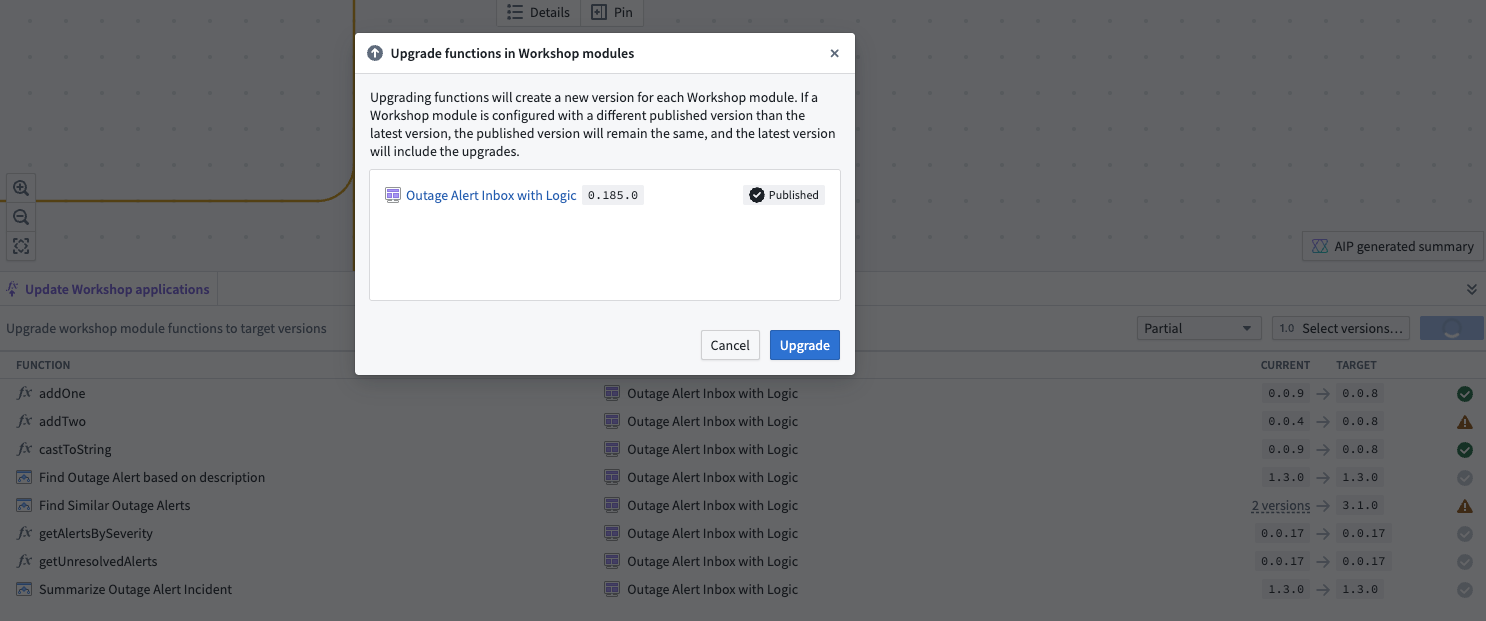
Select Upgrade for the changes to go into effect. The successfully upgraded Workshop application will appear on the pop up.
You also have the choice of bulk publishing the Workshop after the functions are updated. Learn how in the documentation on bulk-publishing Workshop applications.
Bulk publish Workshop applications
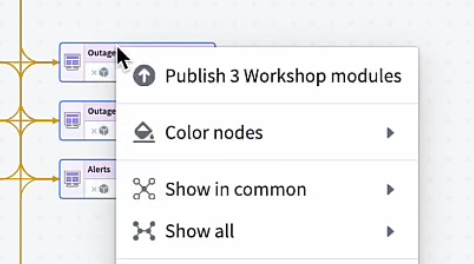
Workshop applications can be configured to always publish the latest version; Workshop applications that do not automatically publish the latest version can be "bulk published", which will update all selected applications at once. To bulk publish Workshop applications, select the Workshop nodes, then right-click and select Publish [number of] Workshop modules.
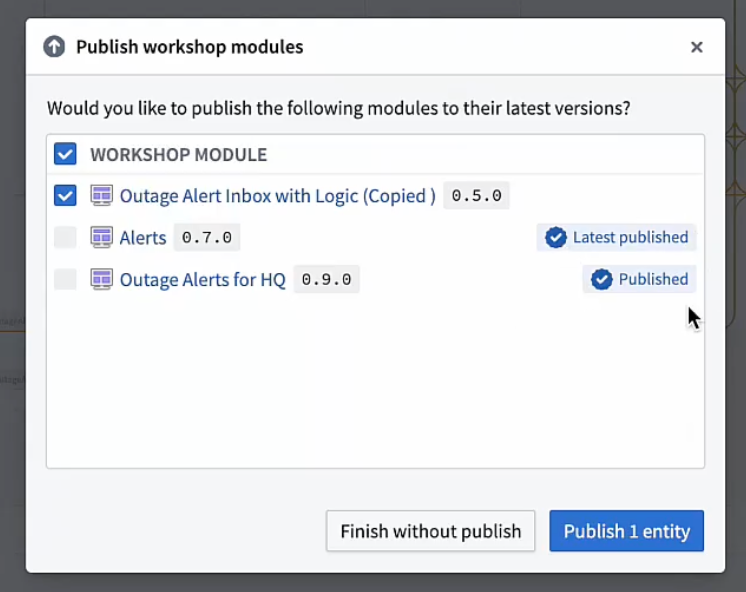
Publishing multiple Workshop modules at once will open a window displaying which of your Workshop applications are already on the latest version. If a Workshop application has a blue checkmark with either Latest published or Published next to it, the workshop is already on the latest version.
Specifically:
- Latest published means that Workshop always automatically publishes the latest version. This is a setting that can be toggled in the Workshop application.
- Published means that Workshop does not automatically publish the latest version, but the application currently has the latest version published.
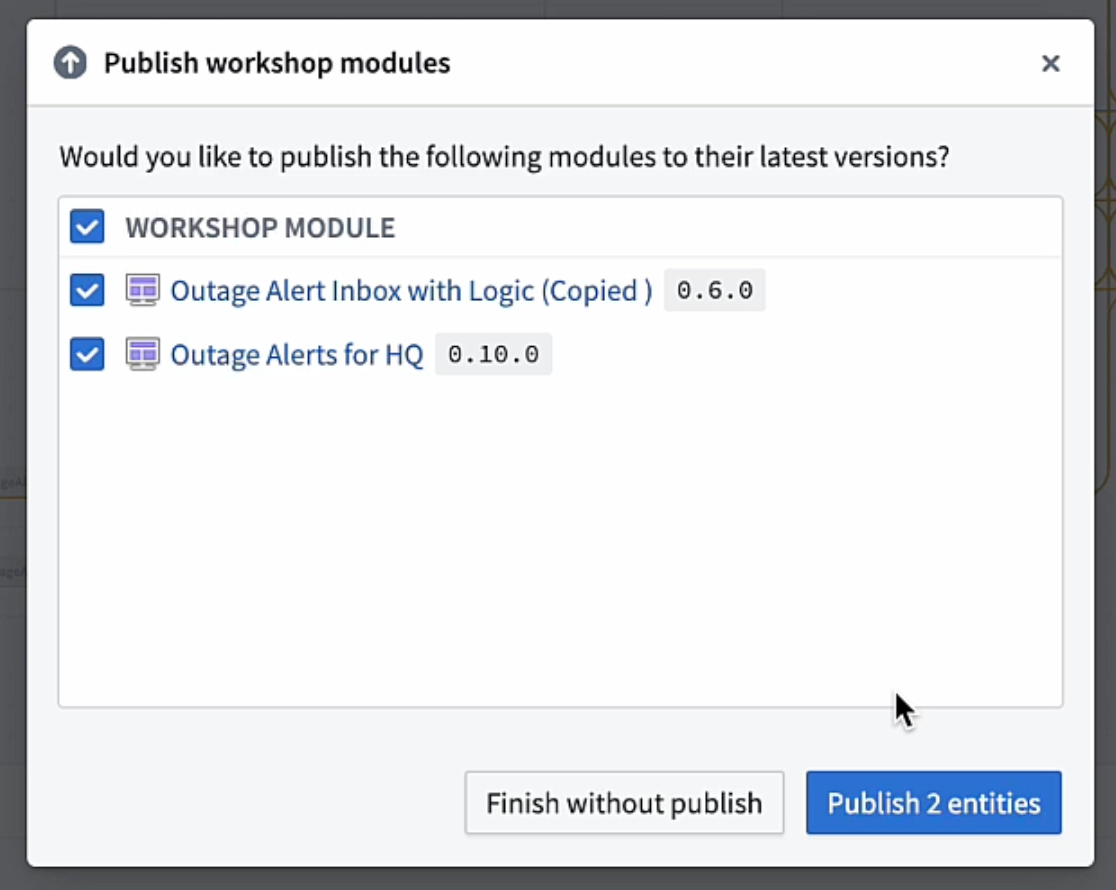
For Workshop applications that are not Published or Latest published, you can select which applications you want to publish to the latest version and then select Publish [number of] entities.
You can also bulk publish Workshop modules after updating functions in Workflow Builder. To do so, after updating the functions, select Continue to publish.
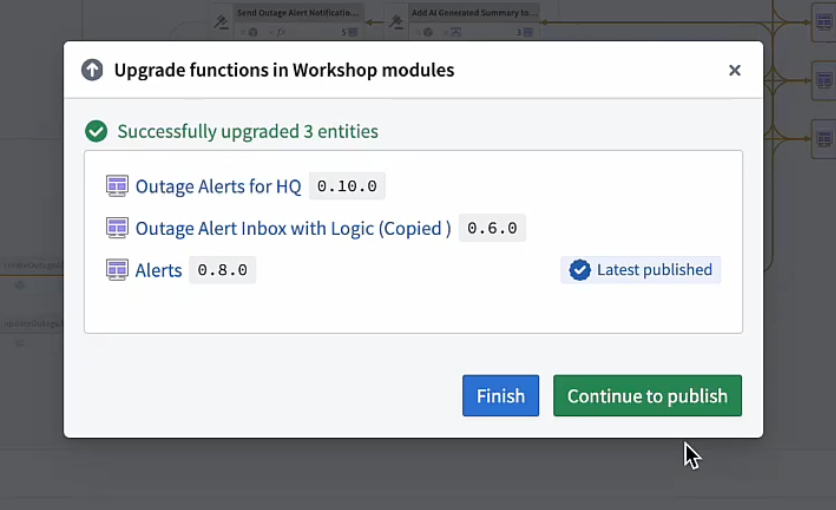
This will bring you to a page with all the Workshop modules that are not yet published to their latest version. Confirm that you want to publish the latest version for these modules and select Publish [number of] entities.
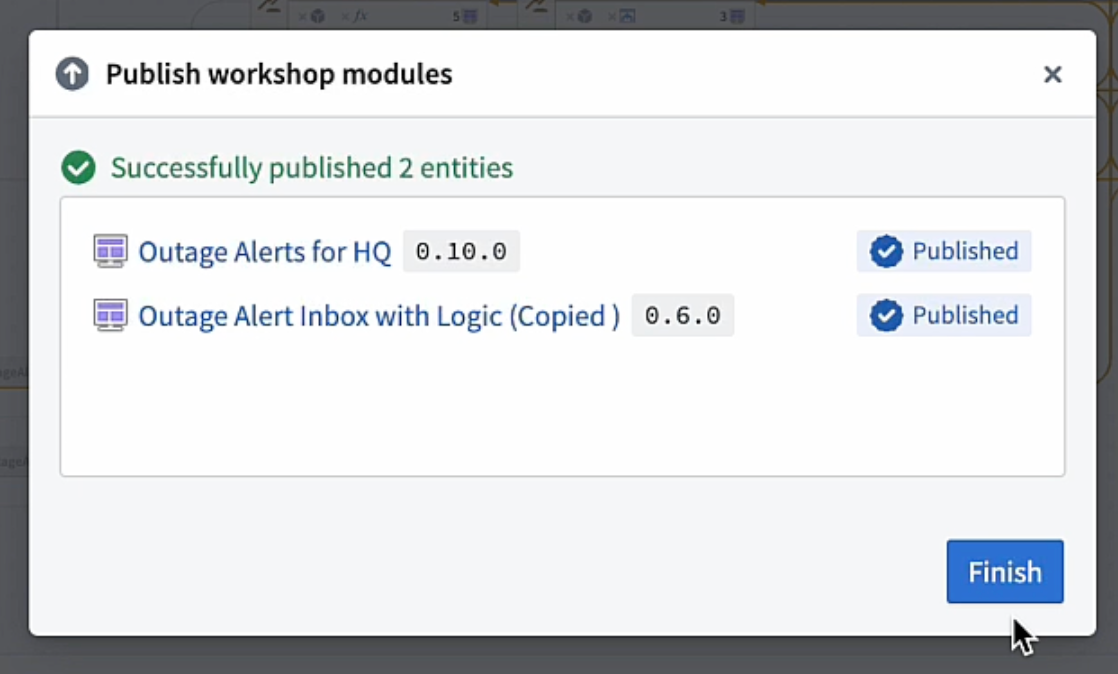
Once this has been done successfully, select Finish.
Bulk update Action submission criteria
You can update an Action's submission criteria to match the submission criteria of a source Action. From the Workflow Builder graph, select the Actions you wish to update. Then, navigate to Update submission criteria from the bottom panel.
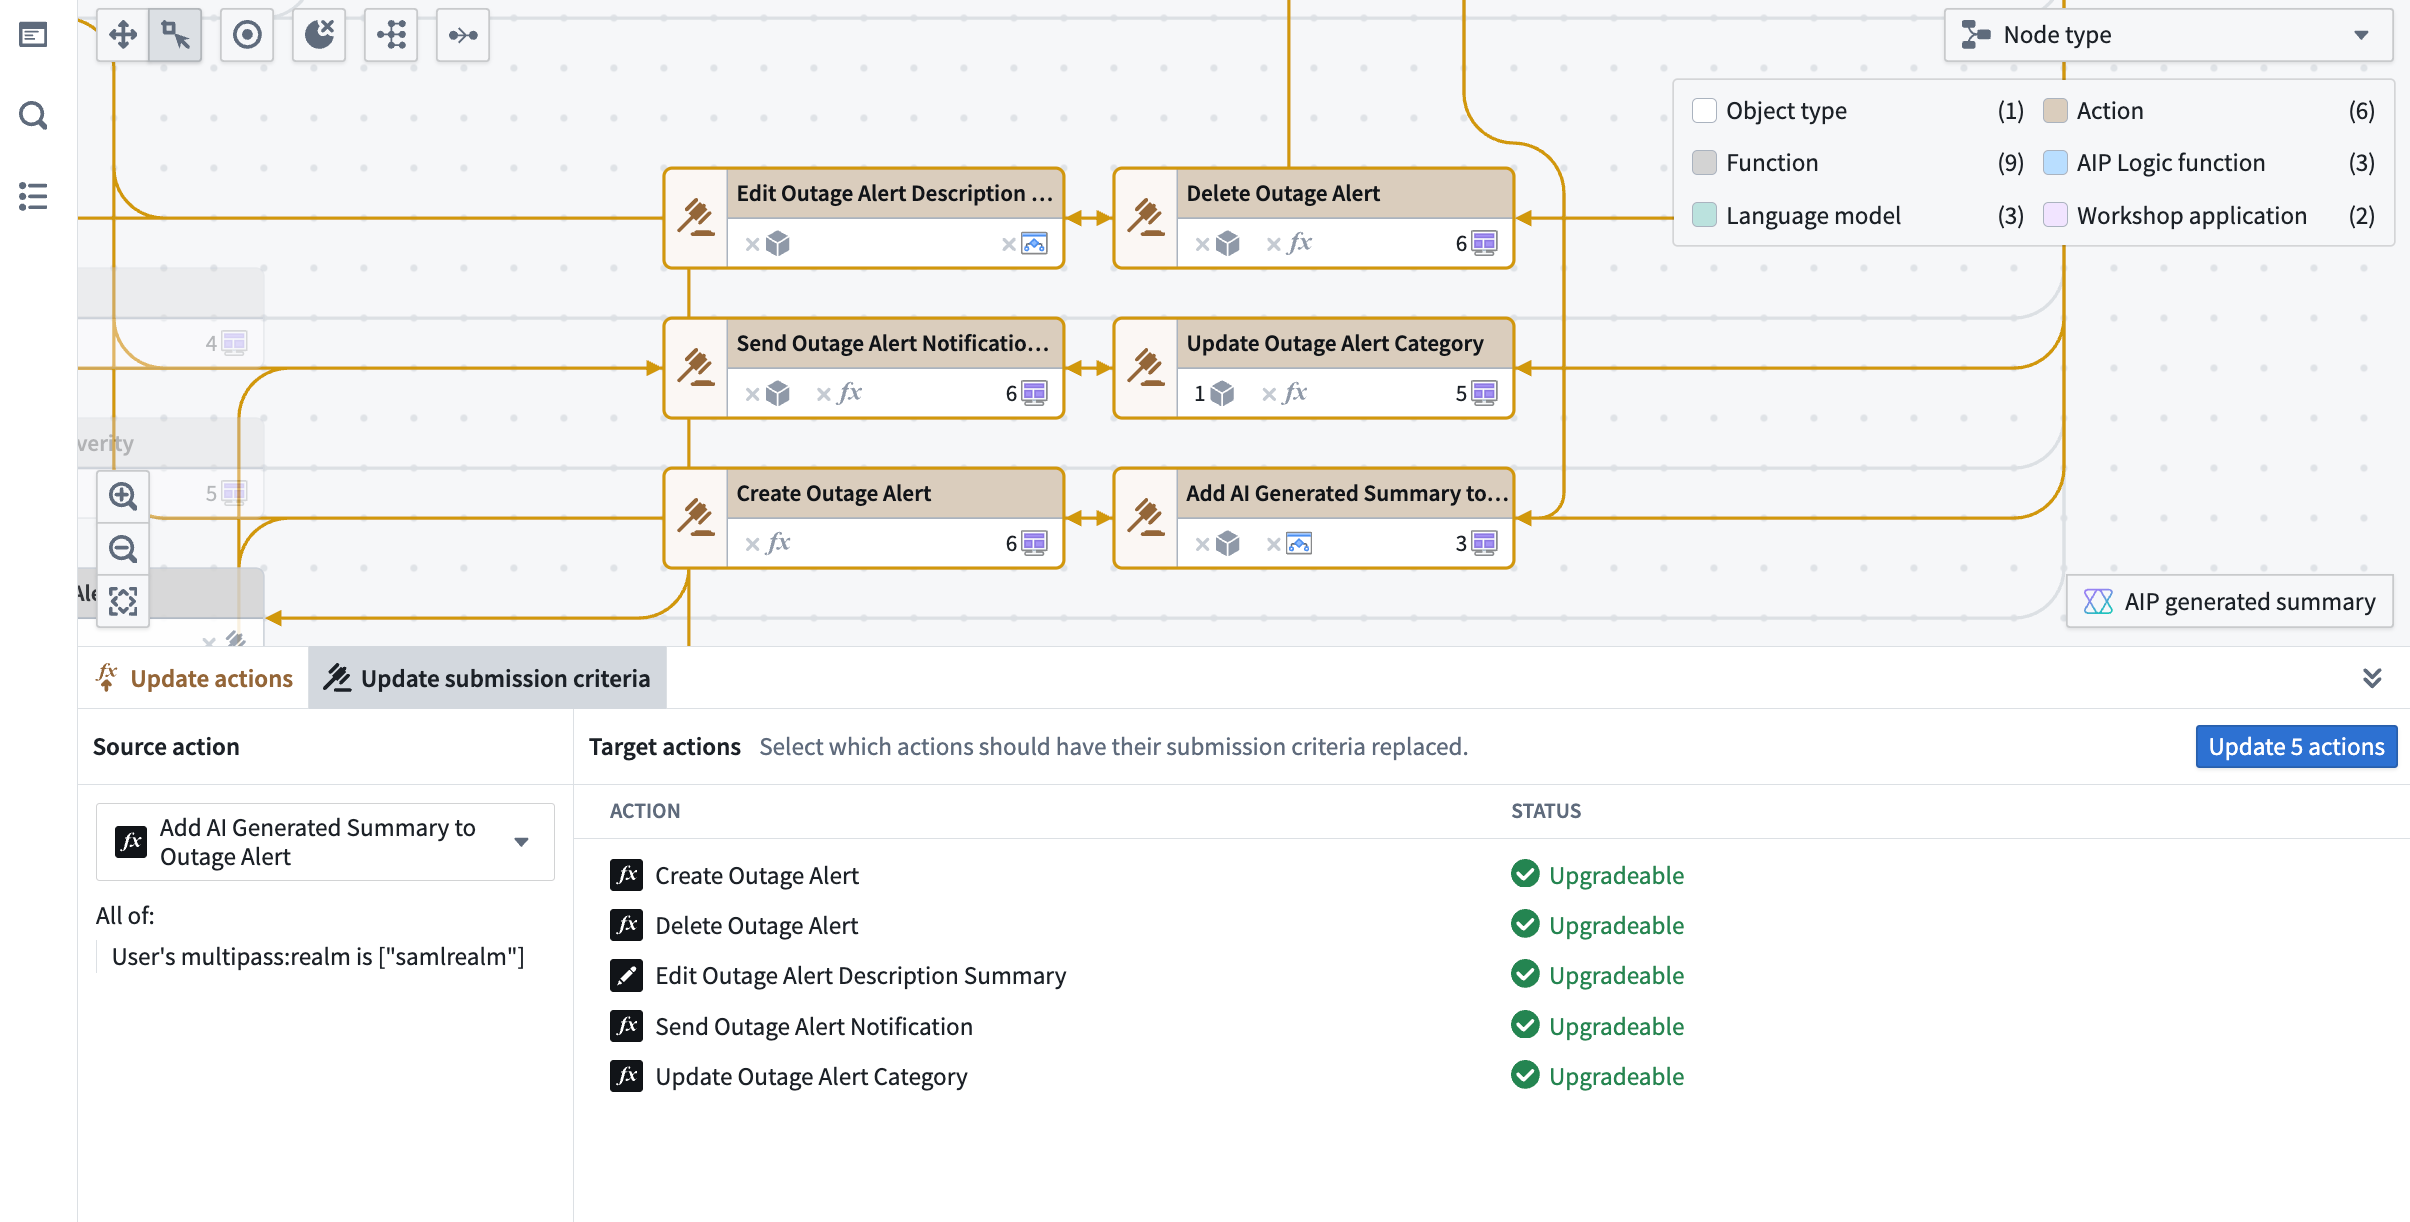
On the left side of the panel, select the source Action whose submission criteria you want applied to the other Actions. The submission criteria of the source Action can be viewed under the selected source Action.
When completed, select the blue Update x actions button where x is the number of Actions that will be updated. This will create a proposal you can approve and submit for the changes to take effect.
Bulk delete objects and Actions
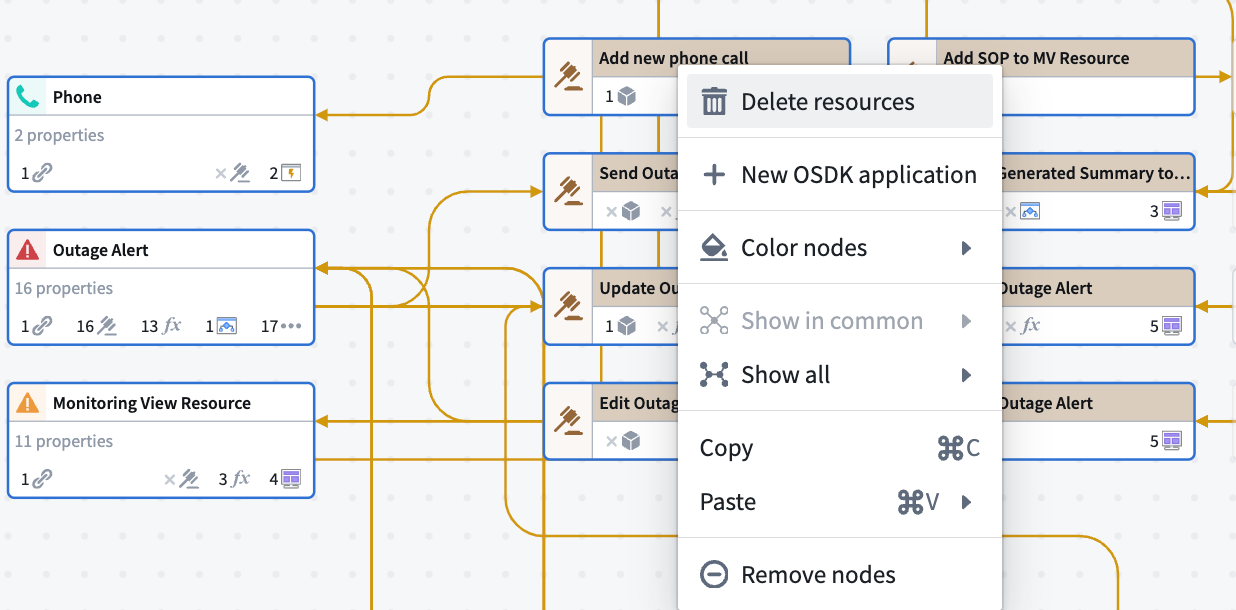
To bulk delete objects and Actions, select the nodes on the graph, right click, and select Delete resources.
This will prompt you to create a proposal. You will also see the number of link types associated with the objects being deleted. These links will also be included in the deletion proposal.

Follow the prompt in Ontology Manager to merge the proposal.

Marketplace products
The Marketplace products sidebar helps you inspect and confirm that Marketplace products have the right inputs, no resources are missing, and all resources are in the expected packages. This feature is especially helpful for packages you created that are publishing elsewhere.
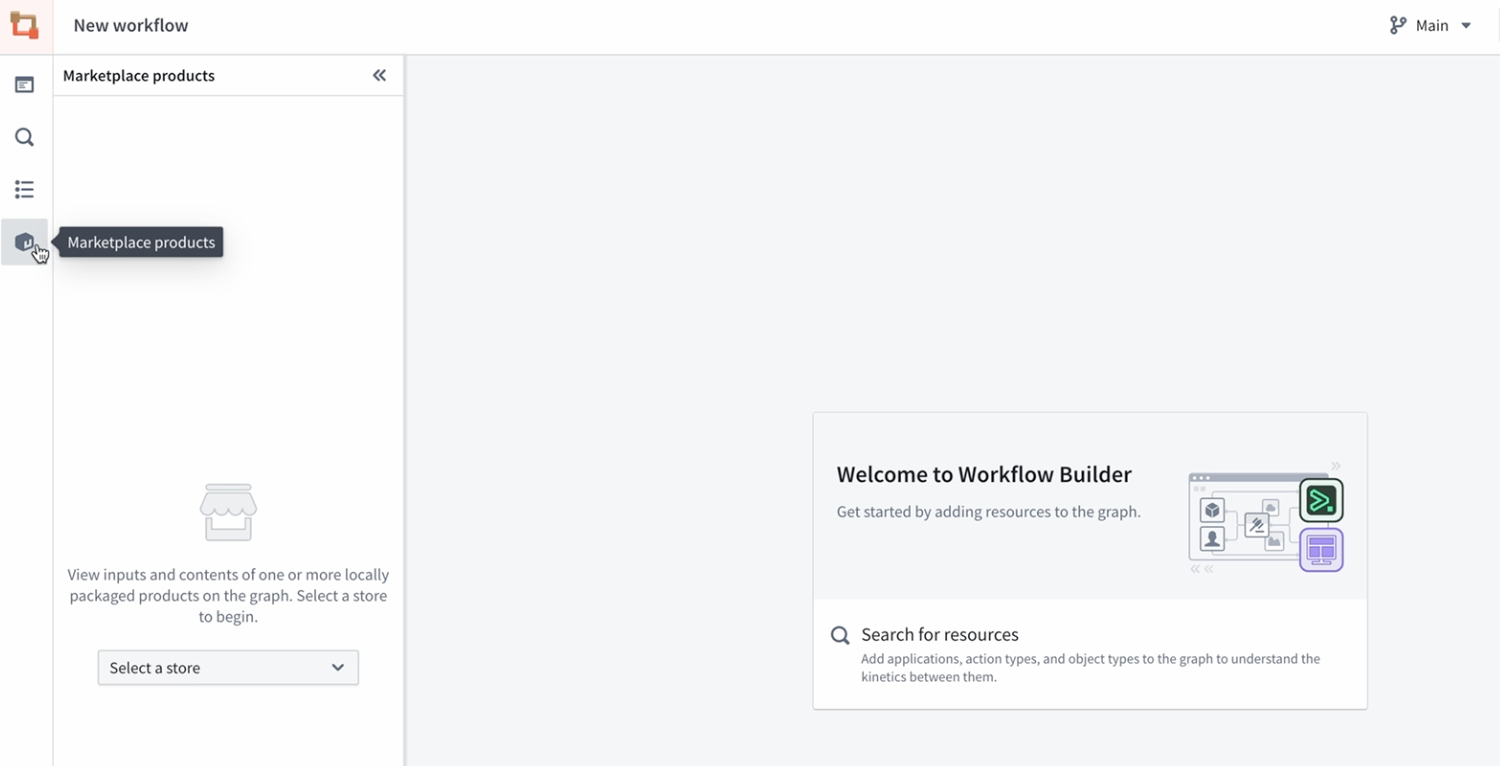
Navigate to the Marketplace products sidebar and choose your store in the dropdown menu. Note that the sidebar will only search local stores and not remote stores.
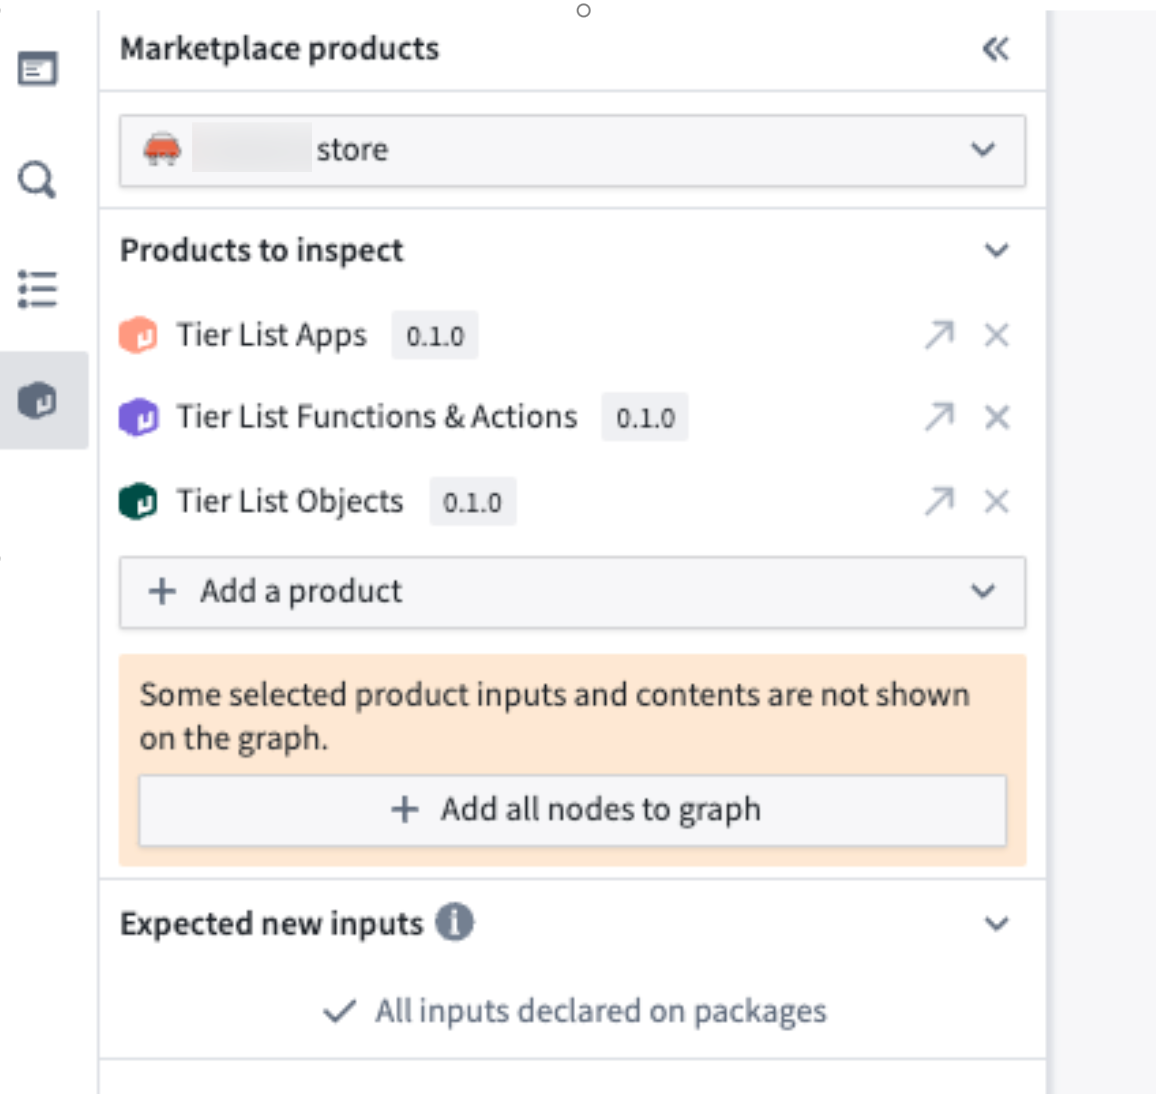
Select Add a product to add the products you wish to inspect, and add all corresponding nodes on the graph by selecting Add all nodes to graph.
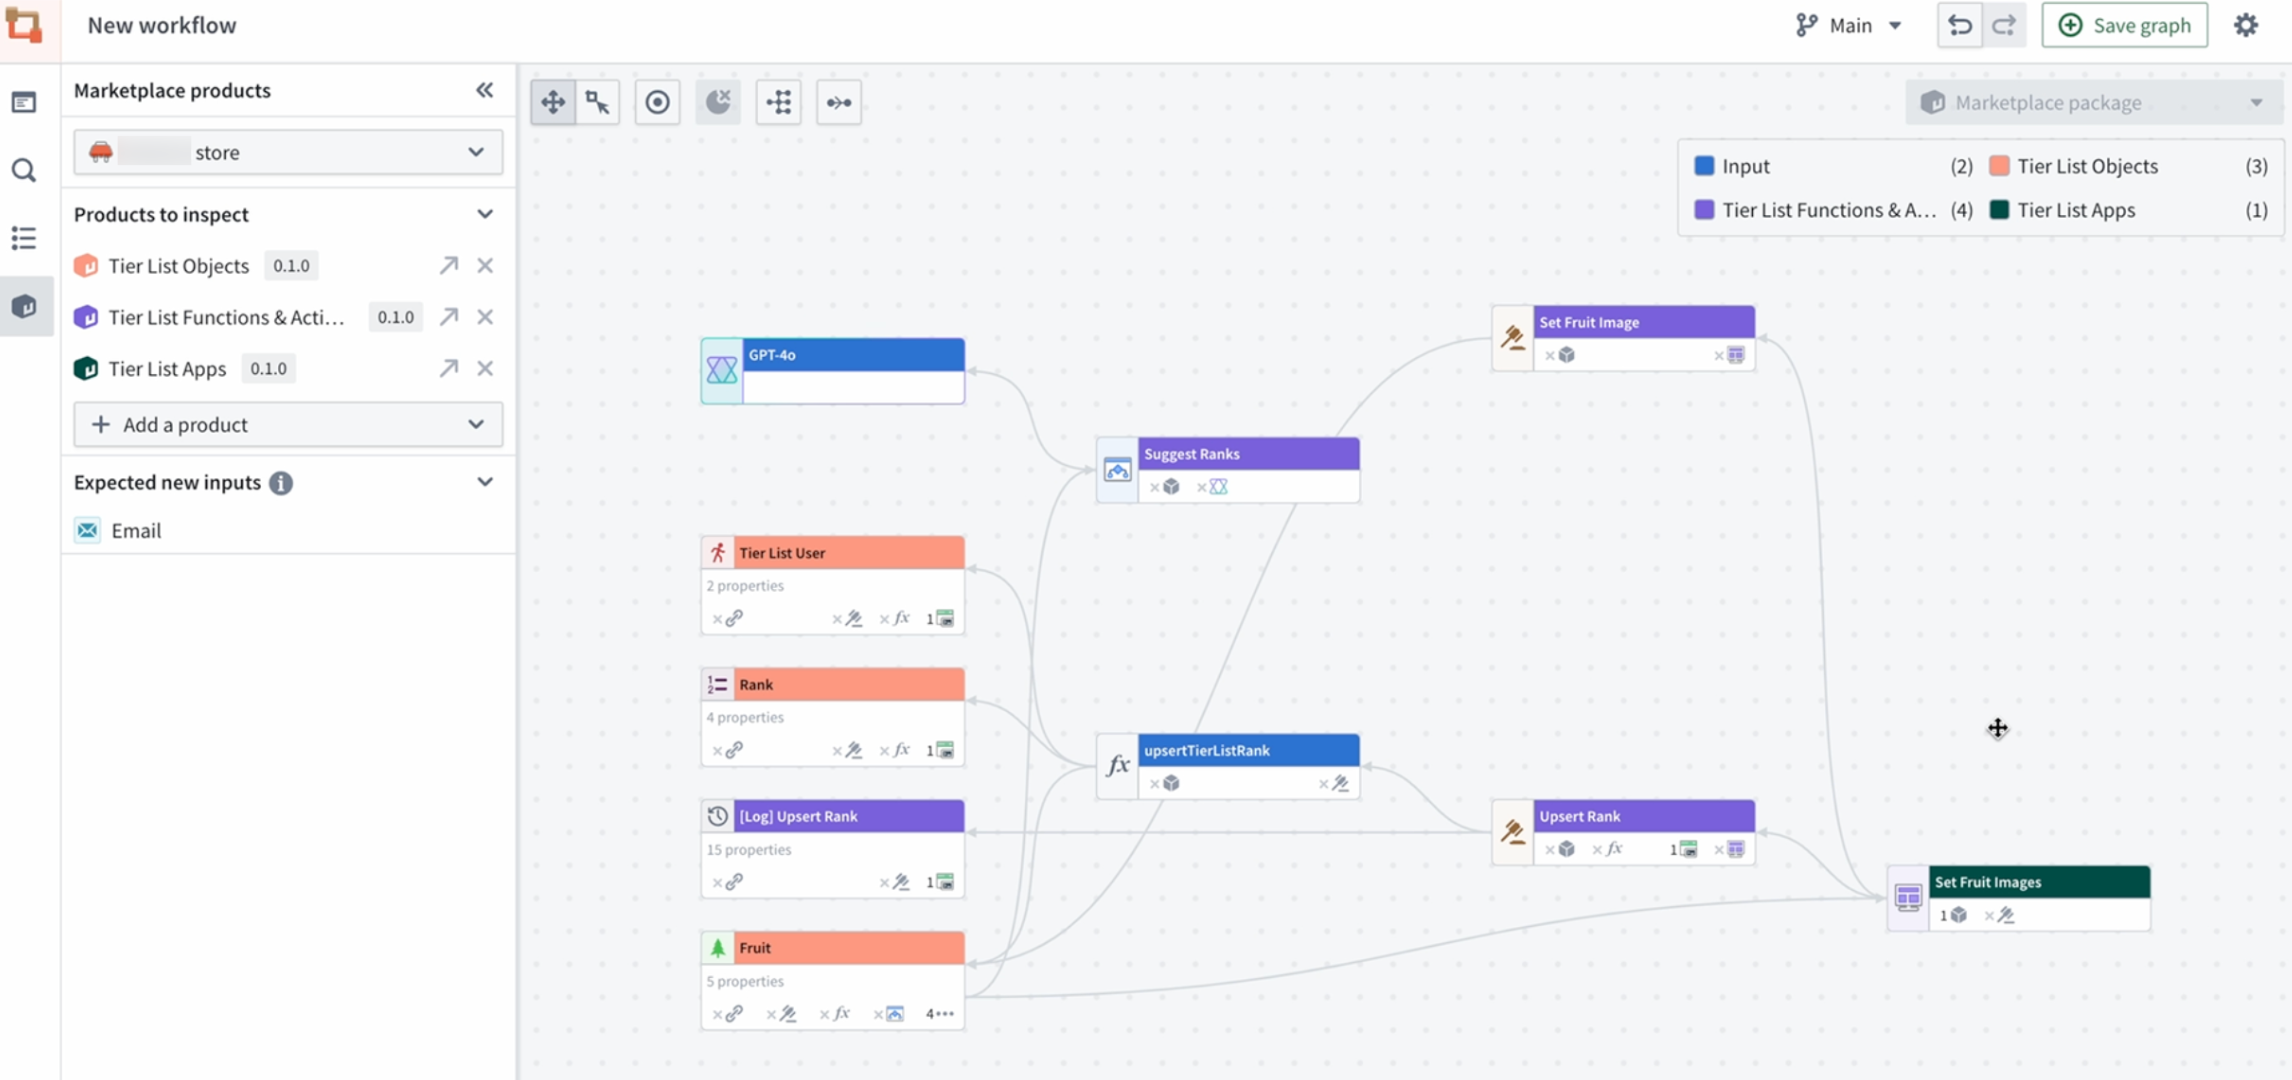
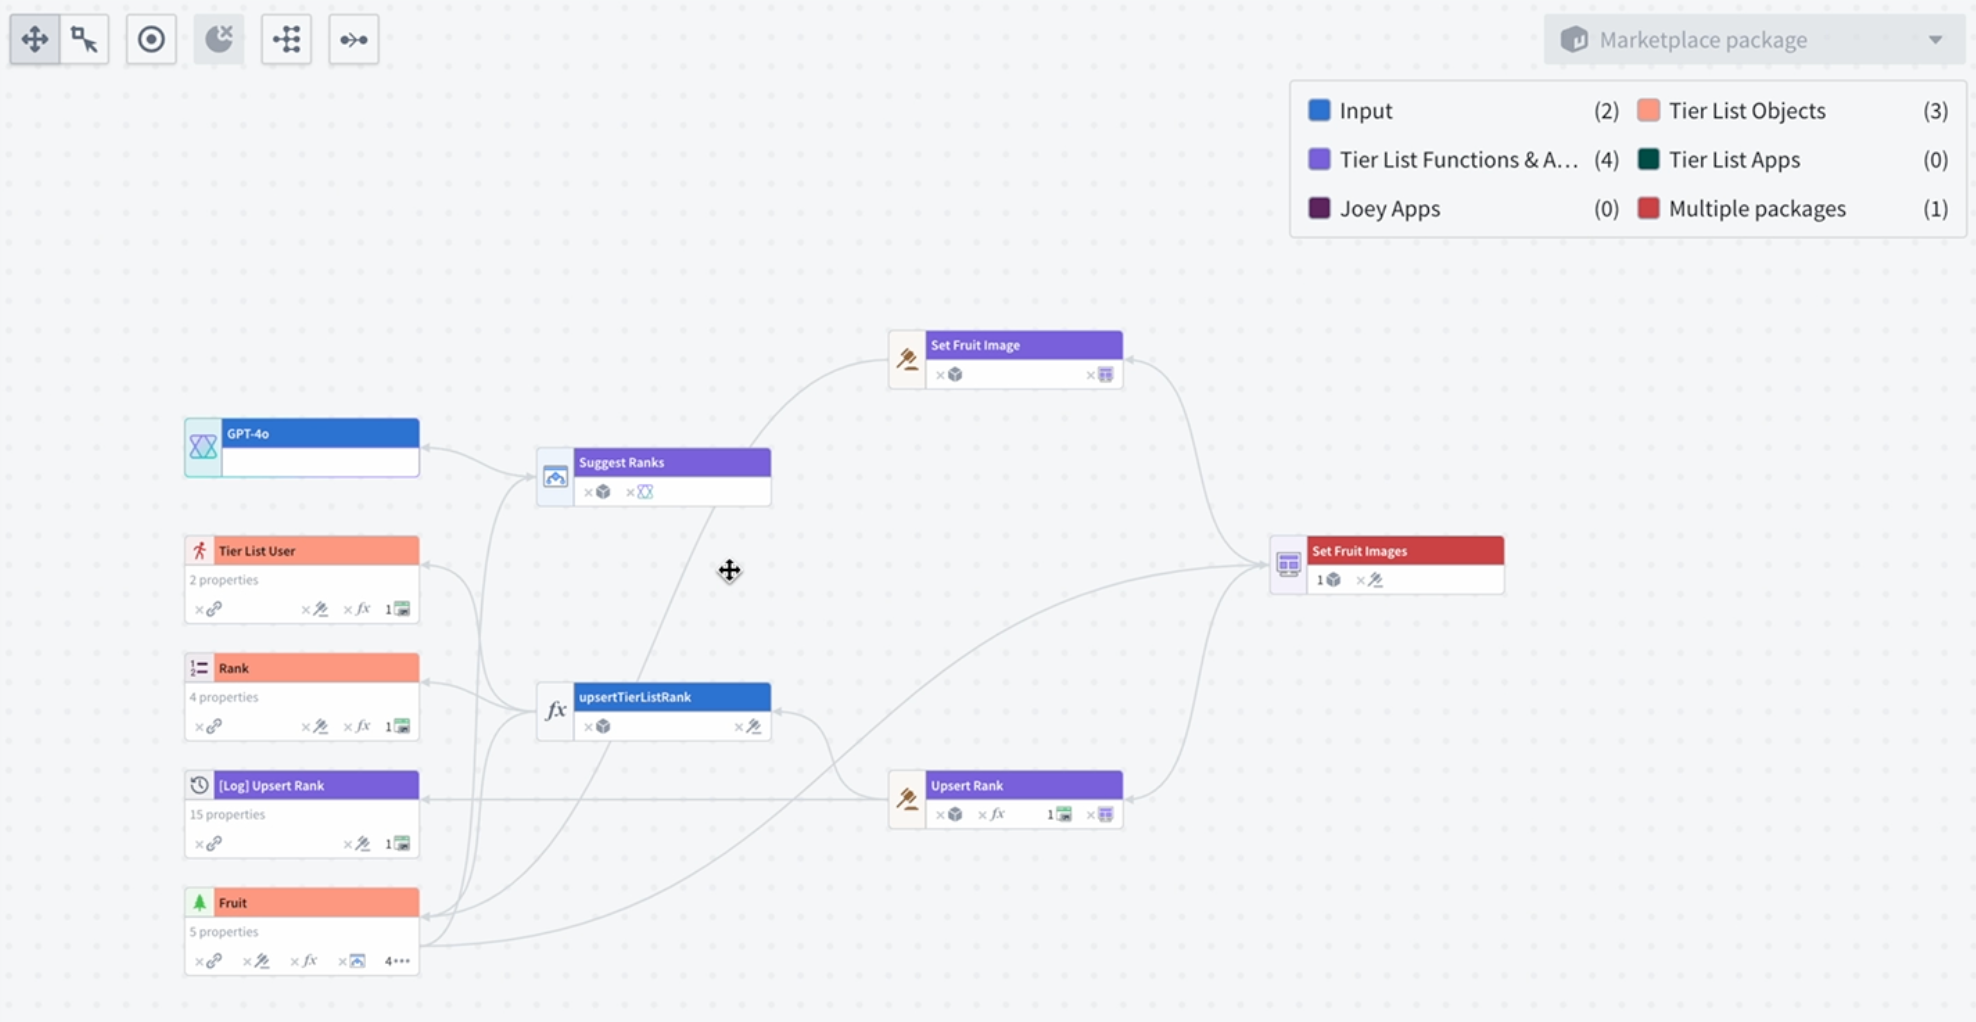
A Workflow Builder graph will populate, colored by which package the resources are in and whether the resources are inputs to a specific package.
In the example below, the Function upsertTierListRank is listed as an input; however, the Function should be packaged because it is used in an Action that is packaged. Additionally, the [Log] Upsert Rank object ended up in Tier List Functions & Actions instead of the Tier List Objects. A flag also shows that the model GPT-4o is required to use the logic Function.
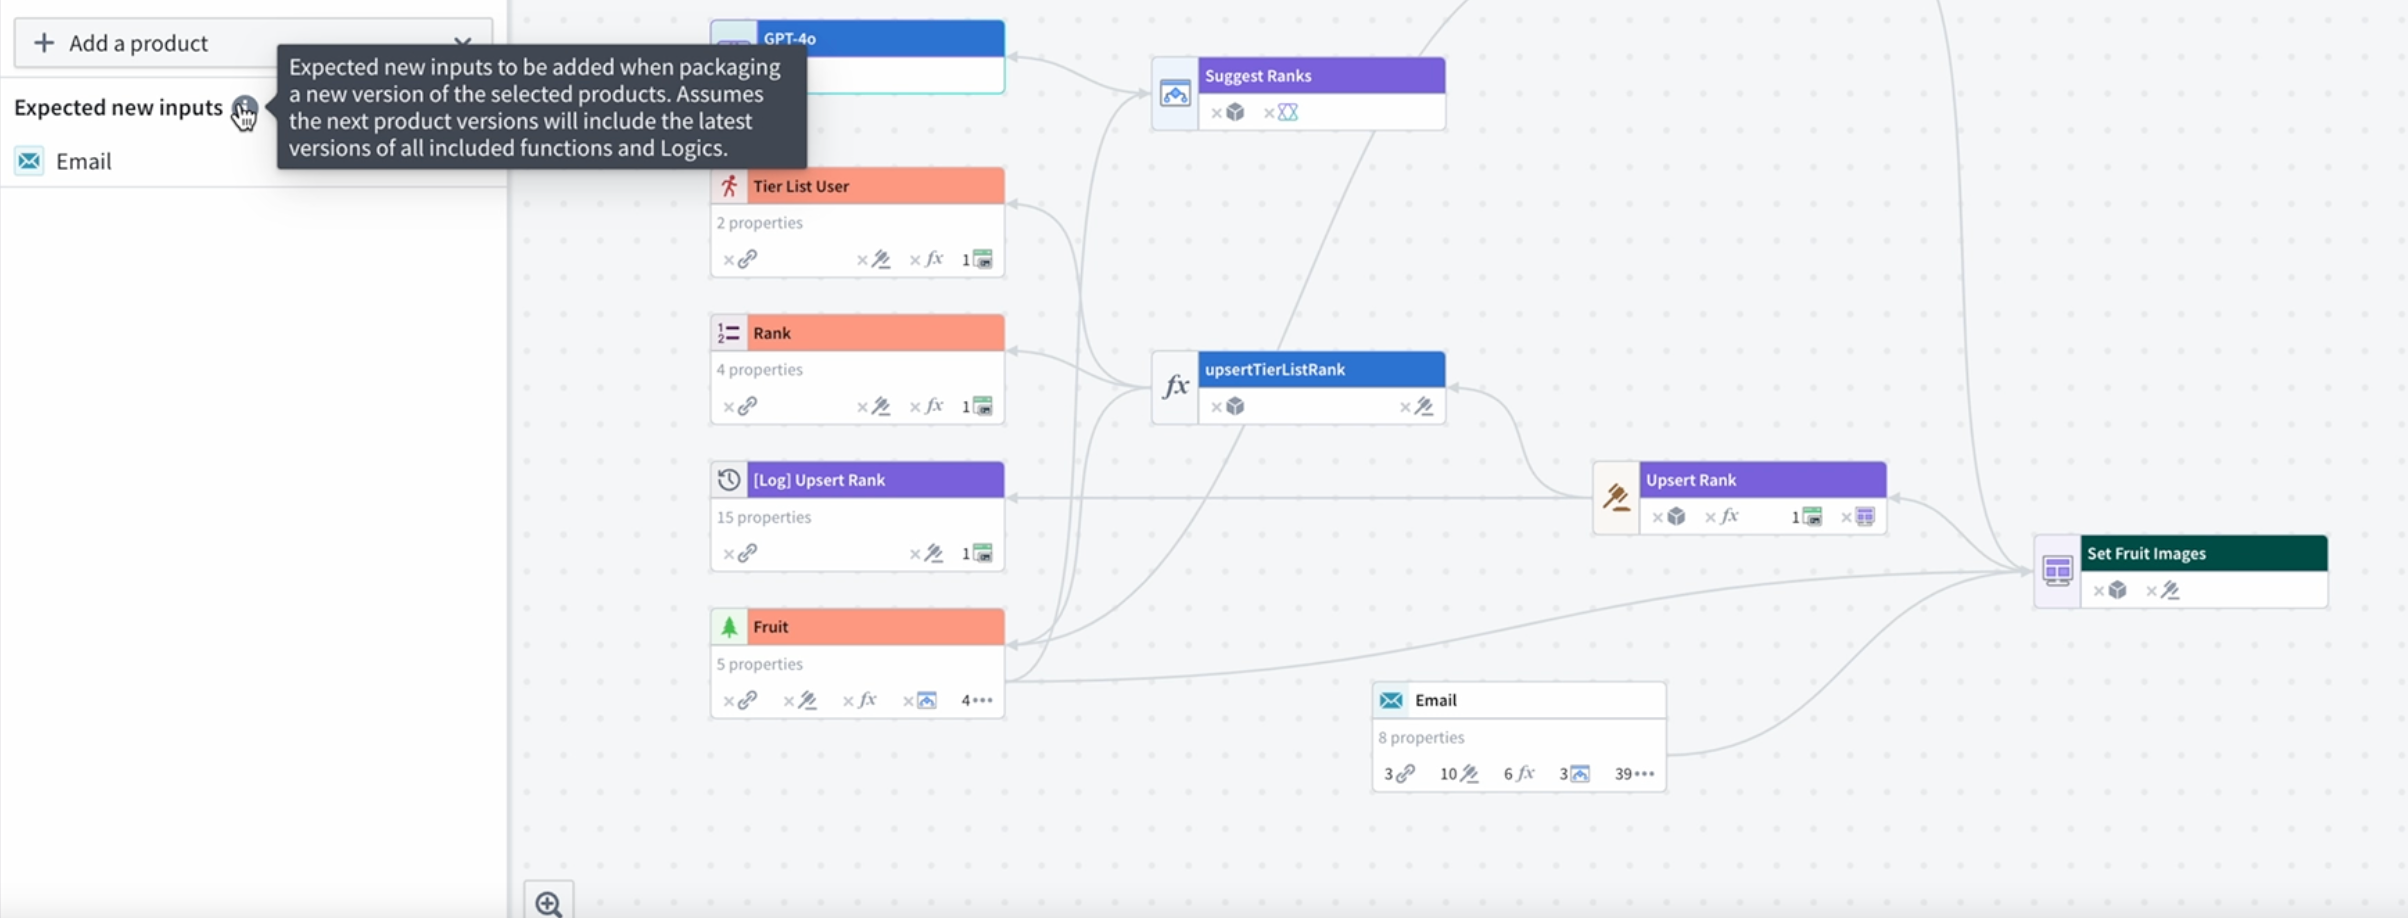
On the left panel, a list of expected new inputs to your package is displayed. In the example below, the Email object feeds into the Set Fruit Images Workshop module, so it should be included in future packages.
The color legend will also show package overlaps with the Multiple packages key.
Text nodes
You can add text nodes in Workflow Builder to help document and call attention to details in your graph. Text nodes use Markdown syntax ↗, and they can be colored like regular nodes. They will not be affected by layout options and are not attached to any specific node on your graph.

- To add a text node to your graph, select Text in the top-left of the graph.
- Double click the text node to edit and add Markdown text.
- Select save when you are done.
To color a text node, right click and select Color nodes. Choose a color or add a new color.

You can also resize text nodes using the three lines in the bottom right corner. If the length of your text is greater than the length of the text node, the node will automatically become scrollable.

Keyboard shortcuts
To view the list of keyboard shortcuts available to you, select Help > View hotkeys.
The available hotkeys are as follows
| Global | macOS | Windows |
|---|---|---|
| Undo last change | Cmd + Z | Ctrl + Z |
| Redo last change | Cmd + Y | Ctrl + Y |
| Redo last change | Cmd + Shift + Z | Ctrl + Shift + Z |
| Save graph | Cmd + S | Ctrl + S |
| Graph | macOS | Windows |
|---|---|---|
| Zoom to fit nodes | ↑ | ↑ |
| Zoom to fit nodes | Home | Home |
| Show/hide Workshop application split view | I | I |
| Deselect all nodes | Esc | Esc |
| Copy nodes to clipboard | Cmd + C | Ctrl + C |
| Remove selected nodes | Delete | Del |
| Remove selected nodes | Backspace | Backspace |
| Lay out all nodes | Cmd + Shift + A | Ctrl + Shift + a |
| Hierarchy layout | Shift + L | Shift + L |
| Lay out nodes | L | L |
| Clustered hierarchy layout | Alt + L | Alt + L |
| Grid layout | G | G |
| Vertical layout | V | V |
| Horizontal layout | H | H |
| Select all nodes | Cmd + A | Ctrl + A |
| Invert selection (select unselected nodes) | Cmd + I | Ctrl + I |
| Select downstream nodes | → | → |
| Select upstream nodes | ← | ← |
| Select all downstream | Shift + → | Shift + → |
| Select all upstream | Shift + ← | Shift + ← |