- Capabilities
- Getting started
- Architecture center
- Platform updates
Tutorial: Develop with a SuperRepo
SuperRepo is in the beta phase of development and may not be available on your enrollment. Functionality may change during active development.
SuperRepos provide the most value when leveraged for full-stack application building, because a SuperRepo enables editing, previewing, and deploying components in lock-step.
This tutorial uses the task management application included in the default SuperRepo template. You will learn how to import an existing object type and explore the template's link type. You will also connect a function-backed action to the frontend to mark tasks as complete. The same development workflow applies to full-stack applications in every domain.
To follow along, create a SuperRepo using the repository creation flow and start its local preview. The template already defines tasks, workers, and the function shown below. Its in-application tutorial guides you through extending these definitions and connecting them to the frontend.
Start by looking at the structure of a SuperRepo repository. The root always contains a foundry.yml file which lays out the project's components. For example, among other settings, it might have the following:
Copied!1 2 3 4 5 6 7components: - type: ONTOLOGY path: ./ontology - type: TYPESCRIPT_FUNCTIONS path: ./functions/typescript-functions - type: APP path: ./app
Components can be added, duplicated, or removed from this file to change the shape of your project. Advanced workflows provides further details on restructuring workflows.
In the following sections, you will work across three layers:
- Explore importing and defining Ontology types and update task assignments in the seed data.
- Understand how to write a TypeScript function and its function-backed action.
- Connect the action to the application frontend.
Import an existing object type
The domain model of a full-stack application within the Palantir platform is defined in the Ontology. In a SuperRepo, existing Ontology types can be imported into the project either by running the foundry import ontology command or by using the Import sidebar of the Palantir extension for Visual Studio Code.

The wizard then guides you through selecting the type you wish to import.
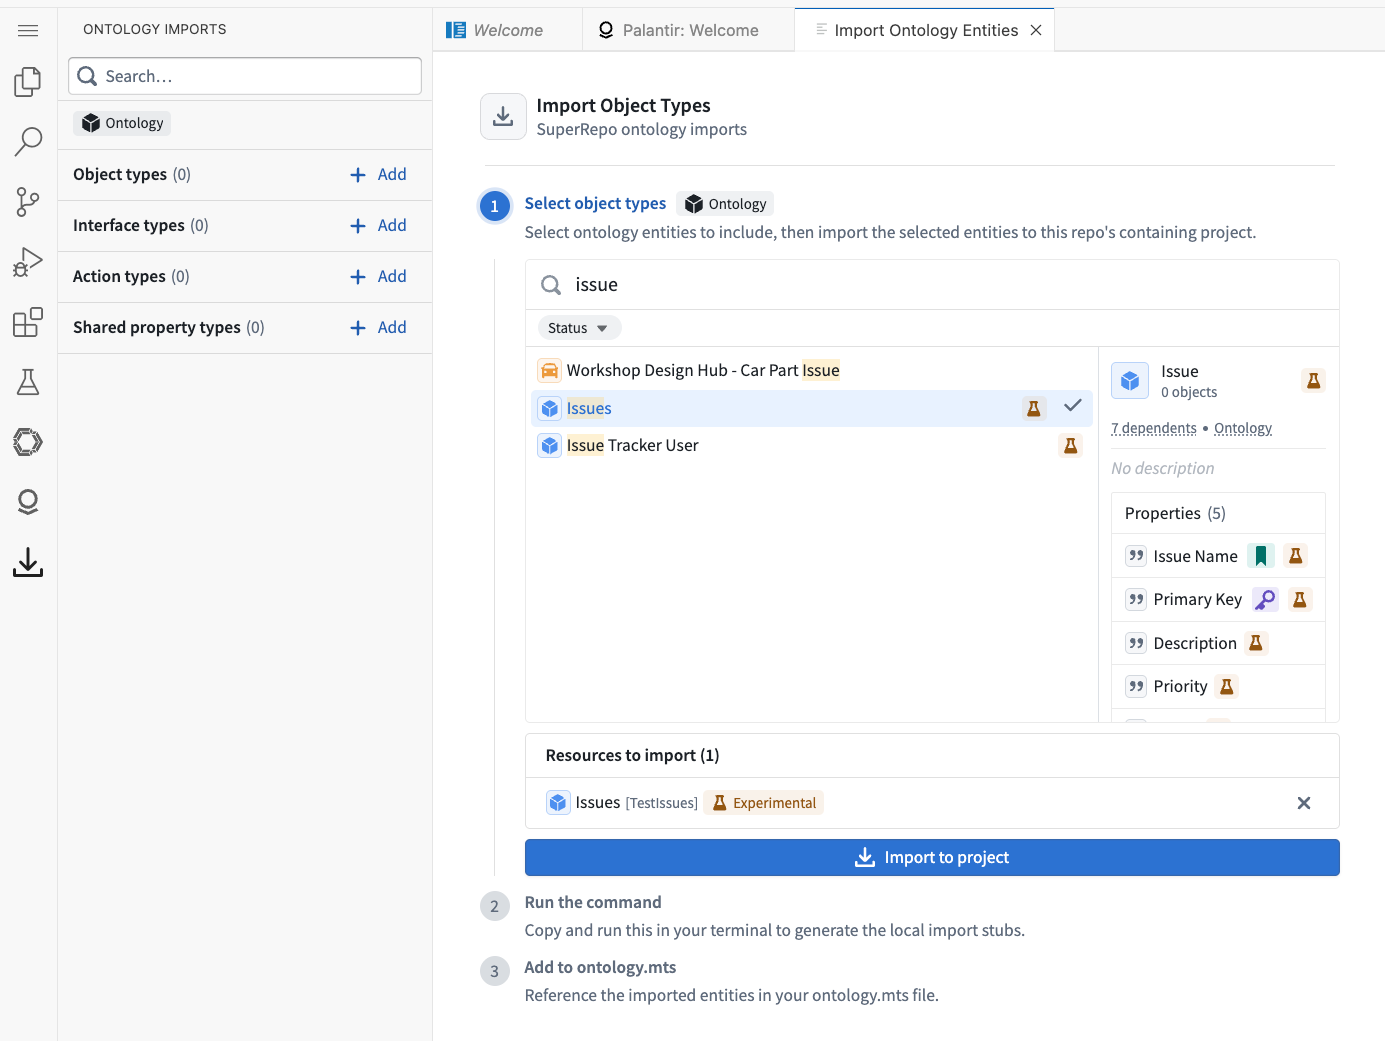
Lastly, selecting the Import to project button imports the selected types into the Foundry Project and shows the foundry import ontology command that you need to run to codify the import within your repository.
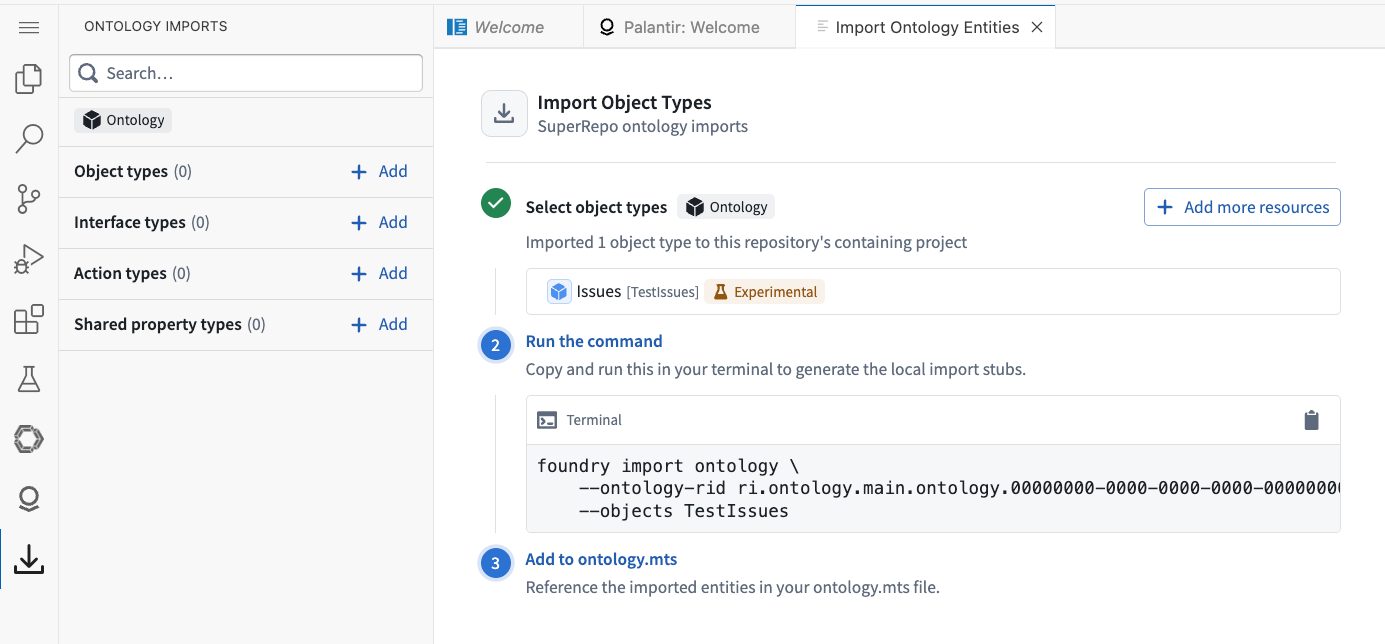
Expand the Ontology
The ontology/src/ontology.mts file is the home of Ontology-as-code, which lets you extend the Ontology using its TypeScript API ↗. For example, the template defines a link type between TutorialWorker and TutorialTask. Each worker can have many assigned tasks, and each task can have one assignee. The following definition is already included in the template:
Copied!1 2 3 4 5 6 7 8 9 10 11 12 13export const assignedTasks: LinkType = defineLink({ apiName: "assignedTasks", one: { object: TutorialWorker, metadata: { apiName: "assignedTasks" }, }, toMany: { object: TutorialTask, metadata: { apiName: "assignee" }, }, manyForeignKeyProperty: "assigneeId", editsEnabled: true, });
Editing seed data resets the local preview data, discarding any objects you created and reverting changes to the seed objects. Seed data is local to the preview and is never deployed.
The assigneeId property on a task holds its worker's primary key. To assign the unassigned task in the local preview, add assigneeId: "WORKER-1" to TASK-103 in ontology/seed/001-tasks.mts. Both object types are seeded in that file.
Whenever the ontology.mts file changes, the local Ontology SDK package is regenerated. You can track the rebuild progress in the status display shown by pnpm run dev (pnpm run dev:windows on Windows), and inspect the ontology:dev output using the Tab and arrow keys.
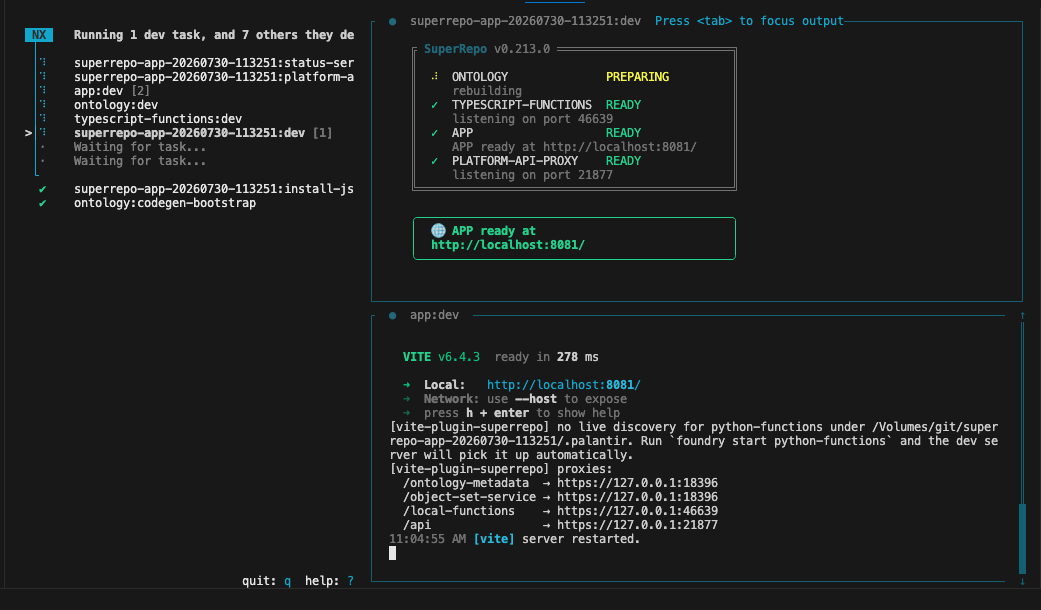
Add a function
SuperRepos currently support TypeScript v2 functions. The template uses a function to mark a task as complete and prevent it from being completed twice.
Open completeTask.ts in functions/typescript-functions/src/functions. The function it contains takes an Ontology SDK client and a task as arguments and returns an edit that updates the task's status.
Copied!1 2 3 4 5 6 7 8 9 10 11 12 13 14 15 16 17 18 19 20 21 22 23 24 25 26 27 28import { task } from "@ontology/sdk"; import { Client, Osdk } from "@osdk/client"; import { createEditBatch, Edits, UserFacingError } from "@osdk/functions"; export const COMPLETE = "Complete"; type OntologyEdit = Edits.Object<task>; function completeTask( client: Client, taskToComplete: Osdk.Instance<task>, ): OntologyEdit[] { if (taskToComplete.status === COMPLETE) { throw new UserFacingError( `${taskToComplete.title ?? taskToComplete.$primaryKey} is already complete`, ); } const batch = createEditBatch<OntologyEdit>(client); batch.update(taskToComplete, { status: COMPLETE }); return batch.getEdits(); } export const config = { apiName: "completeTask", }; export default completeTask;
The Ontology SDK exports task and worker from the object types' apiName values, rather than the TutorialTask and TutorialWorker constant names used in ontology.mts.
You can preview this function immediately using the functions support of the Palantir extension for Visual Studio Code.
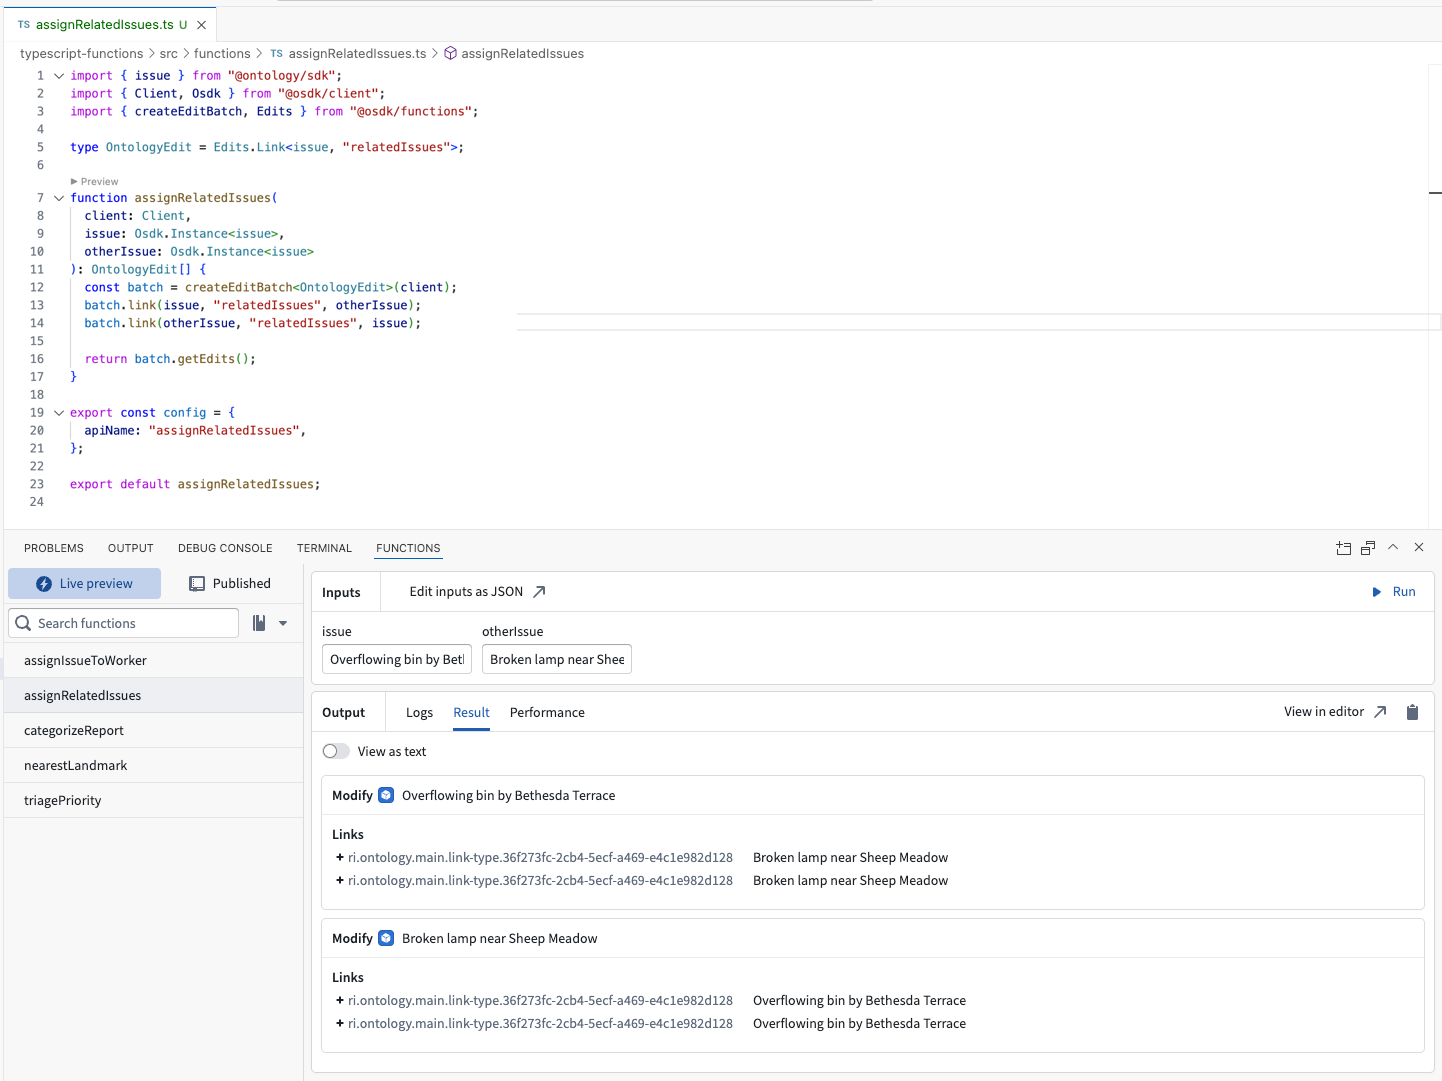
This TypeScript v2 function returns Ontology edits; however, these edits need to be applied to the Ontology to take effect. Only actions are allowed to mutate the Ontology's content. To update a task's status, expose completeTask as a function-backed action.
The template already exposes this function inside the same ontology.mts file that defines the link type by calling the defineFunctionBackedAction function as follows:
Copied!1 2 3 4export const completeTaskAction: ActionType = defineFunctionBackedAction({ functionApiName: "completeTask", apiName: "complete-task-action", });
This allows you to call completeTaskAction through the generated Ontology SDK from inside your React application.
Expose the action through the frontend
The previous sections demonstrated importing an object type, creating a link type, and defining a TypeScript v2 function-backed action. The preview process of the Foundry CLI ensures that these are all exposed through the locally generated Ontology SDK library. You can consume this library from an Ontology SDK React application.
When using the @osdk/react library ↗, accessing these newly added items can be done in a few lines, as shown below.
Copied!1 2 3 4 5 6 7 8import { task, completeTaskAction } from "@ontology/sdk"; import { useOsdkAction, useOsdkObjects, } from "@osdk/react"; const { data: tasks } = useOsdkObjects(task, { pageSize: 50 }); const completeAction = useOsdkAction(completeTaskAction);
These hooks are already called inside the Demo component in app/src/tutorial/Demo.tsx. To enable its Mark as complete buttons, remove the comment markers around the handler in getCompleteHandler and remove return null:
Copied!1 2 3 4 5 6 7function getCompleteHandler(): | ((taskToComplete: Osdk.Instance<task>) => Promise<void>) | null { return async (taskToComplete) => { await completeAction.applyAction({ taskToComplete }); }; }
In the running preview application, select Add your own logic in the tutorial navigation. Under Live preview, select Mark as complete on an incomplete task. Its status changes to Complete. Select Define object relationships in the tutorial navigation to view each worker's assigned tasks. This view uses useLinks(item, "assignedTasks", { pageSize: 50 }) to follow the link defined above.
Conclusion
You updated the task assignments, explored a function and its function-backed action, and integrated it with the frontend through the Ontology SDK, all without leaving the repository or your IDE.
Before SuperRepos, implementing this feature would have required jumping between four applications, waiting for CI checks, and republishing the Ontology SDK multiple times. SuperRepos are designed to eliminate that overhead.
Next steps
- Review Advanced workflows to declare multiple products, define seed data for preview, or configure the platform API proxy.
- Prepare for your first deployment to install your product on an enrollment.