- Capabilities
- Getting started
- Architecture center
- Platform updates
Branching Developer Console applications
Developer Console integrates with Global Branching so you can develop an Ontology SDK (OSDK) React application alongside changes to its Ontology resources. On a global branch, you can change the resources included in your SDK, generate an SDK from branched Ontology definitions, and test your application against data on the branch.
Capabilities
You can use Developer Console on a global branch to:
- Modify the set of resources included in your generated SDK.
- Generate SDKs against branched definitions of Ontology entities.
- Read data from the global branch without generating a new SDK.
- Develop against a branched SDK.
- Read and write branch data from a development server or pull request preview.
Whether you need to generate a new SDK depends on the change you want to test:
| Change you want to test | SDK generation |
|---|---|
| Read branch data using resources already available in your SDK. | You can use your existing SDK after completing the repository setup. |
| Use a changed Ontology definition or a resource newly added to your SDK on the branch. | Generate an SDK on the branch, then run npm install to update your application dependency. |
In either case, complete the indexing prerequisites before testing actions on a branch.
Limitations
The Developer Console integration supports TypeScript SDKs installed with npm in applications that use Vite 6, 7, or 8. It does not currently support other SDK languages or package managers.
Global Branching does not support OSDK applications embedded inside other OSDK applications. The embedded application does not inherit the host application's branch context and can make requests that apply actions to main. Embedded applications support Global Branching only through the bidirectional Workshop Iframe widget configuration, with the required client version and options.
Prerequisites
Before developing on a global branch, complete the following prerequisites:
- Ensure your Developer Console application is in a project. For a legacy application, follow the project migration instructions, including the guidance on permission changes.
- Create or select a global branch for your workflow. Your Developer Console application must already have an Ontology SDK on
main, because you cannot add one on a global branch. The global branch must use the same Ontology as the application's SDK. - Use the supported dependency versions, with Vite
6,7, or8. Upgrade older Vite versions and any affected plugins before configuring branching. If your application uses OSDK 1.x, first follow the TypeScript OSDK migration guide. - For a Foundry code repository, use a template that supports Global Branching and meets its minimum template version requirement. For example, repositories created from the latest version of the Ontology SDK React Application template (
osdk-react-app-v2) already include the required dependencies and Vite configuration. - If your repository uses an older template version or lacks the required configuration, follow the steps in Migrate an existing repository, starting with the template upgrade. Merge the changes into the default branch before adding the repository to a global branch.
- Before testing actions, index every object type edited by those actions on the global branch. To index several object types at once, use bulk indexing in Workflow Lineage. Wait for indexing to complete before running the actions. Running actions on a branch is for testing only. Action edits made on the branch are not merged into
main.
Complete all repository setup steps before running your application on a global branch. Otherwise, your application's requests can read data from and apply actions to main or another branch. For an application embedded in Workshop, also meet the embedded application requirements.
Application restrictions across branches
Application restrictions are shared across all branches, including the default branch, main. Changes to these restrictions affect the application on every branch.
On a non-default branch, you can add only the Ontology resources that the branch needs to the resource restrictions. You cannot remove restrictions, because removing them could break other branches, including main. Project restrictions on the Platform SDK tab, operation restrictions, marking restrictions, and OAuth client settings are read-only on non-default branches.
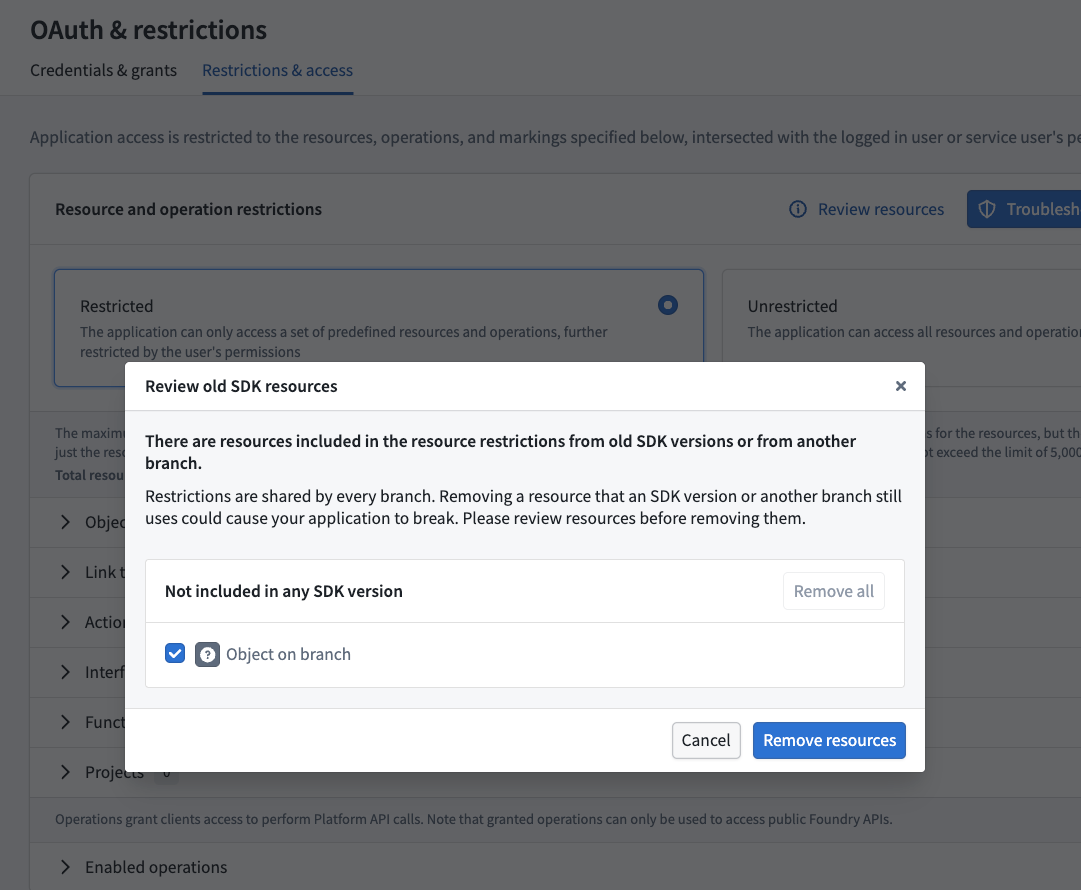
Review unused resource restrictions
To review restrictions for resources no longer included in the current SDK:
- Open the application in Developer Console and switch to
main. - Open the OAuth & restrictions page and select the Restrictions & access tab.
- Select Review resources to open the Review old SDK resources dialog.
- Review the listed resources and select those you no longer need. Removing a resource that another SDK version or branch still uses can break the application on that branch.
- Select Remove resources.
Develop on a global branch
Use the same global branch for the application in Developer Console, its Ontology changes, and its source code. A global branch coordinates resources across Foundry; a Git branch alone does not establish that context.
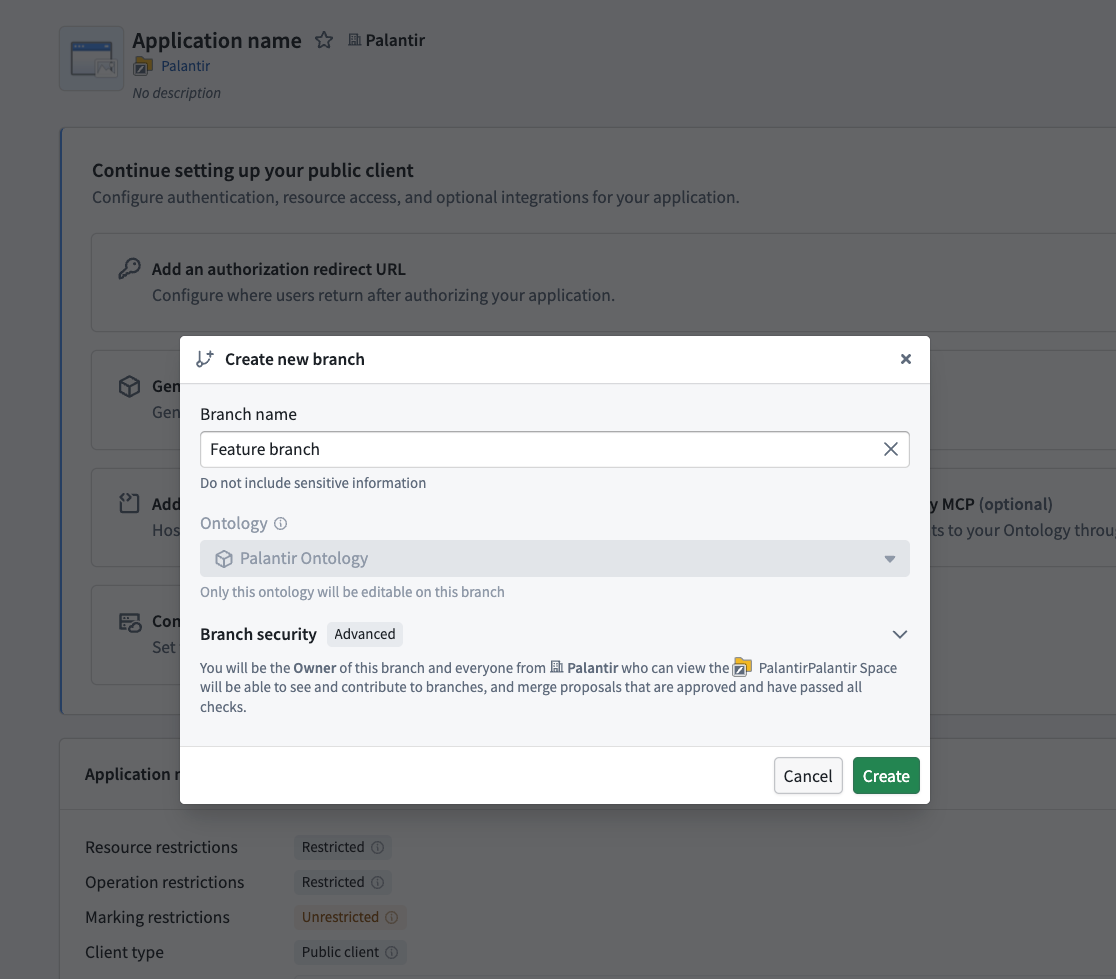
Open the application on a branch
- Open your application in Developer Console.
- Use the branch selector to create or switch to the global branch for your workflow.
- Confirm the selected branch before changing the resources included in the SDK.
- Before you test actions, confirm that indexing has completed for every object type those actions edit, as described in the prerequisites.
For general branch navigation, see Create or access a branch.
Update resources and generate an SDK
To change the resources included in your SDK and generate an SDK from branched Ontology definitions:
- Make the required Ontology changes on the same global branch. See Branching the Ontology.
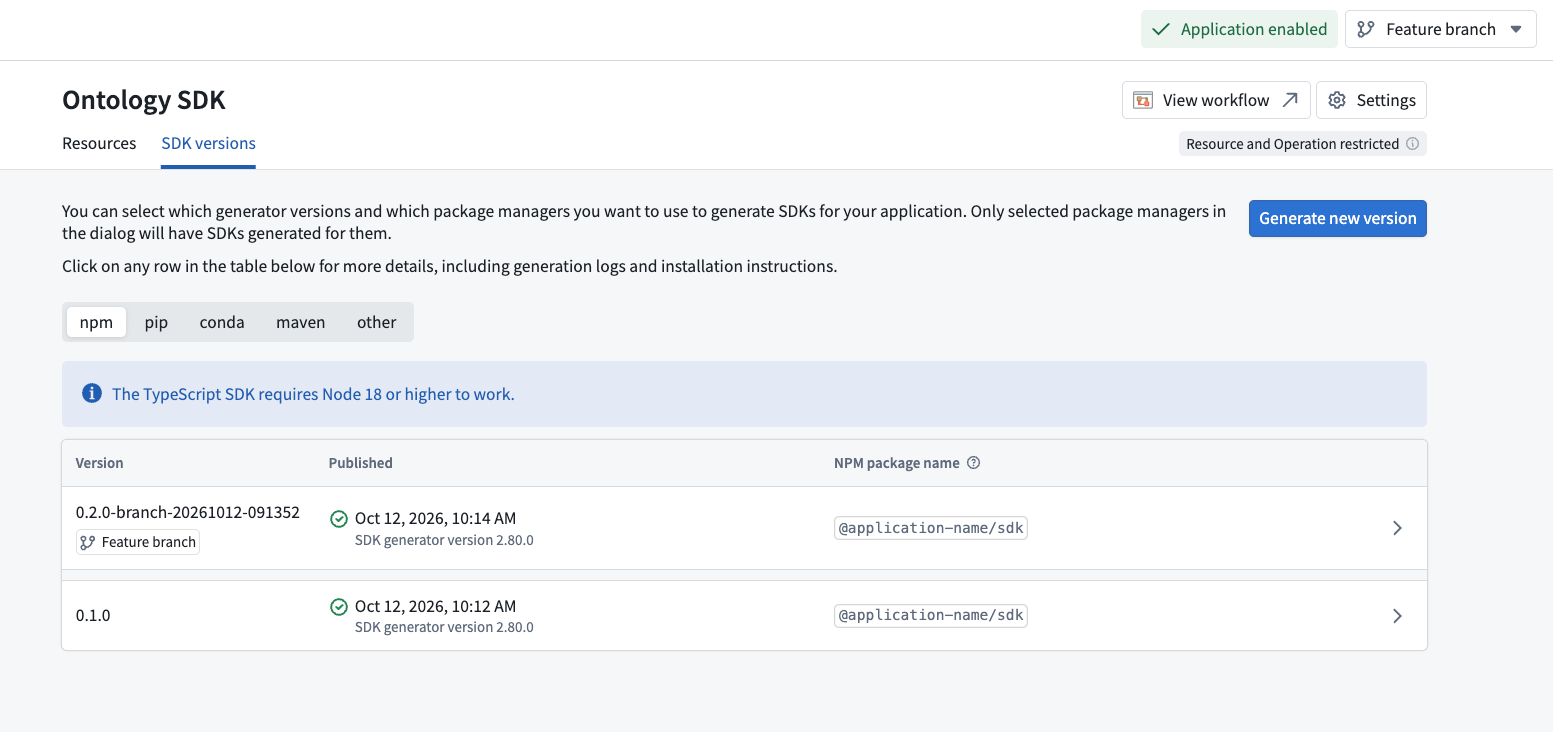
- In Developer Console, open the Ontology SDK page, select the Resources tab, and update the resources included in your application's SDK.
- Open the SDK versions tab and select Generate new version to generate an SDK version on the branch. If the Developer Console application is not already part of the global branch, generating an SDK adds it to the branch.
- In the application repository, check out the same global branch, then run
npm installto use the latest SDK generated on that branch. - Review, commit, and push the updated
package.jsonandpackage-lock.jsonfiles so the proposal checks and preview build use the updated SDK dependency.
The repository's postinstall script synchronizes the SDK dependency. You do not need to manually copy a branched SDK version into package.json.
Run a development server
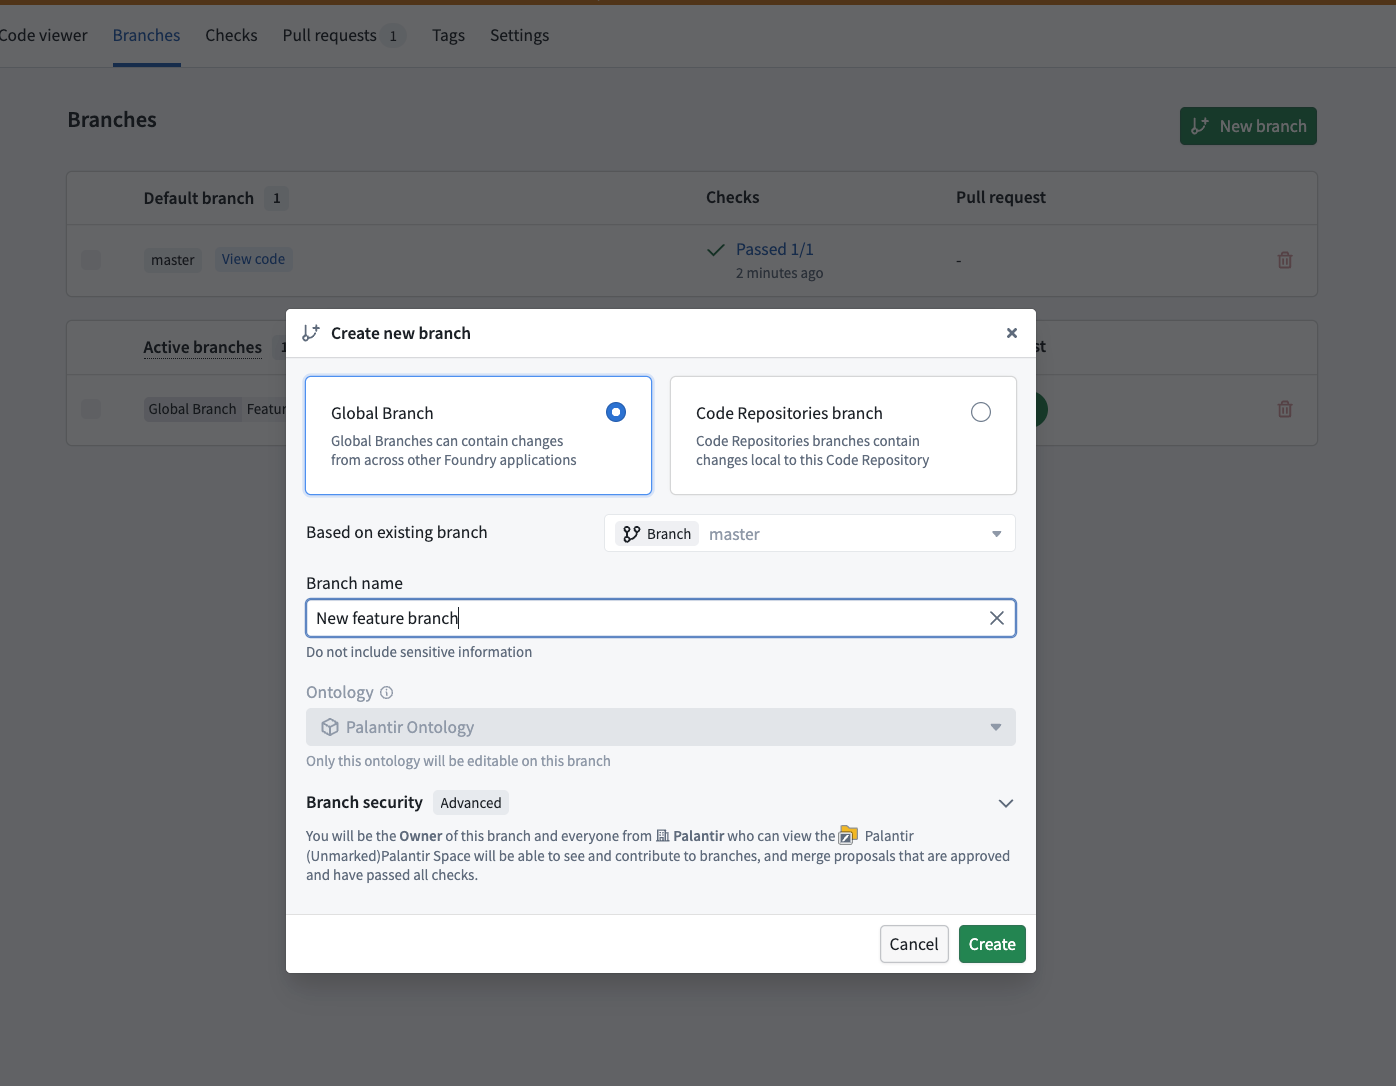
Complete the repository setup before starting development. If the global branch for your workflow does not yet exist, you can create it from your code repository. Open the Branches tab, select New branch, and choose Global branch. You can also create a global branch from your local development environment using the Palantir MCP Global Branching tools. Creating a local Git branch alone does not create a global branch.
Use a VS Code workspace
Open your Foundry-hosted VS Code workspace and check out the global branch for your workflow. Each time the workspace starts the development server, its generated configuration runs npm install first. During installation, the postinstall script synchronizes the application's SDK dependency with the latest SDK generated on the checked-out branch. If you check out a branch after the development server starts, open the additional actions menu in the preview toolbar and select Restart development server to reinstall dependencies.
Use a local development environment
If the global branch does not yet exist, create it in Foundry or use the create_global_branch tool through Palantir MCP in your local AI development tool. Use the same Ontology as your Developer Console application. See the Global Branching tools reference for tools to create and inspect branches and proposals.
Ensure your source code repository is on the same global branch, following the resource branching workflow. In your local clone, fetch and check out the repository branch that Foundry created for that global branch, keeping the same Git branch name locally. To find this name, open the global branch in Code Repositories and hover over the information icon in the branch selector. The popover lists the Code Repositories branch name under Working locally on a global branch. The branch plugin and osdk branch sync use the checked-out Git branch name to determine the branch context. Then install dependencies and start the local development server:
Copied!1 2npm install npm run dev
Running npm install locally invokes the same postinstall script and synchronizes your application with the latest SDK generated on the checked-out global branch.
In either environment, the development server can read data and apply actions on the global branch, subject to the SDK generation and indexing requirements.
Preview a pull request
Opening a proposal for your global branch creates a source code pull request. The continuous integration (CI) build then deploys a pull request preview that reads from and writes to the global branch. The preview requires a repository template that supports Global Branching, the required application configuration, and website hosting configured for the application in Developer Console. Share the preview with others to test the application together with its branched Ontology resources.
- Create a proposal for the global branch.
- Open the code repository pull request created for the proposal.
- After the application publish check succeeds, select Preview beside the check.
- Open the preview and verify that it displays a change or data available only on the intended global branch. In your browser's network tools, confirm that the application's Ontology requests include a
branchquery parameter containing the global branch's resource identifier (RID). Then share the preview URL with reviewers.
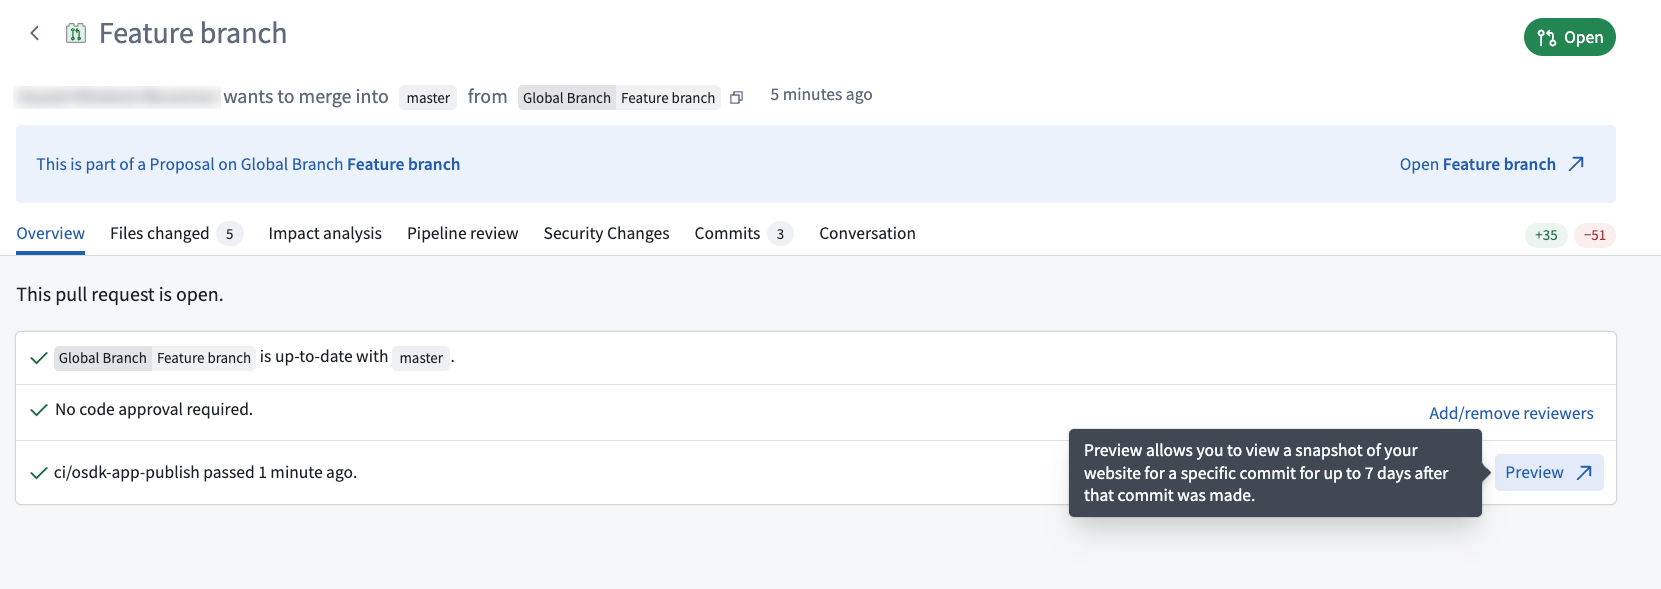
You cannot tag releases or publish the production website from a global branch. This prevents unstable changes from reaching the production website. To share your changes, create a proposal and use its pull request preview.
Use an embedded application in Workshop
This integration supports only the Bidirectional configuration of Workshop's Iframe widget. The Iframe widget documentation recommends custom widgets for new integrations, but this integration does not cover custom widgets.
Iframe configurations other than Bidirectional do not inherit the Workshop module's global branch context. An embedded application must also meet every requirement in this section, including the repository setup. If an embedded application does not meet these conditions, its requests can read data from and apply actions to main or another branch.
Developer Console applications embedded in Workshop support Global Branching when all the following requirements are met:
- The application's repository meets the repository setup prerequisites.
- The application is configured for bidirectional communication with Workshop, and the Iframe widget uses the Bidirectional option.
- The application uses
@osdk/clientversion2.77.0or later. - The application passes
useHistory: falsein the options when initializingcreatePublicOauthClientfrom@osdk/oauth. - The OSDK client does not pass any explicit branch overrides.
Set useHistory: false on the OAuth client, preserving your existing OAuth options, such as scopes:
Copied!1 2 3 4 5 6const auth = createPublicOauthClient(clientId, foundryUrl, redirectUrl, { scopes, useHistory: false, }); const client = createClient(foundryUrl, ontologyRid, auth);
When you preview a Workshop module on a global branch, the bidirectional iframe passes that branch context to the embedded application. The iframe still loads the website deployed at its configured URL, including the SDK bundled with that deployment. Switching the Workshop branch does not regenerate the SDK or rebuild and redeploy the website.
The Ontology schema used by the deployed website must therefore remain stable across the branches you preview. Every object type, property, action type, and other resource the website uses must remain compatible with its bundled SDK. To test incompatible schema changes, generate an SDK for those changes, update the application, and point the iframe to a compatible deployment.
Once you have met the requirements in this section and completed the repository setup, merge the required application and repository changes into the repository's default branch. Then cut a release to deploy them. You can then embedded your production website in the Iframe widget.
If an embedded application does not meet the requirements in this section, it will not use the global branch. Its requests will go to main without warning: it displays data from main, and any actions it applies edit data on main instead of the branch.
To verify the branch context, preview the Workshop module on the global branch. In your browser's network tools, confirm that the embedded application's Ontology requests include a branch query parameter containing the global branch's RID.
Migrate an existing repository
For supported React application templates in Code Repositories, upgrade the repository template to obtain the CI changes, then update the application dependencies and Vite configuration manually. A template upgrade does not modify your application code or dependency files.
Make the manual changes on a Code Repositories branch created from the default branch. Merge the template upgrade and manual changes into the default branch before adding the repository to a global branch. Foundry checks package-lock.json and vite.config.ts on the repository's master branch, which is usually the default branch, to determine whether the repository supports Global Branching.
| File | Required change |
|---|---|
package.json | Add the branch plugin, update the OSDK client, add the OSDK command line interface (CLI), and configure SDK synchronization after installation. |
package-lock.json | Update this file by running npm install after changing dependencies. |
vite.config.ts | Register branchPlugin() so the application build supports branch context. |
.jemma/sync-sdk-dependencies.sh and ci.yml | Obtain these template-managed files through a repository template upgrade. They provide SDK dependency synchronization during proposal merges and CI configuration for branch context and previews. |
Upgrade the repository template
Foundry checks the repository's template version against the minimum version required for that template to support Global Branching. Updating npm dependencies alone does not satisfy this template requirement.
For the Ontology SDK React Application template (osdk-react-app-v2), use version 0.291.0 or later. The example below uses this template. For other supported application templates, upgrade to the latest available version; Foundry checks the minimum version separately for each template.
- Open your repository in Code Repositories and select its default branch.
- Select Upgrade from the repository menu, as described in Manual branch upgrade.
- Review the upgrade changes in
templateConfig.json. Confirm thatparentTemplateIdidentifies your template and that the newparentTemplateVersionmeets its Global Branching minimum. - Apply the repository upgrade, including merging any required upgrade pull request. See Repository upgrades for details.
The following upgrade pull request updates osdk-react-app-v2 from 0.271.0 to 0.291.0:
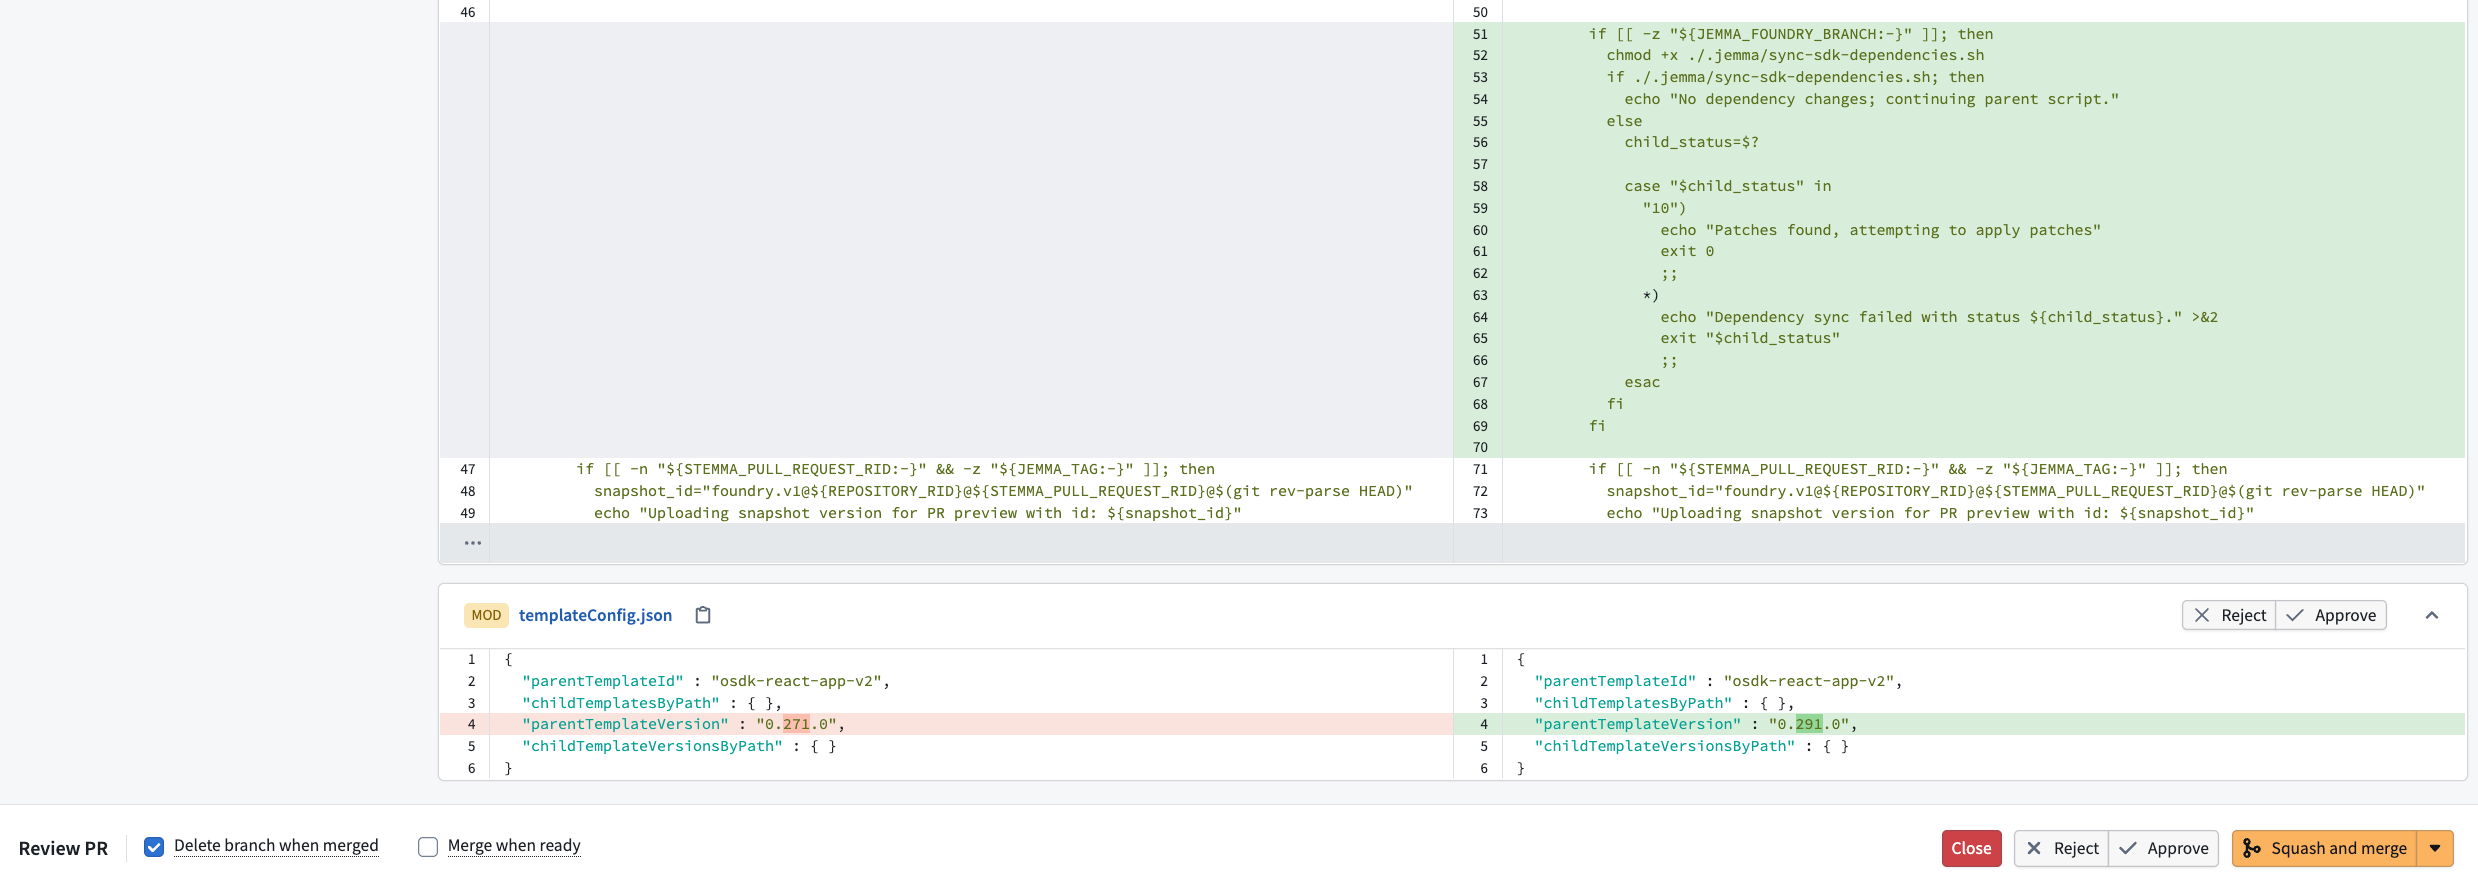
For supported React application templates, the upgrade updates ci.yml and supplies .jemma/sync-sdk-dependencies.sh. These files pass branch context to the build, configure pull request previews, and synchronize SDK dependencies during proposal merges. Use the template-provided files; later upgrades can overwrite template-managed files.
The upgrade does not change package.json, package-lock.json, or vite.config.ts in an existing repository. Complete the manual steps below even after the template upgrade succeeds.
Templates based on TypeScript OSDK 1.x do not support this integration. Use a template based on OSDK 2.x that supports Global Branching, and follow the TypeScript OSDK migration guide for your application code.
Update dependencies and scripts
Use the following dependency versions with Vite 6, 7, or 8:
| Package | Version | Location in package.json |
|---|---|---|
@osdk/client | 2.77.0 or later | dependencies |
@osdk/vite-plugin-branch | 2.77.0 or later | dependencies |
@osdk/cli | 0.104.0 or later; install latest | devDependencies |
Version 0.104.0 of the CLI introduces the osdk branch sync command used by the postinstall script.
Merge the following entries into your existing package.json. Preserve your other dependencies and scripts. If you already have a postinstall script, include the SDK synchronization command alongside your existing commands.
Copied!1 2 3 4 5 6 7 8 9 10 11 12{ "scripts": { "postinstall": "osdk branch sync" }, "dependencies": { "@osdk/client": "^2.77.0", "@osdk/vite-plugin-branch": "^2.77.0" }, "devDependencies": { "@osdk/cli": "latest" } }
Keep your application's generated SDK dependency in package.json. The synchronization command updates that dependency for your active branch when you run npm install.
For bidirectional applications embedded in Workshop, also pass useHistory: false in the options when initializing createPublicOauthClient.
Register the branch plugin
Use a vite.config.ts file at the repository root. Import branchPlugin by name from @osdk/vite-plugin-branch and call branchPlugin() directly inside an inline plugins: [...] array. Foundry's Global Branching configuration check requires this layout; it does not recognize vite.config.js, vite.config.mts, or a plugins array supplied through a separate variable or helper.
Preserve your other plugins and settings, including any Foundry-hosted VS Code workspace configuration. The following example shows the plugin alongside the React plugin:
Copied!1 2 3 4 5 6 7 8import { branchPlugin } from "@osdk/vite-plugin-branch"; import react from "@vitejs/plugin-react"; import { defineConfig } from "vite"; export default defineConfig({ plugins: [react(), branchPlugin()], // Preserve your other plugins. // Preserve your other configuration settings. });
Install dependencies and verify the migration
After updating the files, check out the Code Repositories branch used for the migration in a VS Code workspace or local clone, then run the following command:
Copied!1npm install
This installs the required packages, runs the postinstall script, and updates package-lock.json. Review and commit the application changes to package.json, package-lock.json, and vite.config.ts. Keep the template-managed CI and synchronization files supplied by the repository upgrade. Run the application's existing lint, test, and build checks, then merge the migration into the repository's default branch.
After merging the migration, add the repository to your global branch.
If Foundry reports Unable to add this repository to a global branch:, review the listed reasons. In VS Code, the error details begin with This repository is not set up for Global branching: or This repository template does not support Global branching. If the message reports that the repository template is not supported, upgrade the repository template. For dependency or Vite failures, check the dependency versions in package-lock.json and the configuration in the root vite.config.ts. Confirm that the fixes are on the repository's master branch before adding the repository again.
After adding the repository, check out the global branch and run npm install again to synchronize its SDK dependency. Start the development server and verify that:
- The development server displays a change or data available only on the intended branch. Inspect the application's Ontology requests in your browser's network tools. Confirm that their
branchquery parameter contains the intended branch's name or RID. - After generating an SDK on the branch and running
npm install, the installed SDK version matches the latest version shown on that branch in Developer Console.
To verify a preview deployment, create a proposal and preview its pull request.
Review and merge changes
In Global Branching, you review changes in a proposal before merging them into main. See Create and prepare a proposal for the general workflow.
Opening the proposal creates a source code pull request. Share its preview deployment so reviewers can test the application against the global branch before merging. Merging the proposal does not deploy the production website. To deploy the merged changes, cut a release on the repository's default branch.
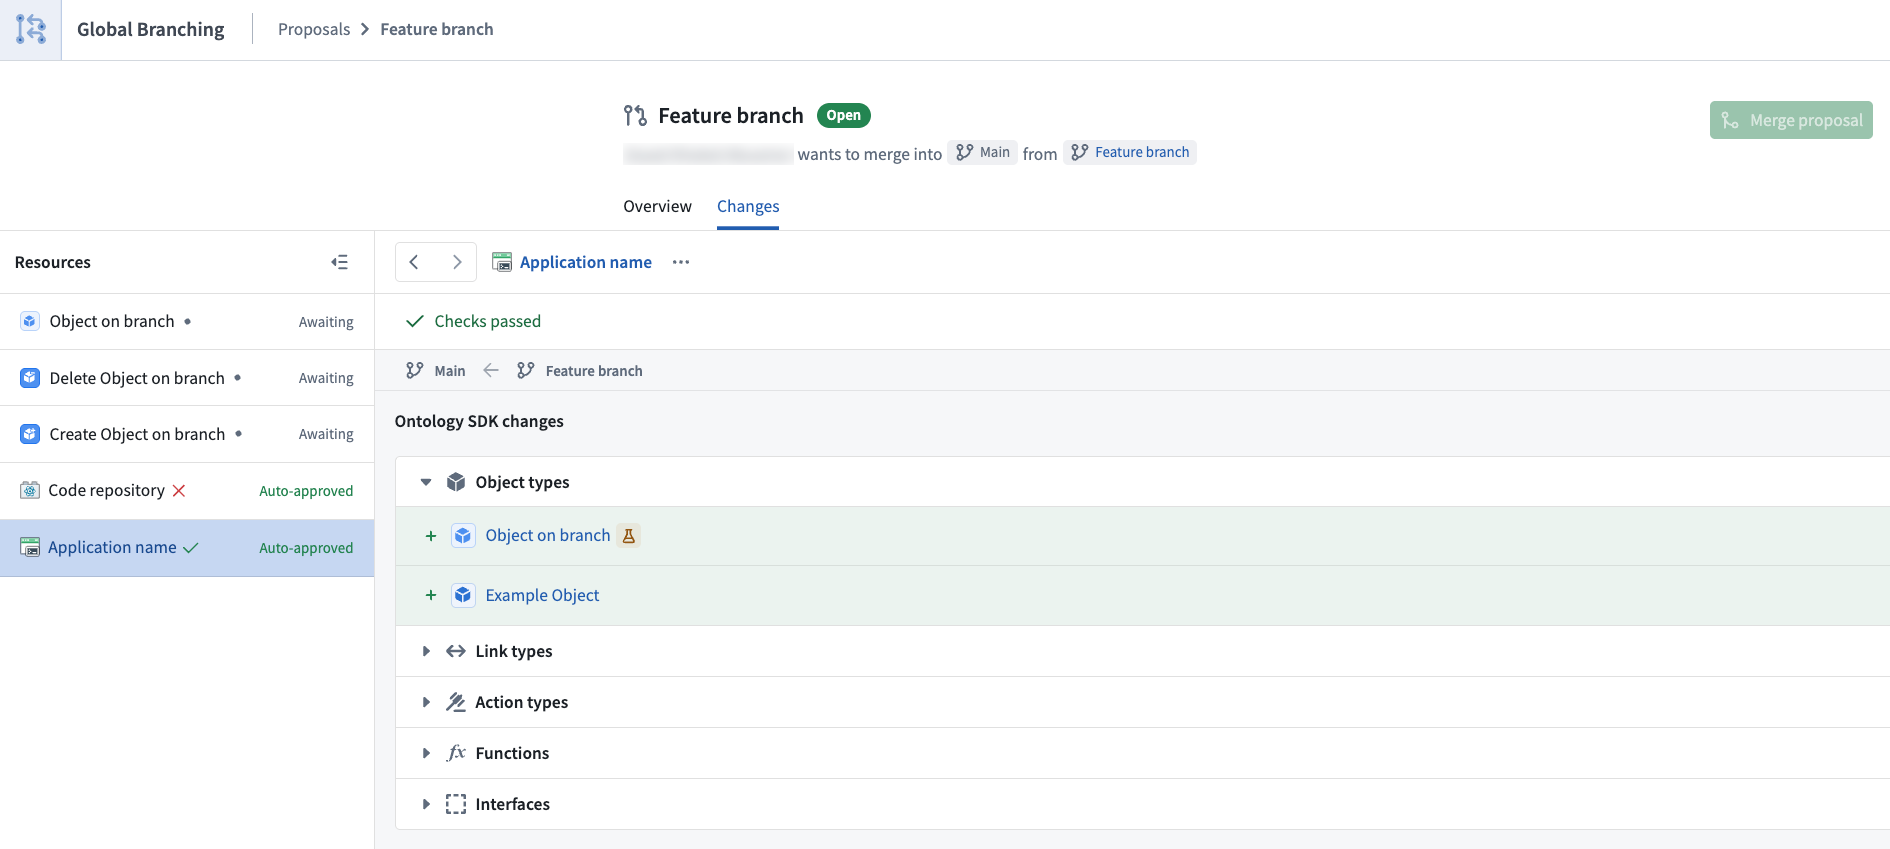
In the proposal's Changes tab, select the Developer Console application to review the resources added to or removed from its SDK.
Resolve conflicts when rebasing
If resources change on main during development, review the Global Branching guidance on rebasing and conflict resolution.
To resolve conflicts in the application's SDK resources:
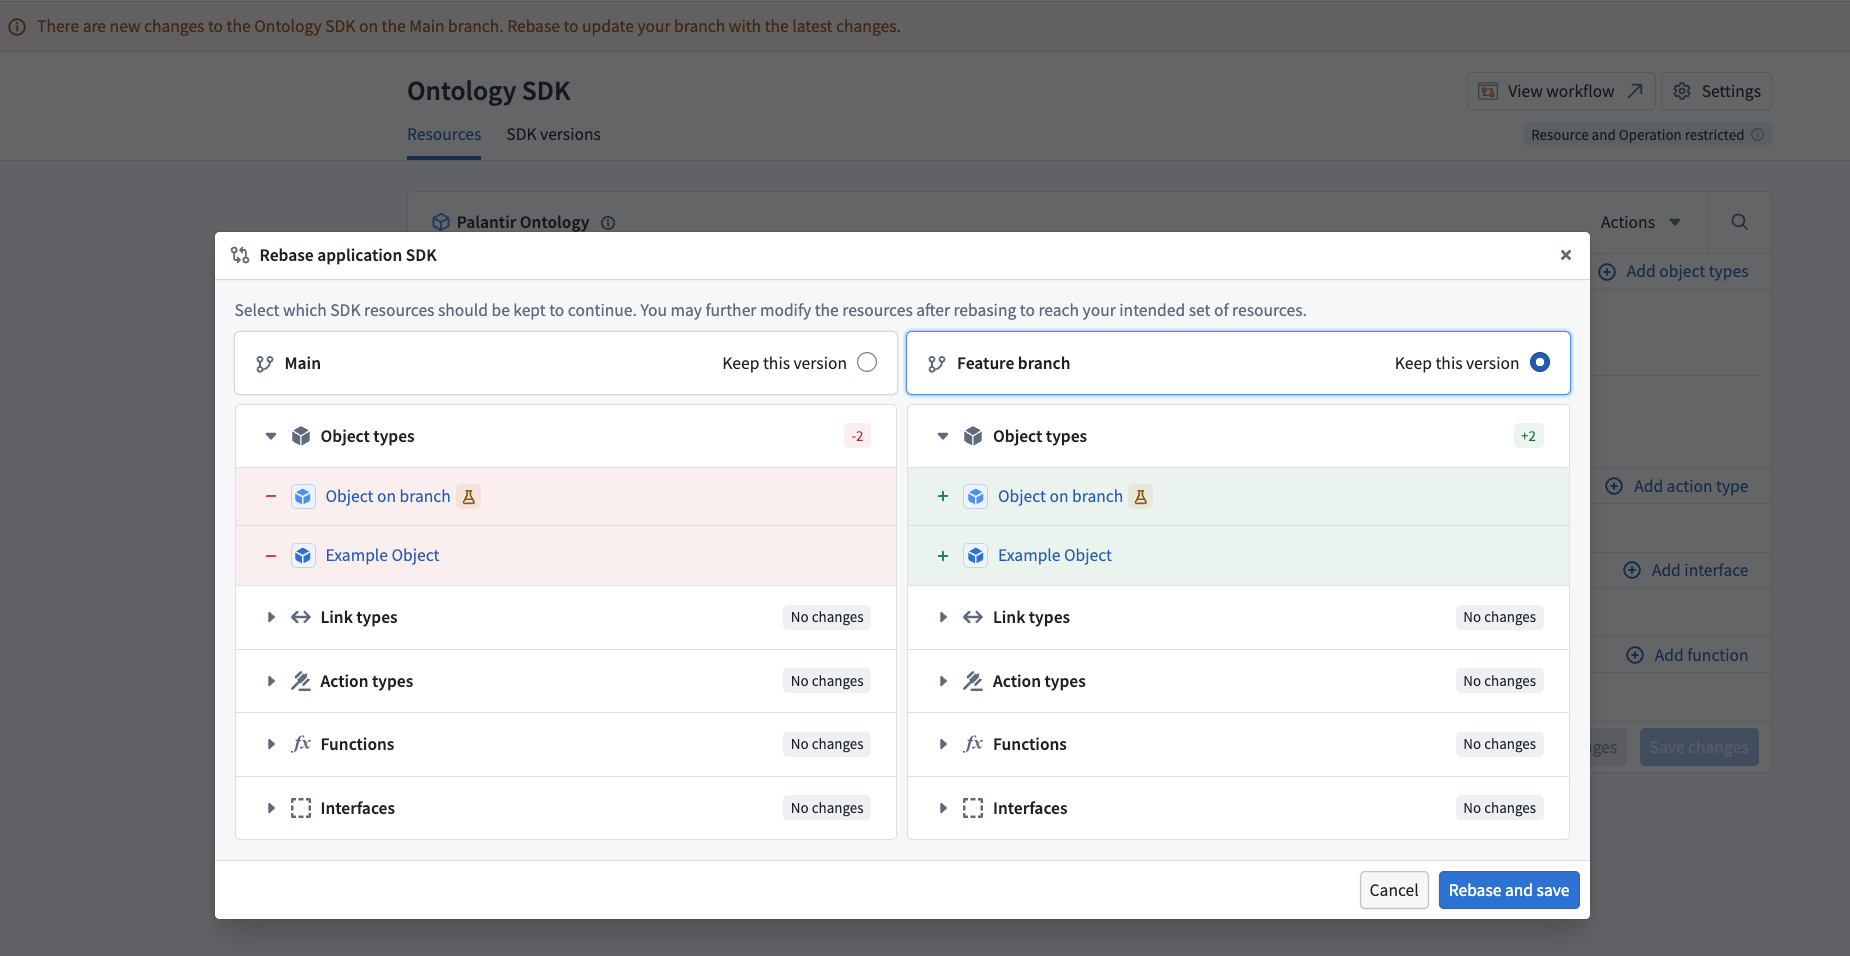
- On the Ontology SDK page in Developer Console, select Start rebase to open the Rebase application SDK dialog.
- Compare the resources on Main and your branch, then select Keep this version for the resource set you want to retain. Keep this version applies to the entire resource set from that side.
- Select Rebase and save.
- Generate a new SDK on the branch, then run
npm installin the source code repository to update the SDK dependency. - Commit and push the updated
package.jsonandpackage-lock.jsonfiles, then retest the application.
The Developer Console proposal check requires an SDK generated from the latest application SDK resources.