Advanced
The advanced widget category consists of the following widgets:
Code Sandbox
The Code Sandbox widget is a secure sandbox for you to implement your own custom widget to extend the functionality of Slate. You are able to build your own custom visualizations, take advantage of third-party JavaScript libraries, or build advanced workflow interactions. You can define the rendering, the widget model, and the event interactions so that your widget integrates with the rest of your application. External JavaScript libraries can be loaded into a folder in your Project and referenced in your widget.
The Code Sandbox widget unlocks advanced, custom development capabilities within your Slate application. Implementing custom functionality through the Code Sandbox widget should be done with a clear understanding of the technical complexity involved and long-term maintenance required for successful development. Widget development is at your own discretion and risk; support is not provided for debugging custom code.
Summary of interaction
A summary of interaction with Slate and functions that can be used can be found below:

JavaScript tab
This tab has the fields for the JavaScript, as well as any JavaScript libraries you might wish to load.
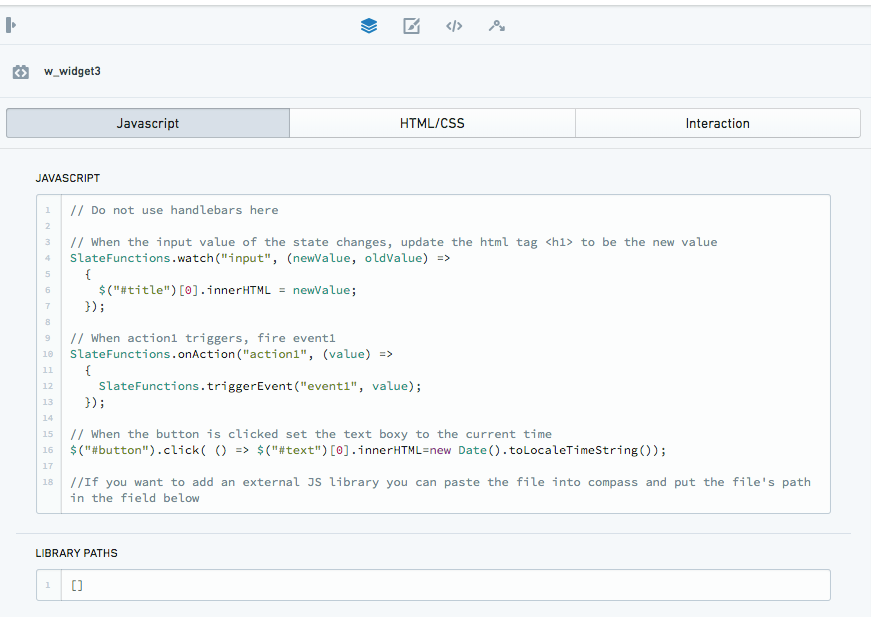
JavaScript
This is a string of JavaScript that will get executed when the widget loads. Making any change to this JavaScript will cause the entire widget to reload. The JavaScript in this field will be executed after the JavaScript from the libraries field. See the JavaScript libraries section for instructions on loading third party libraries.
Do not use Handlebars here. We recommend that you pass in data using SlateFunctions through the Javascript tab to interact with state in the interaction tab.
Network requests and references (for example, the usage of fetch) are not supported in the Code Sandbox for JavaScript, JavaScript libraries, or HTML. Any network requests must be proxied to configured Queries via SlateFunctions.
Available functions
The following native functions can be invoked to interact with Slate specific functionality. These functions allow you to interact with the rest of the Slate application through the use of events, actions, and state changes. The functions are exposed to the JavaScript running within the widget. More information and examples can be found below.
- SlateFunctions.onAction
- SlateFunctions.watch
- SlateFunctions.getState
- SlateFunctions.setState
- SlateFunctions.triggerEvent
JavaScript libraries
This is an array of Project paths which will be downloaded and then executed in order within the widget, or an array of URLs that is allowed by both CORS and CSP policy (where you can mix and match).
Downloading will use the browser, so the URL must be allowed by
the CORS and CSP policy. If you wish to host libraries within Foundry,
you can either host them in Blobster and use the cookie-authenticated APIs or put the script in the asset server. Making changes to this field will cause the entire widget to reload and refresh. (The libraries can themselves invoke the SlateFunctions to allow them to interact with the Slate-specific functionality).
Imported JavaScript libraries must assign their functionality to a globally available scope to be referenced via the JavaScript tab (such as being bundled as a UMD module, or explicitly assigning functionality to the window).
Example
To use the d3.min.js library, downloaded it from
https://d3js.org/d3.v5.min.js and save it to a Foundry directory by
dragging-and-dropping the file. Once the file is uploaded, copy its
Project path and paste it into the library array.
["/Users/admin/d3.min.js"]
You can alternatively use the RID for the resource. For example:
["ri.blobster.main.code.7a4a12a8-e9f5-46ef-8008-5c3f4bbd4abc"]
You can obtain the Project path/RID for a resource by looking at its file's directory. Alternatively, you can right-click on the file once while in its folder and copying the Location / RID.
HTML/CSS tab
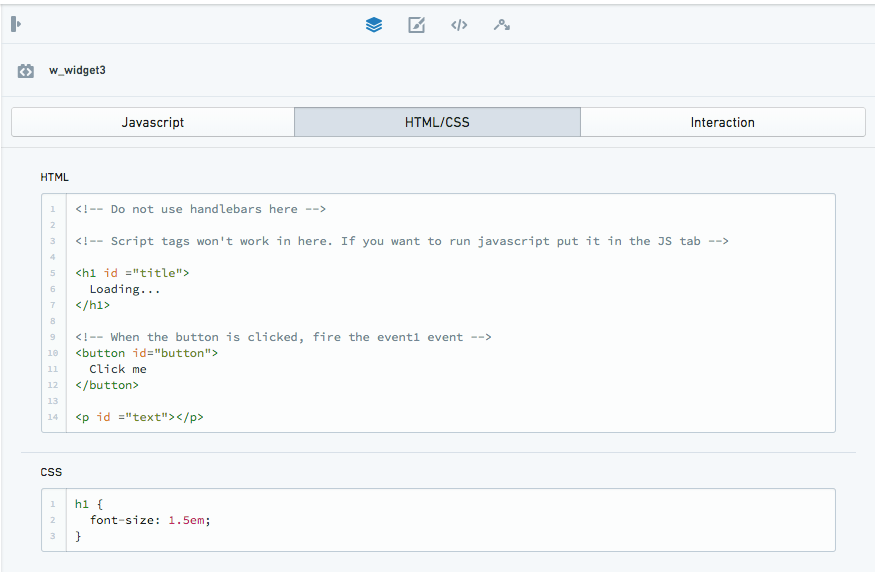
HTML
This is a string of HTML that will get rendered when the widget loads.
Do not use Handlebars here. The HTML tag <script> will not
function, and you need to extract any JavaScript into the
JavaScript tab.
CSS
This is a string of CSS that will get rendered when the widget loads.
Do not use Handlebars here. The specified CSS will allow you to overwrite CSS rendered in the border of the iframe and not in the frame. The same border styling can also be applied via the Additional CSS Classes and Custom Styles in the widget's top-level Styling tab.
CSS libraries
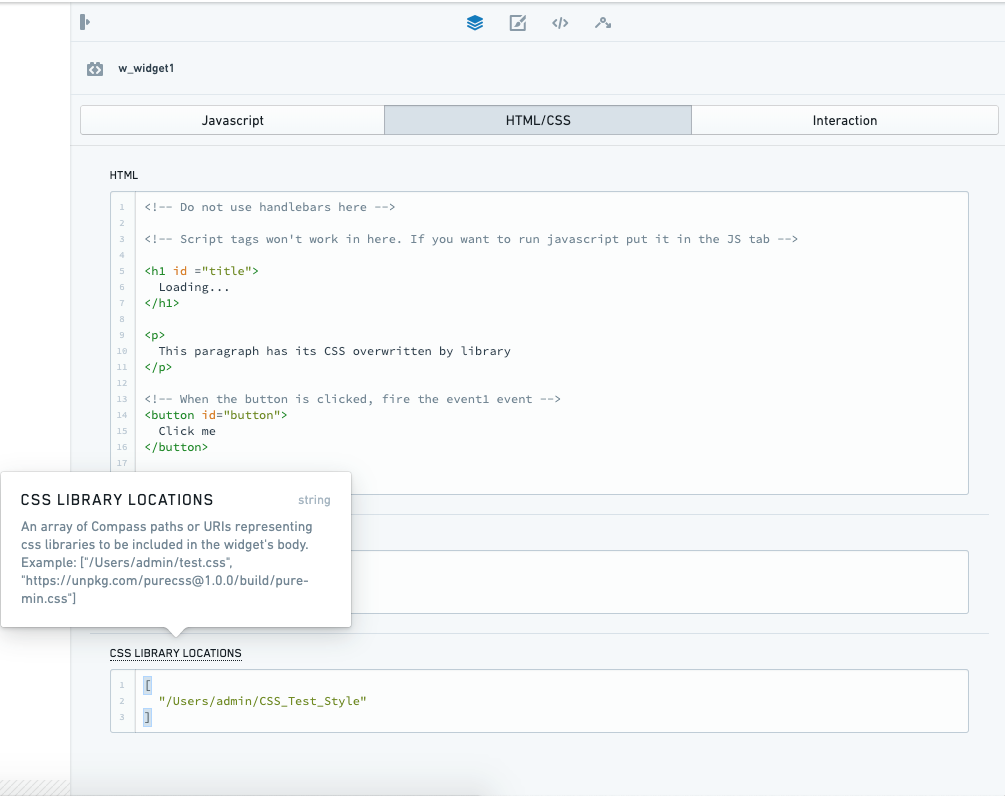
The CSS libraries feature allows you to load CSS so you can use CSS styles (e.g. Blueprint) to create your custom widget. You can access it in the HTML/CSS tab of the widget.
CSS libraries works like Code Sandbox’s JavaScript libraries. The CSS library takes an array of Project paths which will be downloaded and then rendered in order within the widget, or an array of URLs that is allowed by both CORS and CSP policy (where you can mix and match). Downloading will use the browser, so the URL must be allowed by the CORS and CSP policy. If you wish to host CSS libraries within Foundry, you can either host them in Blobster and use the cookie authenticated APIs or put the script in the asset server. Making changes to this field will cause the entire widget to reload and refresh.
Plain CSS is sufficient for the contents of the CSS library file; ensure that you do not have the HTML <style> tag surrounding the CSS style.
Interactions tab
This is the control that lets the widget interact with the Slate paradigm. All the interactions between the Code Sandbox widget and the rest of Slate should be passed through one of the state, events, or actions.
We recommend that you pass in the Handlebars through this interaction tab only. Using the Handlebars directly in the JavaScript box will still work (e.g. to pass in some state without using the SlateFunctions.watch or SlateFunctions.getState), but this is not recommended since the entire widget will reload and refresh each time.
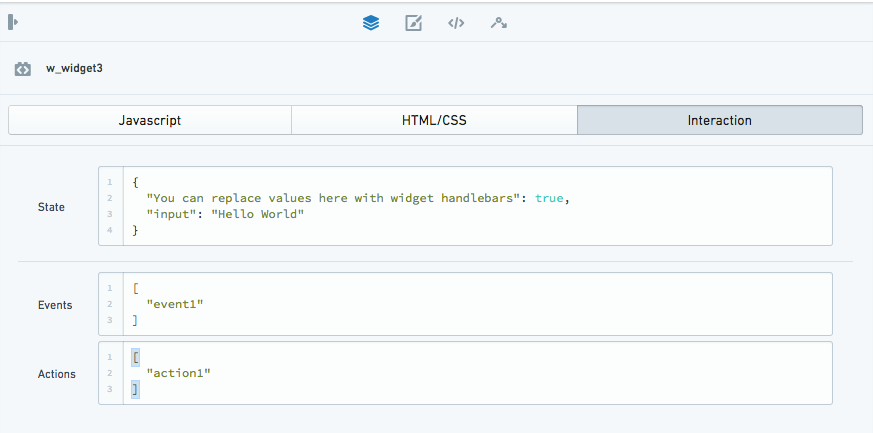
State
This is a JSON blob that represents the current configuration of the widget. This is similar to the state that other widgets in Slate use except that it is nested under this field to allow the other meta-fields. The state can be modified from either inside the widget or from the usual practice of putting Handlebars in the state.
To modify the state from the widget, use SlateFunctions.setState
within the JavaScript. The other Slate functions passing state to the
widget are SlateFunctions.watch and SlateFunctions.getState (see the example below).
There are certain ways to use this field to load additional runtime code into the Code Sandbox widget (e.g. pass in JavaScript into the state and load it in later). However, these ways are not recommended as the purpose of the field is to represent the state of the widget.
Events
This is an array of strings that are the names of the events that this
widget will be able to trigger. These triggers must be explicitly
invoked from the JavaScript within the widget using the functions
provided below. Events will be named custom.{event_name} when
displayed in the events tab. The event name does not need to be separately typed in the triggerEvent parameter.
To trigger an event, use SlateFunctions.triggerEvent(“event”) within
your JavaScript, as shown in the example below.
Actions
This is an array of strings that are the names of Actions that this
widget will allow to be triggered by other widgets. The JavaScript within the widget should be listening for the Action using the functions provided below. Actions will be named custom.{action_name} when displayed in the events tab.The Action name does not need to be separately typed in the onAction parameter.
To have a widget respond to an Action created in the Slate context, use
SlateFunctions.onAction(“action_name”,(value)=>{put JavaScript here})
within your JavaScript, as shown in the example below.
Slate functions
These native functions allow you to interact with Slate-specific functionality and are exposed to the JavaScript running within the widget. These functions will allow you to interact with the rest of the Slate application through the use of events, Actions, and state changes.
onAction
Data direction: Slate context → widget
SlateFunctions.onAction allows you to register a callback for when an
Action gets invoked on your widget. Its arguments are the name of the
Action and the function to be invoked when the Action is received. The
function will be invoked with the sole argument being the 'body'
passed along with the Action.
You then need to list your Action in the Interaction tab below.
Example

This example uses the Slate Checkbox widget which causes the Code Sandbox widget to update when clicked:
- An event emanates from the Checkbox widget when the Checkbox widget is clicked.
- In Slate's event panel, this Slate event has been registered to trigger an Action (custom.checkbox) in the Code Sandbox widget.
- The event panel is able to detect this Action because the Action has been registered in the Code Sandbox widget's Interaction Action box.
JavaScript:
Copied!1 2 3 4 5SlateFunctions.onAction("checkbox", (value) => { var checkbox = document.createElement("div") checkbox.innerHTML = value; document.body.appendChild(checkbox); });
Interaction Action:
Copied!1 2 3[ "checkbox" ]
New event-Action pair registered:
Event: Slate_widget.selectedValues.changed
Action: Code_Sandbox_widget.custom.checkbox
watch
Data direction: Slate context → widget (continuous watching)
SlateFunctions.watch is meant to help you detect changes to the state
field in a way similar to watching in AngularJS. SlateFunctions.watch takes in a string and a function as its arguments. When the portion of the state
represented by the string changes, the function provided will be invoked
with the new state and the old state provided as arguments. This is
possibly the most useful function and is how you can pass data into the
widget by using Handlebars passed into the Interaction tab (e.g."First Argument": "{{handlebars}}").
For example, if your state has two fields - height and width - and you want
to invoke a function when the height changes, you would call
SlateFunctions.watch("height", <insert function here>). If the
initial string is blank, then the function will be invoked on any state
changes.
Example

This example uses Slate's Input widget which passes the state to the Code Sandbox widget and displays it:
- The Slate Input widget generates text state as a data output
{{w_widget2.text}} - This state has been fed into the Code Sandbox widget's Interaction state box, so now you can use the state in the Code Sandbox widget. You use
SlateFunctions.watch("State Name", (data) =>...to use the state/data in the widget.
JavaScript:
Copied!1 2 3 4 5 6 7var el = document.createElement("div") el.id = "display" document.body.appendChild(el); SlateFunctions.watch("Input State", (data) => { el.innerHTML = "Code Sandbox widget: " + data; });
Interaction Action:
Copied!1 2 3{ "Input State": "{{w_widget2.text}}" }
getState
Data direction: Slate context → widget (non-continuous, once-off 'get')
This function returns the current state of the widget that is initially populated by the state field.
SlateFunctions.getState returns a JSON object of the current state of the widget that is initially populated by the state field. You can access different properties of the object (i.e. the different 'states').
SlateFunctions.getState will return a JSON object of your state field,
and you can access different properties of the object (i.e. the different
'states').
SlateFunctions.getState will only get the state once called. In contrast,
SlateFunctions.watch will constantly "watch" for updates to the state field.
You can use this SlateFunctions.getState function in a SlateFunctions.watch to get particular attributes of the full state object.
For example, if your state is:
Copied!1 2 3 4{ "a": "cat", "b": "hat" }
SlateFunctions.getState().a will return cat.
Example
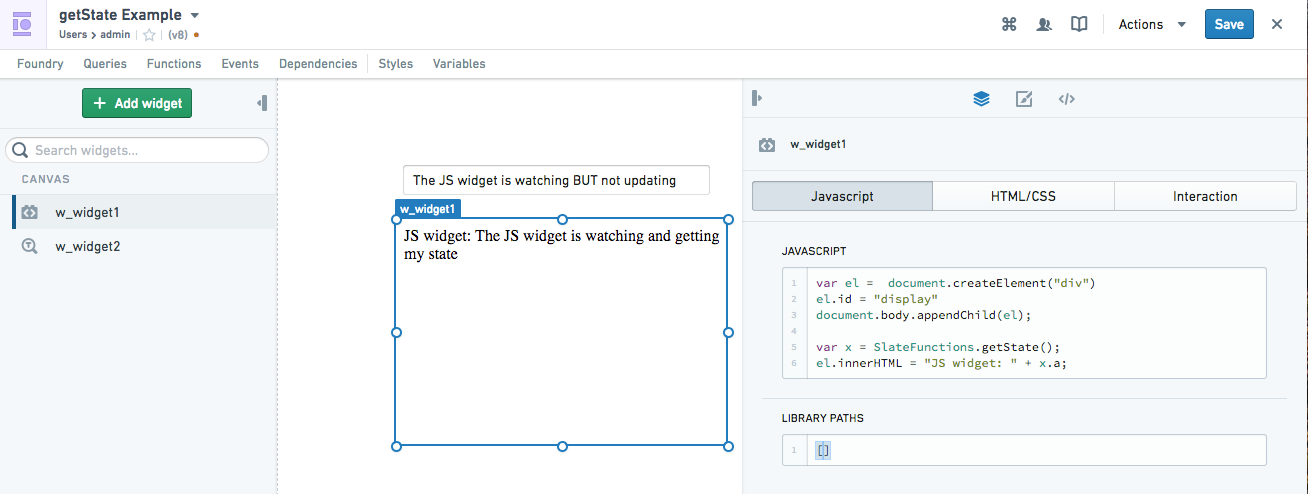
This example uses Slate's Input widget which passes the state to
the Code Sandbox widget. The entire state is called through the use of
the getState function (assigned to x), a particular attribute in this
"entire state" object is then displayed: "a" in this case.
JavaScript:
Copied!1 2 3 4 5var el = document.createElement("div") el.id = "display" document.body.appendChild(el); var x = SlateFunctions.getState(); el.innerHTML = "Code Sandbox widget: " + x.a;
Interaction Action:
Copied!1 2 3"a": "{{w_widget2.text}}", "b": "random_state" }
setState
Data direction: Widget → Slate context.
SlateFunctions.setState modifies the state of the widget both for
external widgets that reference the state of this widget using Handlebars and for future getState calls. It takes two arguments: the string
representing the portion of the state to modify and a JSON blob
representing the new value of that portion.
For example, if you wish to set the view's height of your widget to 4
but leave all other properties, you'd call
SlateFunctions.setState("view.height", 4). If you want to overwrite
the whole state (as opposed to only height), you can pass in "" to the
first argument instead of "view.height".
Example
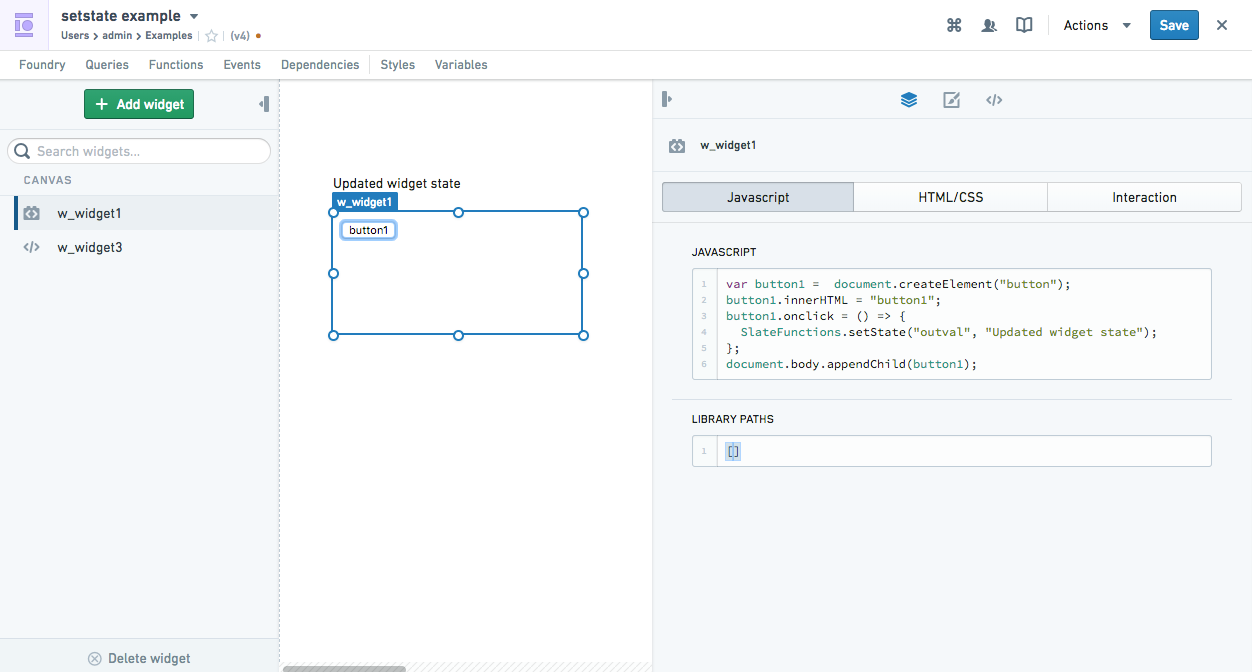
This example uses a generated button in the Code Sandbox widget to update the state of a Slate "HTML widget" from "Initial widget state" to "Updated widget state".
- An interaction with the Code Sandbox widget when the button is
clicked triggers the
SlateFunctions.setState. This updates the state of "outval" from "Initial widget state" to "Changed widget state". - This updated state is able to be detected in Slate because the state has been registered in the Code Sandbox widget's Interaction "state".
JavaScript:
Copied!1 2 3 4 5 6 7 8var button1 = document.createElement("button"); button1.innerHTML = "button1"; button1.onclick = () => { SlateFunctions.setState("outval", "Updated widget state"); }; document.body.appendChild(button1);
Interaction state:
Copied!1 2 3{ "outval": "Initial Widget State" }
triggerEvent
Data direction: Widget → Slate context.
SlateFunctions.triggerEvent triggers an event. The two arguments are
the name of the event to trigger and the message to be passed as the
body of the event.
Example
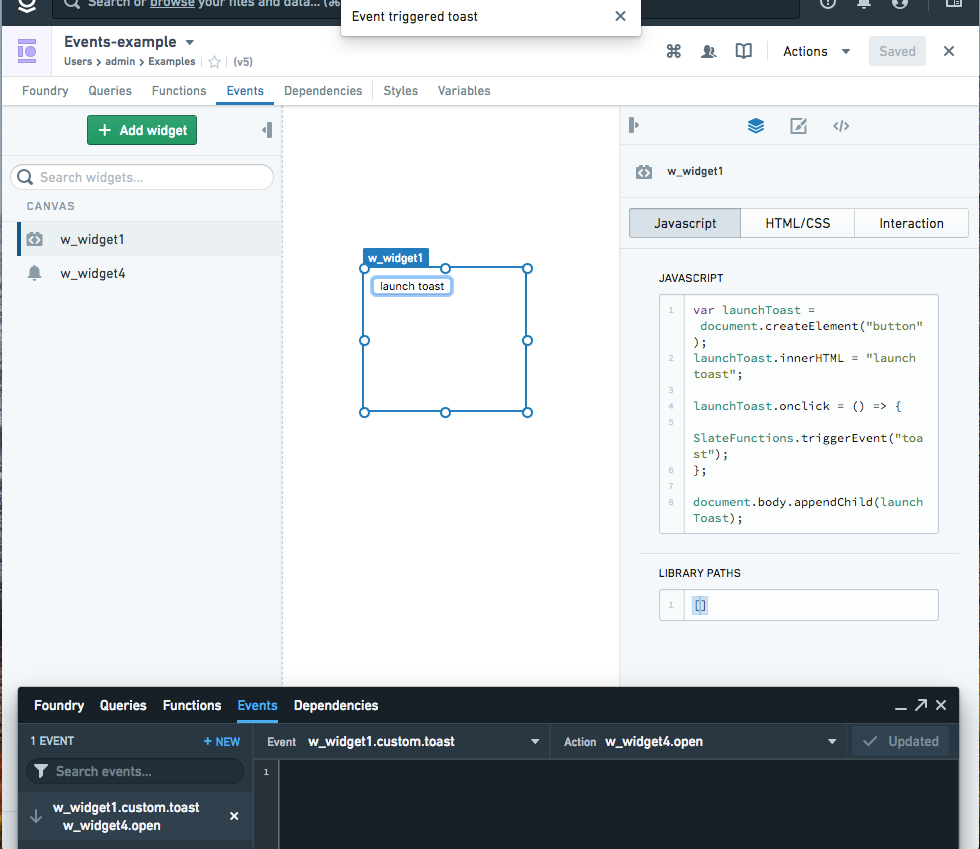
In this example, when the Code Sandbox widget is interacted with by a click of the button, a Slate Toast widget is launched in the Slate context.
- When the button is clicked, the function
launchToast.onclickruns which triggers theSlateFunctions.triggerEvent. - An event emanates from the Code Sandbox widget because this event has been further registered in the Code Sandbox widget's Interaction "event".
- In Slate's event panel, this Code Sandbox widget event has been registered to trigger an Action (Slate_widget.open) in the Slate widget.
JavaScript
Copied!1 2 3 4 5 6 7 8var launchToast = document.createElement("button"); launchToast.innerHTML = "launch toast"; launchToast.onclick = () => { SlateFunctions.triggerEvent("toast"); }; document.body.appendChild(launchToast);
Interaction event:
Copied!1 2 3[ "toast" ]
New event registered:
Event: Code_Sandbox_widget.custom.toast
Action: Slate_widget.open
Load order
The Code Sandbox widget loads in the following order:
- Slate (the parent frame context containing the widget) loads, then the widget iframe loads.
- Slate sends the widget "state" to the widget (see Interactions below for more details), followed by CSS, HTML, libraries, and JavaScript.
- The iframe receives and sets up the following:
- The CSS and HTML are appended.
- The libraries are executed
- The JavaScript is executed
- The appropriate "SlateFunctions" are triggered (input).
- The user interacts with the widget frame (updating the state, triggering events, creating actions, etc.). These, in turn, can modify or produce "SlateFunctions" which are sent from the widget to the parent Slate frame. These widget outputs can then be used in the rest of Slate if they are specified as Interactions (output).
Security
The security model for this widget is very similar to that of Slate functions. The code will be executed in a sandboxed iframe with inputs and outputs being transferred using postMessage. This allows us to safely execute untrusted JavaScript code. The only modification is that the iframe is visible on the page, which doesn't change the security model.
Debugging tips
When in the Chrome console, you can select the dropdown that defaults to the top and select codeSandboxIframe.html. This will cause any JavaScript you type into the console to be executed in the environment of the widget. This can be useful when you are trying to figure out how to get your widget to work since changes to the JavaScript field will force a reload of the widget.
Third party code
We recommend following this general approach when using third party code:
- Check the license to ensure that you can use it.
- Minimize the code complexity by finding examples with as few separate chunks of JavaScript as possible.
- If the JavaScript uses any libraries, proceed to download the .js file from the source and put the Foundry Project path of the uploaded file into the library section. You can also link the URL directly and test it after to ensure that it does not conflict with CSP or CORS policy.
- Ensure that all JavaScript in the HTML <script> </script> tags are refactored out and placed into the JavaScript section.
- Use Slate functions for your interactions:
- Pass any data you need into the custom Code Sandbox from Slate using
SlateFunctions.getState. - To convey an interaction within the widget to the rest of Slate, you can tag
SlateFunctions.triggerEventto the function. - To have the widget respond to an Action emanating from the rest of Slate, you can tag
SlateFunctions.onActionto the function.
- Pass any data you need into the custom Code Sandbox from Slate using
File Import
The File Import widget enables users to upload files which can then be referenced and processed in the Slate application. This allows applications to incorporate file-based data and functionality directly within Slate.
Properties
| Attribute | Description | Type | Required | Changed By |
|---|---|---|---|---|
| buttonCssClasses | CSS classes to apply to the browse button | string[] | Yes | Direct Edit |
| buttonText | The text of the browse button | string | Yes | Direct Edit |
| message | The message to display in the upload pane | string | Yes | Direct Edit |
| fileNames | The names of the files that the user imported | string[] | Yes | User Interaction |
| fileTypes | The MIME types of the files that the user imported | string[] | Yes | User Interaction |
| fileContents | The user's imported files as binary strings | string[] | Yes | User Interaction |
| fileDataUrls | The user's imported files as base64-encoded data URLs | string[] | Yes | User Interaction |
Iframe
The following tables offer usage details about the properties available to iframe widgets. Several examples follow the tables.
If you are embedding something that is loaded via workspace, you need to add ?embedded=true to the end of the URL
Properties
| Attribute | Description | Type | Required | Changed By |
|---|---|---|---|---|
| uri | The iframe src URI | string | No | Direct Edit |
Actions
| Action Name | Description |
|---|---|
| sendMessage | Triggering this Action causes the widget to send a message to the inner iframe in the format of { source: ‘slate-iframe-action’, message: {…}}. |
| reload | Triggering this Action reloads the iframe. |
Events
| Event Name | Description |
|---|---|
| getMessage | This event is triggered when the widget’s inner iframe post message to Slate is in the format of { target: ‘slate-iframe-event’, message: {…}}. |