Write back data to Phonograph [Legacy]
Object Storage V1 (Phonograph) writeback is in the legacy phase of development, and no additional development is expected. Phonograph writeback will not be supported for any new workflows.
We recommend migrating to Object Storage V2 to take advantage of the improvements and evolved architecture of the Ontology. Additionally, we recommend using Actions with the Action Widget to apply updates and changes to the Ontology. Refer to the Action types documentation for more information.
Three components are required to capture data from user input/data modifications in Slate and save them to Foundry:
- The source dataset: This is the dataset that exists in Foundry that you want to be made available for editing. This dataset must have a primary key.
- The Phonograph sync: Phonograph is a manual editing cache that allows Slate to capture user input changes to the source dataset. You will sync the dataset to Phonograph (not Postgres), which will make the dataset available in Slate and allow for user edits.
- The writeback dataset: This is the Foundry dataset you will create to store the user-modified version of the source dataset. The source dataset will always remain unmodified, and all user edits stored in the Phonograph cache will be saved to the writeback dataset in Foundry.
Add the source dataset
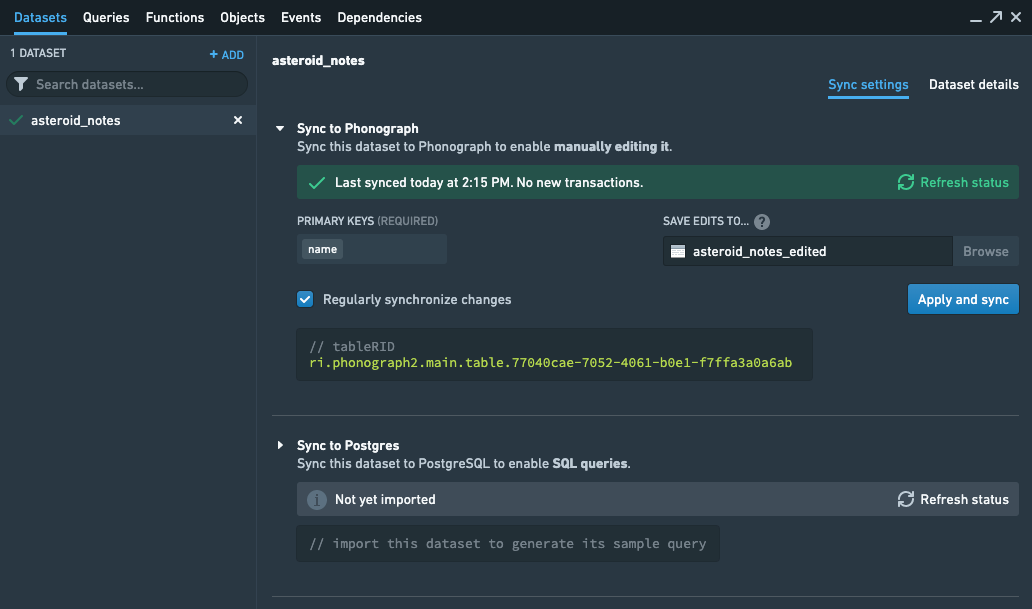
First, add the source dataset to your Slate application in the Dataset tab. We will add a simple derived dataset named asteroid_notes using the + Add button. This notional dataset contains asteroid names and a blank column named research_notes intended to hold user-entered information on the asteroid.
After adding the dataset, you will view the sync settings for the dataset. We will configure a sync to the manual editing cache called Phonograph.
Select a primary key. Your primary key selection must uniquely identify a single row. Generally, you must combine multiple columns in a transform to generate an appropriate primary key before indexing. It is possible to define a group of columns to serve as a joint primary key; however this increases the complexity of editing data.
Once the primary key is configured, we will create the writeback dataset which will store user edits in Foundry. Select "Browse" to create a dataset in Foundry that your edits can be saved to. In the pop-up window, you will specify the name of the dataset and the location in Foundry where you would like the dataset to be created.
When finished, your sync configuration should look something like this:
The writeback index does not support struct column types. This means that a dataset with a DateTime column type will fail to index. You can use Contour or a SQL or Python transform to cast the DateTime column to a Timestamp before indexing.
Currently it's not possible to unregister (delete) a sync through the UI. For usage in Slate, however, you can add a query to the "Table Registry - Unregister" endpoint. The only parameter is the Table RID and the result will be the deletion of the Table - this will not affect the input or output dataset. In the sync UI for the associated dataset, you will see that there is no longer a registered writeback sync. This will remove all data from the Table permanently, so only use it carefully and ensure you either delete the query or set it to run manually.
Query examples
With our data indexed into Phonograph, we can now read and write from it. The simplest pattern looks like this:
- Use a query to get all rows or a subset of rows and display them to the user.
- The user interacts with application widgets to add a row, delete a row, or modify values in a row.
- Each change is written back independently on a user submission (for example, user clicks submit button).
- Get all rows again to display the changes...
Later, we will explore some options for adding complexity with the bulk endpoint and separating the front-end display state from the back-end data state to maintain a more responsive application, but these are both advanced topics.
Select rows
To retrieve all of the rows from the table we will need to create a new Slate query.
- Begin by creating a new query in the Slate application.
- Select "Phonograph2" as the source for this query
- In the "Available Services" field, select
Table Search Service. - Fill in the
Search Requestfield of this query using the code below. You'll notice that this request uses amatchAllblock, which will return all rows. You will need to fill in the RID of the table (available in the sync configuration), as well as a column to sort on (optional).
q_getAllRows example
searchRequest
Copied!1 2 3 4 5 6 7 8 9 10 11 12 13 14{ "tableRids": [ "<your_table_rid>" ], "filter": { "type": "matchAll", "matchAll": {} }, "sort": { "<your_column_to_sort_by>": { "order": "desc" } } }
This query pattern allows for both paging - to reduce the memory burdens on the browser and to improve performance - as well as sorting (with the addition of a sort block). For more on using the Server-side Paging function see the Table Widget.
pagingToken
"{{w_tableWidget.gridOptions.pagingOptions.currentOffset}}"
pageSize
"{{w_phonographResults.gridOptions.pagingOptions.pageSize}}"
The Get All Rows endpoint, which was previously recommended for retrieving rows, is deprecated. Migrate to the Search endpoint as described above and update the f_getAllRowsFormat function as follows:
var rawData= {{getAllRows.result.[0].results.rows}}
becomes
var rawData= _.map({{getAllRows.result.[0].hits}}, h => h.row)
q_getRows example
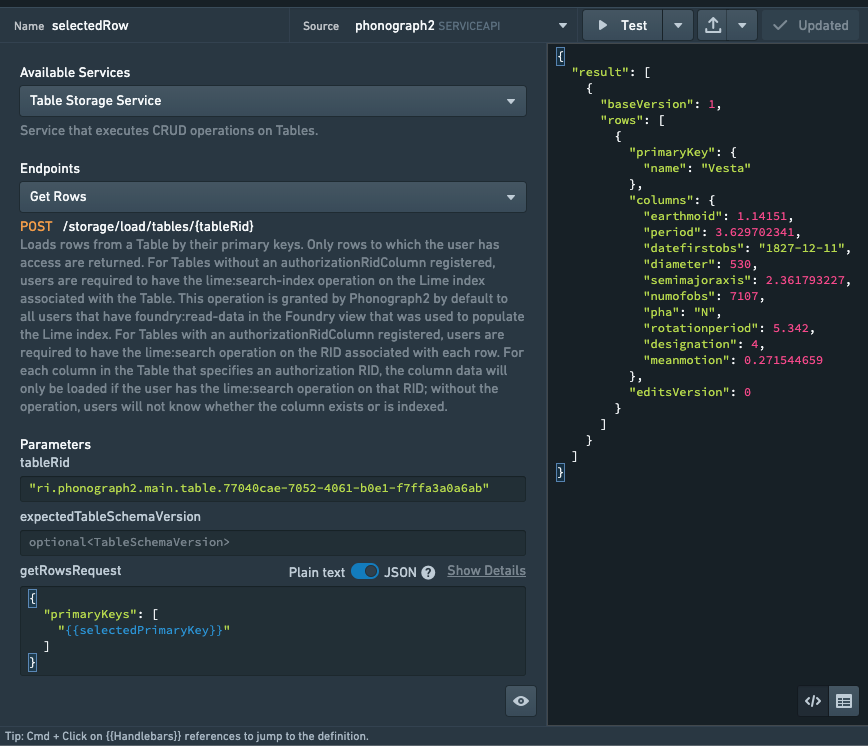
In addition to getting all the rows at once, you can use the Get Rows endpoint to provide a list of primary key objects to retrieve a number of rows by their ID. This is a simple way to check if a row already exists when a user is entering new values, which is necessary to determine whether to apply the changes as an edit or add event (more on this below).
Display query results in a widget
The results of these get endpoints are an array of objects, where each object represents a row and the values of the nested primaryKey object and columns object represent the column pair for that row. Slate widgets such as charts and tables expect data in parallel arrays, where each array represents a column and the index of the array the value for a given row. This helper function takes in results from a Get or Search and returns parallel arrays to feed into a table or other widget:
Copied!1 2 3 4 5 6 7 8 9 10 11 12 13 14 15 16 17 18 19 20 21 22 23var rawData= _.map({{getAllRows.result.[0].hits}}, h => h.row) var primaryKeys=Object.keys(rawData[0].primaryKey); var columns=Object.keys(rawData[0].columns); var parsedData={} // initialize for (var pkey of primaryKeys) { parsedData[pkey]=[] } for (var column of columns) { parsedData[column]=[] } for (var row of rawData) { for (var pkey of primaryKeys) { parsedData[pkey].push(row.primaryKey[pkey]) } for (var column of columns) { parsedData[column].push(row.columns[column]) } } return parsedData;
Account for null values
Null values in the data are not indexed into Phonograph. As a result, rows that contain columns with null values will not be present in Phonograph. When converting Phonograph results into rows and columns, you may have to account for these missing values. Below is an example to detect all columns across all rows. This example can be combined with the example above to avoid problems about null values in the first row.
Copied!1 2 3 4 5const queryResult = {{getAllRows.result.[0].hits}}.map(e => (Object.assign({}, ...[e.row.primaryKey, e.row.columns]))); const columns = [...new Set(...queryResult.map(e => Object.keys(e)))1; const queryResultFilled = Object.assign({}, ...columns.map(e => ({[e]: queryResult.map(_e => _el[e])}))); return queryResultFilled;
Search vs Storage service for reading updates
The Search Service endpoints use the search index for the associated Phonograph table. This search index does not update synchronously with the Post Event endpoint of the Storage service, which means there is some small delay between when a change is written and when the change will appear in queries to the Search endpoint. A simple pattern is to use a Toast widget to create a timer like:
q_postEvent.success->w_successToast.openw_successToasttimeout configured to5000(5s)w_successToast.close->q_getAllRows
You may need to tune the duration of the toast up or down to make sure you're retrieving changed rows. Also ensure you add a sort block to your getAllRows query as the default sort is by the last update timestamp for the row document, which means edited rows will "move" to the back of all results.
Alternatively, define patterns for your application that separate the display of the data and the persisting of data to Phonograph. This can be done by using a state variable to track the current view and then periodically saving that data when triggered by the user back to Phonograph, but without automatically re-running the query to get all rows. This pattern gives a better user experience (updates appear instant) but requires a more complicated design.
Any request to the Table Storage Service, which includes retrieving rows by a list of primaryKey values, is guaranteed to include all edits, so it is safe to chain events like: q_postEvent.success -> q_getRowByPrimaryKey.run
In this case, any changes written to the particular row retrieved by the primary key lookup are guaranteed to be included in the result.
Edit data
The Post Event endpoint on the Table Storage Service handles three types of events: rowAdded, rowDeleted, and rowModified.
Queries for all three events expect a tableEditedEventPostRequest with a primaryKey object and a payload object, like this:
Copied!1 2 3 4 5 6 7 8 9 10 11 12 13 14 15{ "primaryKey": { "<primary_key_col>": "<primary_key_value>", "<second_primary_key_col>": "<second_value>" // only if you specified multiple columns when you created the manual editing index }, "payload": { "type": "rowModified", // "rowAdded" or "rowDeleted" "rowModified": { // "rowAdded" or "rowDeleted" "columns": { "<col_a>": "<new_value>", "<col_b>": "<new_value2>" } } } }
rowDeleted events have an empty rowDeleted object - you don't need to pass columns to delete a row.
It is general best practice to use a function to build the tableEditedEventPostRequest. These can take many different forms depending on the desired workflow and the implementation.
Example function f_createTableEditEvent:
Copied!1 2 3 4 5 6 7 8 9 10 11 12 13 14 15 16 17var selectedRow={{q_getAllRows.result.rows.[w_rowsTable.selectedRowsKeys.[0]]}}; var updatedCols=selectedRow.columns; updatedCols.research_notes={{w_notesInput.text}} var tableEditedEventPostRequest = { "primaryKey":{ "name": selectedRow.primaryKey.name, }, "payload": { "type": "rowModified", "rowModified": { "columns": updatedCols, } } } return tableEditedEventPostRequest;
In the simple function example above, all of the rows from q_getAllRows are displayed in the w_rowsTable widget. A column representing row number has been added to the table as the selection key, such that by selecting a row in w_rowsTable, we can use the selection key to find the row in the raw results of q_getAllRows. With a row selected, we can then update the value of the research_notes column to the user entered value in the w_notesInput widget. This happens in this line: updatedCols.research_notes={{w_notesInput.text}})
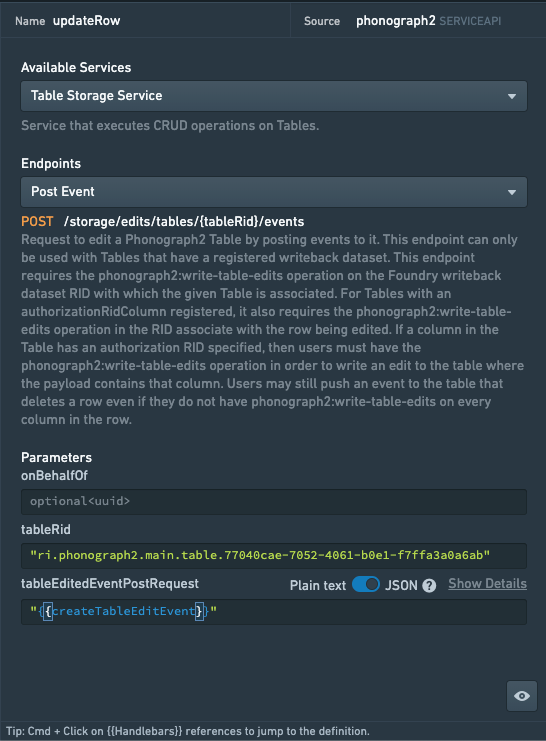
The final step in the function f_createTableEditEvent is to insert the updatedCols object into the tableEditedEventPostRequest variable and return it as the result of the function. Regardless of how much complexity you need to do, this should be the output of your function and can feed directly into your query.
Once the function is complete, you can plug the output of the function, which is the tableEditedEventPostRequest object, into the appropriate parameter field of the updateRow query (see image below).
Set the query to run manually
Now that the query has the appropriate parameters, we will define the condition on which we want the query to run, so that edits are only made to the table when they should be.
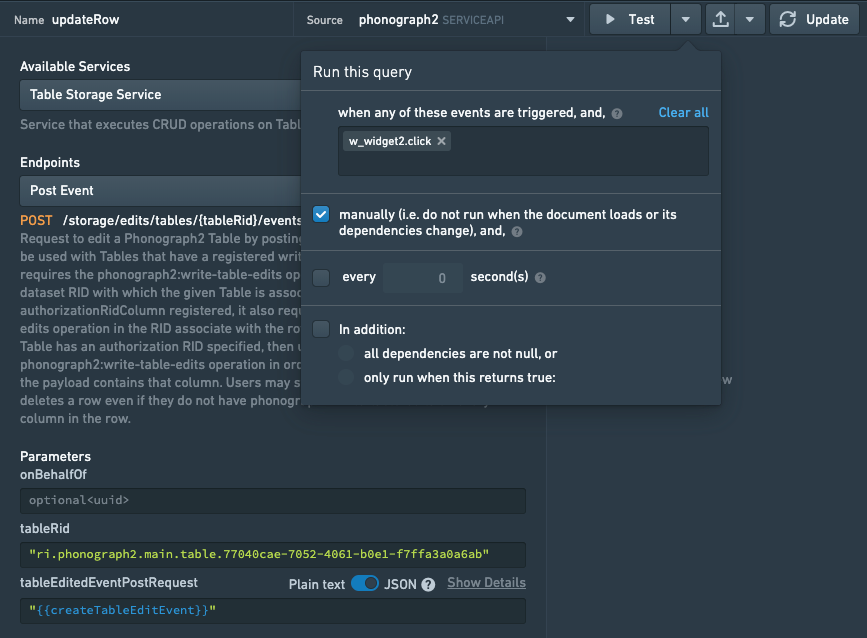
While viewing the query in the query editor, use the dropdown menu next to Run to check Run manually. This prevents the query from running on page reload or when its dependencies change.
We will now configure a trigger for the query so that it runs on some user action. The simplest way to do this is to add a button widget and trigger the query on the button.clickevent, though there are many other possible solutions. Add a button widget to the Slate application and configure the query to run on click. Note that running this query will only update the Phonograph cache (edits will not immediately be seen in the writeback dataset in Foundry).
In addition, it's often best practice to write a separate function to validate the form inputs and generate feedback text to display alongside your form. This helps guard against data quality issues stemming from user input data. A function to do this might look like this:
f_validateForm
Copied!1 2 3 4 5 6 7 8 9 10 11 12 13 14 15 16 17 18 19var form { disableSubmit: false, globalMessage: "", fields : { i_widget1: { value: {{i_widget1.text}}, message: "" }, i_widget2: } value: {{i_widget2.text}}, "message" } etc... } // Logic for validating values, generating per-widget messages, and determining global valid state // If values are deemed invalid, switch disableSubmit to true return form;
You can then disable the button widget by linking the widget's disable property to "{{f_validateForm.disableSubmit}}"
Add a new row
Adding a new row works identically to editing a row; simply substitute the rowAdded for rowModified in the examples above.
One caveat is that trying to add a new row with the same primary key as an existing row will fail. A simple option is to trigger a toast widget to simply alert the user that the row already exists.
A slightly more user-friendly option is to have a q_validatePrimaryKey query against the Get Rows endpoint that uses the user-entered primary key to check if the row already exists. If it does, then in f_createTableEditEvent generate a rowModified event, otherwise use rowAdded.
Delete a row
To delete a row, simply use the Post Event endpoint to submit a rowDeleted event with the primary key for the row to be removed.
Copied!1 2 3 4 5 6 7 8 9{ "primaryKey": { "<primary_key_col>": "<primary_key_value>" }, "payload": { "type": "rowDeleted", "rowDeleted": {} } }
Search for rows
The Table Search Service provides a search endpoint when you need to find rows by values rather than by primaryKey. The syntax is similar to ElasticSearch search syntax. You can find the full specification for the available search types in the API documentation ↗.
All searches return an object with a nested hits object; if you pass this object into the parsing function in the Getting Rows section, substituting for the .rows in the assignment to the rawData variable, you can use the same logic to break the results into parallel arrays that can be displayed in a table widget.
All text-type columns are processed by the default ElasticSearch indexer, which tokenizes strings on breaking non-word characters. This can lead to unexpected search behavior when looking for exact matches. To perform an exact match, you can use the queryString search type and escape the search term with string literal characters: \"8156-Apron 2 P.2\"
Terms filter
The terms filter type takes an array of values and matches either across all columns or - optionally - against a single column specified in the field property. See the note above on how terms are indexed.
searchRequest
Copied!1 2 3 4 5 6 7 8 9 10 11 12 13 14 15 16{ "tableRids": [ "{{f_getTableId}}" ], "filter": { "type": "terms", "terms": { "field": "first_name", "terms": [ "agnese", "ailee", "woodman" ] } } }
queryString filter
The queryString filter type attempts to provide an equivalent search to natural language searching. You can include AND and OR operators as well as quote multiple words for exact matching: e.g. \"multi word exact match\"
searchRequest
Copied!1 2 3 4 5 6 7 8 9 10 11{ "tableRids": [ "{{f_getTableId}}" ], "filter": { "type": "queryString", "queryString": { "queryString": "jang" } } }
Range filter
The range filter provides comparative filtering for numeric and date type columns. Supports gt, gte, lt, lte.
searchRequest
Copied!1 2 3 4 5 6 7 8 9 10 11 12 13{ "tableRids": [ "{{f_getTableId}}" ], "filter": { "type": "range", "range": { "field": "start_date", "lt": "2018-01-01", "format": "yyyy-MM-dd" } } }
GeoBoundingBox and GeoDistanceSearch filter
If you've generated geohashes ↗ in your pipeline, then you can use these filters to perform bounding box and radius searches.
Contact your Palantir team for examples of these queries.
Complex filters
All filter types can be nested with AND and OR filter types to build up more complex filtering logic. A normal pattern would be to generate these complex queries using a function and simply include the output of the function into the searchRequest parameter for the query.
searchRequest
Copied!1 2 3 4 5 6 7 8 9 10 11 12 13 14 15 16 17 18 19 20 21 22 23{ "tableRids": {{f_getTableId}}, "filter": { "type": "and", "and": [ { "type": "queryString", "queryString": { "queryString": "pixoboo" } }, { "type": "terms", "terms": { "field": "first_name", "terms": [ "harcourt" ] } } ] } }
Write back to Foundry
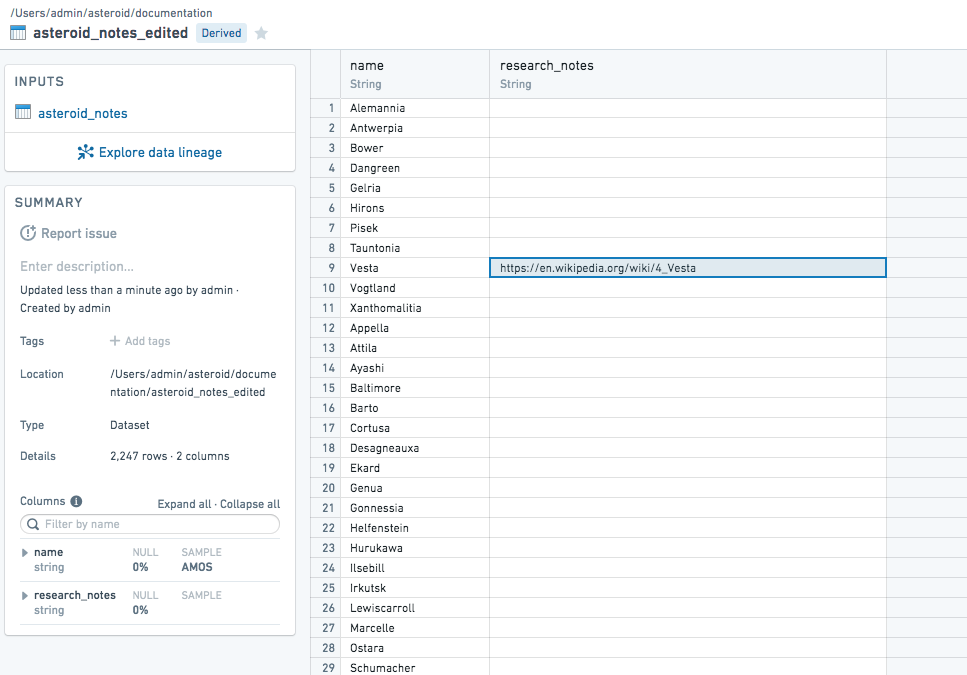
The updateRow query we’ve written will only update the copy of asteroid_notes stored in Phonograph. In order to get the data to show up in Foundry, we will need to click "Build" on the preview page of the dataset within Foundry.

Once that’s been completed, we can see our edits to research_notes appear in asteroid_notes_edited
Advanced
Bulk endpoint
In addition to the Post Event endpoint we saw above, the Table Service provides a Post Events for Table endpoint, which expects an array of tableEditedEventPostRequest just like those we generated above. The events can be a mixture of types (rowModified, rowAdded, or rowDeleted), however a given primaryKey can only appear once in the array, meaning you cannot have, for example, a rowModified and a rowDeleted event for the same primaryKey in a single request.
Post Events for Table requests
Copied!1 2 3 4 5 6 7 8 9 10 11 12 13 14 15 16 17 18 19 20 21 22 23 24[ // Event Request 1 { "primaryKey": { "primary_key_col": "primary_key_value", }, "payload": { "type": "rowModified", // "rowAdded" or "rowDeleted" "rowModified": { // "rowAdded" or "rowDeleted" "columns": { "col_a": "value", } } } }, { "primaryKey": { "primary_key_col": "different_primary_key_value", }, "payload": { "type": "rowDeleted", // "rowAdded" or "rowDeleted" "rowDeleted": {} } }, etc...
We'll discuss below how you can use the bulk endpoint and the Events framework to build a more powerful solution to handle latency for making changes.
Manage latency
Due to the underlying architecture of the manual edits cache, edits are not guaranteed to be in the primary index immediately after a successful call to Post Event. Work is currently underway to make the Get All Rows and Get Rows calls synchronous, so that if you set your q_getAllRows to trigger on the success of your q_postEditEvent query, then any edits are guaranteed to appear. However, if you rely on the search endpoint, then you will need to accommodate a few seconds of latency until the search indexes are updated.
The simplest method is to insert a toast between the edit query and the get all rows query. Trigger the toast on the q_postEditEvent.success event and give it a 3-4s duration (3000-4000 as the value in ms). You can then trigger the q_getAllRows query on the w_editSuccessToast.closed event and the delay should provide enough time for the indexes to update.
For more complex workflows, you may consider doing additional work to separate the state used to display your Slate app from the state of the editing index. To do this, on page load you would populate a Slate variable with the results of your q_getAllRows query and that would become your "front end state". All of your edit/delete/update events would make changes to this front-end state variable, rather than directly triggering queries to the backend. Periodically you could diff the state of the front-end variable to the data from the query and create the payload for a bulk query to apply all the changes.
You would probably also want to provide some user feedback in the way of toasts or maybe an "Unsaved Changes" counter and a manual button to click to save all the changes. This setup is heavyweight for anything other than complex, long-lived applications. In most cases the toast approach is sufficient, and improvements to the Get Rows and Get All Rows endpoints should shortly make this obsolete in nearly all cases, so if you're considering this option, it's most likely best to get in touch with the Palantir team for further discussion.
Aggregations
The search endpoint also supports aggregations for generating statistics and bucketing values across your indexed data.
A subset of ElasticSearch 2.0 Aggregation ↗ syntax is supported: value_count, max, geohash_grid, terms, top_hits, sum, cardinality, avg, nested, filter, histogram, min.
Note that due to limitations of Elasticsearch, the results of some aggregations may be approximate. Before using any type of aggregation, refer to the Elasticsearch documentation and understand whether it is exact or an approximation. If it is an approximation, you should decide whether this is acceptable for your use case before continuing.
Below is a simple example of the syntax. Note that a raw version of the visits field must be used and that "Exact Match" has to be enabled because we are aggregating by a string field.

Copied!1 2 3 4 5 6 7 8 9 10 11 12 13 14 15 16{ "tableRids": [ "{{f_getTableId}}" ], "filter": { "type": "matchAll", "matchAll": {} }, "aggregations": { "visits": { "terms": { "field": "visits.raw" } } } }
The query above will bucket all the rows from the filter section of the query by the value in the visits field and return the count. If you're only interested in the aggregated values, set the pageSize to 0 to remove the individual record hits from the results and reduce the load time and memory pressure of your application.
The return format will look like:
Copied!1 2 3 4 5 6 7 8 9 10 11 12 13 14 15 16 17 18 19 20 21"aggregations": { "genders": { "doc_count_error_upper_bound": 0, "sum_other_doc_count": 30, "buckets": [ { "key": "daily", "doc_count": 148 }, { "key": "often", "doc_count": 141 }, { "key": "weekly", "doc_count": 129 }, ... ] } }
Each aggregation type will have a slightly different return syntax, but you may find the Rows to Columns function valuable for working with this type of data in Slate widgets like Charts or Tables.