- Capabilities
- Getting started
- Architecture center
- Platform updates
Access values with Handlebars
Slate uses Handlebars ↗ for templating in queries, functions, and widgets. Handlebars templates are wrapped in {{ }} and can access Slate objects like widgets, variables, and query/function results. For example, if you have a drop down widget w1, you can access the selected value with the template {{w1.selectedValue}}. Slate automatically evaluates the template and replaces it with the evaluated value.
Handlebars templates can also call helper functions. For more information, see Helpers.
Which Slate objects can be referenced?
Variables
You can access variables defined in the Variables editor with {{variableName}}. For example, if you have a variable var1 = {"a": [1,2,3]}, then the template {{var1.a.[0]}} evaluates to 1.
You can also access Slate environment variables, including information about the current application user or user-dedicated storage. For example, using the template {{$global.user.firstName}} will display the first name of the user.
Queries
You can access query results. For example, {{myQuery}} contains the results from the SQL or HttpJson query. There is also a hidden _response field that contains some metadata.
Copied!1{"name": ["Ceres","Pallas"],"earthmoid": [1.59376,1.23071],"pha": [false,false],"datefirstobs": ["1830-04-18","1825-03-23"]"_response": {"hasRun": true,"message": "Unable to parse query.","success": false}}
Functions
You can access the return value of a function by enclosing the function name in handlebars. For example, {{myFunction}}.
Widget properties
You can access certain widget properties. Specifically, templates can access the leaf properties (including arrays and their sub-properties). For example, assume we have a chart widget.
These are the properties listed in the widget’s raw JSON tab:
Copied!1{"allowSelection": true,"animate": true,"datasets": [{"name": "dataset1","renderer": "bar","xValues": "{{yearToObsNum.name}}","yValues": "{{yearToObsNum.numofobs}}"}],"labelsEnabled": false,"panZoomEnabled": false,"selection": {"indices": [],"xMax": null,"xMin": null,"xValues": [],"yMax": null,"yMin": null,"yValues": []},"tooltipsEnabled": false,"xAxes": [{"gridlinesEnabled": false,"label": "first observed {{w9.selectedValue}}","name": "x1","position": "bottom","scale": "category"}],"yAxes": [{"gridlinesEnabled": false,"label": "Number of Observations","name": "y1","position": "left","scale": "linear"}]}
These are the properties that you can and cannot access:
{{w1.allowSelection}}             (leaf property)
{{w1.animate}}                    (leaf property)
{{w1.datasets}}                   (array)
{{w1.datasets.[0]}}               (subproperty inside array)
{{w1.datasets.[0].xValues}}       (array subproperty inside array)
{{w1.datasets.[0].xValues.[0]}}   (subproperty inside array)
{{w1.labelsEnabled}}              (leaf property)
{{w1.panZoomEnabled}}             (leaf property)
{{w1.selection.indices}}          (array)
{{w1.selection.xMax}}             (leaf property)
{{w1.selection.xMin}}             (leaf property)
{{w1.selection.xValues}}          (array)
{{w1.selection.yMax}}             (leaf property)
{{w1.selection.yMin}}             (leaf property)
{{w1.selection.yValues}}          (array)
{{w1.tooltipsEnabled}}            (leaf property)
{{w1.xAxes}}                      (array)
{{w1.yAxes}}                      (array)
{{w1.yAxes.[0]}}                  (subproperty inside array)


{{w1}}                            (not accessible, not leaf)
{{w1.selection}}                  (not accessible, not leaf)
Where can Handlebars be used?
Queries editor
Handlebars templates in the Queries editor are always replaced with a string values. If the template does not evaluate to a string, then the value is first converted to a string. This is because the query itself is always a string. For example:
Copied!1SELECT {{column w8.selectedValues}} FROM allNamed WHERE name = {{param w12.selection.xValues}};
Non-string values are converted with the toString method. This generally works fine for integers and booleans but could produce unexpected output on more complex objects. For example, running toString on an object evaluates to [object Object], which is probably not what you want. You can use helpers like {{jsonStringify myObject}} to get around this.
Functions editor
Unlike Queries, Handlebars templates in the Functions editor are always replaced with their evaluated value. For example:
Copied!1 2var a = {{query1}}; // query1 is an object var b = a.results[0]; // You can access its properties.
Helper functions cannot be used in the Functions editor, you must reference Slate objects directly. Also, you cannot set variables or property values because you cannot change any state outside of the function. For example:
Copied!1 2var c = {{jsonStringify query1}}; //invalid - cannot use helpers {{var1}} = [1,2,3]; // invalid - cannot set global variables
Widget properties editor
You can use handlebars in a widget’s properties editor when the application is in Edit mode. In widgets, Handlebars templates must always be enclosed in double quotes "" because curly braces are not valid JSON syntax.
Copied!1 2 3 4 5 6{ "property1": "{{variable1}}", "property2": "Hello, my name is {{var1}}", "property3": [1, 2, "{{var3}}"], "property4": {{variable1}} //Invalid: JSON parse error }
In general, templates in widgets are replaced with strings. If the evaluated value is not a string, then Slate will run toString on the value. There are a few exceptions to this rule. Slate directly replaces the template with the evaluated value when the following conditions are true:
- There is only one set of brackets
{{}}AND - There are no other characters (including white spaces) outside of the brackets.
Let’s look at a few examples:
Copied!1 2 3 4 5 6 7 8 9 10 11 12{ // value replacement examples "property1": "{{var1}}", "property2": "{{ var1 }}", // whitespace is inside the handlebars "property3": "{{ add 2 (add 1 var1) }}", // helpers, can be nested "property4": ["{{var1}}", "{{w1.property.[0]}"], // string replacement examples "property5": "Hello {{var1}}!", "property6": " {{var1}} ", // whitespace outside of brackets "property7": "{{#if 0}}3{{else}}4{{/if}}" // more than one set of brackets }
Where can Handlebars NOT be used?
- Handlebars cannot be used in the Variables editor.
- Handlebars cannot be used in the Styles editor.
- Handlebars cannot be used in the view mode of an application. If you enter handlebars into a widget or text field, the expression is neither evaluated nor substituted.
Tutorial: Link widgets
The following tutorial will teach you how to create a button that gives a user the option to learn more about an aircraft for a specific flight. This requires us to create a link between two widgets.
To link widgets, you must know the name of the widget and the property that you want to link. In our case, we want to get the tail_num value for the selected row in our original table, but we configured the selection in the table to use the flight_id as the primary key.
This is an ideal time to use another helper function. As getting column values for a selected table row is a common pattern, we can use a function to implement this:
Copied!1 2 3 4 5 6 7 8 9 10 11 12 13 14 15 16 17 18 19 20 21 22 23 24 25function getRowData(s){ var returnObj = {}; var index = data[selectionColumn].indexOf(s); //this iterates through each array in the object data //value is the actual array, and key is the key for that array _.forOwn(data, function(value, key){ returnObj[key] = value[index]; }); return returnObj; } // The same data as is fed into the table var data = {{f_data}}; // The current selection in the table var selection = {{w_mainTable.selectedRowKeys}}; // The column configured as the table primary key var selectionColumn = {{w_mainTable.selectionIdentityColumnId}} var rowData = _.map(selection, getRowData); return rowData;
Add a new function called f_selectedRowValues to the code above. Change the Handlebar template for the value of var data to point to {{q_allFlights}} and the selectionColumn and selection variables to point to our w_flightTable.
To understand what selectedRowKeys is, look back at the code for the table widget. We set "selectionIdentityColumnId" to "flight_id". This means that the column flight_id is used as the unique key for a given row. Once the user selects a row in the table, that unique key (the flight ID number) is added to selectedRowKeys.
selectedRowKeys is a property of table widgets that can only be modified by user interaction. When editing a widget, you can see read-only values of user-interaction properties below the JSON editor.
Now, we can make a selection in the table by selecting Test to verify the function behavior.
With our selection function configured, we can add a Text widget, name it w_linkingButton and move it above the table. In the property editor for the widget, switch to the HTML tab under Content and enter the following:
Copied!1 2 3 4 5 6 7<a class = 'pt-button pt-intent-primary pt-icon-document-open' target = '_blank' href = 'https://registry.faa.gov/AircraftInquiry/Search/NNumberResult?nNumberTxt={{f_selectedRowValues.[0].tail_num}}' role='button'> Learn More About Aircraft {{f_selectedRowValues.[0].tail_num}} </a>
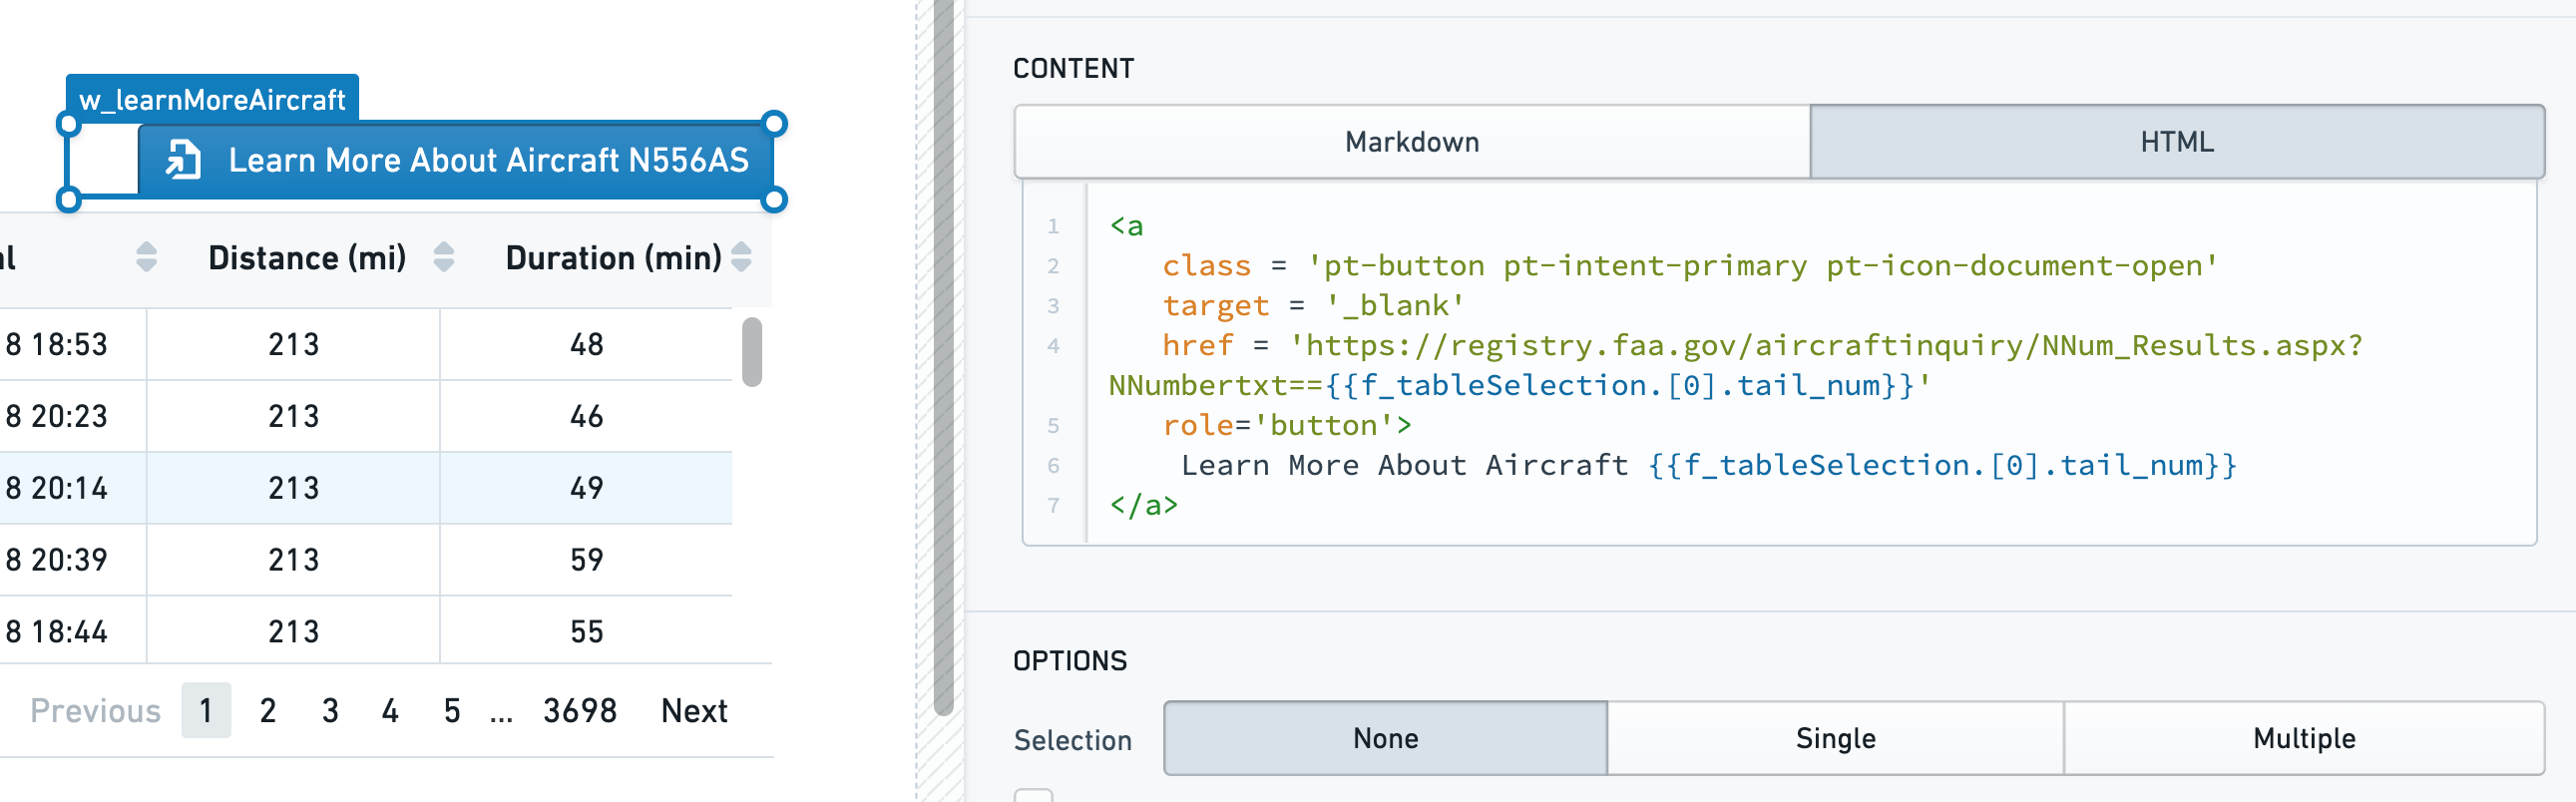
The code above has two functionalities. Adding pt-button gives the widget the appearance of a button, and adding pt-intent-primary turns the background blue. Adding "pt-icon-document-open" adds a Blueprint icon to the button. You can review the full list of icons from the Blueprint documentation ↗.
Next, we build a link by adding user input to a base URL. Then, we set the display text.
Additionally, we can add a snippet of styling to right-justify the widget for easier alignment:
sl-text {text-align: right}
Both the text and the link rely on the selection function configured above: {{f_selectedRowValues.[0].tail_num}}. f_selectedRowValues refers to the function that is reading from the table selection that we created earlier in the tutorial.
When nothing is selected, the text widget will indicate Learn More About Aircraft. Selecting it at this point would take you to a broken link.
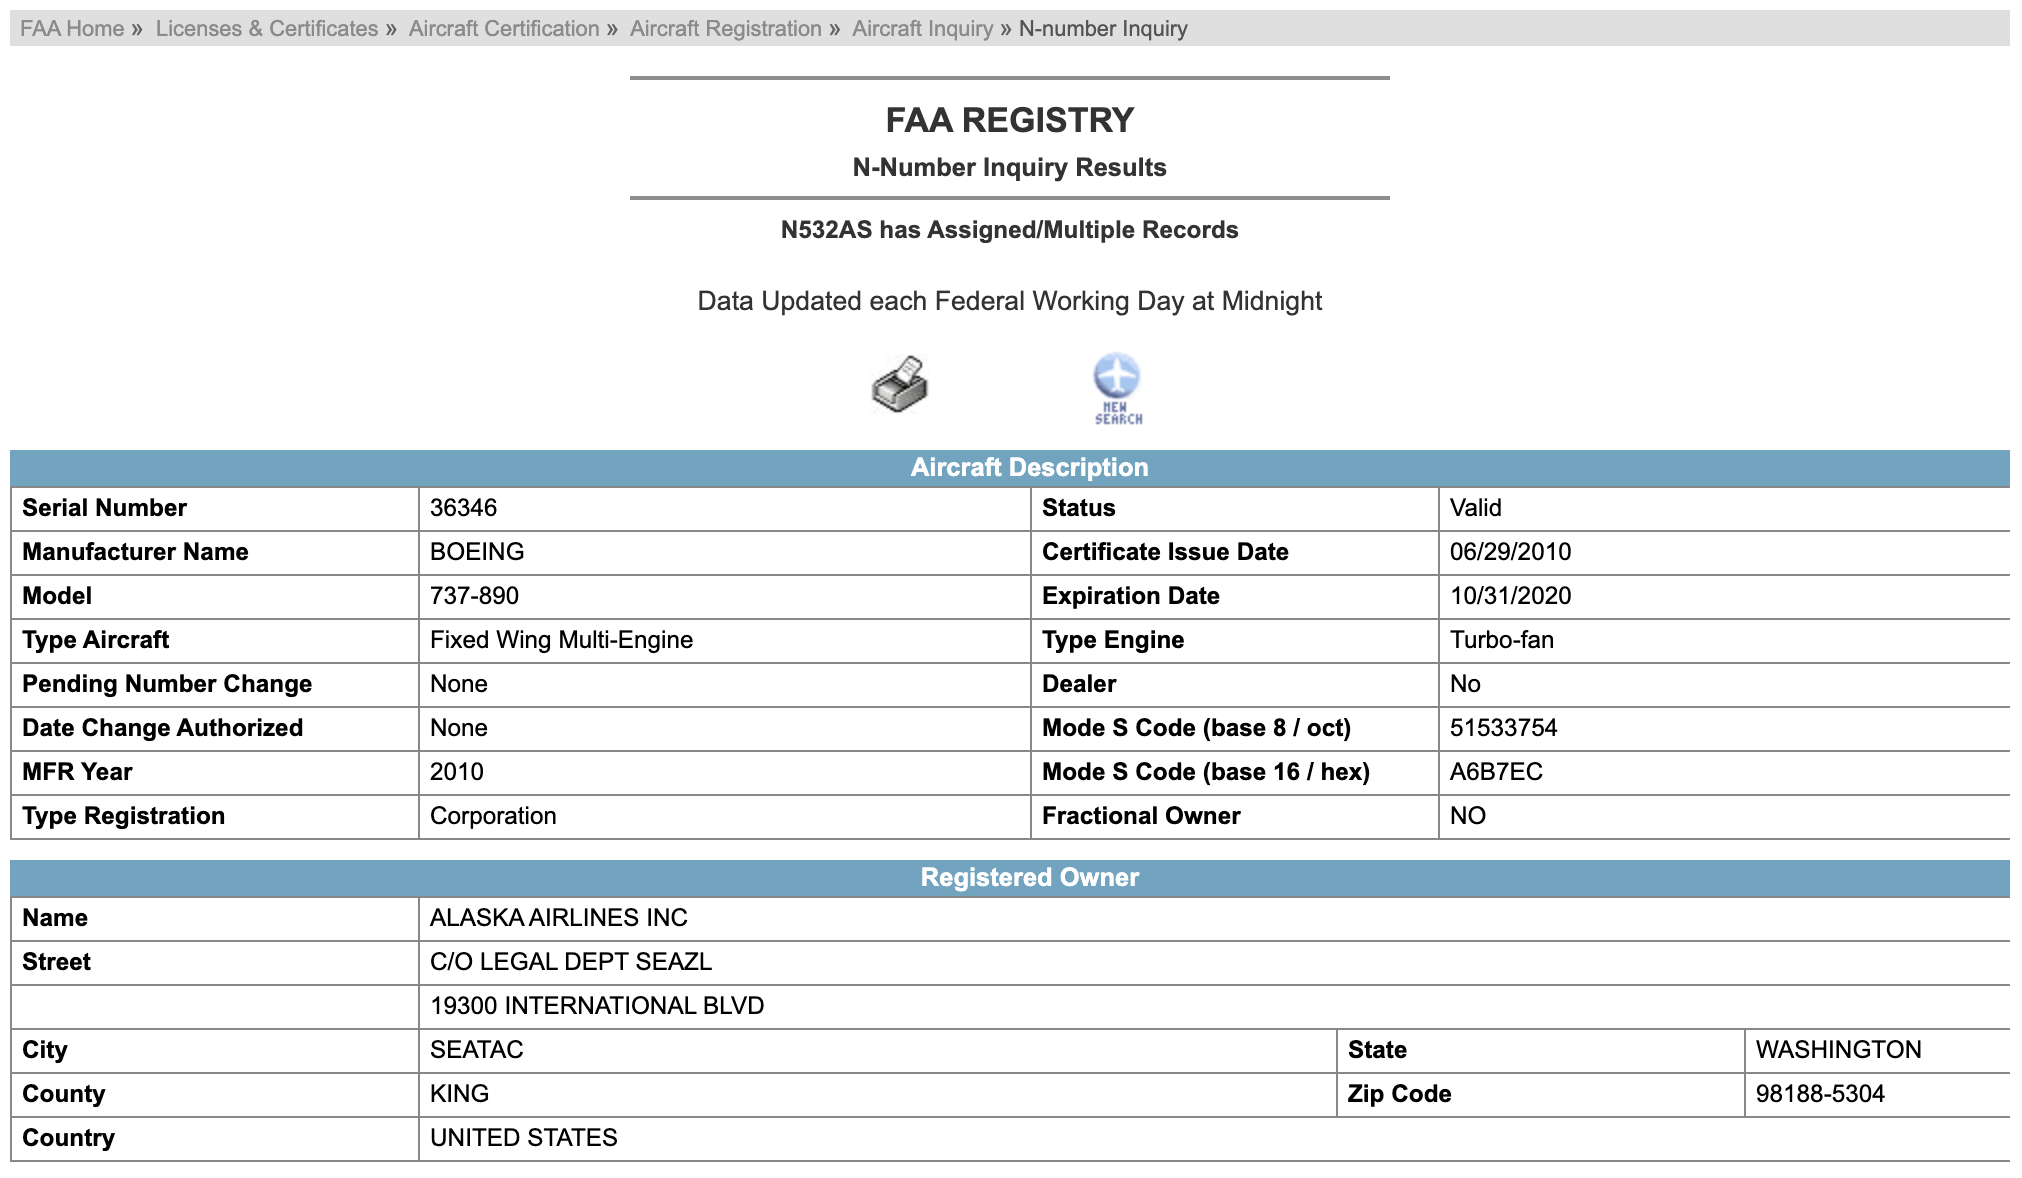
Once a row in the table is selected, the button text updates to reflect the name of the selection; selecting the button takes you to the correct webpage.
Make sure to save your application, and select X from the top right corner to exit into View mode.