Package-based suppressions
Apollo detects vulnerabilities in your Products and recalls the Releases that carry them. A suppression tells Apollo to stop recalling a Release for a finding you have already reviewed and accepted. Your team is then not interrupted by a vulnerability you cannot act on right now.
A package-based suppression, or Package Vulnerability Suppression, is a suppression type that targets a software package by its Package URL (PURL) rather than a single vulnerability. Instead of suppressing one CVE at a time, you define a rule that describes which vulnerabilities, which packages, and which scope the suppression applies to. The rule mutes matching findings wherever the package appears within that scope, including findings that appear in future scans.
Overview
There are two kinds of suppression in Apollo:
- Human-requested suppressions: Suppressions that you create in the Risk Management application, including package-based suppressions.
- Grace-period suppressions: A fixed window to address a CVE before the affected Release is recalled. The grace period begins when a vulnerability is first discovered, not when a scan runs.
Package-based suppressions exist because some vulnerabilities in a Product do not come from code the Product team wrote. They come from software packages the Product depends on but does not control and cannot patch. Handling those findings one CVE at a time does not scale. A single package can produce a stream of CVEs over time, and the same packages are triaged again and again across every Product that uses them. Targeting the package by its PURL lets you accept the risk for one package in one place, rather than filing a separate request for each new CVE as it arrives.
Defining a broad rule is not blanket permission to suppress a package. Choose the narrowest definition that fits your Product and rationale. Every suppression opens a change request that must be approved before it takes effect, and every suppression carries a required rationale and a required expiration date. Nothing is suppressed silently, and every change retains a full audit trail.
Key concepts
| Term | Meaning |
|---|---|
| Package Vulnerability Suppression | A suppression type that targets a software package by its PURL rather than a single vulnerability. Mutes every current and future finding in that package that also matches the rule's vulnerability matcher, within the rule's scope, regardless of which layer the package sits in. Lets you accept risk package by package. |
| Package | A software component identified by a PURL (pkg:type/namespace/name). The ecosystem is part of the identity, so pkg:rpm/redhat/coreutils and pkg:deb/ubuntu/coreutils are different packages. A package can come from the operating-system layer or from outside it. |
| Finding | A (package, CVE) pair found in one or more scanned images. This is the unit you suppress. |
| Scope | How widely a suppression applies: specific image repositories, an image prefix, an SLS distribution, a Product, or global. |
| Category | The reason a finding is being suppressed. It drives downstream review and automation. |
| Status | Where a finding sits against its SLA: in grace period, overdue, or suppressed. A pending suppression indicator shows when a change request is in flight. |
Common patterns
Package-based suppressions support a range of workflows. The following patterns are common:
- Target every vulnerability from one package. Match the package by its PURL and use a vulnerability matcher that covers all severities, so current and future CVEs in that package are suppressed within your scope.
- Target vulnerabilities only from a certain operating-system vendor. Use the Package namespace URL matcher to match every package published under that vendor's namespace, so the rule applies only to that vendor's packages.
- Automatically suppress vulnerabilities without a fix. Use Match by properties and select the
Not fixedandWon't fixfix statuses, so findings that have no fix available do not recall your Releases. - Automatically suppress vulnerabilities below a certain severity. Use Match by properties and select only the lower severities, so low-risk findings are suppressed within your scope.
PURL packages
A package is a software component identified by a Package URL, commonly abbreviated to PURL. A PURL has the form pkg:type/namespace/name, for example, pkg:rpm/redhat/perl-overload or pkg:golang/golang.org/x/sys.
The type is the packaging ecosystem, such as rpm, deb, golang, npm, or maven. The ecosystem is part of the package identity, so pkg:rpm/redhat/coreutils and pkg:deb/ubuntu/coreutils are treated as different packages even though they share a name. A package can come from the operating-system layer of an image or from outside it.
The namespace is the prefix that groups a package within its ecosystem, such as the operating-system vendor for an OS package or the module path for a language package. In pkg:rpm/redhat/perl-overload, the namespace is redhat, and in pkg:golang/golang.org/x/sys, the namespace is golang.org/x. The namespace is part of the package identity, so pkg:rpm/redhat/coreutils and pkg:rpm/suse/coreutils are treated as different packages even though they share a type and name. Some packages have no namespace, in which case this segment is empty, as in pkg:npm/lodash.
The name is the package's own identifier within its type and namespace, such as perl-overload in pkg:rpm/redhat/perl-overload or sys in pkg:golang/golang.org/x/sys. The name alone does not identify a package; the same name can appear under different types and namespaces and refer to unrelated software.
When you match a package by PURL, provide only the type, namespace, and name. Omit the following:
- Versions, which follow an
@(for example,@1.2.3). - Qualifiers, which follow a
?(for example,?arch=x86_64). - Subpaths, which follow a
#.
You control versions separately through the Package version matcher described below. By targeting the type, namespace, and name, a single rule can cover a package everywhere it appears, across every image and Release. You do not need a new suppression each time a related CVE surfaces in that package.
Before you begin
You need access to the Risk Management application and permission to create vulnerability suppressions. Permissions are set on the Permissions tab of the Settings & Configuration page in the Apollo sidebar. Grant the Approver role under Vulnerability suppressions to configure who can approve suppression change requests.
Every suppression opens a change request. For each change request, you must provide a clear rationale and a required expiration date.
Create a package-based suppression
A rule applies only when its suppression scope, package matcher, and vulnerability matcher all match. The following steps walk through each part of the creation form.
Open the Risk Management application
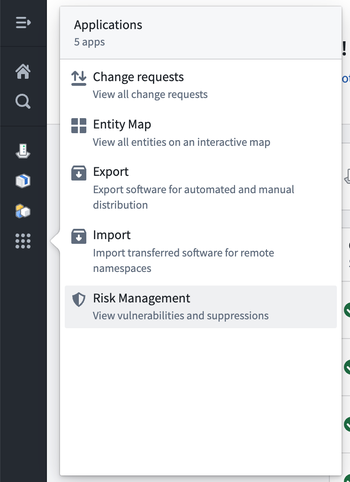
Select Risk Management from the Applications menu in the left sidebar.
Open the suppression form
Navigate to the Vulnerabilities tab and find the finding you want to suppress. Alternatively, use the Actions menu in the top right to open the suppression form directly. The form is also accessible from the Product Release Security page and the Bundle Security page.

The Actions menu offers Create vulnerability suppression and Download all suppressions as a CSV.

Choose the suppression scope
On the Rules step, choose the Scope the suppression applies in. The scope controls which Apollo resources the rule covers. Choose the most granular option that covers your case.
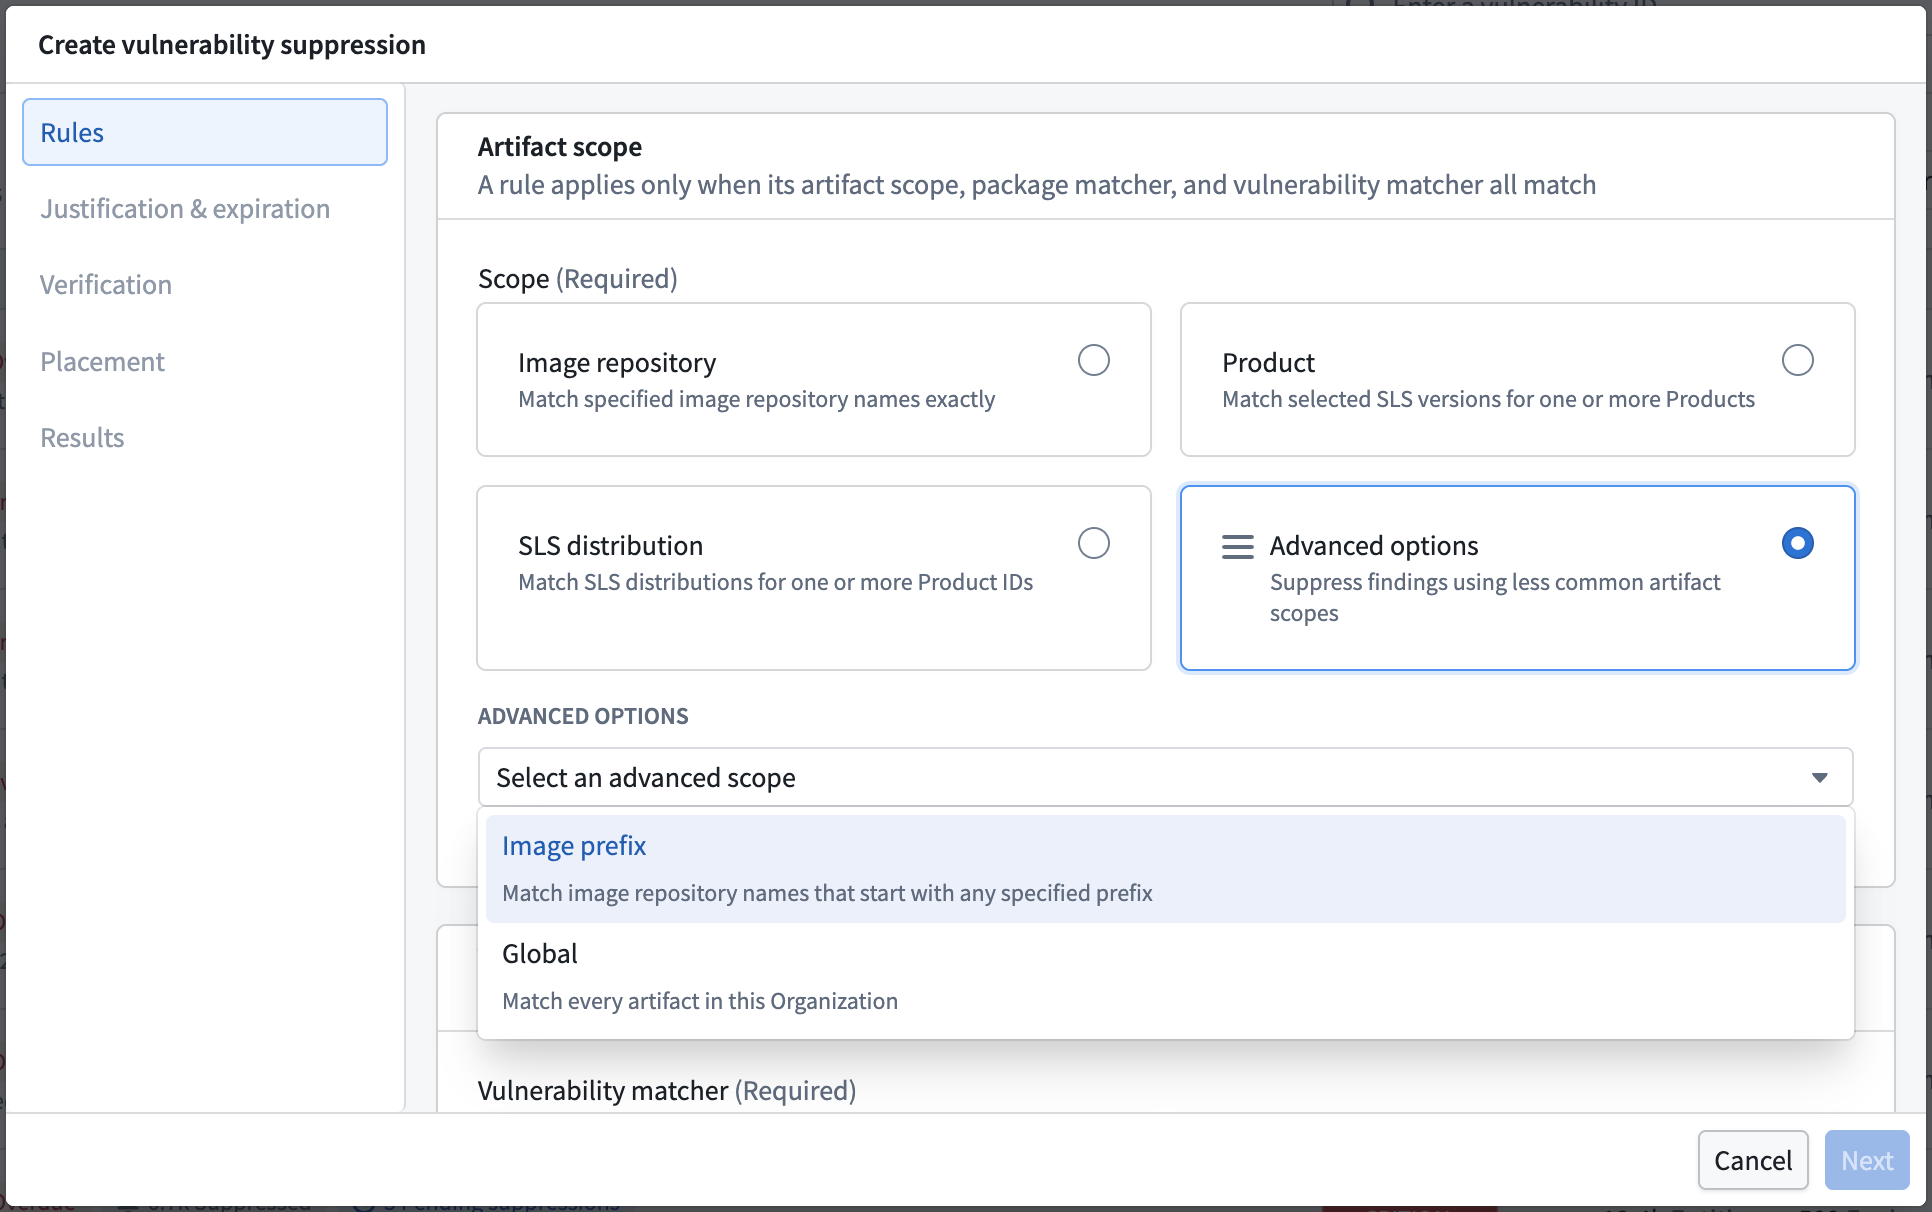
- Image repository: Match specified image repository names exactly. This is the default and narrowest choice.
- Product: Match selected SLS versions for one or more Products.
- SLS distribution: Match SLS distributions for one or more Product IDs.
- Advanced options: Suppress findings using less common suppression scopes. Selecting Advanced options reveals the following:
- Image prefix: Match image repository names that start with any specified prefix.
- Global: Match every artifact in the organization.
When you choose Image repository, use the Image repositories field to add one or more repositories. Repository names are matched exactly after the registry and the tag or digest are removed. For example, enter team/service.
Choose the vulnerabilities to suppress
Under Vulnerabilities, choose a Vulnerability matcher. You can either declare vulnerabilities directly or define a set of rules that match vulnerabilities automatically. A vulnerability must match every property group; values within a group are alternatives.
Explicit vulnerability IDs matches only the vulnerability IDs you specify.
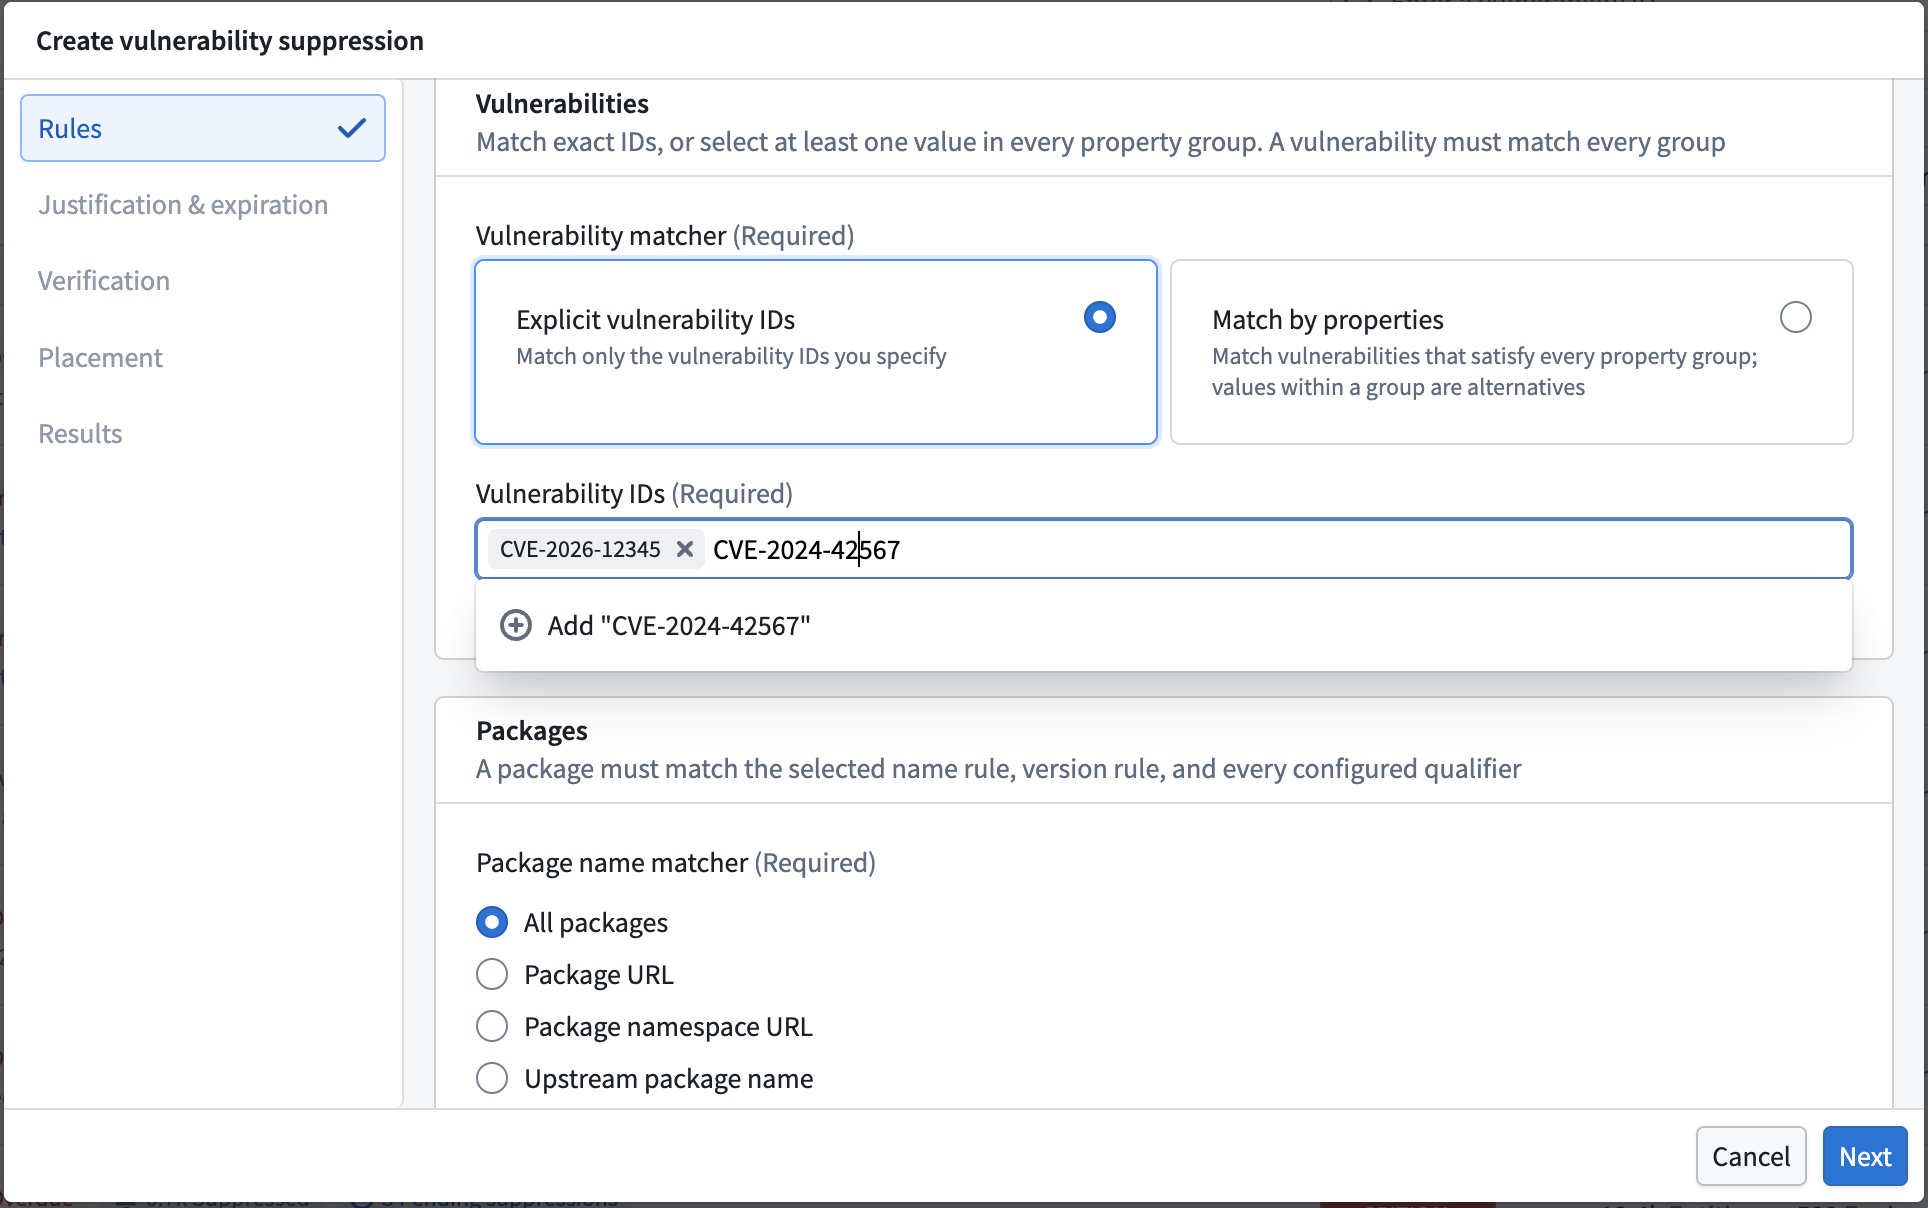
Use the Vulnerability IDs field to add each ID. Match vulnerability IDs exactly as reported by the scanner, for example CVE-2024-0056.
Match by properties matches every vulnerability that satisfies each property group, allowing you to cover current and future CVEs that share the same characteristics.
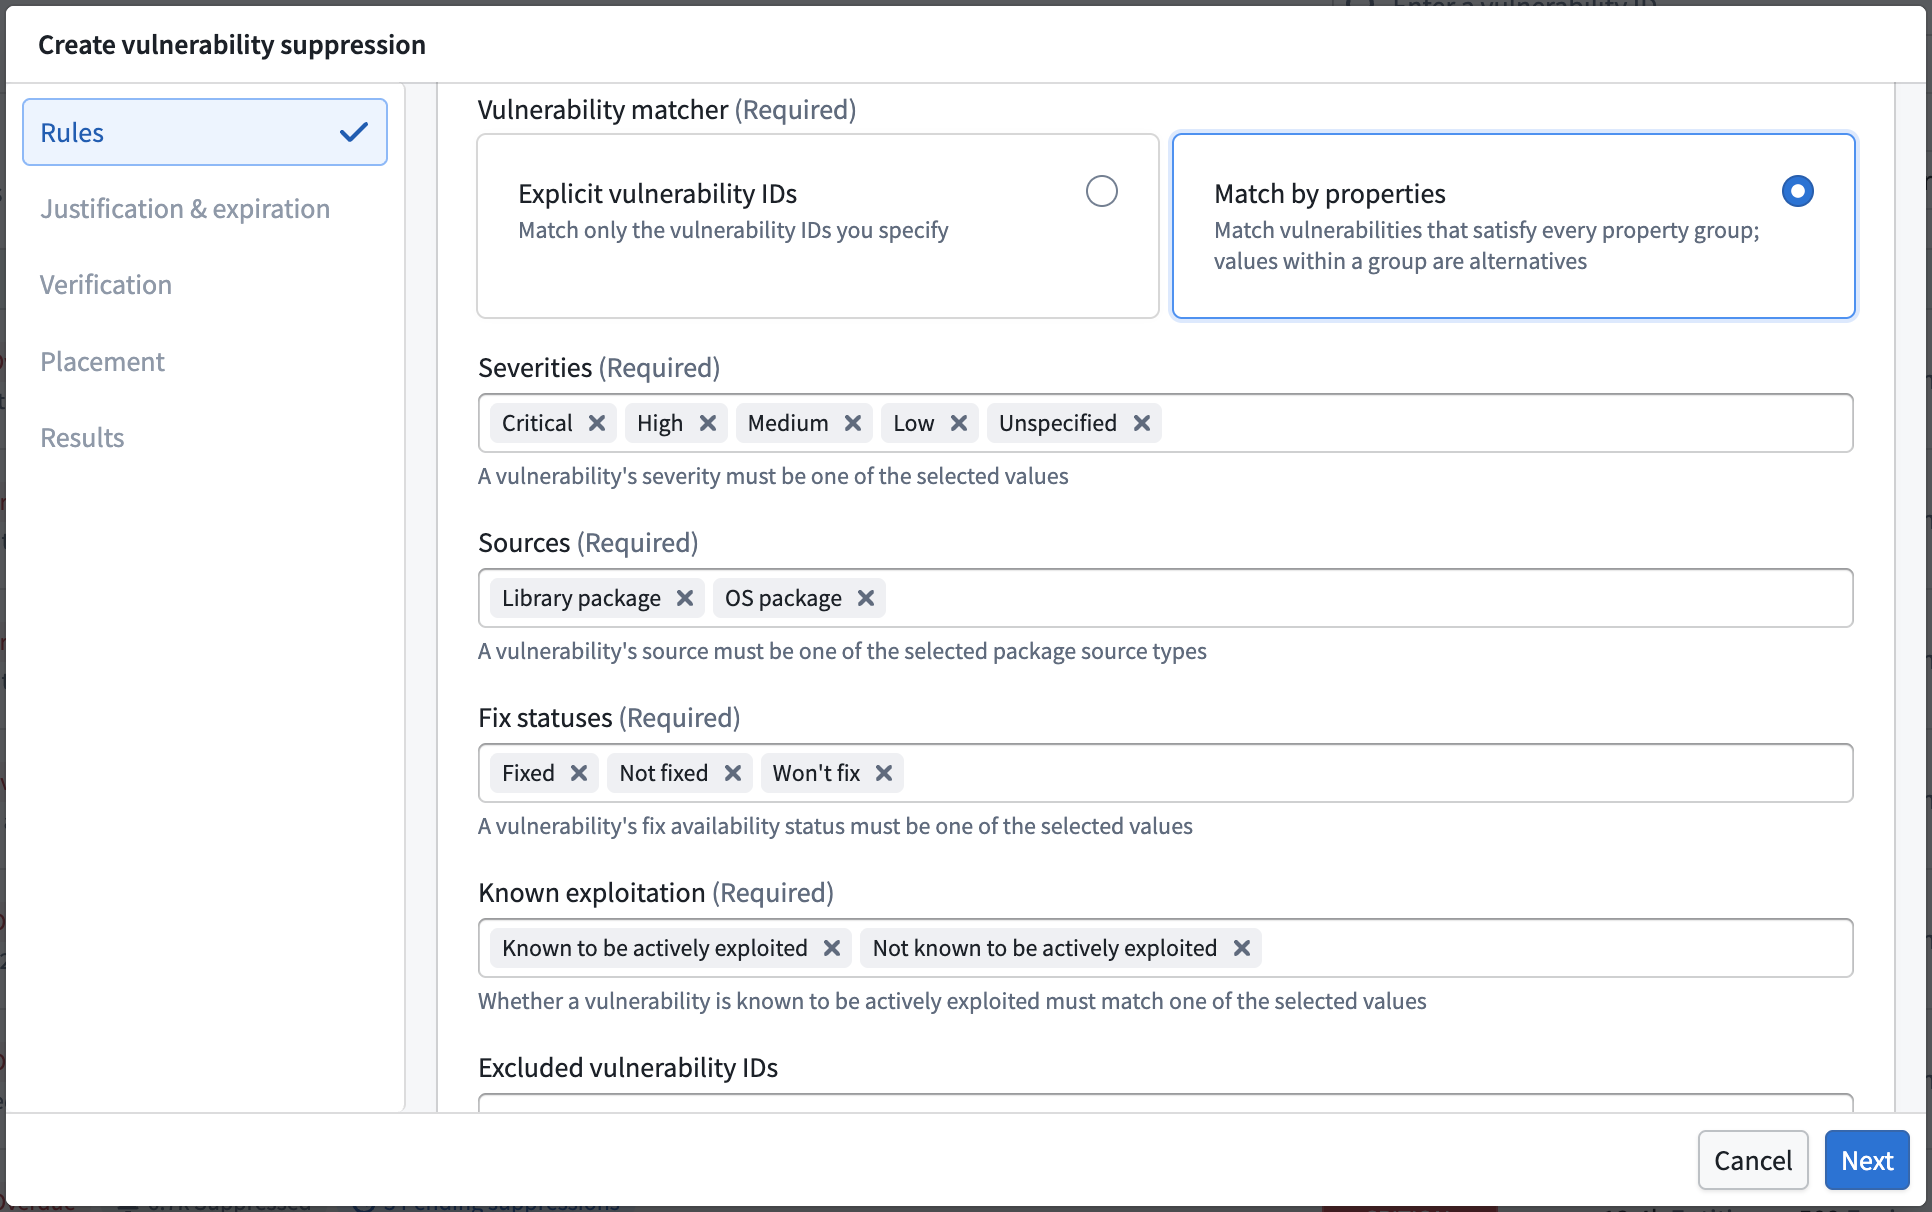
- Severities: A vulnerability's severity must be one of the selected values:
Critical,High,Medium,Low, orUnspecified. - Sources: A vulnerability's source must be one of the selected package source types:
Library packageorOS package. - Fix statuses: A vulnerability's fix availability status must be one of the selected values:
Not fixed,Fixed, orWon't fix. - Known exploitation: Whether a vulnerability is known to be actively exploited must match one of the selected values:
Known to be actively exploitedorNot known to be actively exploited. - Excluded vulnerability IDs: The vulnerability IDs you add here never match, even when they satisfy every selected property group. Use this to omit specific CVEs from an otherwise broad property match.
Choose the package to target
Under Packages, define which package the rule targets. A package must match the selected name rule, version rule, and every configured qualifier.
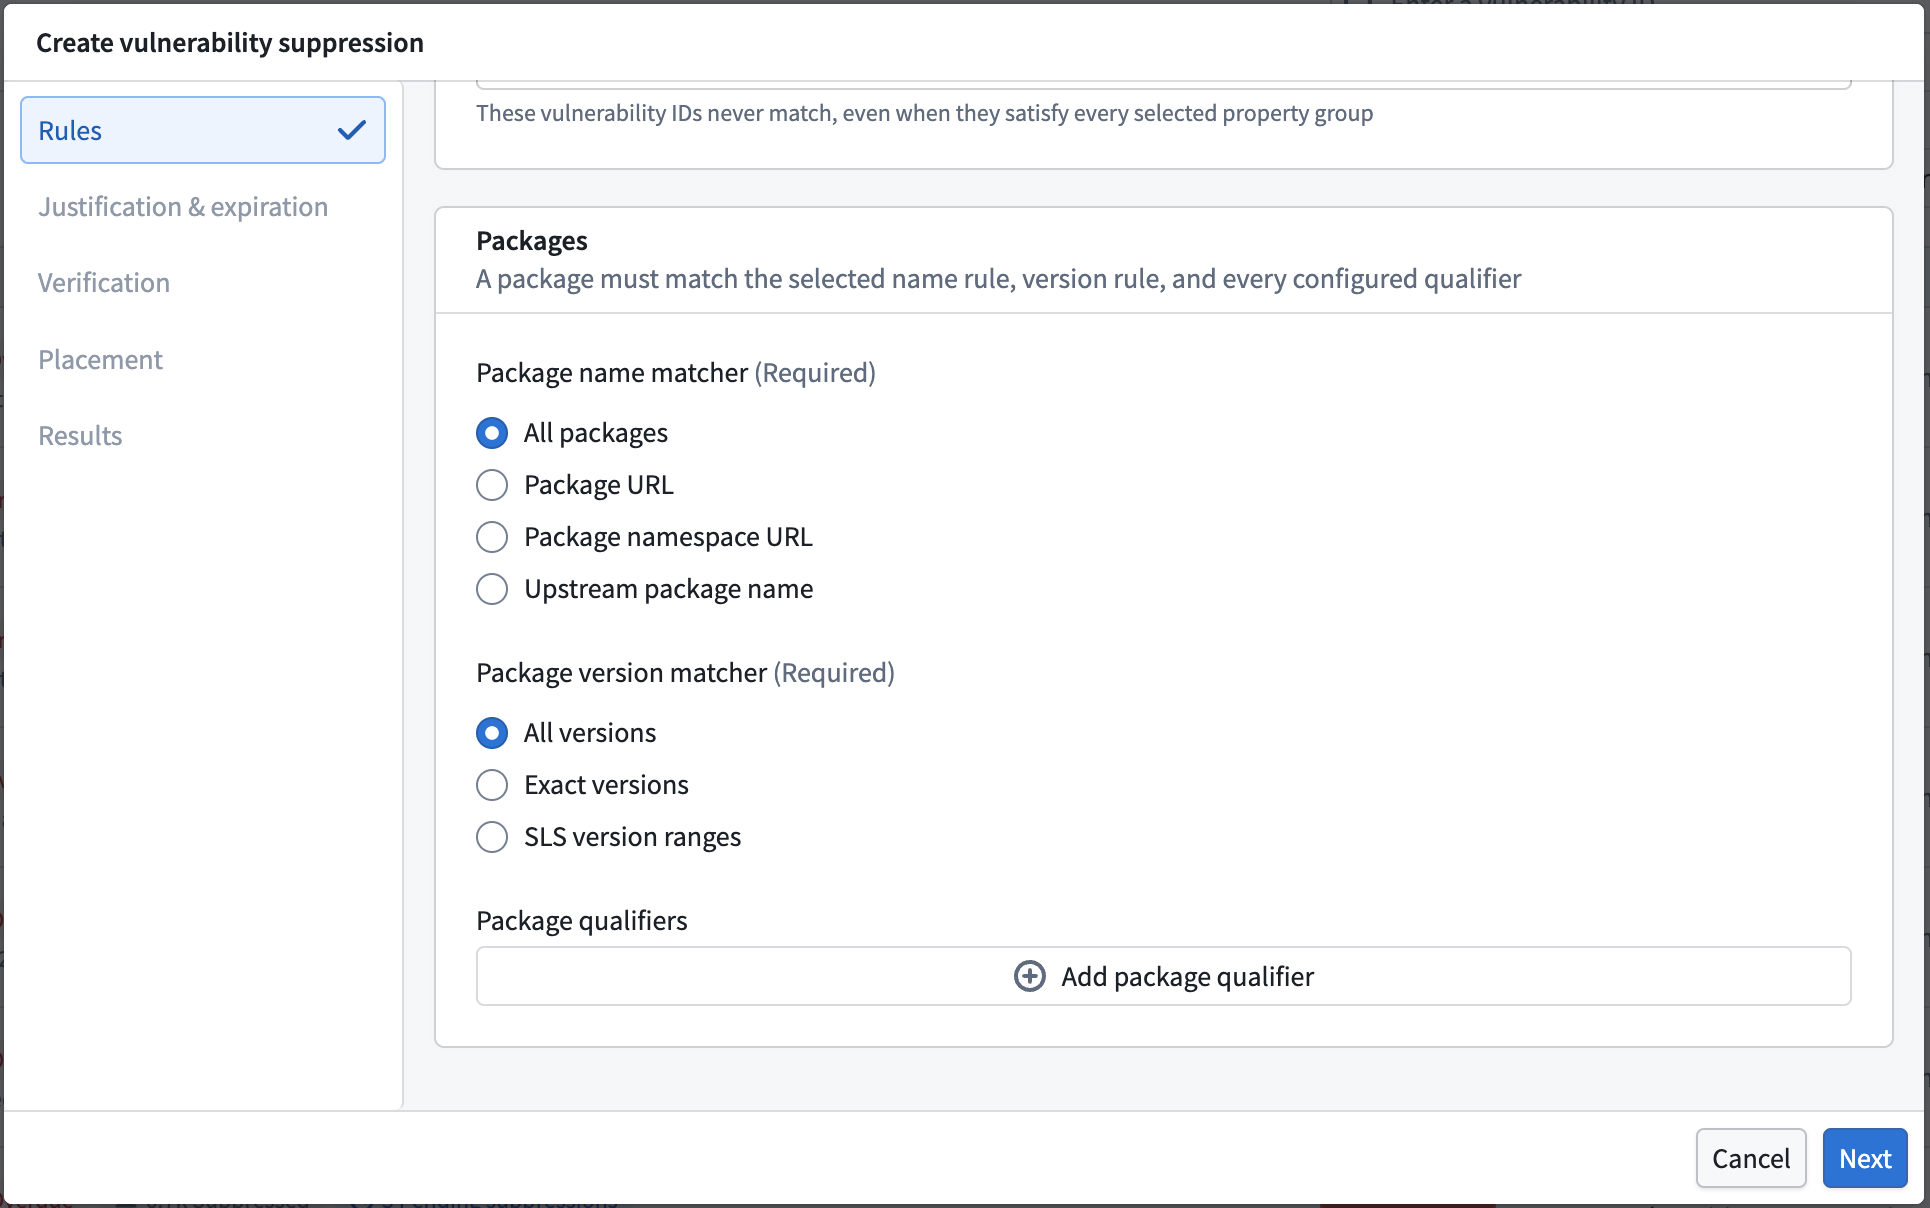
Choose a Package name matcher to control how the rule identifies a package:
- All packages: Match every package. Use this only when the vulnerability and scope rules already make the suppression safe.
- Package URL: Match one or more packages by their PURL.
- Package namespace URL: Match every package published under a namespace.
- Upstream package name: Match by the upstream package name.
Choose a Package version matcher to control which versions are in scope:
- All versions: Match every version of the package.
- Exact versions: Match only the versions you specify.
- SLS version ranges: Match versions that fall within an SLS version range.
Use Package qualifiers to narrow the match further with qualifier values, such as an architecture.
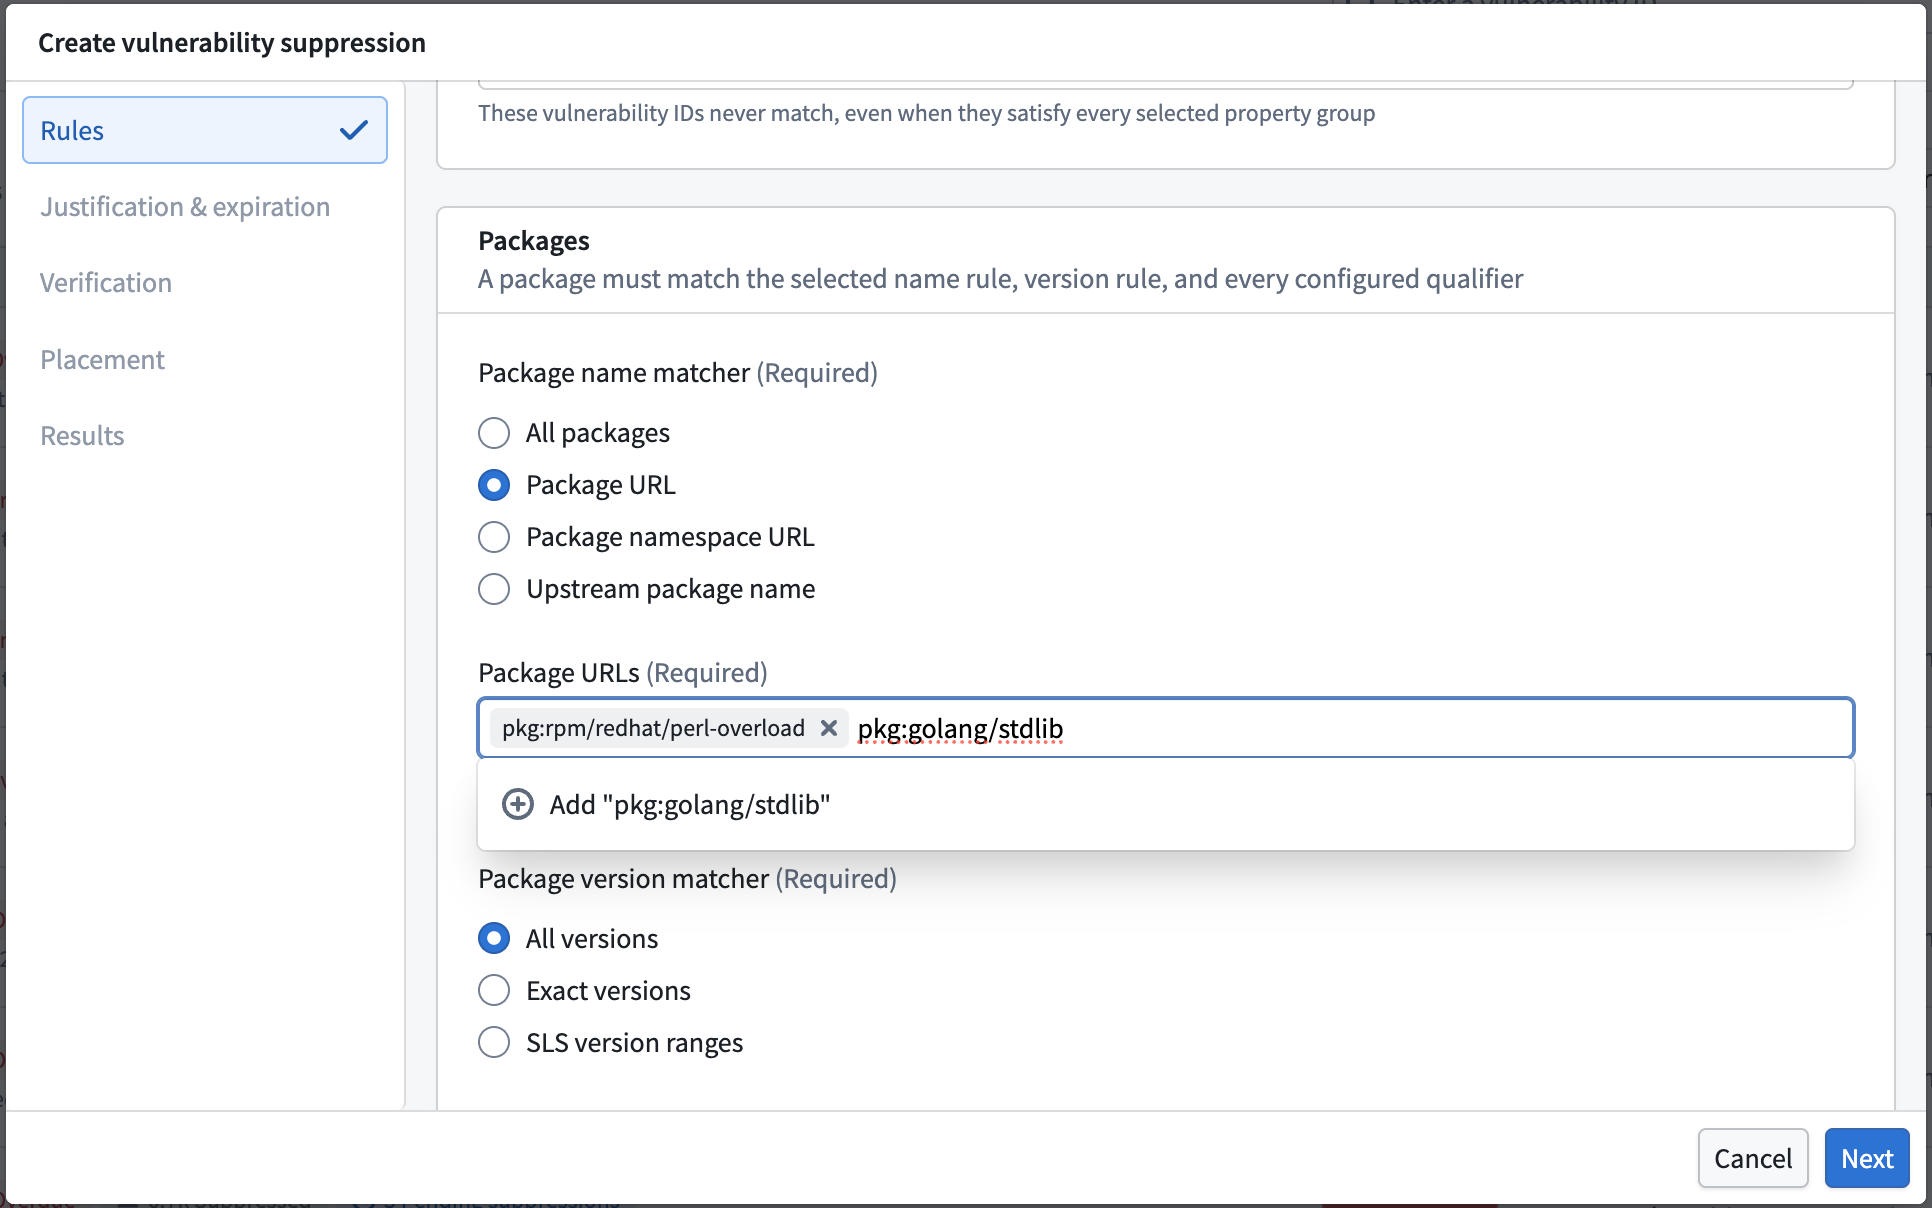
When you choose Package URL, use the Package URLs field to add each PURL. You can match PURL packages by type, namespace, and name, and omit versions, qualifiers, and subpaths.
Choose a suppression category
Although you are suppressing findings, future scans continue to detect them. The Suppression category records why it is acceptable that future scans yield the same findings. Choose the reason that best describes why these findings should be suppressed.
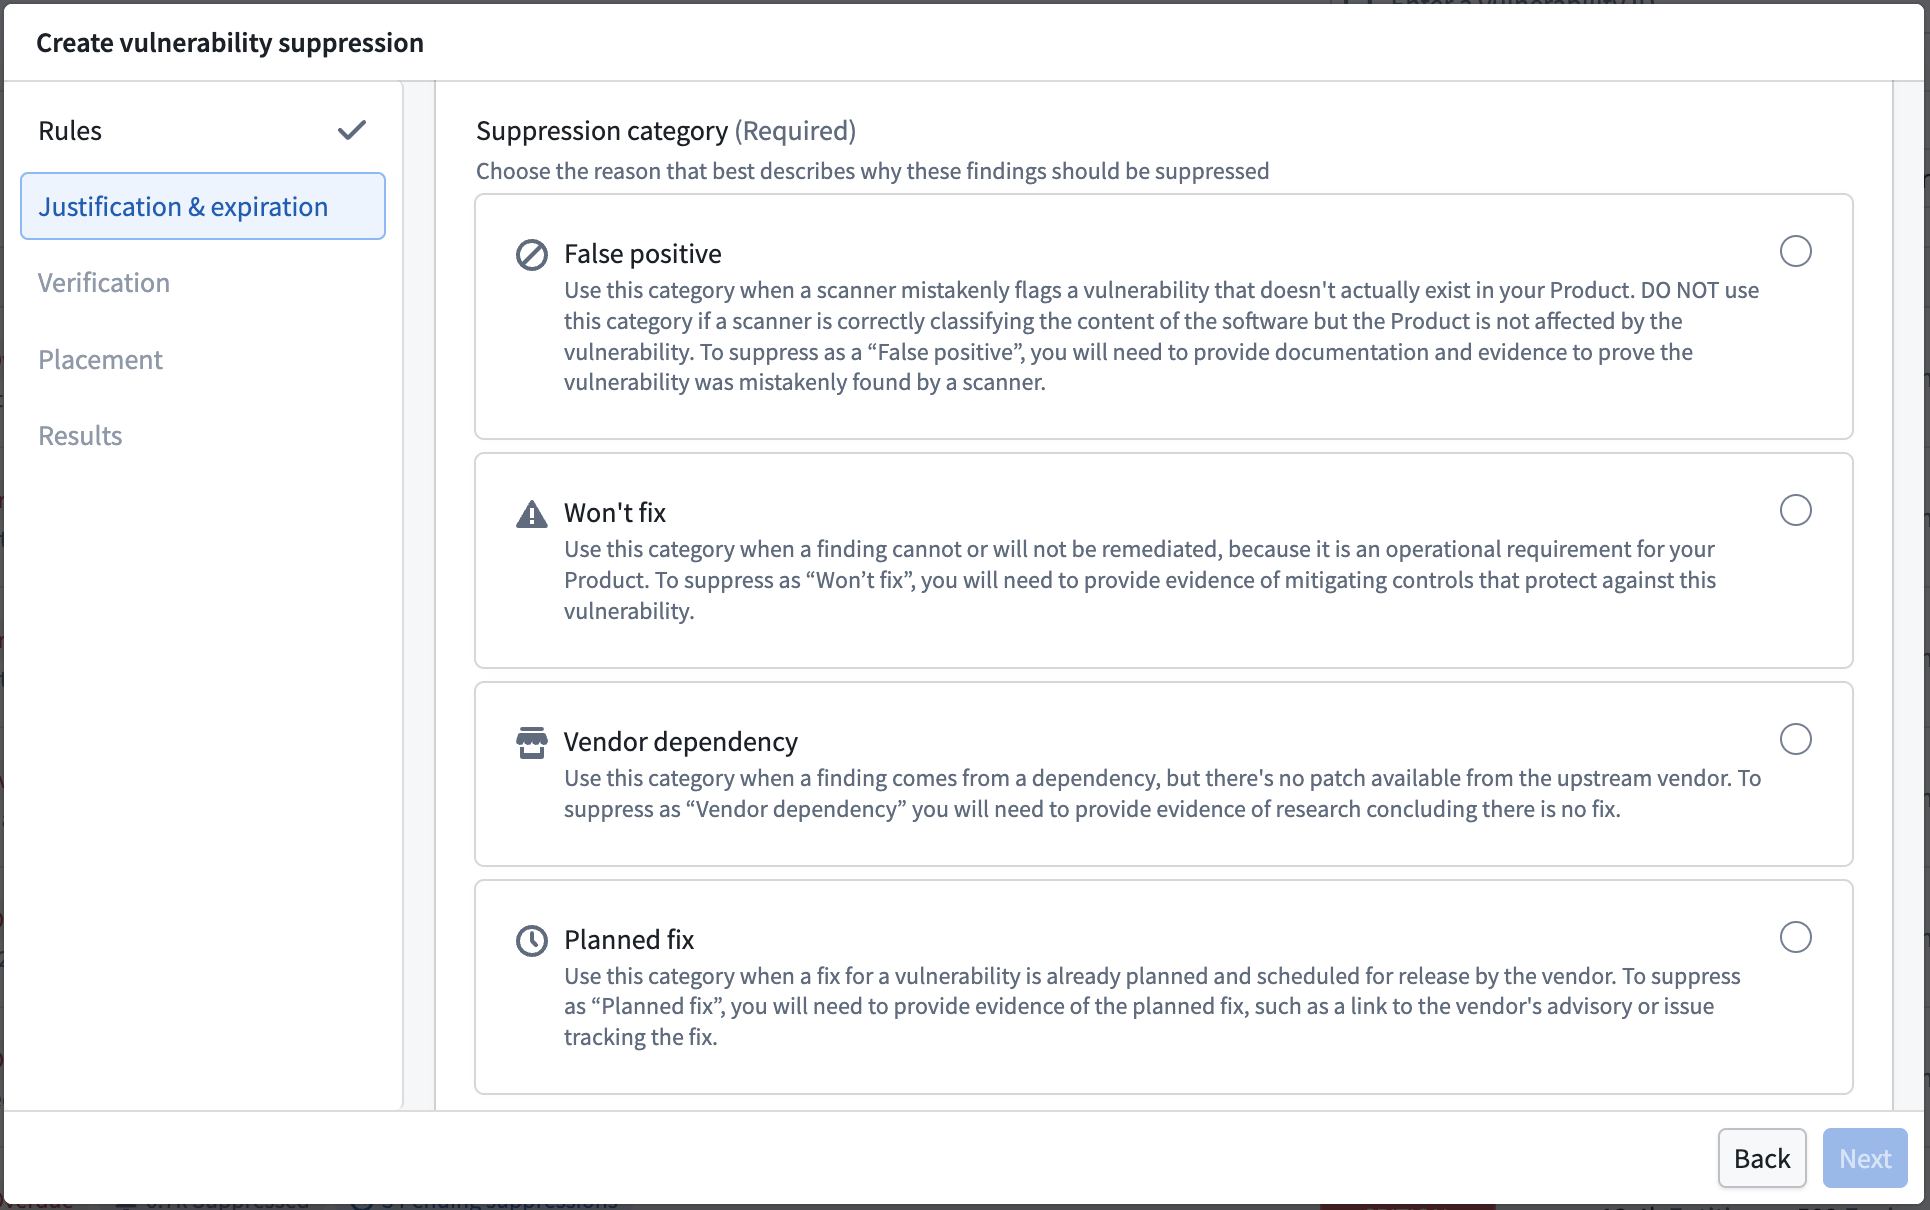
- False positive: Use this category when a scanner mistakenly flags a vulnerability that does not actually exist in your Product. Do not use this category if a scanner is correctly classifying the content of the software but the Product is not affected by the vulnerability. To suppress as a false positive, provide documentation and evidence that proves the vulnerability was mistakenly found by a scanner.
- Won't fix: Use this category when a finding cannot or will not be remediated because it is an operational requirement for your Product. To suppress under this category, provide evidence of mitigating controls that protect against the vulnerability.
- Vendor dependency: Use this category when a finding comes from a dependency but no patch is available from the upstream vendor. To suppress as a vendor dependency, provide evidence of research concluding there is no fix.
- Planned fix: Use this category when a fix for the vulnerability is already planned and scheduled for release by the vendor. To suppress as a planned fix, provide evidence of the planned fix, such as a link to the vendor's advisory or the issue tracking the fix.
See Suppression categories for a summary of each category.
Answer the justification questionnaire
Answer the questionnaire for the category you chose. These fields are required. Write each answer so that a security reviewer can decide without asking you for more context.
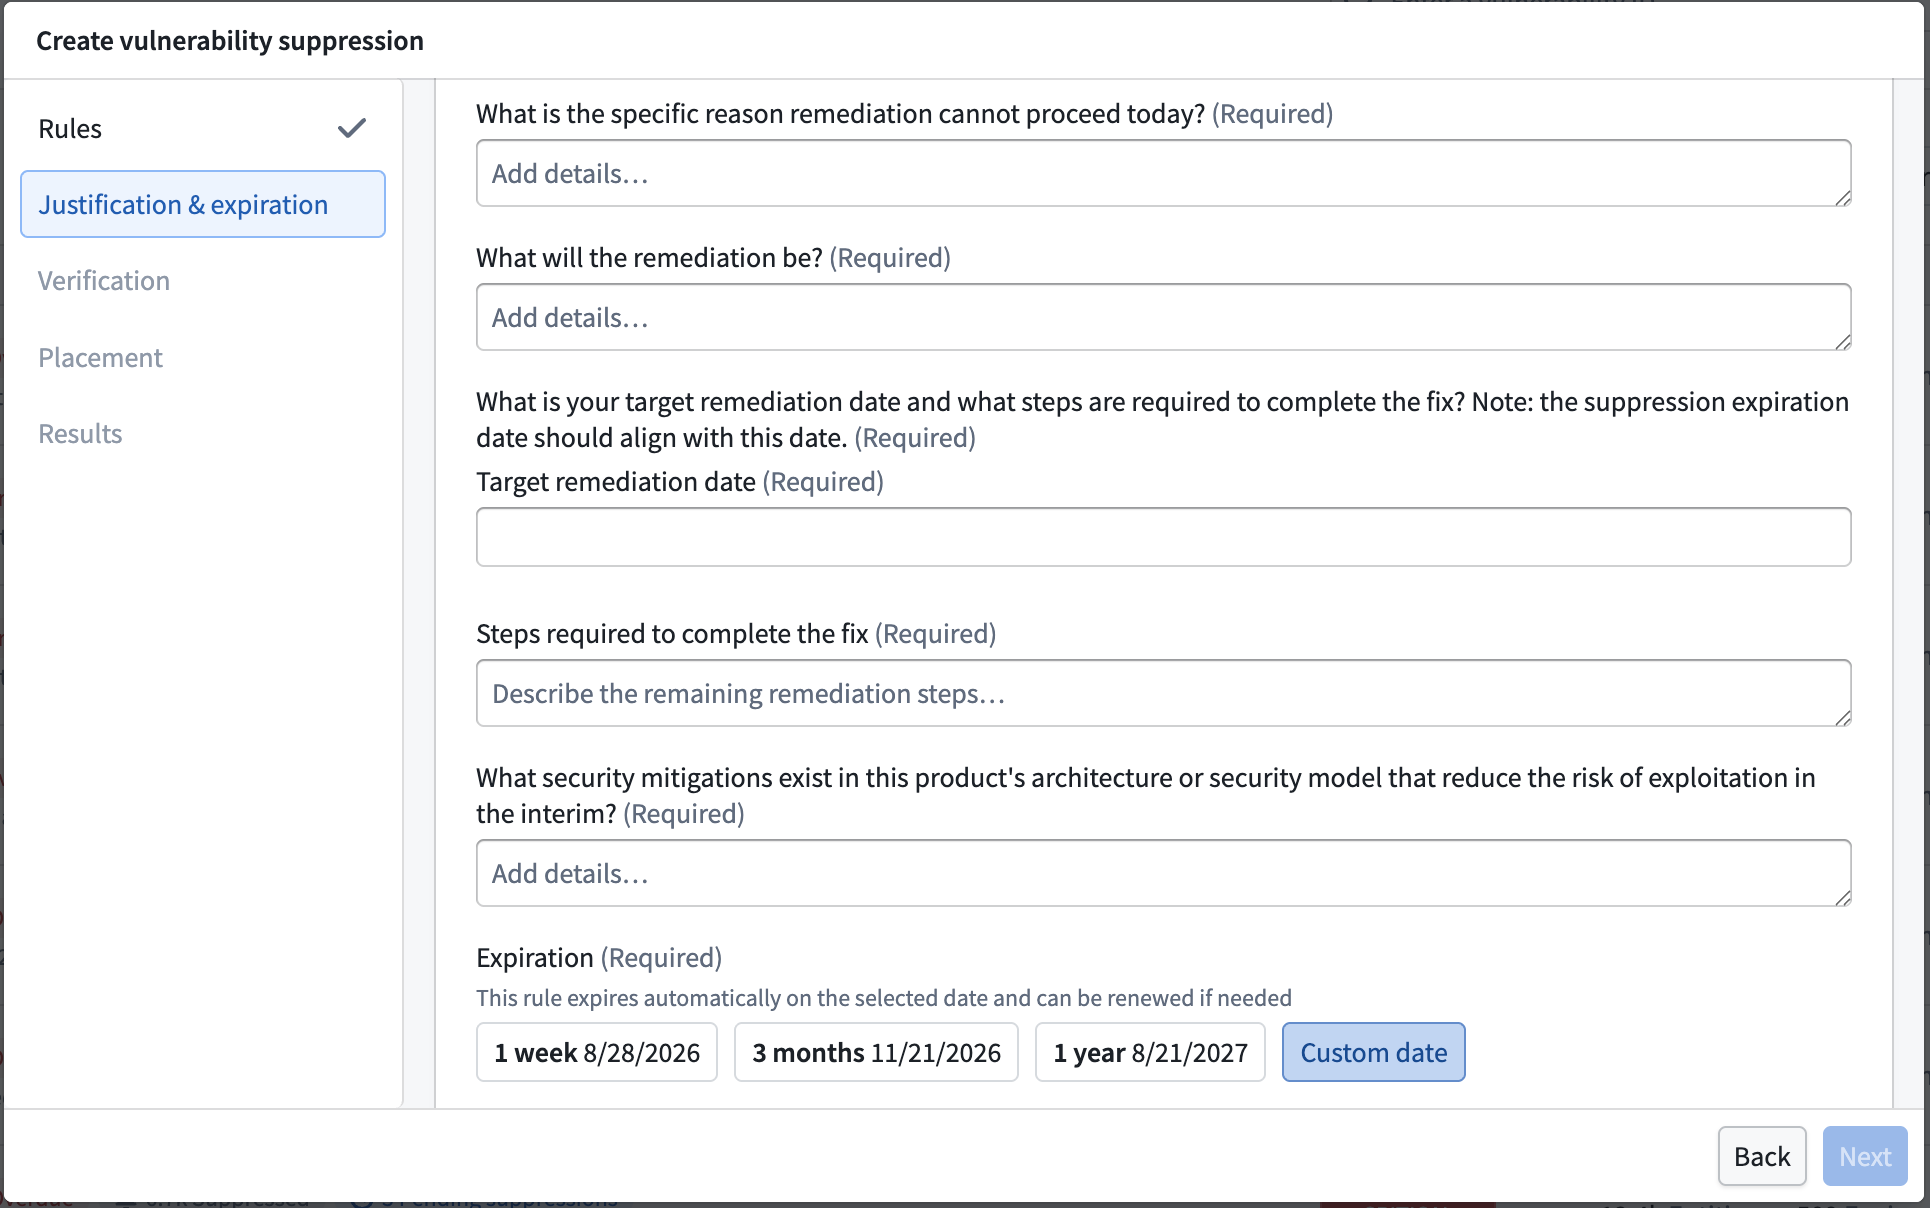
The exact questions depend on the category you chose. Expect to provide the following:
- The specific reason remediation cannot proceed immediately.
- What the remediation will be.
- Your target remediation date and the steps required to complete the fix. The suppression expiration date should align with this date.
- What security mitigations exist in the Product's architecture or security model that reduce the risk of exploitation in the interim, such as network restrictions, monitoring, firewalls, usage restrictions, an unused part of the codebase, or being behind authentication.
Set an Expiration for the suppression. Choose one of the presets, such as 1 week, 3 months, or 1 year, or choose Custom date to set your own. An expiration is required, so no suppression is open-ended.
Verify the predicted impact
On the Verification step, review the findings the rule would target before you submit. This is the predicted impact of the suppression you are creating.
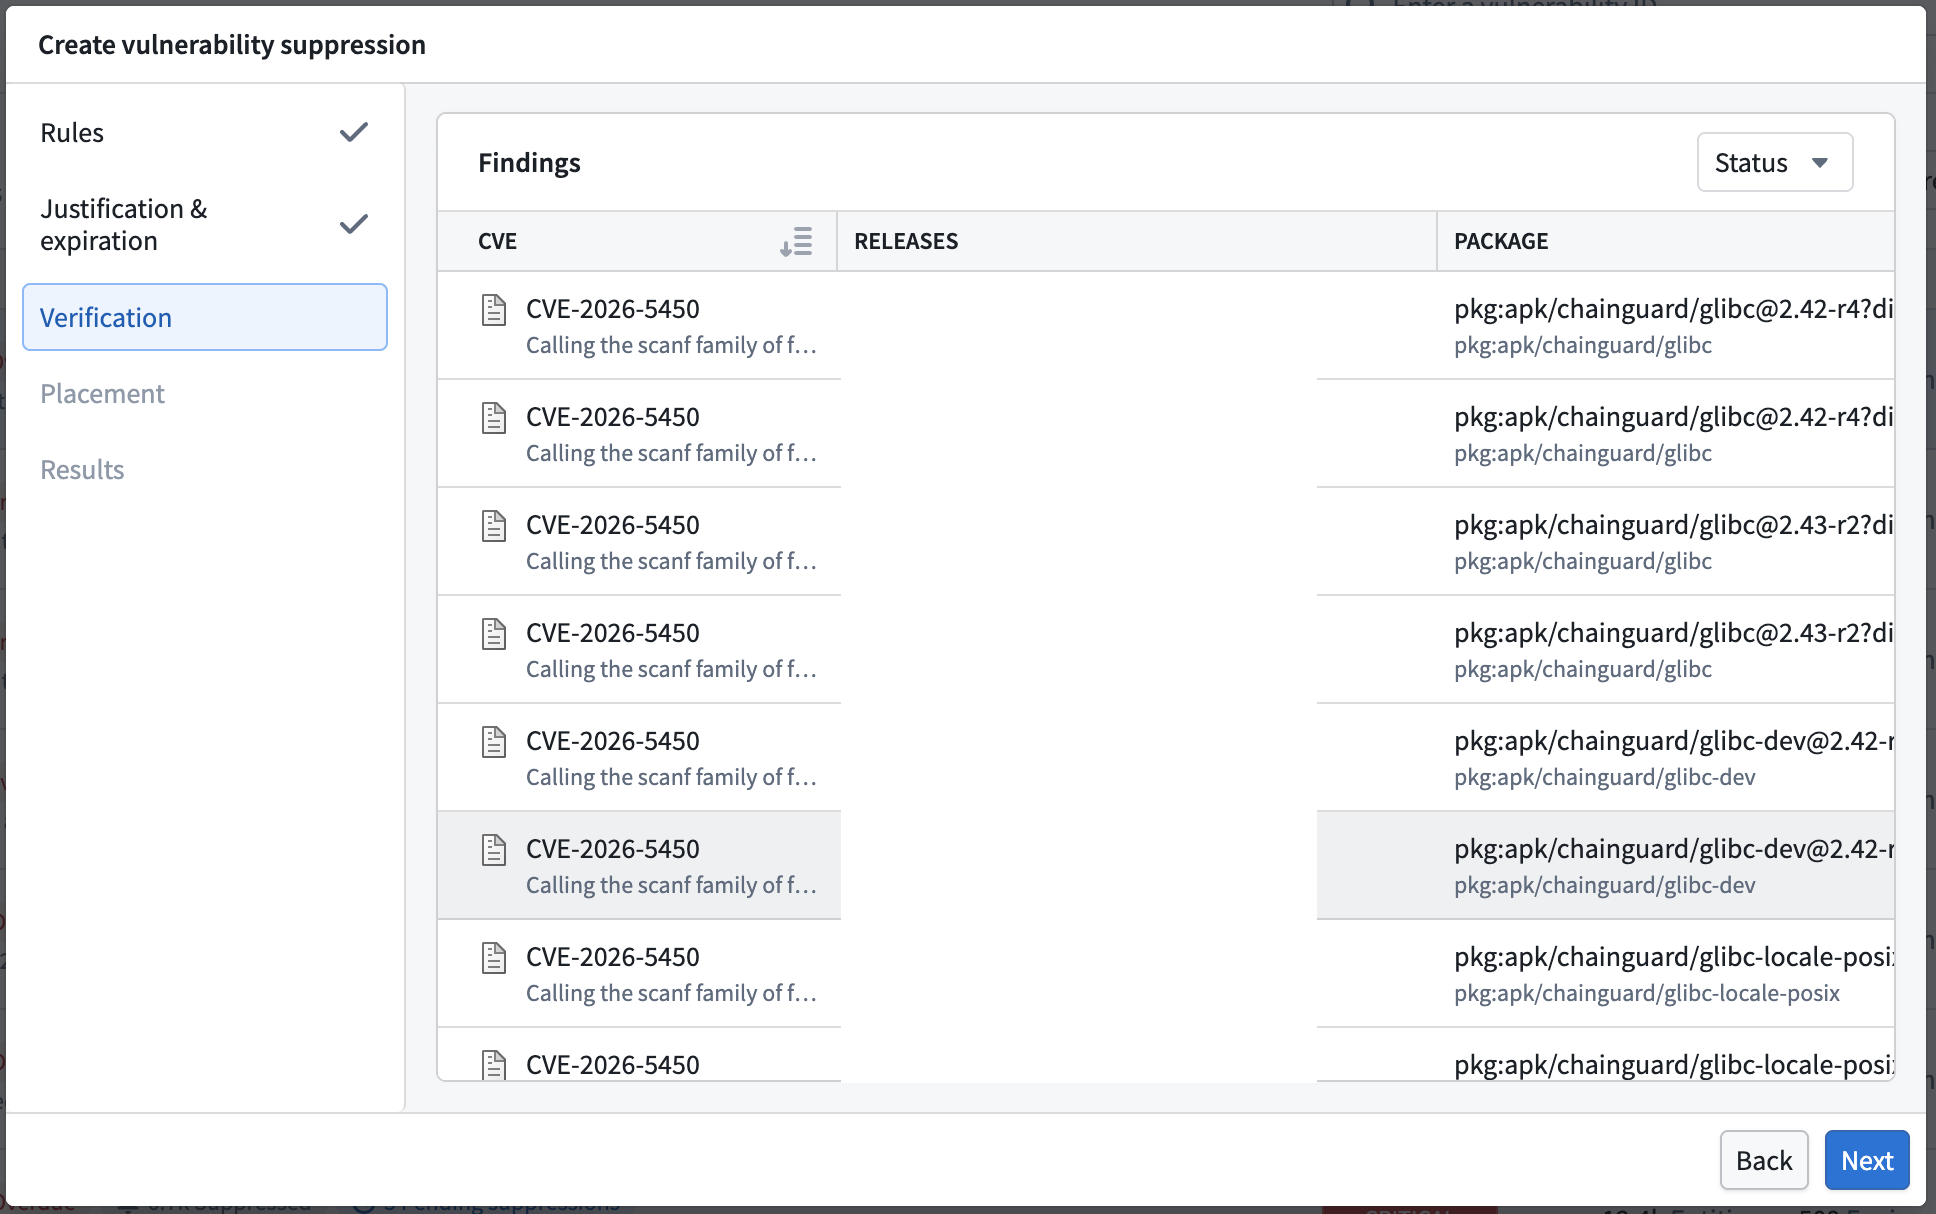
The table lists each matching finding by its CVE, the Releases the finding appears in, and the Package identified by its PURL. Use this view to confirm the rule matches what you intend before opening a change request.
Review the suppression placement
On the Placement step, Apollo recommends where to add each new rule. Based on the rules you specified, Apollo recommends either adding a rule to an existing suppression or creating a new one. Review the placement for each rule before opening change requests.
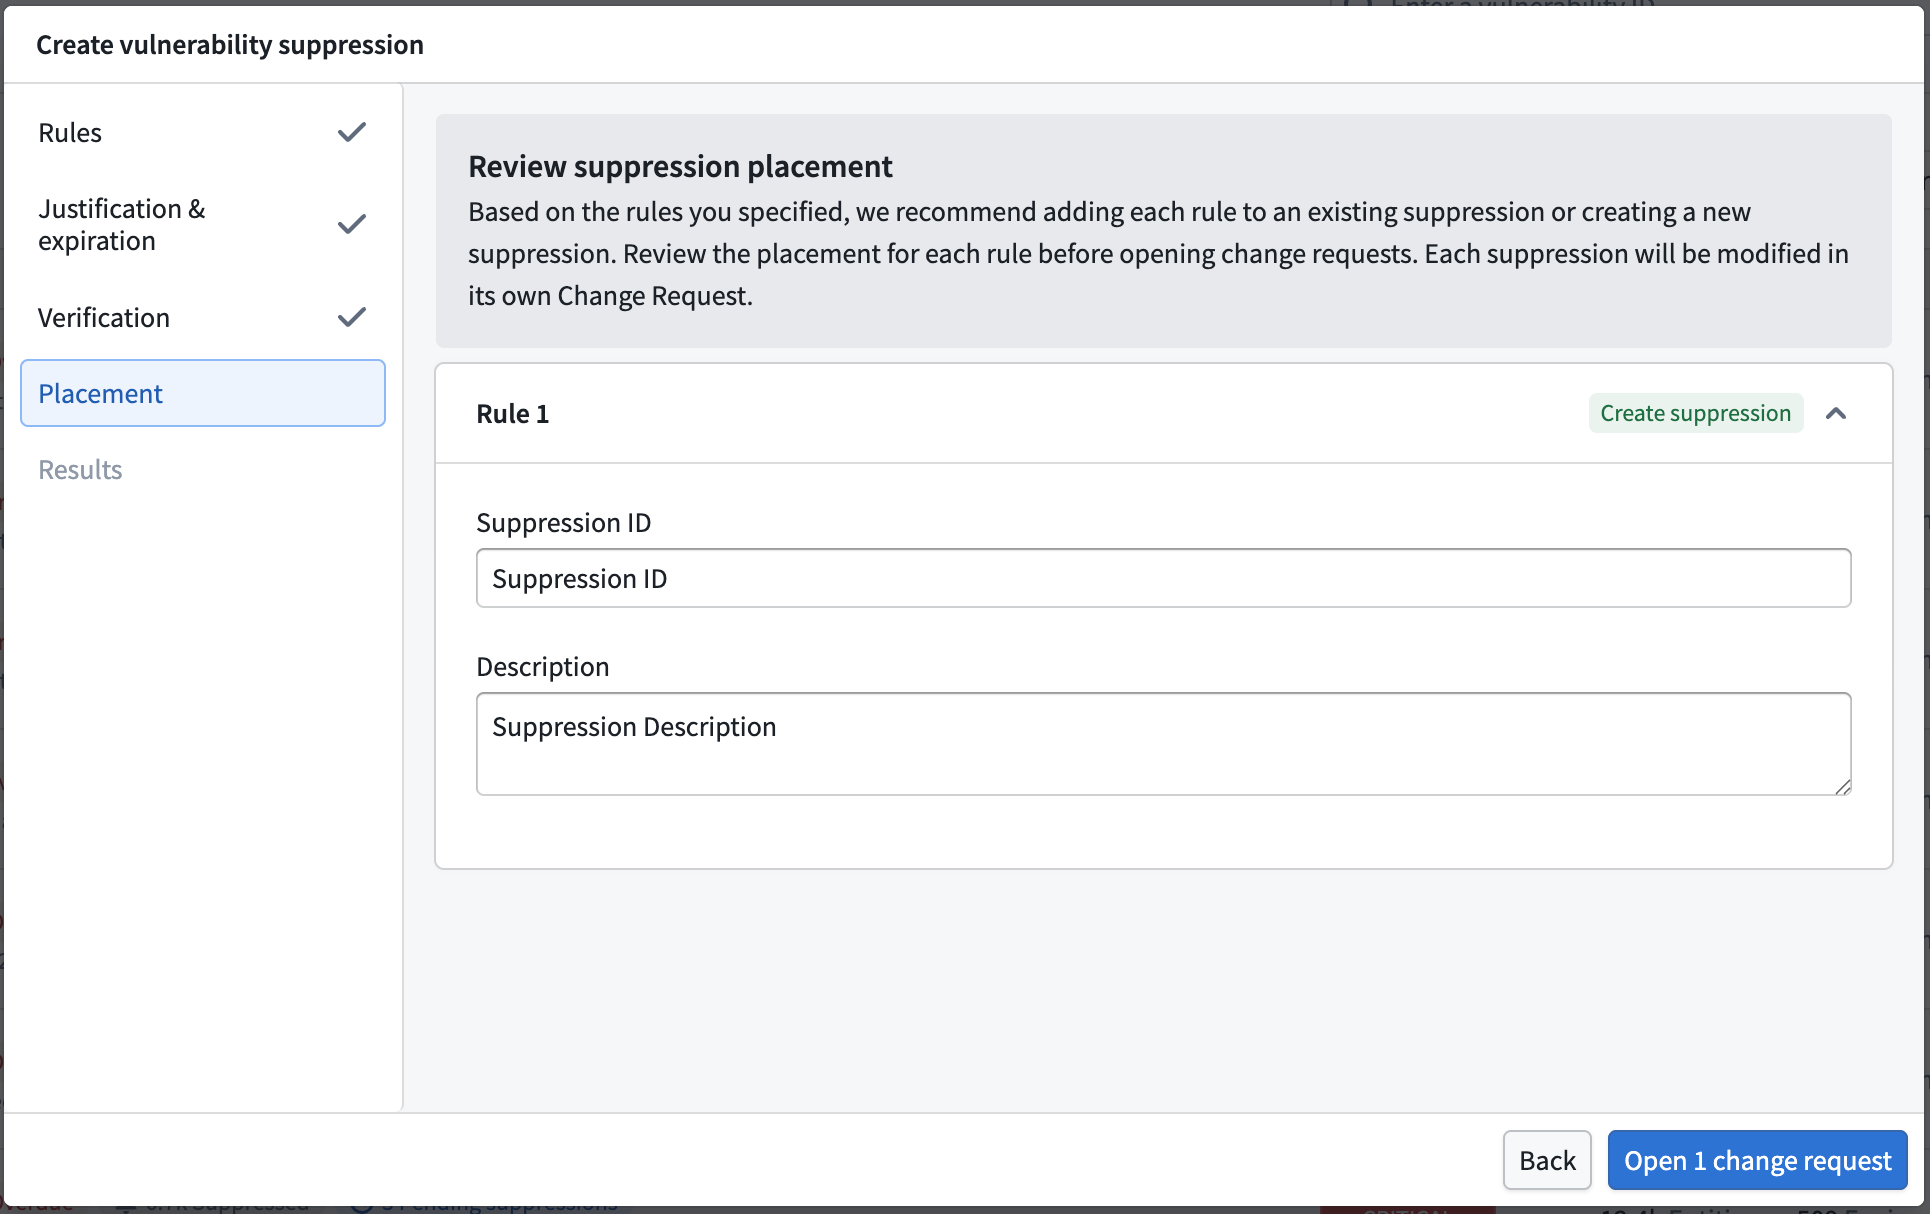
- Suppression ID: A suggested identifier for the suppression, based on the selected rules. You may modify it.
- Description: A suggested description of what the suppression covers. You may modify it.
- Use one suppression ID and description for all Create New rules: Apply a single ID and description across every rule that creates a new suppression.
Each suppression is modified in its own change request, so consolidating rules into fewer suppressions means fewer requests to approve.
Open the change requests
When you open the change requests, Apollo creates one request per suppression. Each request must be reviewed and approved separately.
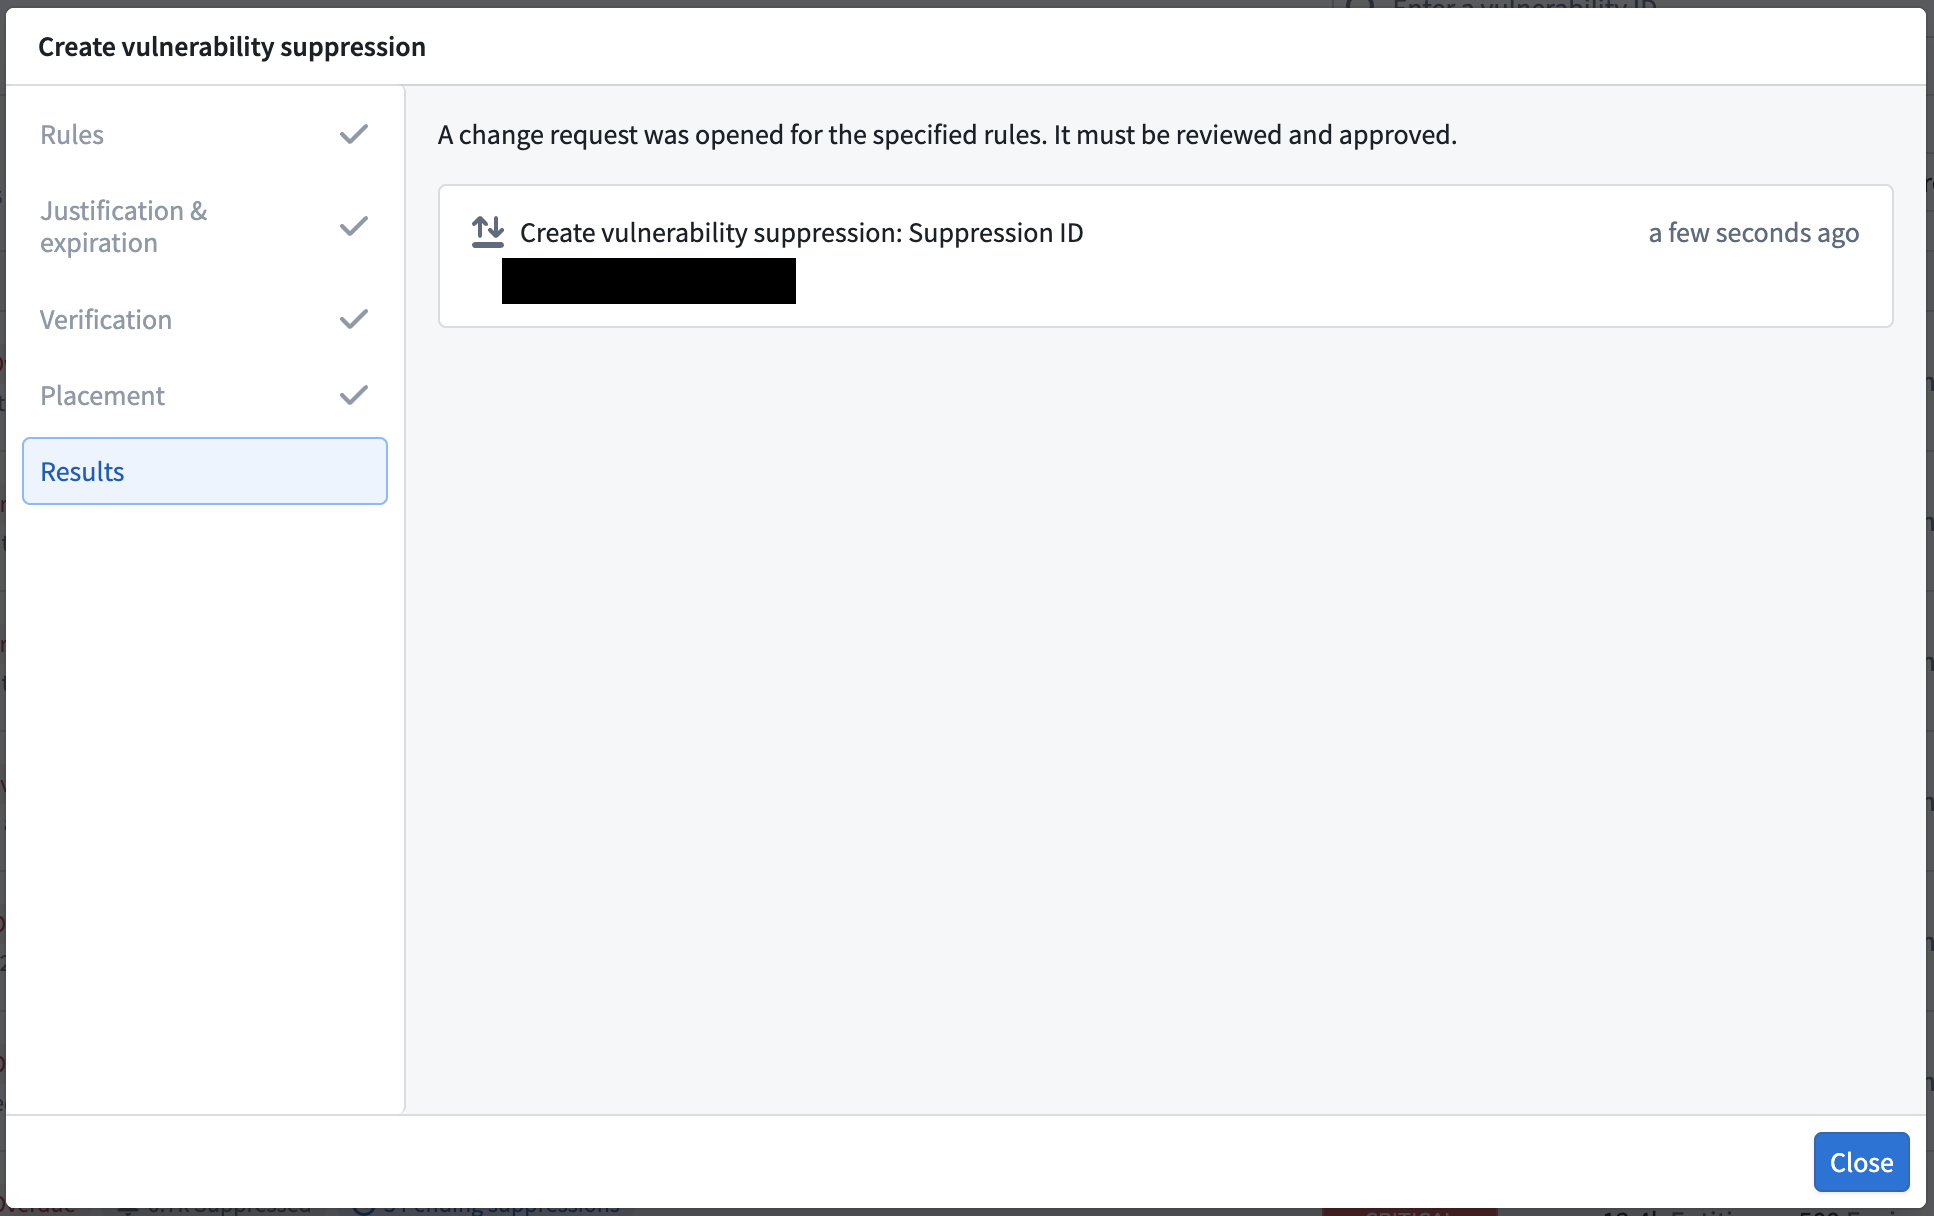
A security reviewer reviews each change request. Once a request is approved, the finding moves to suppressed on the next scan. If a request is rejected, the finding stays in your list so it resurfaces for you to act on.
Suppression scopes
Scope controls which Apollo resources a suppression applies to. Choose the most granular option that covers your case.
| Scope | What it covers |
|---|---|
| Image repository | Match specified image repository names exactly. This is the default and narrowest choice. |
| Product | Match selected SLS versions for one or more Products. |
| SLS distribution | Match SLS distributions for one or more Product IDs. |
| Image prefix | Match image repository names that start with any specified prefix. Available under Advanced options. |
| Global | Match every artifact in the organization. Use only when the package scope alone already makes the suppression safe, and expect closer review. Available under Advanced options. |
Scope does not change who approves a request or how it is routed. It changes the amount of risk the reviewer weighs.
Suppression categories
The category records why the finding is being suppressed. It drives downstream review and automation. Use the one that matches your situation.
| Category | When to use it |
|---|---|
| False positive | A scanner mistakenly flags a vulnerability that does not actually exist in your Product. Requires documentation and evidence that proves the vulnerability was mistakenly found. |
| Won't fix | A finding cannot or will not be remediated because it is an operational requirement for your Product. Requires evidence of mitigating controls that protect against the vulnerability. |
| Vendor dependency | A finding comes from a dependency, but no patch is available from the upstream vendor. Requires evidence of research concluding there is no fix. |
| Planned fix | A fix for the vulnerability is already planned and scheduled for release by the vendor. Requires evidence of the planned fix, such as a link to the vendor's advisory or the issue tracking the fix. |
Governance and review
Every suppression goes through a security change request. Two things matter most for a smooth review:
- A clear rationale on every request. A vague rationale will be returned for revision.
- An expiration on every suppression. An Expiration date is required, so no suppression is open-ended.