- Capabilities
- Getting started
- Architecture center
- Platform updates
Use commands as tools in AIP Chatbot Studio
You can add commands as tools to AIP chatbots, enabling the chatbot to interact with and act on behalf of a user in Palantir applications. Commands run directly in the user's application, giving them access to the current application state and screen. This enables integrations that traditional backend tools struggle to support. For example, the chatbot can use commands to navigate the user interface, like setting the view to a specific location on a map.
You can also configure Workshop's Button Group, Metric Card, and App Pairing widgets to trigger operations in any application that produces commands.
Add command tools to an AIP Chatbot
Chatbots can use commands as tools once an application declares and produces the command. To add commands as tools to a chatbot, select Add tool > Commands from the Chatbot configuration panel.
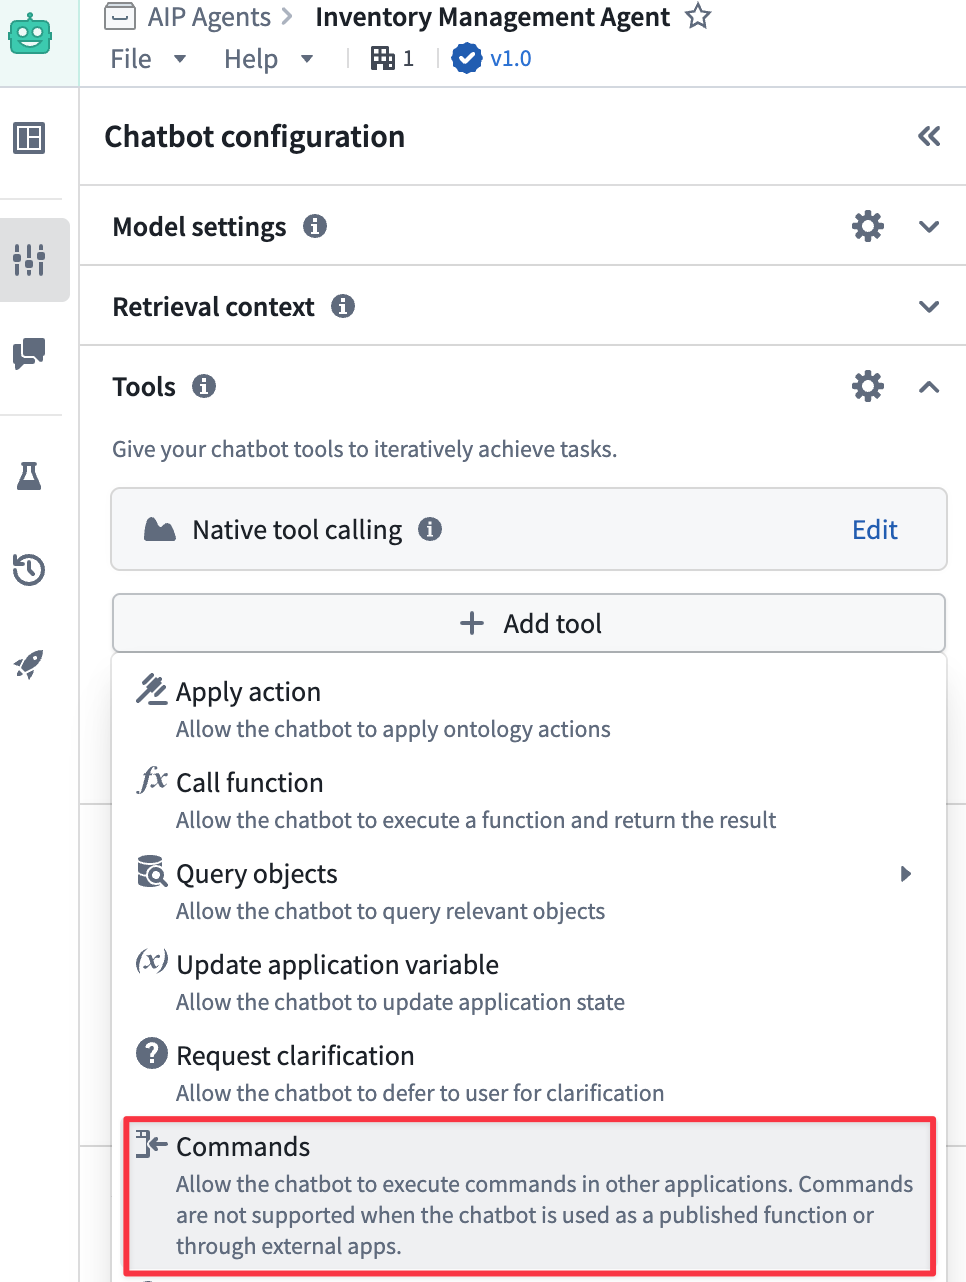
Search for and select one or multiple commands from the Search commands... modal. You can select a command multiple times if you need to configure distinct prompts for each instance of that command. Add the selected commands to your chatbot and apply configurations as needed.
AIP Chatbots that use commands as tools have a retention window that is automatically set to expire after 24 hours of inactivity.
Configure command tools [Beta]
The ability to configure a command used as a chatbot tool is in the beta phase of development. Its supporting interface may change during active development. Contact Palantir Support with questions about configuring commands as tools in AIP Chatbot Studio.
After you add one or multiple commands as tools to your chatbot, you can select a command to open a modal with additional configurations the chatbot uses to inform its actions. Select Show more to render additional documentation to help you learn more about each tool's optional configuration settings, such as its input parameters and expected behavior when invoked.

Review the sections below to learn more about additional configuration options.
Additional descriptions
Provide command-specific context in addition to the default documentation made available to help the chatbot's backing model understand the action it will execute. While each command contains default documentation that helps the chatbot use it as a tool, you can provide more detail in Additional documentation to help the chatbot decide precisely when and how it should call the tool. As an example, you can instruct the Remove all features command to remove ephemeral features before drawing a new one if the existing features are not related to the new in a certain manner.
Input parameters
Some commands accept input parameters when you configure them as a tool. Use Input parameters to set input values for command parameters, such as Fill pattern or Stroke width for the Draw polygon command.
By default, the chatbot determines the value of all required parameters based on your Instructions and the user's prompt. For optional parameters, the chatbot may optionally determine the value based on your Instructions and the user's prompt.
To override the default behavior, select Add parameter override, choose the parameter you want to override, and configure it using one of the following override options:
- Chatbot decides (default): The chatbot determines the value. This is the default behavior.
- Preset values: Hard-code a static value to consistently use the same value as an input parameter.
- Application variable: Use a preconfigured string or object set variable.
- Don't pass the parameter to chatbot: Instruct the chatbot not to provide a value for an optional parameter. This option is available for optional parameters only.
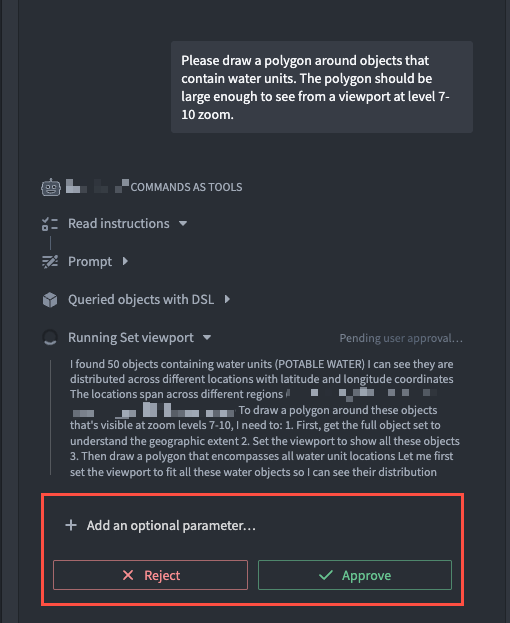
Asks for user approval before execution
Enabled by default, your chatbot will ask a user to review the command payload data and either Reject or Approve the command's action or output from their prompt before the command is executed. When disabled, your chatbot will execute commands based on a user's prompt without manual approval intervention.
Test an AIP Chatbot's ability to use commands as tools
After you configure your commands in AIP Chatbot Studio, you can follow the instructions below to test your chatbot and validate its configurations before you save and publish to make it available in production applications:
- In a separate browser window, open the application that produces your chatbot's command tool(s) and arrange it next to a window containing your chatbot in AIP Chatbot Studio.
- Select Choose an app to pair with... > Pair for the application launched in the separate browser window, such as a Gaia map.
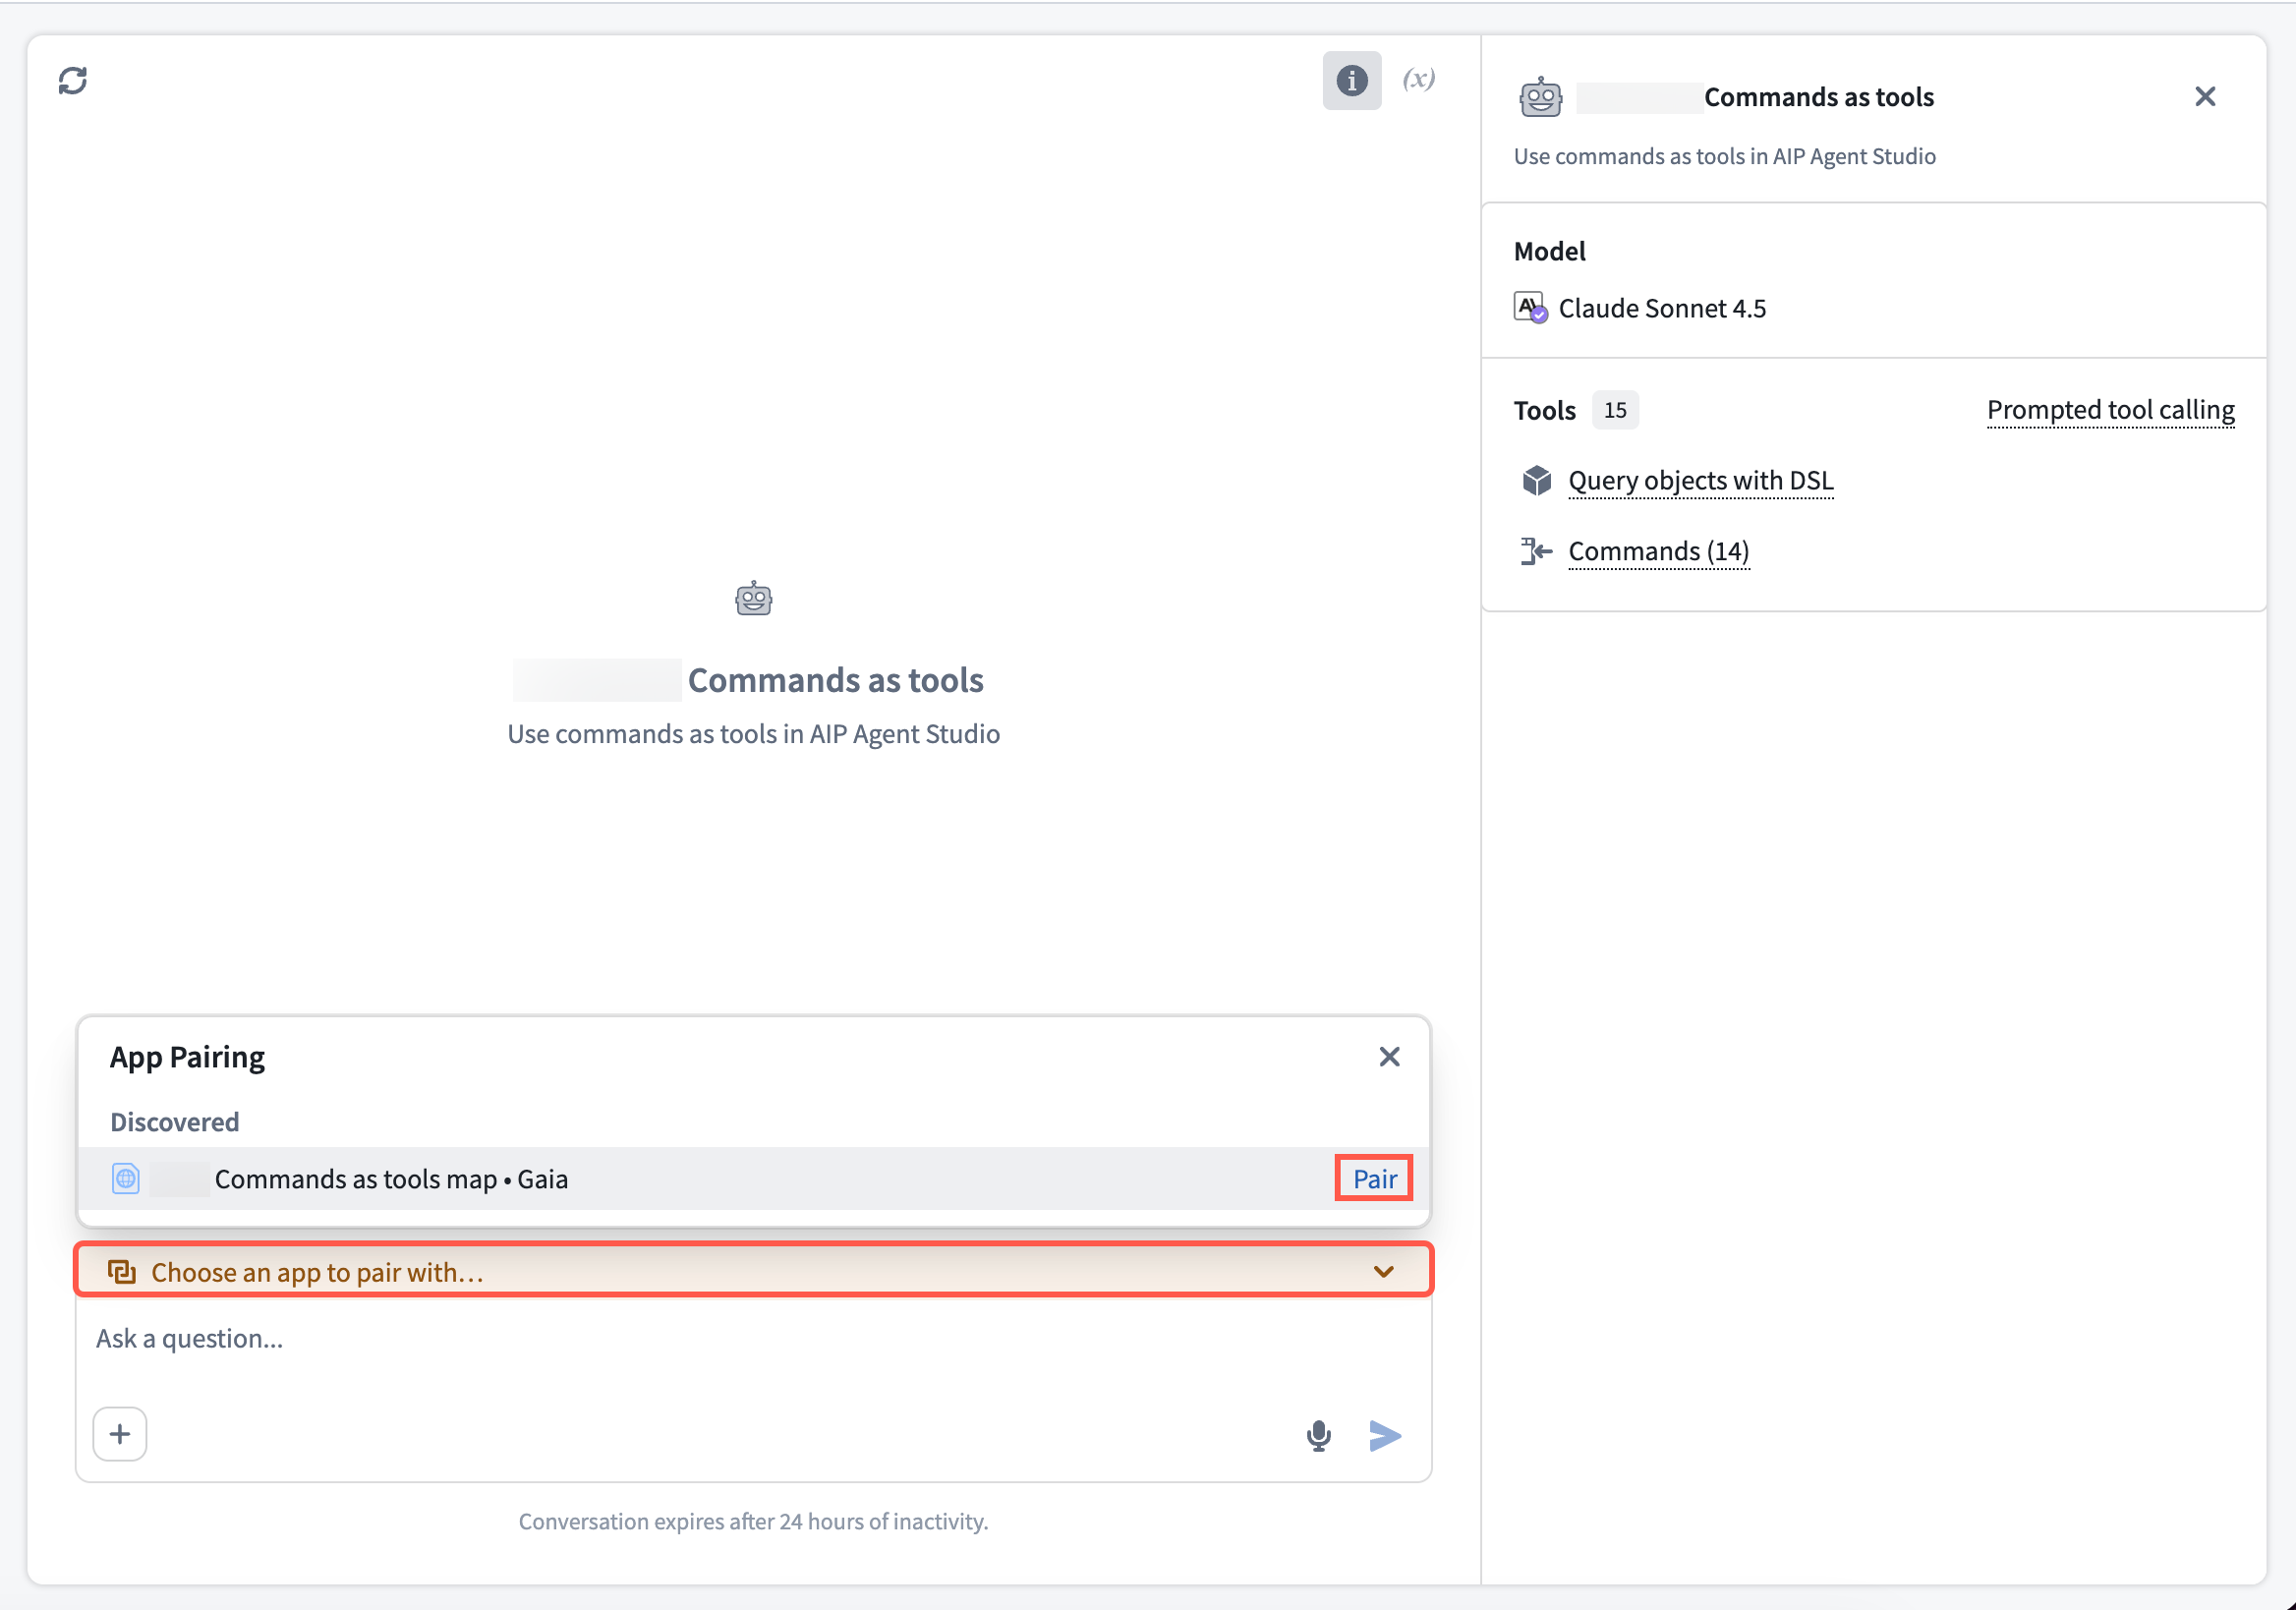
- Enter prompts in your chatbot's chat input window to test its ability to use the commands you added as tools.
Once you are satisfied with your chatbot's configurations, publish the chatbot for use as an assistant embedded in AIP Assist or through Workshop within the AIP Chatbot widget.
A chatbot will ignore commands as tools if you publish it as a function and execute it from an environment that does not support commands, such as configuring it to run within an automation built in Automate. Contact Palantir Support with questions about your environment.
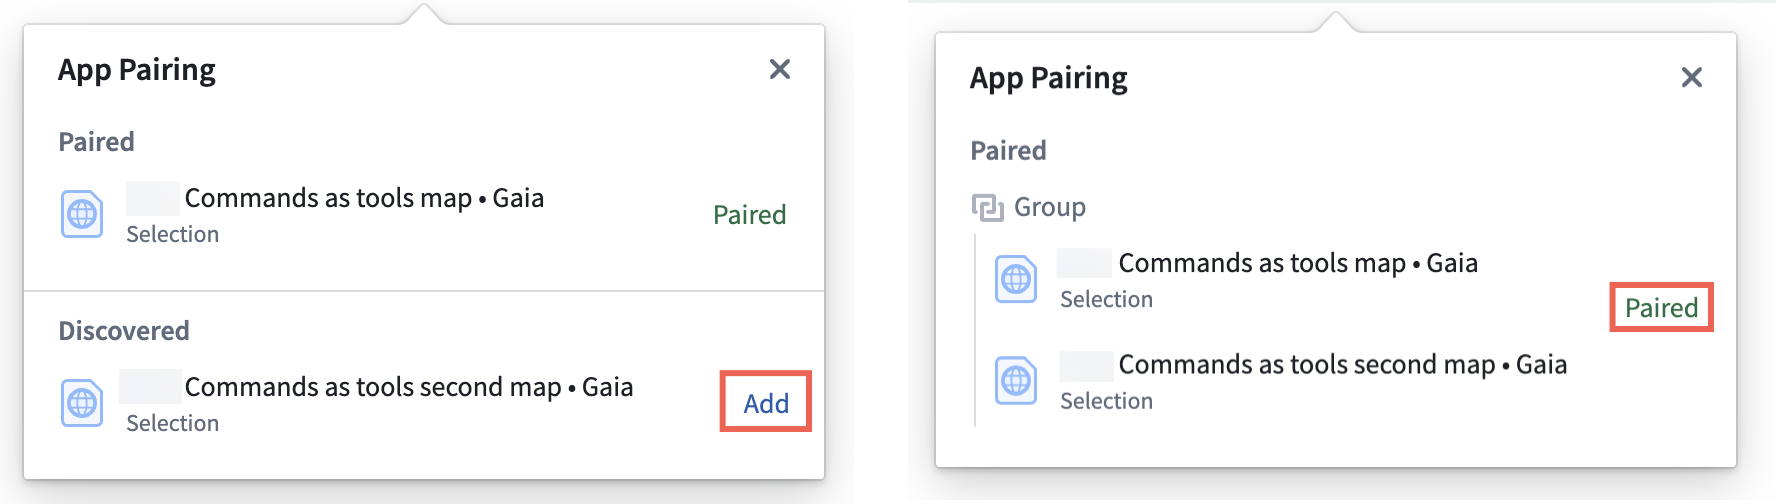
Pair your chatbot with multiple applications
Through App Pairing, your chatbot will automatically discover other applications you have open in your browser. To pair your chatbot with multiple application instances, select Add next to the Discovered application to create a pairing Group.
If your chatbot is not paired with an application to execute a command, then it will prompt the user to select an application to pair.
Embed your chatbot in AIP Assist or Workshop
While you can use AIP Chatbot Studio with your paired application to test your chatbot's performance, you should embed the chatbot in a Workshop module or AIP Assist panel for a streamlined user experience. In both cases, the chatbot will automatically pair to the application with which it interacts.
Publish your chatbot to AIP Assist
To make your chatbot accessible to AIP Assist, choose the rocket icon on the left side of your screen in AIP Chatbot Studio to launch the Usage panel before selecting the AIP Assist toggle. Next, select Publish on the top right of your screen. This will deploy the latest published chatbot version to AIP Assist, after which you will be able to select it from the Chat with an AIP Chatbot menu in an AIP Assist chat panel.

Once you select the chatbot, AIP Assist will automatically pair with the target application, and all relevant commands configured as tools will target the application. If your chatbot contains tools for multiple applications but is not paired with those applications, then AIP Assist will prompt you to choose an application to pair in one of your open browser tabs.
Add your chatbot to Workshop
Use Workshop's AIP Chatbot widget to embed your chatbot in a module, where you can also use the Iframe widget to embed one or more applications within sections adjacent to the AIP Chatbot widget. An AIP Chatbot widget and an iframe-embedded application in a Workshop module will automatically pair, and all relevant commands you configure as tools will target the iframe-embedded application.