- Capabilities
- Getting started
- Architecture center
- Platform updates
Configure secure tunnels
Secure tunnels provide a network path for services in the Palantir platform to reach systems on a separate, privately hosted network, without exposing those systems to inbound connections. They serve the same purpose as an agent proxy: applications connect to a source as if it were directly reachable over the platform network. All traffic is brokered through a component that runs inside your network.
This page explains how secure tunnels work and how to create a cluster, deploy an initiator, and configure network access.
How secure tunnels work
A secure tunnel is established by three components:
| Component | Location | Role |
|---|---|---|
| Initiator | Your network | Connects outbound to the control plane and responder, and forwards tunneled traffic to destination systems. |
| Control plane | Palantir platform | Authenticates the initiator, issues and refreshes its access token, and serves as its network configuration. |
| Responder | Palantir platform | Accepts the tunnels opened by the initiator. Platform services route egress traffic to the responder, which carries it back through the tunnel. |
The initiator opens outbound tunnels to the responder, allowing platform services to send requests through those connections without opening inbound firewall rules.
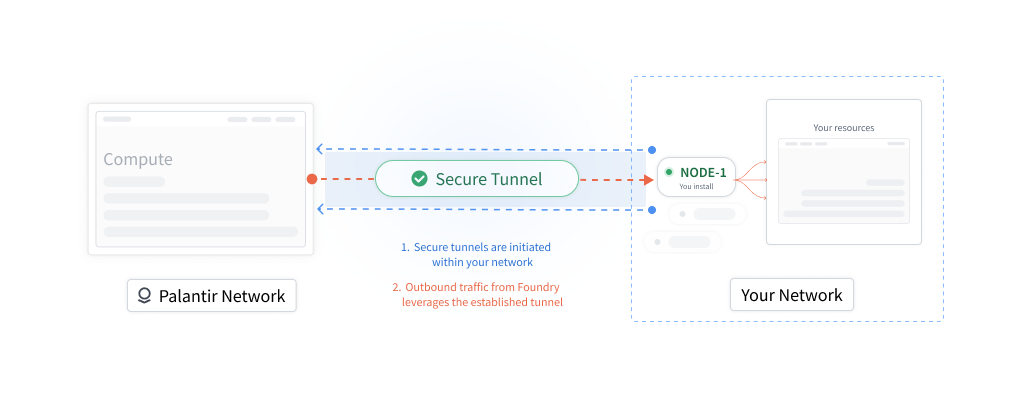
All connections between your network and the platform are encrypted with TLS.
Secure tunnels initiator
The initiator is a single-purpose Envoy ↗ proxy that runs inside your network and connects to the platform using Envoy's reverse tunnel ↗ capability.
The initiator authenticates to the platform with a short-lived access token that the control plane issues and rotates automatically, so no long-lived credentials are stored in your network. It also enforces a configurable egress allowlist.
Secure tunnel cluster
A cluster groups one or more initiators that provide access to the same network and destination systems. Egress policies reference the cluster.
You can add multiple initiators to a cluster to improve availability and distribute traffic. Egress policies reference the cluster, not individual initiators, so you can take an initiator down for maintenance while the others keep handling connections. Each initiator establishes and maintains its own set of outbound tunnels to the platform.
Deployment models
Choose a deployment model to manage the initiator's lifecycle:
| Deployment model | Lifecycle management |
|---|---|
| Data Connection agent | The agent deploys, restarts, and upgrades the initiator. |
| Apollo | Apollo deploys, restarts, and upgrades the initiator using a Helm chart. |
Managed by a Data Connection agent
If you already have a functioning Data Connection agent in the network you want to access, you can deploy the initiator with it. Otherwise, set up a new agent.
If the initiator process stops unexpectedly, for example because it runs out of memory, the agent restarts it. The agent also upgrades the initiator as new versions are released. It can continue running its regular Data Connection jobs and serving agent proxy policies in parallel.
Helm chart managed by Apollo
The initiator is deployed as a Helm chart managed through Apollo, Palantir's continuous deployment system. The deployment environment must allow outbound connections to your Palantir platform instance. Apollo deploys the chart into the prepared environment and configures it with the following:
- The address of the control plane to which it connects.
- A trust bundle used to validate the platform's TLS certificates.
- An initial access token used to bootstrap authentication. The initiator then rotates its own token automatically.
Once the initiator is running, it establishes tunnels to the responder and reports its health to Apollo.
Create a cluster and initiator
Before deploying an initiator, create a cluster and initiator to establish its identity in the platform. The initiator uses the generated cluster and initiator resource identifiers (RIDs) to authenticate with the control plane and register with the cluster.
Follow the steps below to create a cluster and deploy its first initiator using a Data Connection agent.
-
Navigate to the Network egress section of Control Panel and open the Secure tunnels tab.

-
Select Create cluster. In the creation dialog, enter a cluster name on the Cluster details page, then select Create cluster.

-
On the Create your first initiator page, enter an initiator name. Then, select Create initiator.

-
On the Deploy your first initiator page, search for and select the Data Connection agent that will deploy and manage the initiator. Select Save.
You must have Owner permissions on the selected agent. An agent can deploy only one initiator at a time.

-
On the Next steps page, select Open agent to go to the agent's management page, then restart the agent. The agent deploys the initiator on its next restart.

-
Return to the creation dialog and select Done to close it.
Once the initiator is running, follow the next steps to configure access to your systems.
Configure the egress allowlist
The initiator's egress allowlist controls which destination IP ranges and ports it can connect to. The initiator rejects connections that do not match an entry. An explicitly empty allowlist blocks all egress.
Foundry workloads still require a secure tunnel egress policy to route traffic through the cluster.
Each entry specifies an IP range in cidrBlock and a destination port. Optionally, set endPort to allow an inclusive range from port through endPort.
For example, the following allowlist permits connections to a single host on ports 7000 through 9000, and to a subnet on port 443:
Copied!1 2 3 4 5 6allowListedCidrs: - cidrBlock: '192.168.1.1/32' port: 7000 endPort: 9000 - cidrBlock: '192.168.2.2/24' port: 443
Data Connection agent configuration
When a Data Connection agent deploys an initiator, it automatically configures the following allowlist to permit egress to all IPv4 addresses on ports 1 through 65535, except always-denied destinations:
Copied!1 2 3 4allowListedCidrs: - cidrBlock: '0.0.0.0/0' port: 1 endPort: 65535
To edit this allowlist, open the managing agent in Data Connection and navigate to Agent settings > Configuration > Advanced > Envoy, and update the initiator's allowListedCidrs entries. To restrict egress, replace the default entry with the IP ranges and ports you want to allow.
Apollo configuration
For Apollo-managed deployments, edit the allowlist on the product's configuration page in Apollo.
Always-denied destinations
The initiator always denies egress to the IPv4 link-local range 169.254.0.0/16, even when the allowlist permits all egress.
Next steps
If a Data Connection agent manages the initiator, restart the agent after selecting it for deployment. The agent deploys the initiator on its next restart.
Once the initiator is running, create a secure tunnel egress policy in Control Panel. Then assign the policy to a source in Data Connection to route the source's traffic through the tunnel. You can create the policy before or after the initiator is running, as long as the cluster exists.