- Capabilities
- Getting started
- Architecture center
- Platform updates
Getting started
To get started with compute modules, you can use your preferred developer environment. In a few minutes, you will be able to create and deploy a compute module and test it in Foundry.
In Foundry, choose a folder and select + New > Compute Module, then follow the steps in the dialog to start with an empty compute-module backed function or pipeline. Follow the documentation below for next steps depending on your execution mode, or, for a more seamless experience, select the Documentation tab within your compute module to follow along with in-platform guidance.
Build a compute module-backed function
Compute modules support multiple languages through open-source SDKs. Choose the language that best fits your team and use case:
- Python: Use the open-source Python library ↗.
- Java: Use the open-source Java library ↗ with the
com.palantir.computemodules:libdependency. - Node.js: Use the open-source Node.js library ↗.
If you prefer to create your own client or implement your compute module in another language not supported by the SDKs, review the documentation on how to implement the custom compute module client.
Prerequisites:
- Install Docker Desktop
- Install one of the following:
- Python 3.9 or higher
- Java 21 or higher
- Node.js 18 or higher
Write the compute module locally
- Begin by creating a new directory for your compute module.
- Create a file called
Dockerfilein the directory. - Copy and paste the following into the
Dockerfile:
Copied!1 2 3 4 5 6 7 8 9 10# Change the platform based on your Foundry resource queue FROM --platform=linux/amd64 python:3.12 COPY requirements.txt . RUN pip install -r requirements.txt COPY src . # USER is required to be non-root and numeric for running compute modules in Foundry USER 5000 CMD ["python", "app.py"]
Copied!1 2 3 4 5 6 7 8 9 10 11 12 13 14 15# Build stage FROM --platform=linux/amd64 gradle:jdk21 AS build COPY . /home/gradle/src WORKDIR /home/gradle/src RUN gradle shadowJar --no-daemon # Run stage FROM --platform=linux/amd64 eclipse-temurin:21-jre-alpine RUN mkdir /app COPY --from=build /home/gradle/src/build/libs/*.jar /app/app.jar # USER is required to be non-root and numeric for running compute modules in Foundry USER 5000 CMD ["java", "-jar", "/app/app.jar"]
Copied!1 2 3 4 5 6 7 8 9 10 11# Change the platform based on your Foundry resource queue FROM --platform=linux/amd64 node:18-alpine WORKDIR /app COPY package.json package-lock.json ./ RUN npm ci --production COPY src . # USER is required to be non-root and numeric for running compute modules in Foundry USER 5000 CMD ["node", "index.js"]
- Create the dependency file for your language:
Copied!1 2# requirements.txt foundry-compute-modules
Copied!1 2 3 4 5 6 7 8 9 10 11 12 13 14 15 16 17 18 19// build.gradle plugins { id 'java' id 'com.github.johnrengelman.shadow' version '8.1.1' } repositories { mavenCentral() } dependencies { implementation 'com.palantir.computemodules:lib:0.6.0' } jar { manifest { attributes 'Main-Class': 'com.example.App' } }
Copied!1 2 3 4 5 6 7{ "name": "my-compute-module", "version": "1.0.0", "dependencies": { "@palantir/compute-module": "^0.2.12" } }
- Create the directory structure for your application code:
Copied!1 2 3 4 5MyComputeModule ├── Dockerfile ├── requirements.txt └── src └── app.py
Copied!1 2 3 4 5 6 7 8 9MyComputeModule ├── Dockerfile ├── build.gradle └── src └── main └── java └── com └── example └── App.java
Copied!1 2 3 4 5MyComputeModule ├── Dockerfile ├── package.json └── src └── index.js
- Inside your application file, copy and paste the following code:
Copied!1 2 3 4 5 6 7 8 9from compute_modules.annotations import function @function def add(context, event): return str(event['x'] + event['y']) @function def hello(context, event): return 'Hello' + event['name']
Copied!1 2 3 4 5 6 7 8 9 10 11 12 13 14 15 16 17 18 19 20package com.example; import com.palantir.computemodules.ComputeModule; public class App { public static void main(String[] args) { ComputeModule.builder() .add("add", (context, event) -> { int x = event.get("x").asInt(); int y = event.get("y").asInt(); return String.valueOf(x + y); }) .add("hello", (context, event) -> { String name = event.get("name").asText(); return "Hello" + name; }) .build() .start(); } }
Copied!1 2 3 4 5 6 7 8 9 10 11 12 13const { ComputeModule } = require("@palantir/compute-module"); const computeModule = new ComputeModule(); computeModule.register("add", (context, event) => { return String(event.x + event.y); }); computeModule.register("hello", (context, event) => { return "Hello" + event.name; }); computeModule.start();
Learn how to add type inference and automatically register a compute module function with the function registry.
For production use, consider using typed inputs and outputs with the Python SDK. This enables automatic schema inference and function registration:
Copied!1 2 3 4 5 6 7 8 9 10 11 12 13 14 15 16 17 18 19from dataclasses import dataclass from typing import TypedDict from compute_modules.annotations import function class HelloInput(TypedDict): planet: str @dataclass class AddPayload: x: int y: int @function def hello(context, event: HelloInput) -> str: return "Hello " + event["planet"] + "!" @function def add(context, event: AddPayload) -> int: return event.x + event.y
Review the documentation on automatic function schema inference for more details on supported type patterns.
Understand your function code
When working with compute module functions, your function will always receive two parameters: event objects and context objects.
Context object: An object parameter containing metadata and credentials that your function may need. Examples include user tokens, source credentials, and other necessary data. For example, if your function needs to call the OSDK to get an Ontology object, the context object includes the necessary token for the user to access that Ontology object.
Event object: An object parameter containing the data that your function will process. Includes all parameters passed to the function, such as x and y in the add function, and name in the hello function. In Python, this is a dict; in Java, this is a JSON node object; in Node.js, this is a plain JavaScript object.
If you use static typing for the event/return object, the library will convert the payload/result into that statically-typed object. Review documentation on automatic function schema inference for more information.
The function result will be wired as a JSON blob, so be sure the function is able to be serialized into JSON.
Create your first container
Now, you can publish your code to Foundry using an Artifact repository, which will be used to store your Docker images.
- Create or select an Artifact repository to publish your code to Foundry. To do this, navigate to the Documentation tab of your compute module. Then, find the corresponding in-platform documentation section to this external documentation page: Build a compute module-backed function > Create your first container. There, you can Create or select repository.
- On the next page, select the dropdown menu to choose Publish to DOCKER and follow the instructions on the page to push your code.
- In the Configure tab of your compute module, select Add Container. Then, select your Artifact repository and the image you pushed.
- Select Update configuration to save your edits.
- Once the configuration is updated, you can start the compute module from the Overview page, test it using the bottom Query panel, and view the logs.
Build using Code Repositories
As an alternative to developing locally, you can build a Python compute module directly within the Foundry platform using Code Repositories. This approach provides an integrated development experience with built-in version control, dependency management, and container image publishing.
Prerequisites
- Understand function execution mode and its configuration.
- Familiarity with Code Repositories.
Create a Python compute module code repository
- In Foundry, navigate to a folder and select + New > Code Repository.
- Select Python Compute Module as the repository type.
- Name your repository and select Create.
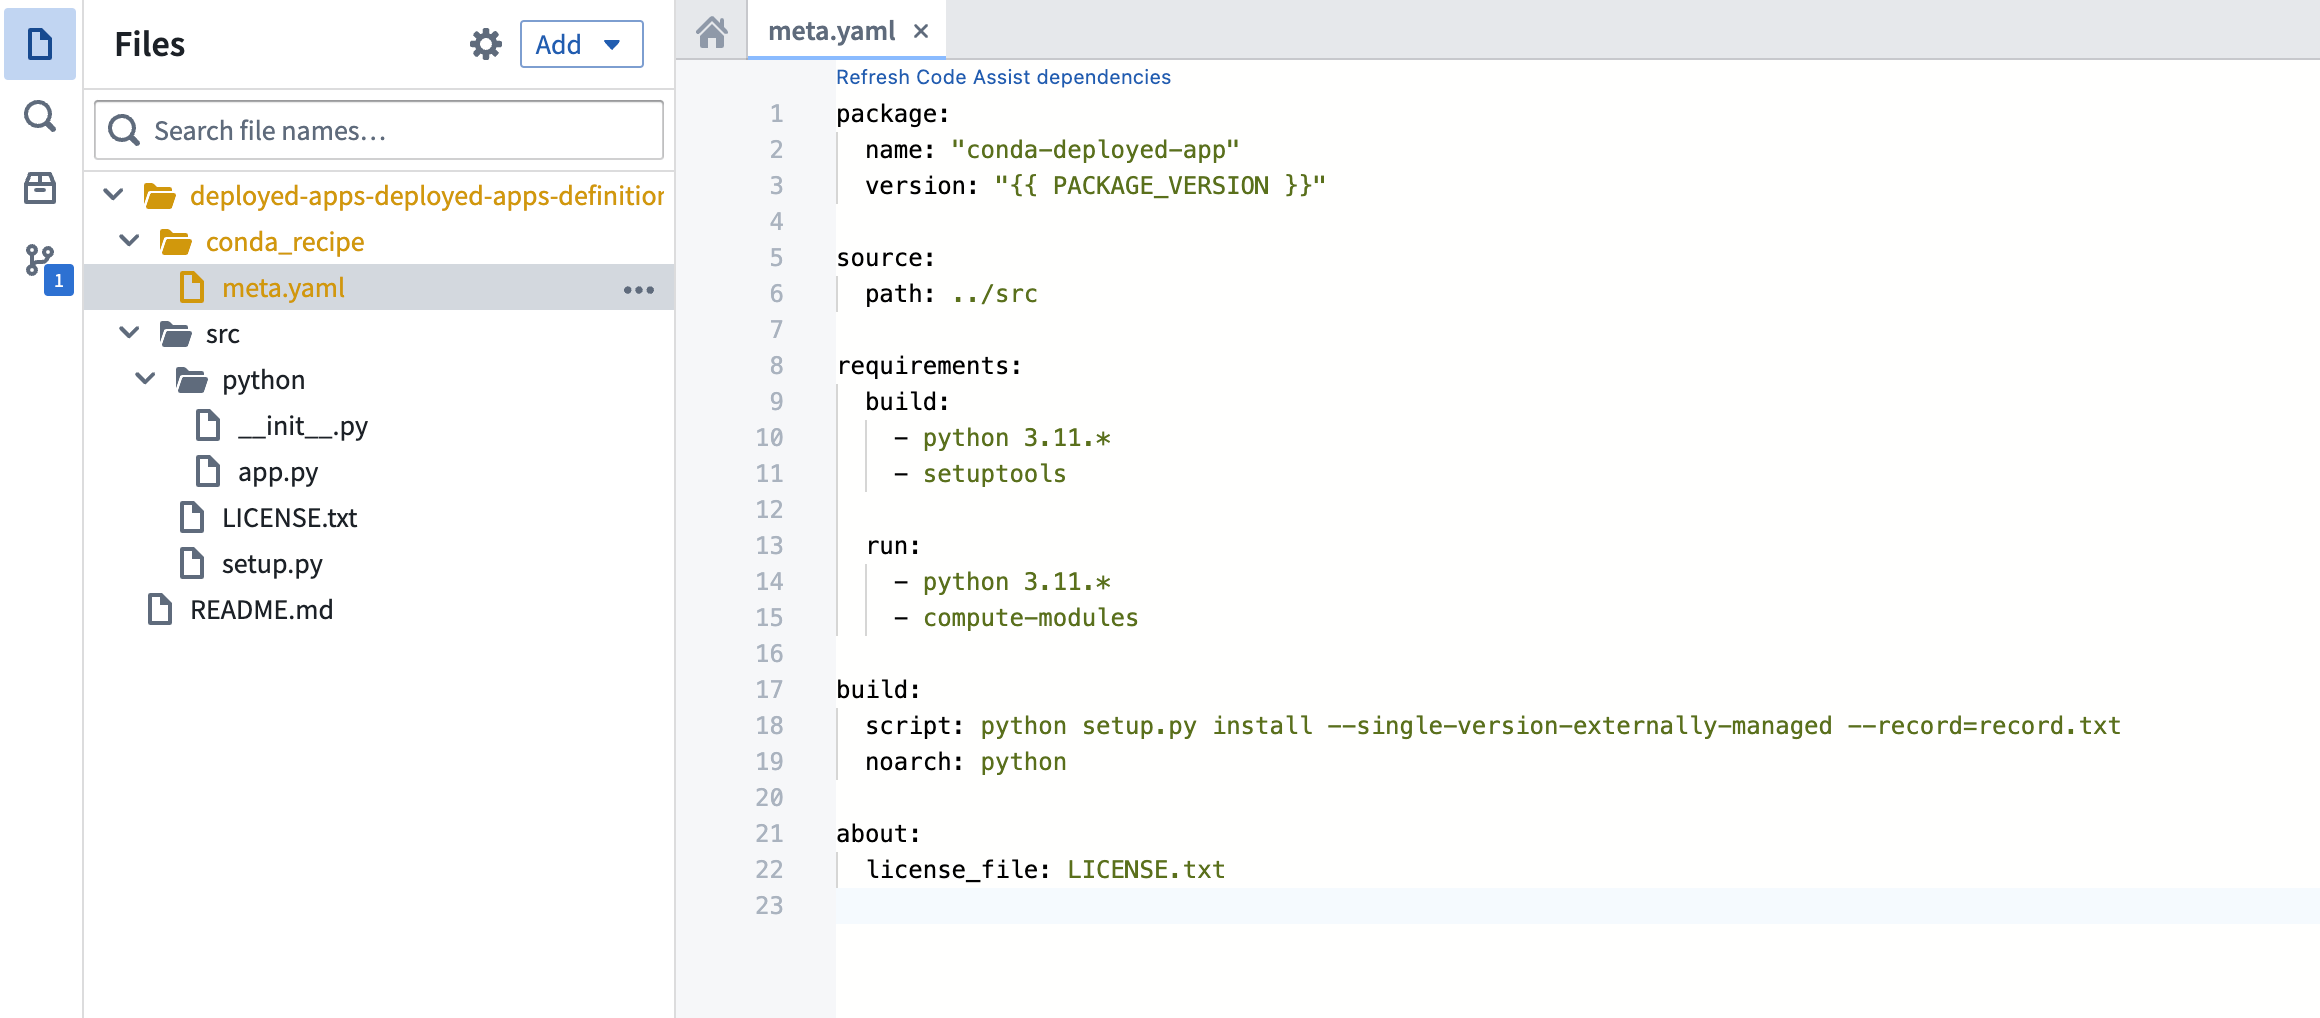
The code repository will be pre-configured with the necessary project structure for a compute module, including a src/ directory and default configuration files.
Write functions in your code repository
Inside the src/ directory, open the app.py file and define your functions using the @function decorator:
Copied!1 2 3 4 5 6 7 8 9from compute_modules.annotations import function @function def add(context, event): return str(event['x'] + event['y']) @function def hello(context, event): return 'Hello ' + event['name']
For typed inputs and outputs that enable automatic schema inference, use TypedDict or dataclass types as described in the automatic function schema inference documentation.
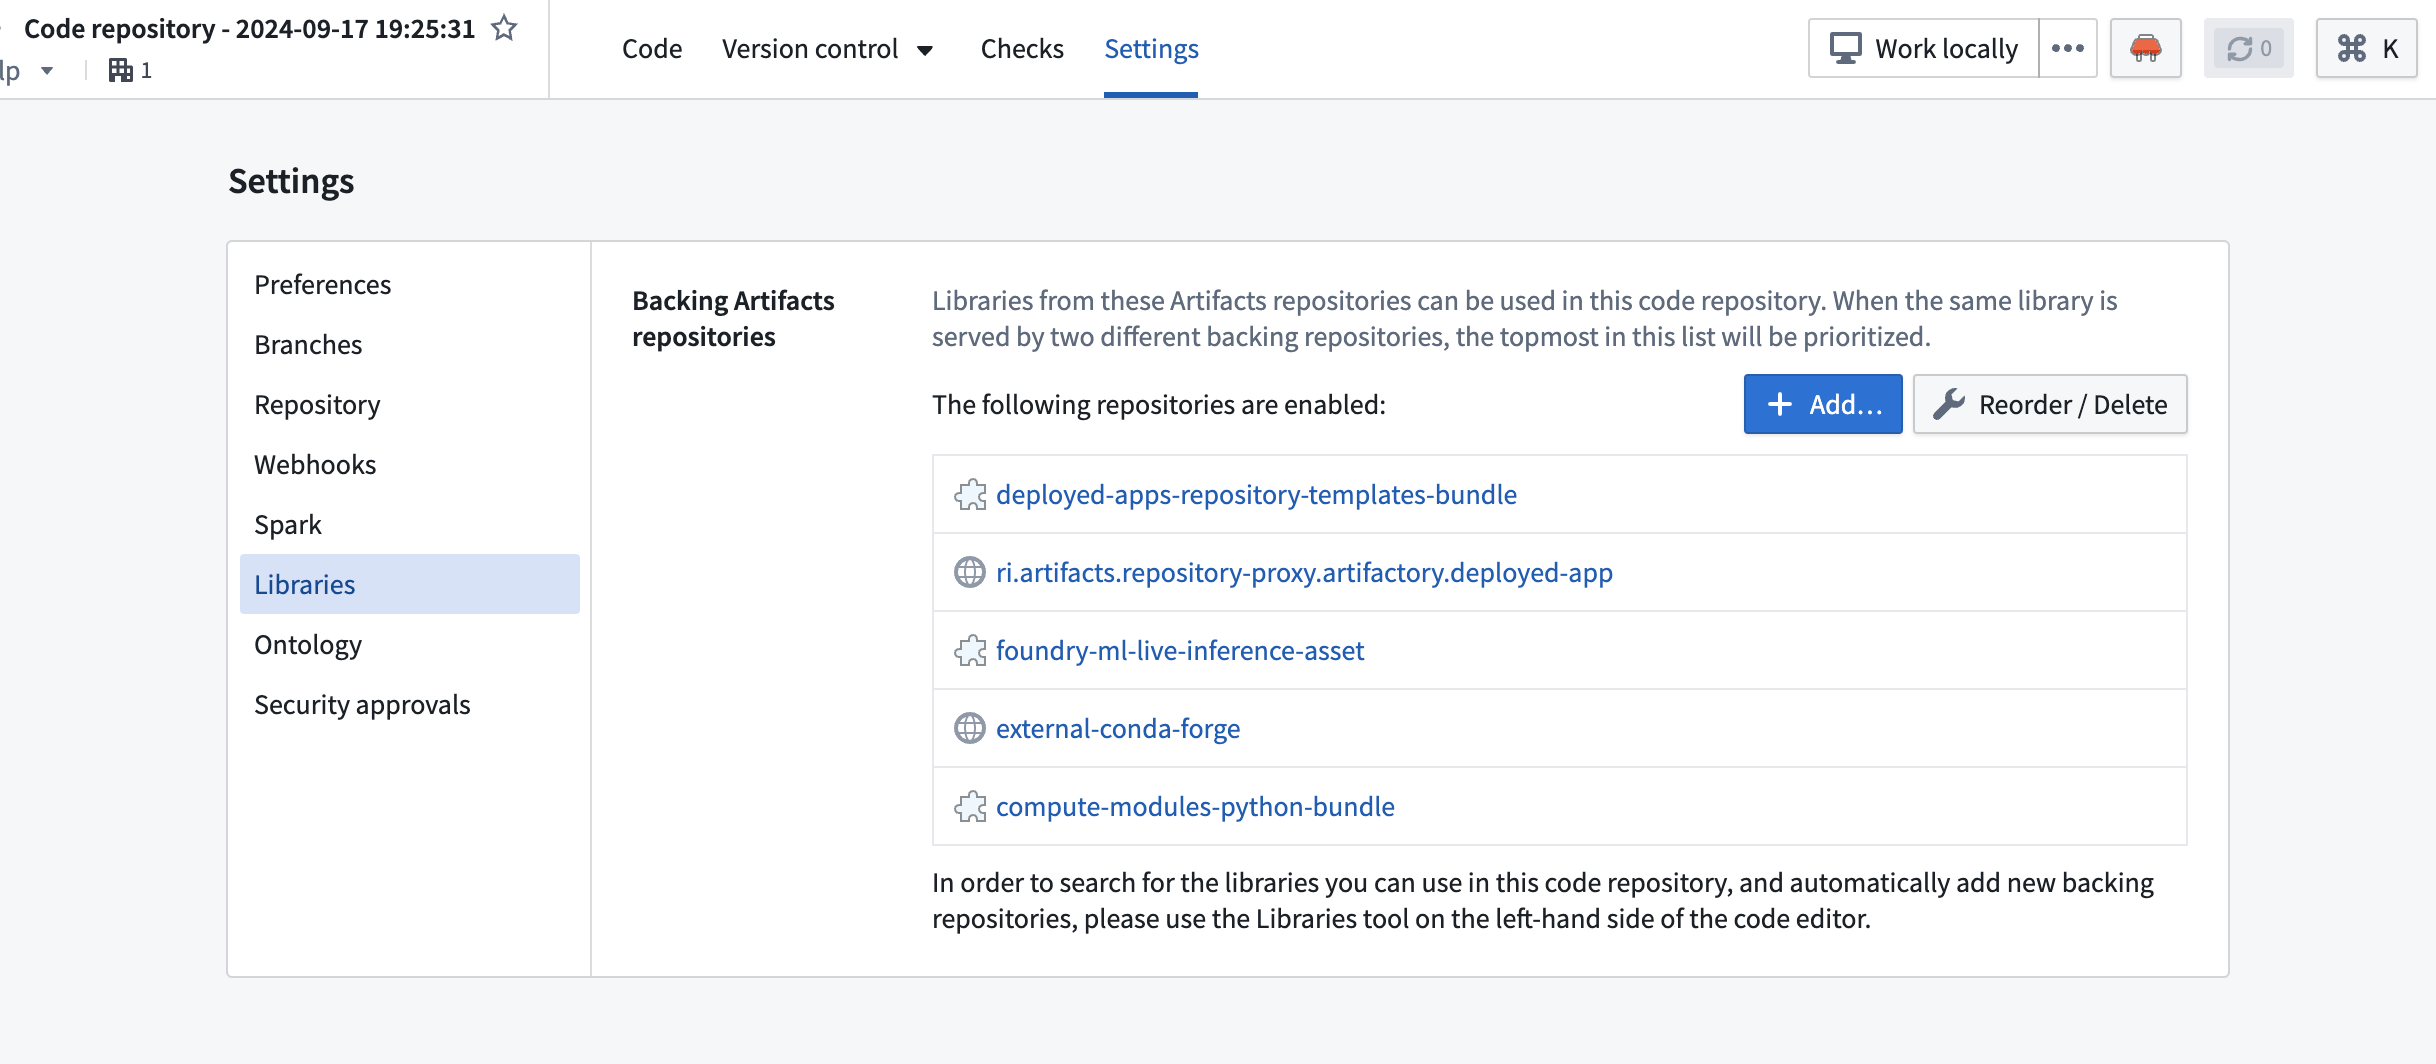
Add Python libraries
You can add Python libraries to your compute module code repository in two ways:
- Using the Settings panel: Navigate to Settings > Libraries in your code repository and add the libraries you need.
- Using
meta.yaml: Add dependencies directly in themeta.yamlconfiguration file in your repository root.
Tag a version
Once your code is ready, tag a version in your code repository to create an image:
- Select Tag version from the repository toolbar.
- Enter a version number (for example,
0.0.1). - Select Tag to create the version.
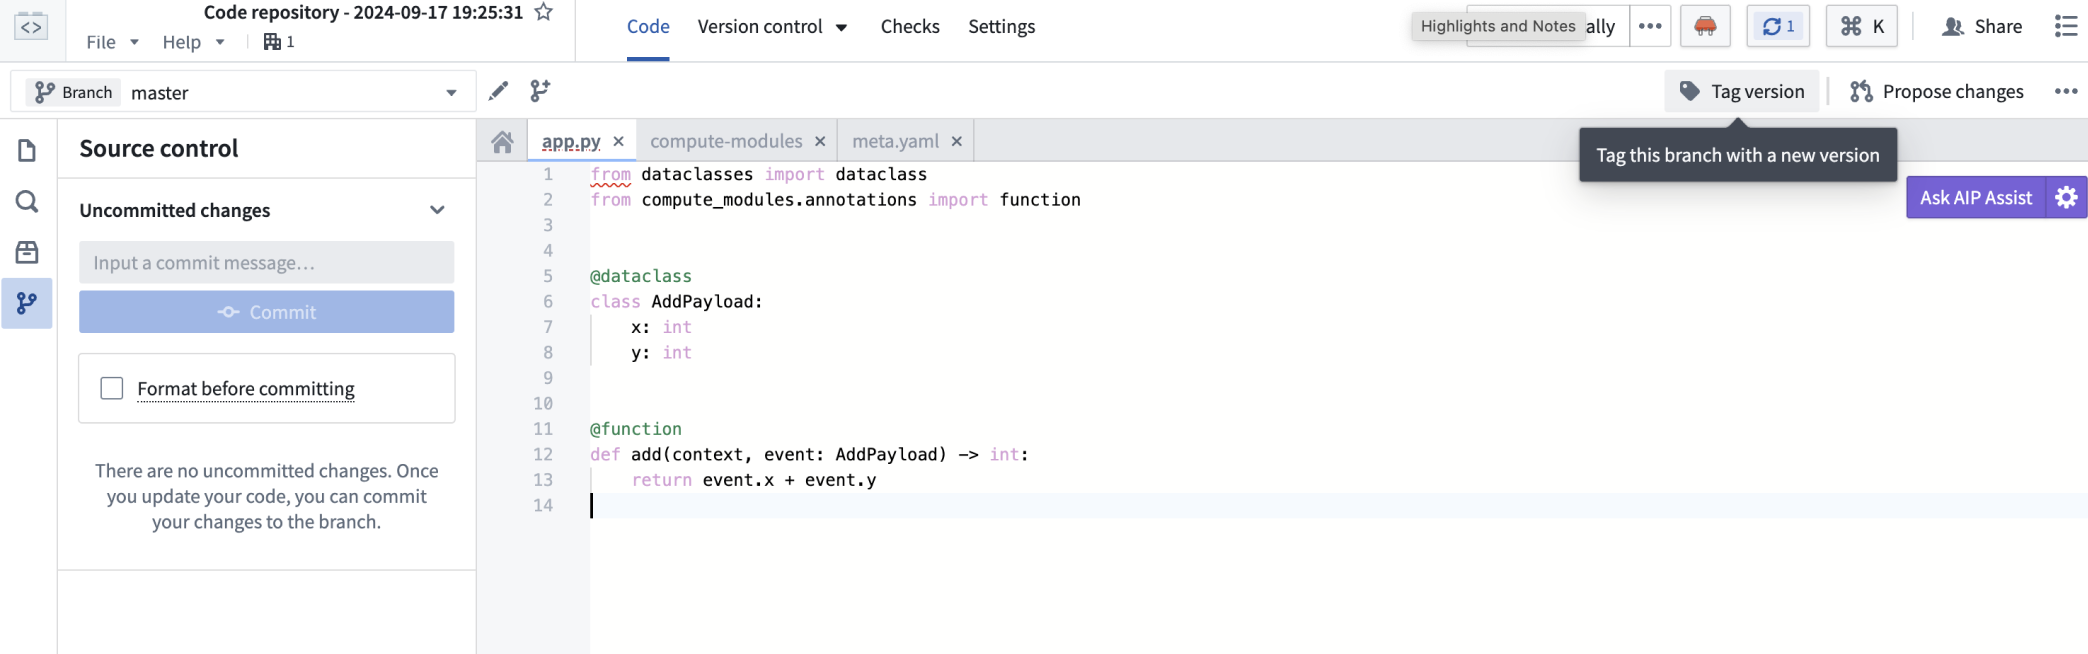
This creates a container image that can be linked to your compute module.
Link the image to your compute module
- Navigate to the Configure tab of your compute module.
- Select Add Container.
- Select your code repository and the tagged version you created.
- Select Update configuration to save your edits.
Import functions
After the compute module is running, you can import your functions:
- Navigate to the Functions tab in the Compute Module application.
- Select Import to view the list of detected functions from your running compute module.
- Select the functions you want to register and confirm the import.
Your functions are now available to use across the Foundry platform, including in Workshop and Slate applications.
Build a compute module-backed pipeline
Compute modules can operate as a connector between inputs and outputs of a data pipeline in a containerized environment. In this example, you will build a simple use case with streaming datasets as inputs and outputs to the compute module, define a function that doubles the input data, and write it to the output dataset. You will use notional data to simulate a working data pipeline.
Prerequisites
- Understand pipeline execution mode and its configuration.
- Set up an input and output stream.
- Install Docker Desktop.
- Install Python 3.9 or higher
Write the compute module to your local machine
- Create a new directory for your compute module.
- Create a file called
Dockerfilein the directory. - Copy and paste the following into the
Dockerfile:
# Change the platform based on your Foundry resource queue
FROM --platform=linux/amd64 python:3.12

COPY requirements.txt .
RUN pip install -r requirements.txt
COPY src .

# USER is required to be non-root and numeric for running compute modules in Foundry
USER 5000
CMD ["python", "app.py"]
- Create a new file called
requirements.txt. Store your dependencies for your Python application in this file. For example:
requests == 2.31.0
- Create a new subdirectory called
src. This is where you will put your Python application. - Inside the
srcdirectory, create a file calledapp.py. - Your directory should now look like the following:
MyComputeModule
├── Dockerfile
├── requirements.txt
└── src
    └── app.py
- Add the following code to
app.py. This complete example reads from an input stream, doubles the values, writes to an output stream, and repeats every 60 seconds:
Copied!1 2 3 4 5 6 7 8 9 10 11 12 13 14 15 16 17 18 19 20 21 22 23 24 25 26 27 28 29 30 31 32 33 34 35 36 37 38 39 40 41 42 43 44import os import json import time import requests # Read the bearer token for input and output access with open(os.environ['BUILD2_TOKEN']) as f: bearer_token = f.read() # Read input and output resource information with open(os.environ['RESOURCE_ALIAS_MAP']) as f: resource_alias_map = json.load(f) input_info = resource_alias_map['identifier you put in the config'] output_info = resource_alias_map['identifier you put in the config'] input_rid = input_info['rid'] input_branch = input_info['branch'] or "master" output_rid = output_info['rid'] output_branch = output_info['branch'] or "master" FOUNDRY_URL = "yourenrollment.palantirfoundry.com" def get_stream_latest_records(): url = f"https://{FOUNDRY_URL}/stream-proxy/api/streams/{input_rid}/branches/{input_branch}/records" response = requests.get(url, headers={"Authorization": f"Bearer {bearer_token}"}) return response.json() def process_record(record): # Assume input stream has schema 'x': Integer x = record['value']['x'] # Assume output stream has schema 'twice_x': Integer return {'twice_x': x * 2} def put_record_to_stream(record): url = f"https://{FOUNDRY_URL}/stream-proxy/api/streams/{output_rid}/branches/{output_branch}/jsonRecord" requests.post(url, json=record, headers={"Authorization": f"Bearer {bearer_token}"}) # Run the pipeline autonomously while True: records = get_stream_latest_records() processed_records = list(map(process_record, records)) [put_record_to_stream(record) for record in processed_records] time.sleep(60)
Deploy your compute module
- Build a Docker image and publish it to the Artifact repository.
- Finally, deploy the compute module using pipeline execution mode after selecting the relevant container image.
You can now view the results streamed live in the output dataset.
Understand your pipeline code
To interact with inputs and outputs, we provide a bearer token and input/output information.
You can then write code to interact with the inputs and outputs and perform computations. The code snippets provide a simple example of pipelining two stream datasets:
- It reads the latest records from the input stream dataset using the bearer token and input info by calling the
stream-proxyservice. - It then performs computations (in the above example, doubling the data). The data format depends on your own input data.
- Next, it writes results to the output stream dataset using the bearer token and output info.
- Finally, as you cannot query a pipeline mode compute module, the code runs the pipeline autonomously at the end of the script, which will be executed on container start.
Create your first container
Now, you can publish your code to Foundry using an Artifact repository, which will be used to store your Docker images.
- Create or select an Artifact repository to publish your code to Foundry. To do this, navigate to the Documentation tab of your compute module. Then, find the corresponding in-platform documentation section to this external documentation page: Build a compute module-backed function > Create your first container. There, you can Create or select repository.
- On the next page, select the dropdown menu to choose Publish to DOCKER and follow the instructions on the page to push your code.
- In the Configure tab of your compute module, select Add Container. Then, select your Artifact repository and the image you pushed.
- Select Update configuration to save your edits.
- Once the configuration is updated, you can start the compute module from the Overview page, test it using the bottom Query panel, and view the logs.