Configure private link egress [Beta]
Private link egress is in the beta phase of development and may not be available on your enrollment. Functionality may change during active development.
Private links, also called VPC connectivity, are cloud provider services that allow direct, secure connectivity between the Palantir platform and another system hosted on the same cloud provider as the Palantir platform. Learn more about private links.
Private link egress refers to traffic from the Palantir platform to your cloud VPC, and is currently configurable by users only for AWS-hosted Palantir platforms connecting to customer services hosted in the same AWS region, powered by AWS PrivateLink ↗. If your target resource is in a different region, configure VPC peering ↗ to the Palantir platform’s region, then create a private link.
This page outlines how private link egress is configured and managed in Control Panel, and how these created connections are used in the Palantir platform. Private link egress supports private egress to AWS services, user-owned resources deployed on AWS, or third-party APIs deployed on AWS.
If you want to configure a private link for ingress to Foundry (that is, making requests from your network to Foundry), consult the private link documentation.
Limits
- 20 private links are allowed per enrollment.
- 10 private domains are allowed per private link.
To increase these limits contact your Palantir administrator.
Configure a private link
Navigate to the Private links tab in the Network egress page in Control Panel to manage private links.
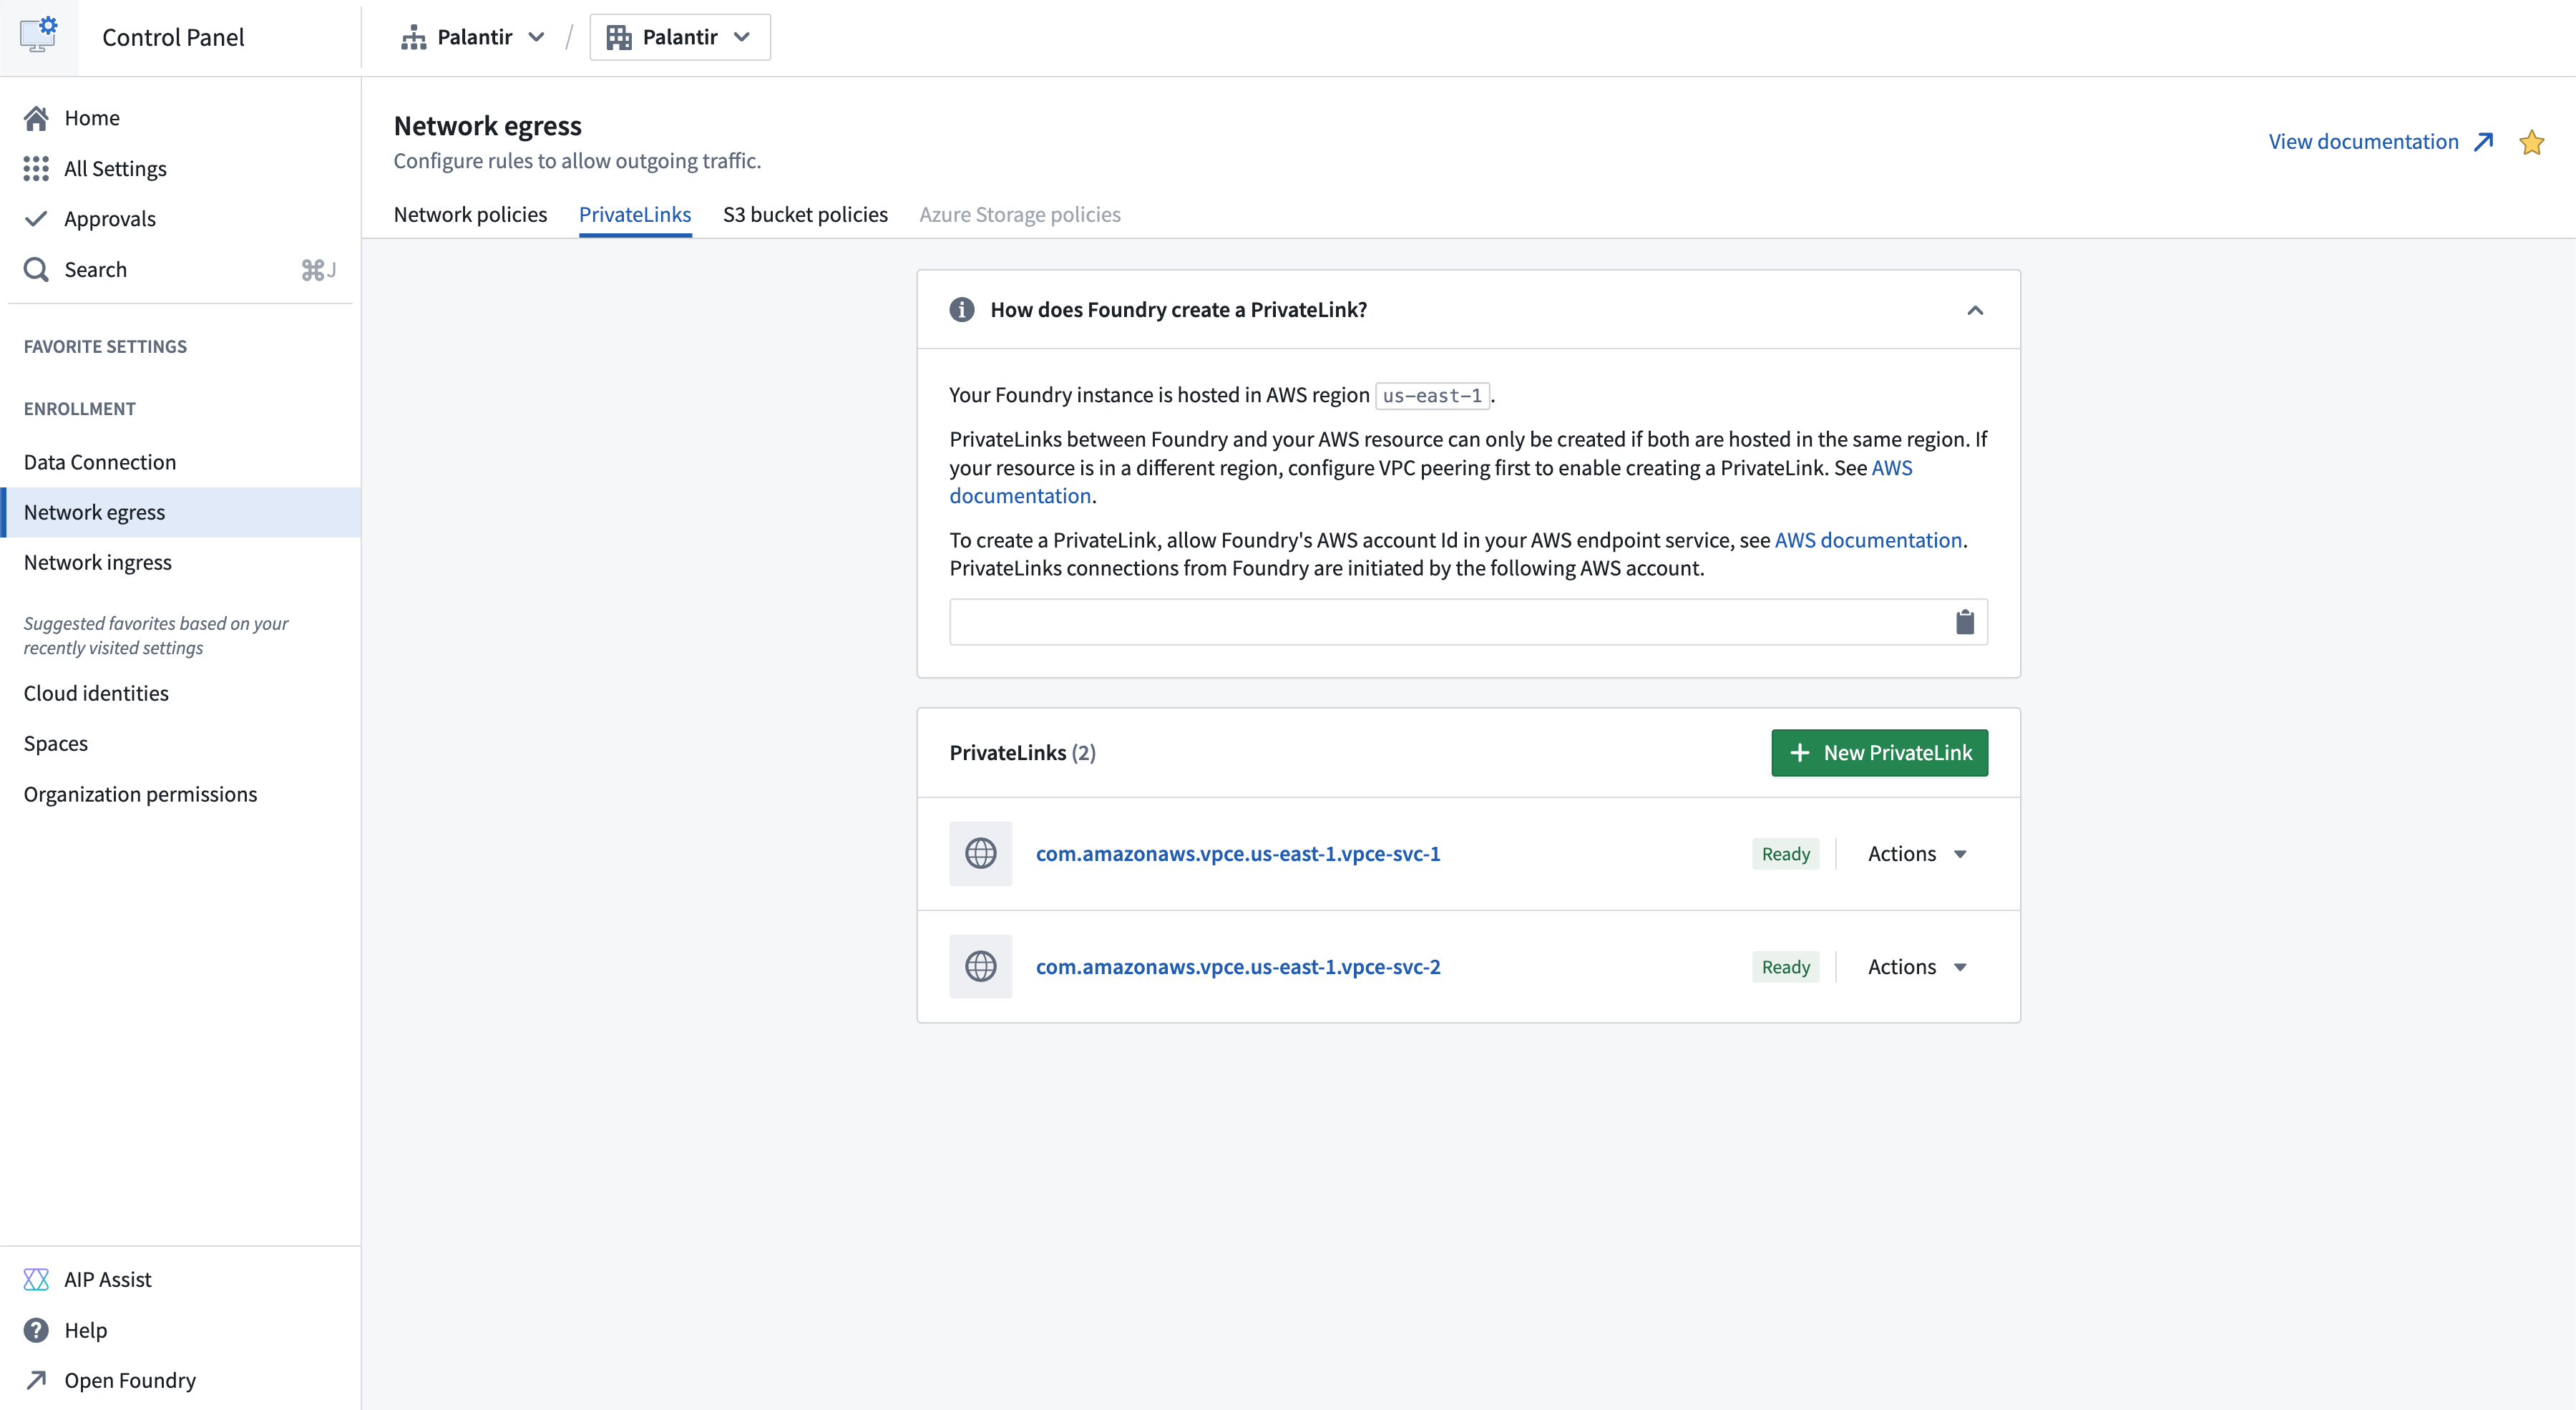
To successfully create a private link connection, do the following:
- Create an endpoint service for your target resource.
- Allow the Palantir platform to access the target resource.
- Provide the target resource endpoint service name.
- Create network egress policies.
Create an endpoint service for your target resource
AWS services
A list of private link compatible AWS services and their endpoint service names can be found in the AWS documentation ↗. Creation of an endpoint service is not required for AWS services, the endpoint service name provided by AWS can be used. An example of an AWS service that supports private links is Amazon Bedrock ↗.
Private links to AWS S3 are not supported. Use same region S3 bucket policies for private connectivity to S3.
User-owned resources on AWS
For a user-owned resource deployed on AWS, create an endpoint service following the steps in the AWS documentation ↗. An example of a user owned resource is databases powered by AWS RDS ↗.
Third-party APIs on AWS
For user-owned third-party APIs deployed on AWS, create an endpoint service following the steps from the AWS documentation ↗. If owned by another party, request their VPC endpoint service name. For example, Snowflake’s VPC endpoint service name can be requested as shown in the Snowflake documentation ↗.
Additionally, request the private domains of third-party APIs if the service uses custom transport layer security (TLS) certificates that are not valid for the AWS-generated domain ↗ of the private link. For example, Snowflake’s private domains can be found following the Snowflake documentation ↗. Below is an example of a private third party domain:
abc.us-east-1.privatelink.snowflakecomputing.com
Allow the Palantir platform to access the target resource
To access the target resource through a private link, allow the Palantir platform to access the resource. Add the Palantir platform’s AWS account in the allowed principal list of your endpoint service by following the AWS documentation ↗. The allowed principal should look like the following:
arn:aws:iam::<palantir_platform_aws_account_id>:root
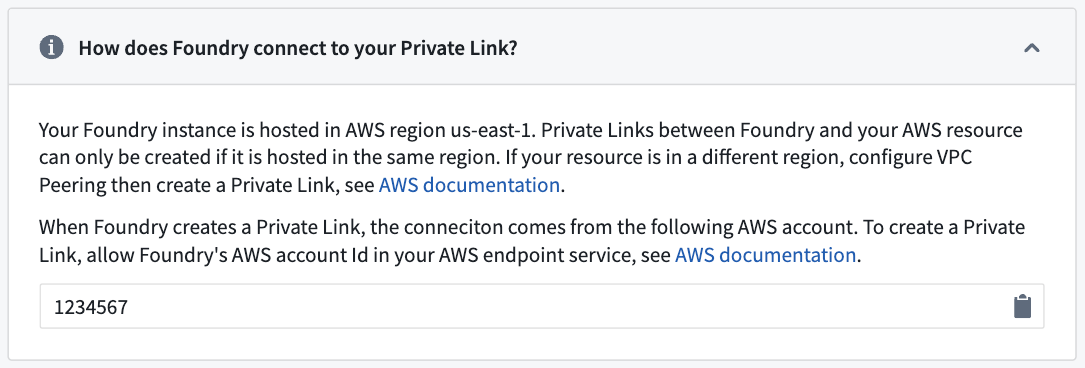
Provide the target resource endpoint service name
-
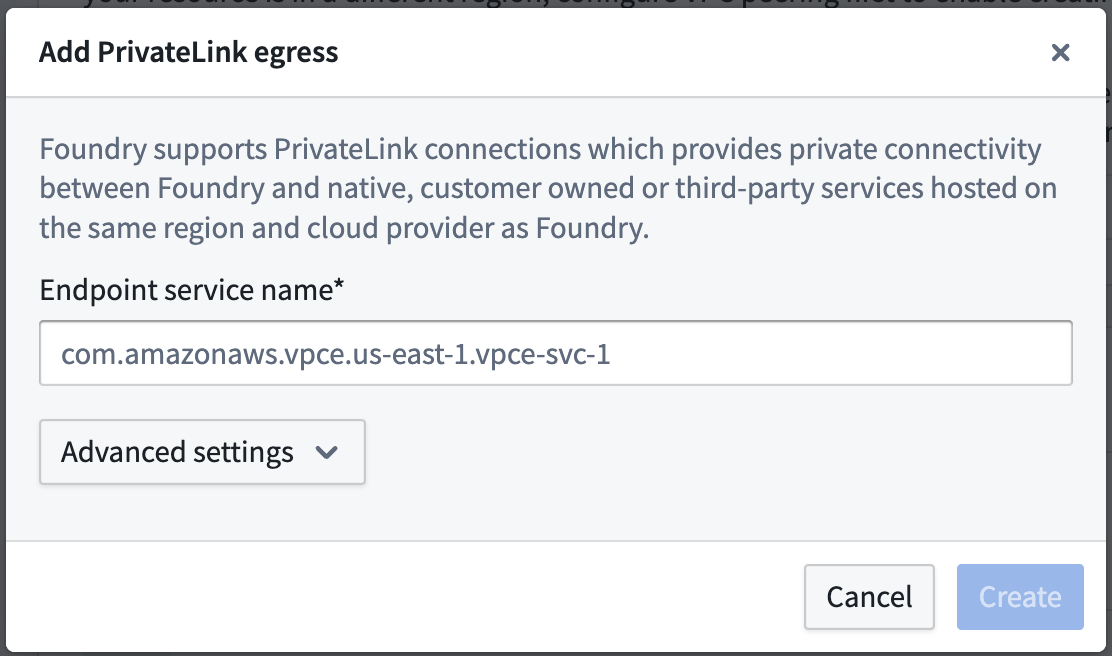
Navigate to Control Panel > Network Egress > Private links and select New private link to create a private link.
-
Enter the following details for your target resource for the private link:
-
Endpoint service name: The endpoint service name of the target resource that was retrieved in the step above.
-
Advanced settings:
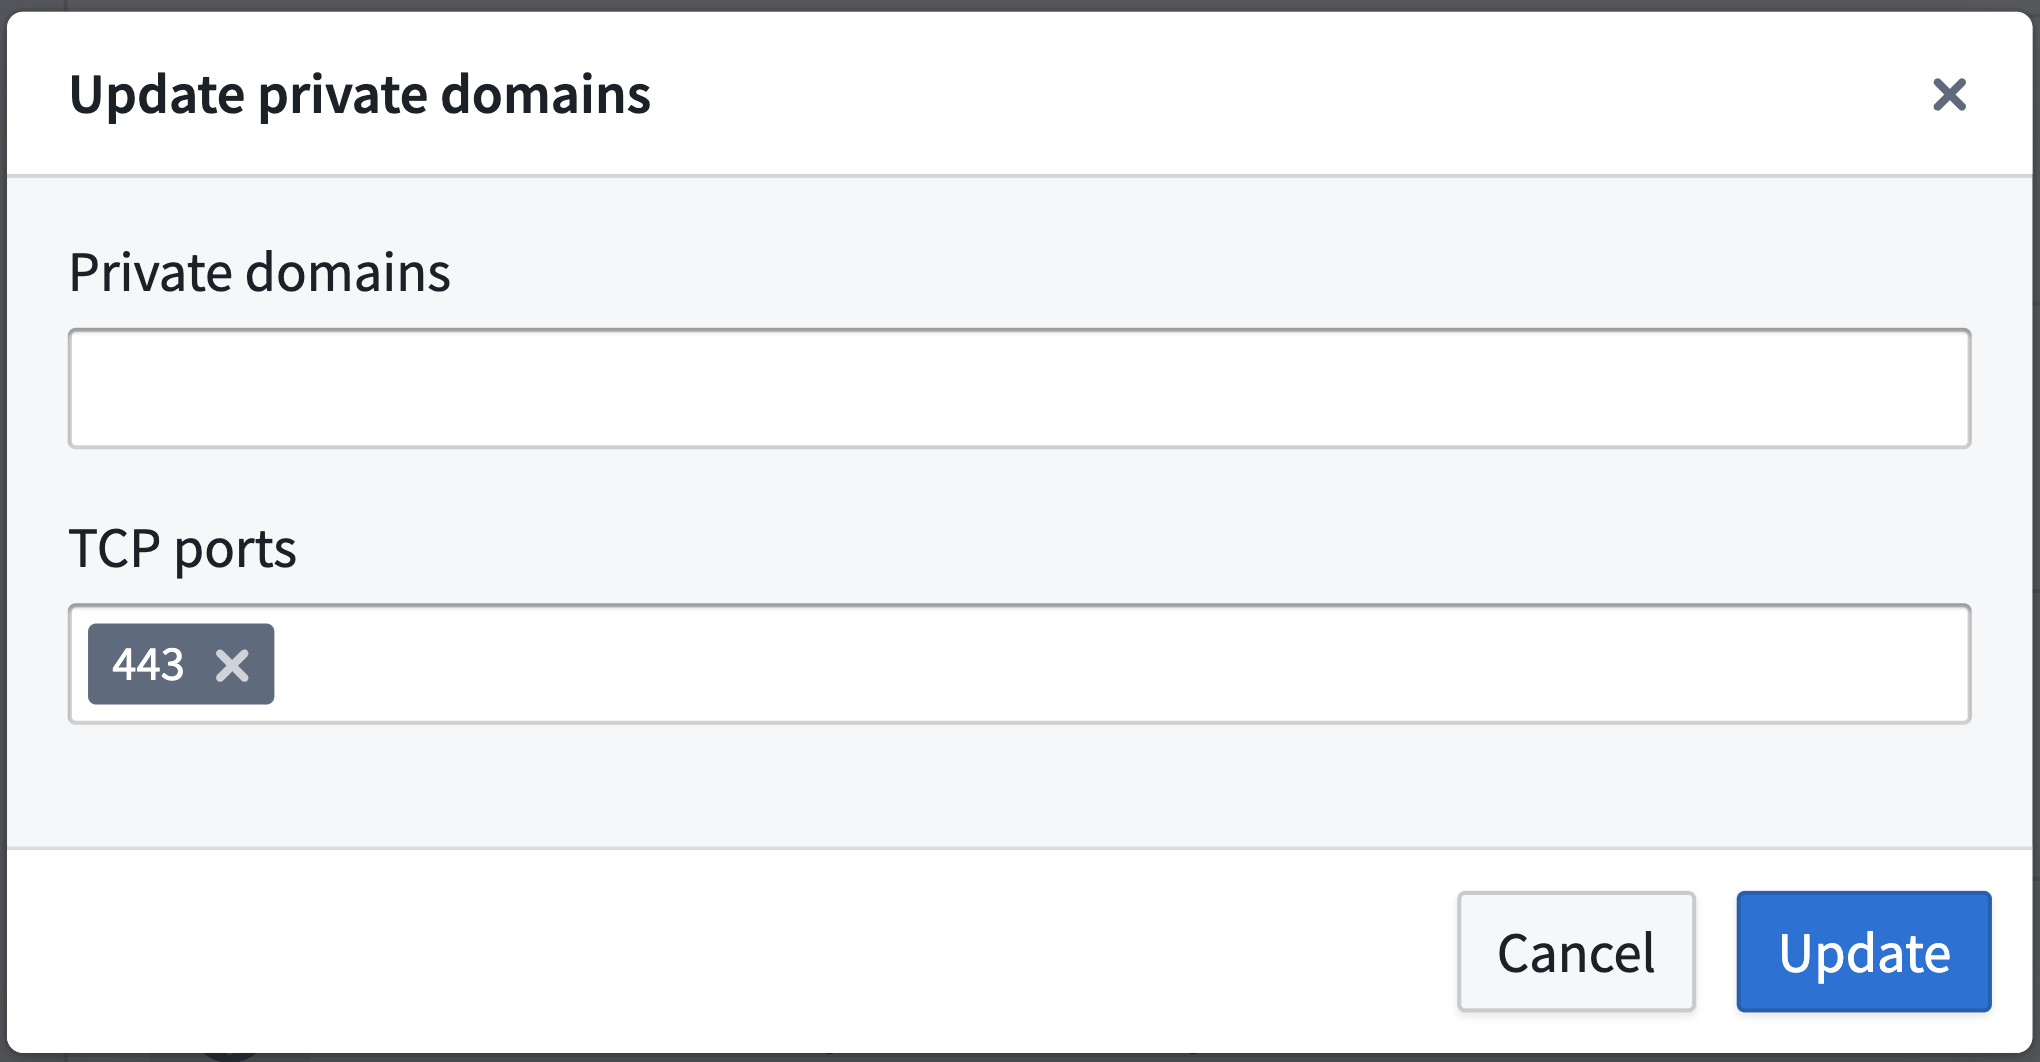
- Private domains: If the private link egresses to a resource that has custom TLS certificates, add those domain entries here. the Palantir platform will create
CNAMErecords for theses domains that map to the other end of the private link. - TCP ports: Add ports that should be allowed over this private link, the default port is 443.
- Private domains: If the private link egresses to a resource that has custom TLS certificates, add those domain entries here. the Palantir platform will create
-
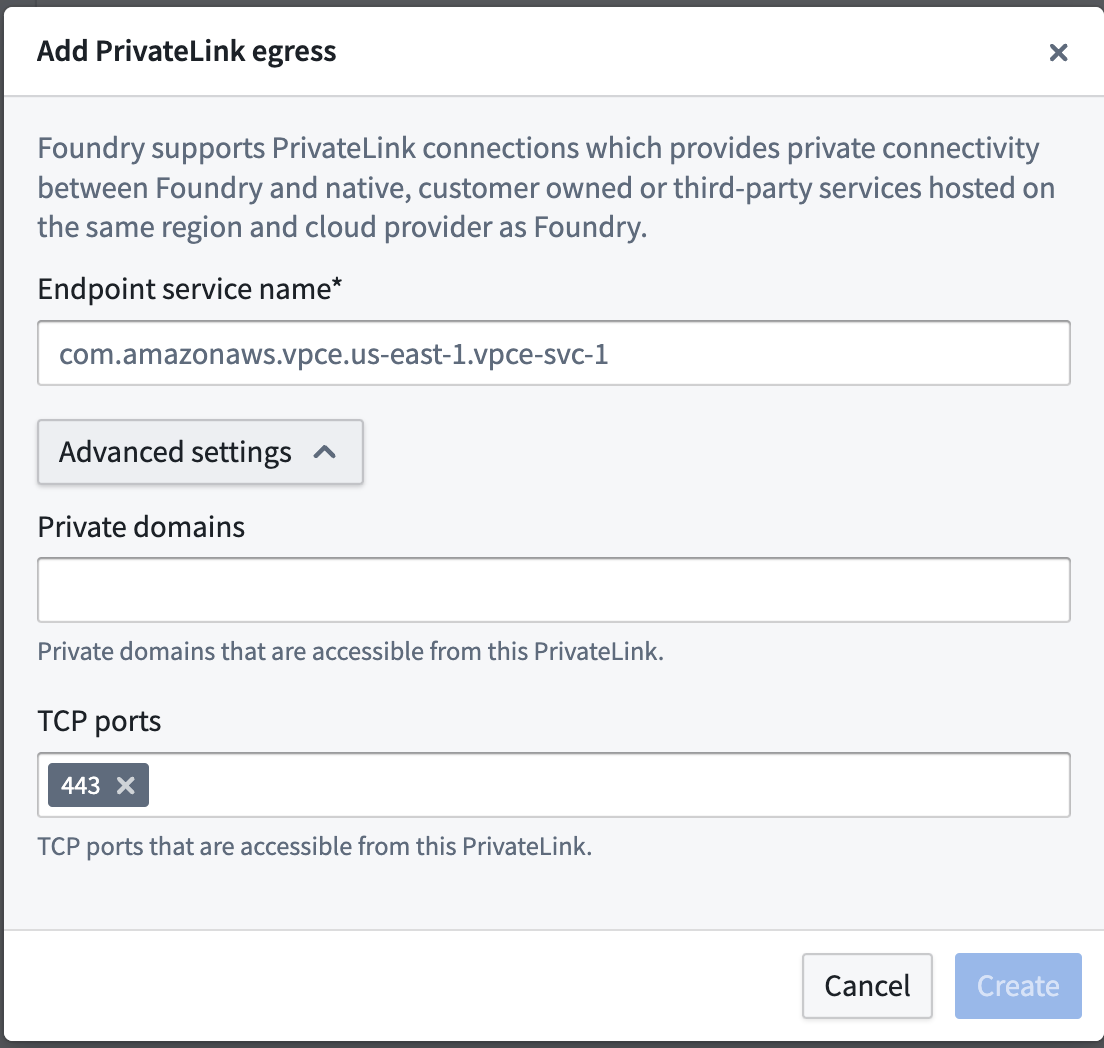
- After providing the details above, select Create.
The private link may have the following states:
- Creating: Creation of the private link has begun.
- Creating cloud resources: Provisioning cloud resources.
- Managing DNS: Managing DNS records.
- Waiting for cloud resources: Waiting for resources to be created by the cloud provider.
- Pending acceptance: The private link is awaiting acceptance by the service provider.
- Ready: The private link has been successfully created.
If the private link is in the Failed state, one of the following errors have occurred:
- Failed: The connection request failed. Check permissions for your virtual private cloud (VPC) endpoint service configuration in AWS and recreate.
- Rejected: The service provider rejected the connection request. The owner of the VPC endpoint service has rejected the connection, contact them to move forward.
- Expired: The connection request expired. The owner of the VPC endpoint service has not accepted the connection in time, re-create the private link.
- Timeout: Private link creation timed out. This could be a transient error, delete and retry. Contact your Palantir administrator if retrying does not solve the issue.
- Validation failed: Private link validation failed. Contact your Palantir administrator to move forward.
- Cloud provider error: Cloud resource creation failed. Contact your Palantir administrator to move forward.
- DNS management failed: DNS management failed. Contact your Palantir administrator to move forward.
Create private link egress policies
After successful creation of a private link, create private link egress policies to allow egress to the target resource.
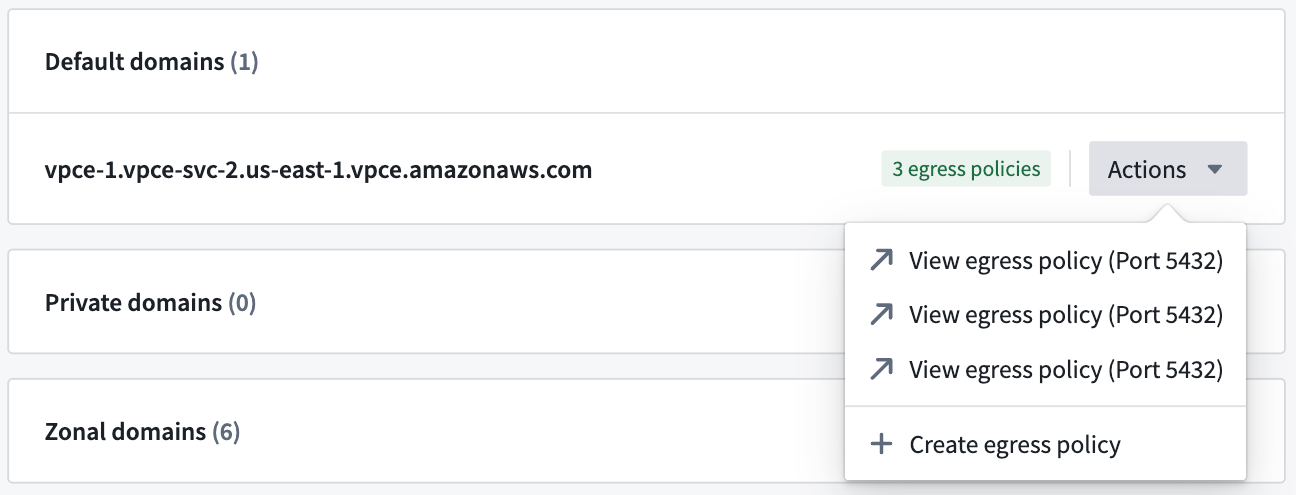
- Create network egress policies by selecting Actions > Create network egress policy in Control Panel.
- Select a Private link type of address and input the port of the target resource per item when creating a network egress policy. These created policies are visible under Actions > View network egress policy in Control Panel.
Cases that require egress policies
- A network egress policy is required for the default domain. If you are connecting to a third-party API, and the AWS generated default domain is not intended for use, a network egress policy is not required.

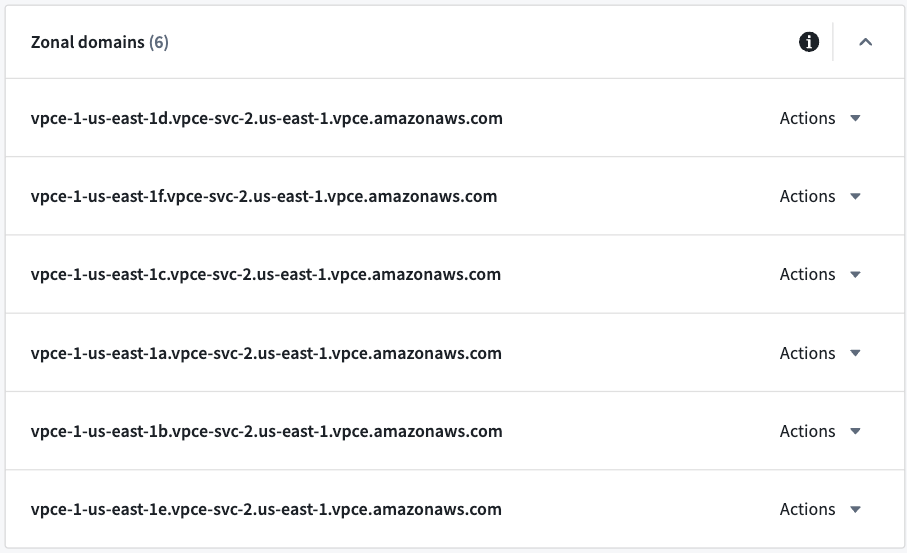
- If you intend to use zonal domains, create network egress policies for the zonal domains. If your VPC is in the same AWS zone as the Palantir platform, then using the same zone domain may be more efficient.
- Create network egress policies for private domains if configured.

Once the private link is in the Ready state and network egress policies are created, the private link can be used in the Palantir platform.
Manage private links
Possible actions on the private link are displayed under Actions in the private link details page, and in the private links page for each item.


Update a private link
A private link’s Private domains and TCP ports can be updated by selecting Actions > Update.
Delete a private link
Private links can be deleted by selecting Actions > Delete.
Share network egress policies
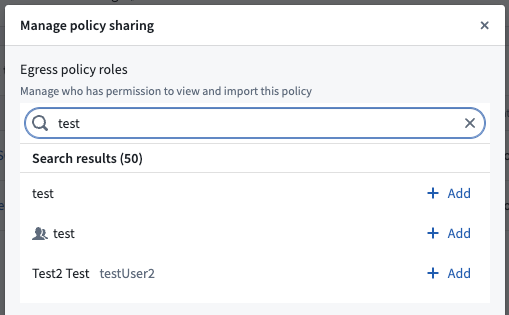
Share the created network egress policies with users who intend to egress to the target resource through the private link. On the domain or IP that is to be shared, select Actions > View network egress policy and navigate to the network policy page. On the network policy page select Actions > Manage sharing and add the intended user or user group to share the network egress policy.
Use a private link
Data Connection source
In Data Connection, configure a source using the default domain or the third-party API domain, and attach the created network egress policies. After configuring, test connectivity by previewing or exploring the source and verifying that the source’s data is accurate.
Snowflake source
To create a Snowflake source connected through a private link, follow these steps:
- Allowlist the Palantir platform cloud provider account in Snowflake.
- Create the private link in Control Panel.
- Create the Snowflake source in Data Connection.
Allowlist the Palantir platform cloud provider account in Snowflake
For the Palantir platform to create a private link to Snowflake, the Palantir platform’s account needs to be allowlisted in your Snowflake account. To do this follow these steps:
- Find the Palantir platform’s cloud provider account ID in Control Panel > Network Egress > Private links as shown below:

- Open a support case ↗ with Snowflake and provide the following information:
- The Palantir platform’s cloud provider account ID (include the cloud provider; AWS, Azure or GCP).
- The Snowflake account URL.
- Include that the above account ID needs to be allowlisted for private connectivity with Palantir. Note that
SYSTEM$AUTHORIZE_PRIVATELINKcannot be used, since Palantir users do not have direct access to the underlying cloud provider infrastructure and are not provided with the requiredfederated_token.
Once Snowflake has allowlisted the Palantir platform’s cloud provider account, continue to the next step.
Create the private link in Control Panel
Before creating a private link between the Palantir platform and Snowflake, retrieve the private link configuration from Snowflake by running the command SYSTEM$GET_PRIVATELINK_CONFIG ↗. This command outputs the required information to create a private link in the Palantir platform.
- To create a private link, navigate to Control Panel > Network Egress > Private links > New private link.
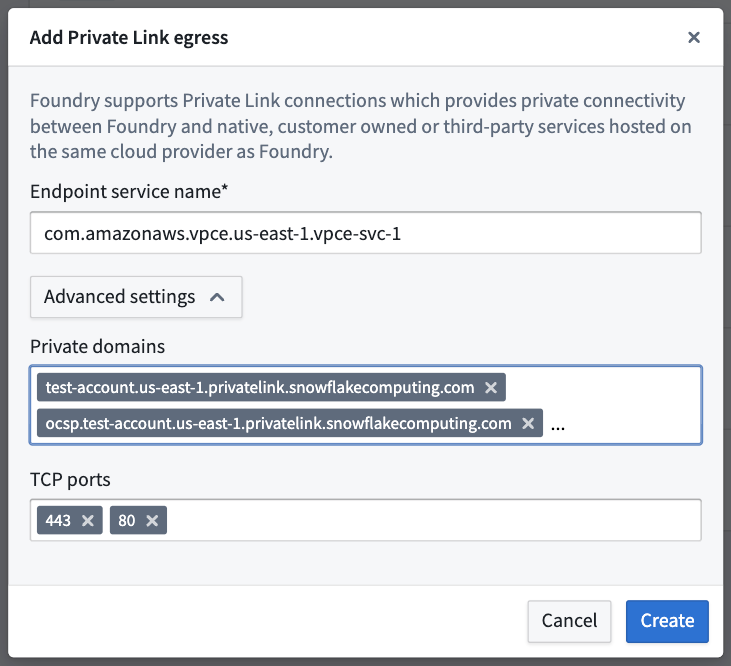
- Enter the following details from the output above to create a private link:
- Endpoint service name: Enter the
privatelink-vpce-idfrom the output ofSYSTEM$GET_PRIVATELINK_CONFIG. - Advanced settings:
- Private domains: The Palantir platform will map these URLs to the other end of the Snowflake private link and route traffic over the private link, maintaining Snowflake's use of Online Certificate Status Protocol (OCSP) for security. Read more about configuring your VPC network ↗ in the Snowflake documentation. The following values can be obtained using
SYSTEM$GET_PRIVATELINK_CONFIG:privatelink-account-urlprivatelink-connection-ocsp-urlsprivatelink-connection-urlsprivatelink-ocsp-urlregionless-privatelink-account-urlregionless-snowsight-privatelink-urlsnowsight-privatelink-url
- TCP ports: Enter
443and80as mentioned in the Snowflake documentation ↗.
- Private domains: The Palantir platform will map these URLs to the other end of the Snowflake private link and route traffic over the private link, maintaining Snowflake's use of Online Certificate Status Protocol (OCSP) for security. Read more about configuring your VPC network ↗ in the Snowflake documentation. The following values can be obtained using
- Endpoint service name: Enter the
Once configured, select Create to create the private link. When the private link is in the Ready state, continue to the next step.
Create the Snowflake source in Data Connection
- To create a Snowflake data source in Data Connection, navigate to Data Connection > New Source > Snowflake.
- Configure the source, and do the following in Connection details to use the created private link:
- Account identifier: Input the account ID of the Snowflake account that the private link was created for.
- Private link: Toggle this to use the private link.

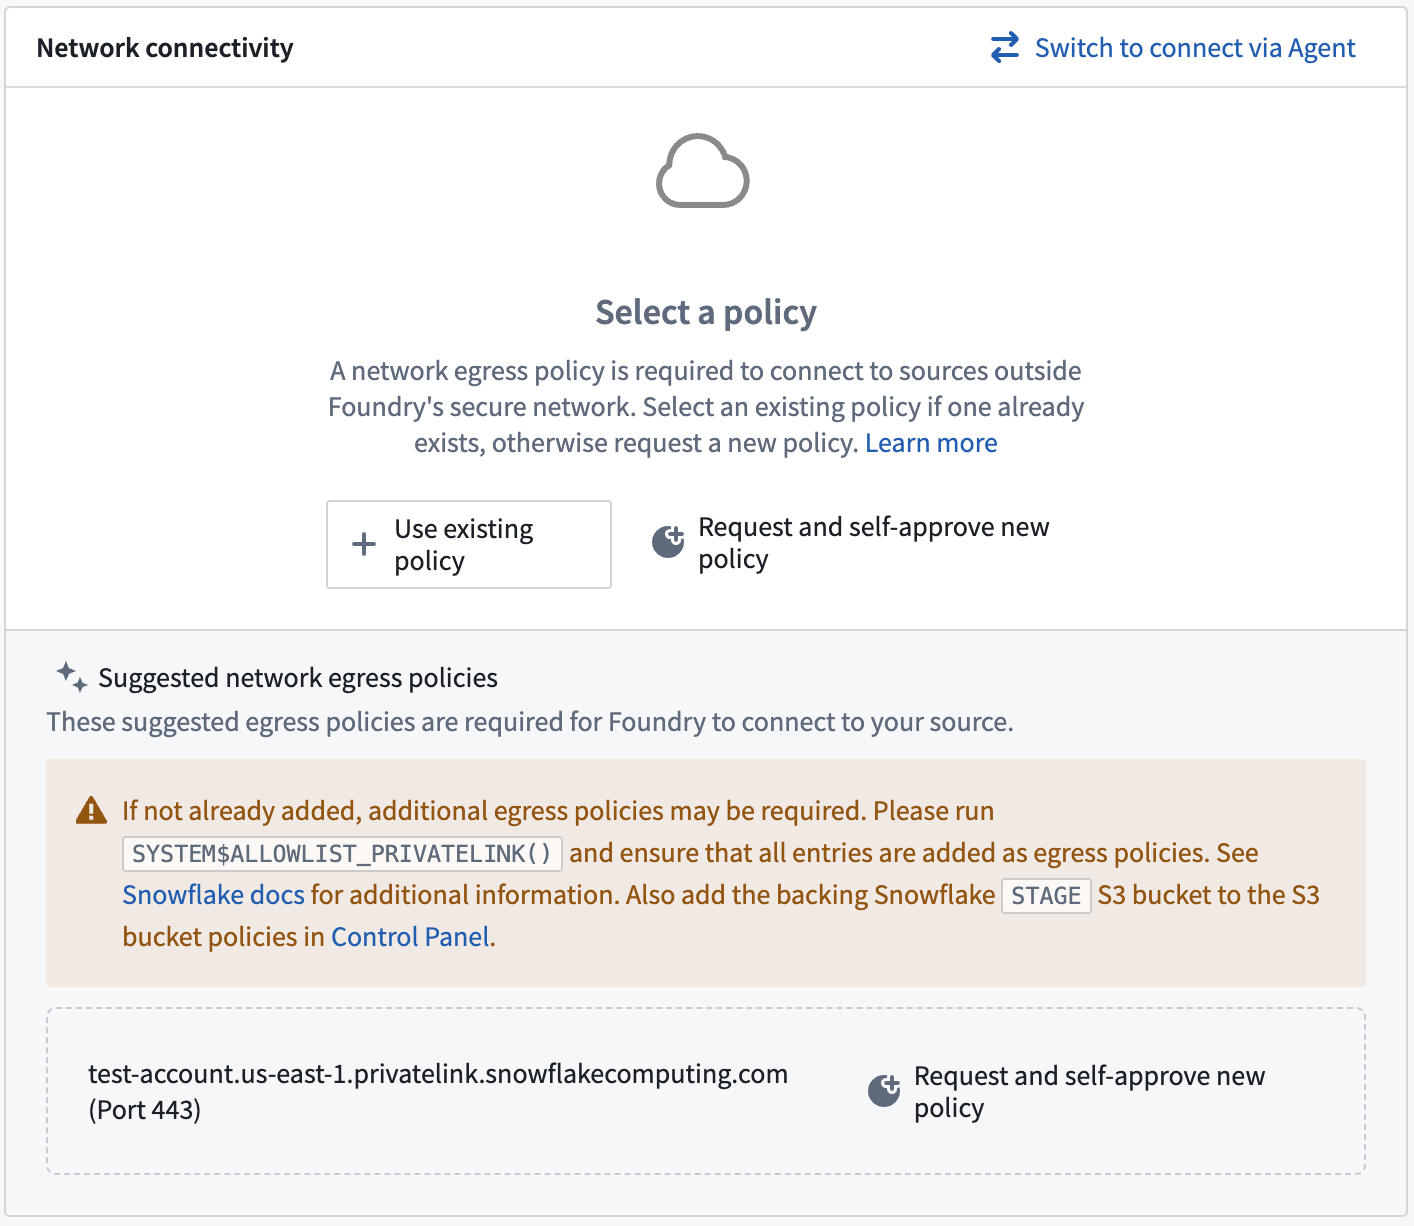
Network egress policies
Create network egress policies for all of the URLs output by the command SYSTEM$ALLOWLIST_PRIVATELINK ↗. Additionally, create an S3 bucket policy for the STAGE of the output as shown below:
For more information on Snowflake configuration refer to our Snowflake documentation.