- Capabilities
- Getting started
- Architecture center
- Platform updates
Configure outbound applications with OAuth 2.0 authorization code grants
Outbound applications provide a way for administrators to manage OAuth 2.0 connections to external systems from workflows built in Foundry. Outbound applications are managed at the Organization level in Control Panel.
An outbound application represents a bundle of configurations required for Foundry to behave as an OAuth 2.0 client. The application makes requests to another system that can behave as an OAuth 2.0 server.
Outbound applications in Foundry only support the OAuth 2.0 authorization code grant ↗ type. To set up an OAuth 2.0 client credentials grant, follow these resources to manually establish the handshake process within a webhook.
Outbound applications support connections to OAuth 2.0 servers on private networks using agent proxy egress policies. This allows Foundry to route traffic through a Data Connection agent installed in your network. See the egress policy configuration option documentation for details.
Create an outbound application
To create an outbound application, first navigate to the Outbound applications in Control Panel, under Organization settings. If you have access to multiple Organizations, be sure to select the Organization in which you wish to create your outbound application. All users of this Organization with permission to set up sources in Data Connection will be able to select any outbound application as an authorization mechanism for their connection.
To view the Outbound applications page, you need access to the "Manage outbound applications" workflow, which is granted by default to the Organization administrator role in Control Panel.
Learn more about configuring roles.
Select New application and provide the required inputs to set up your outbound application. Detailed configuration options are listed below.
Configuration options
The following configuration options are available when creating an outbound application.
| Option | Required? | Description |
|---|---|---|
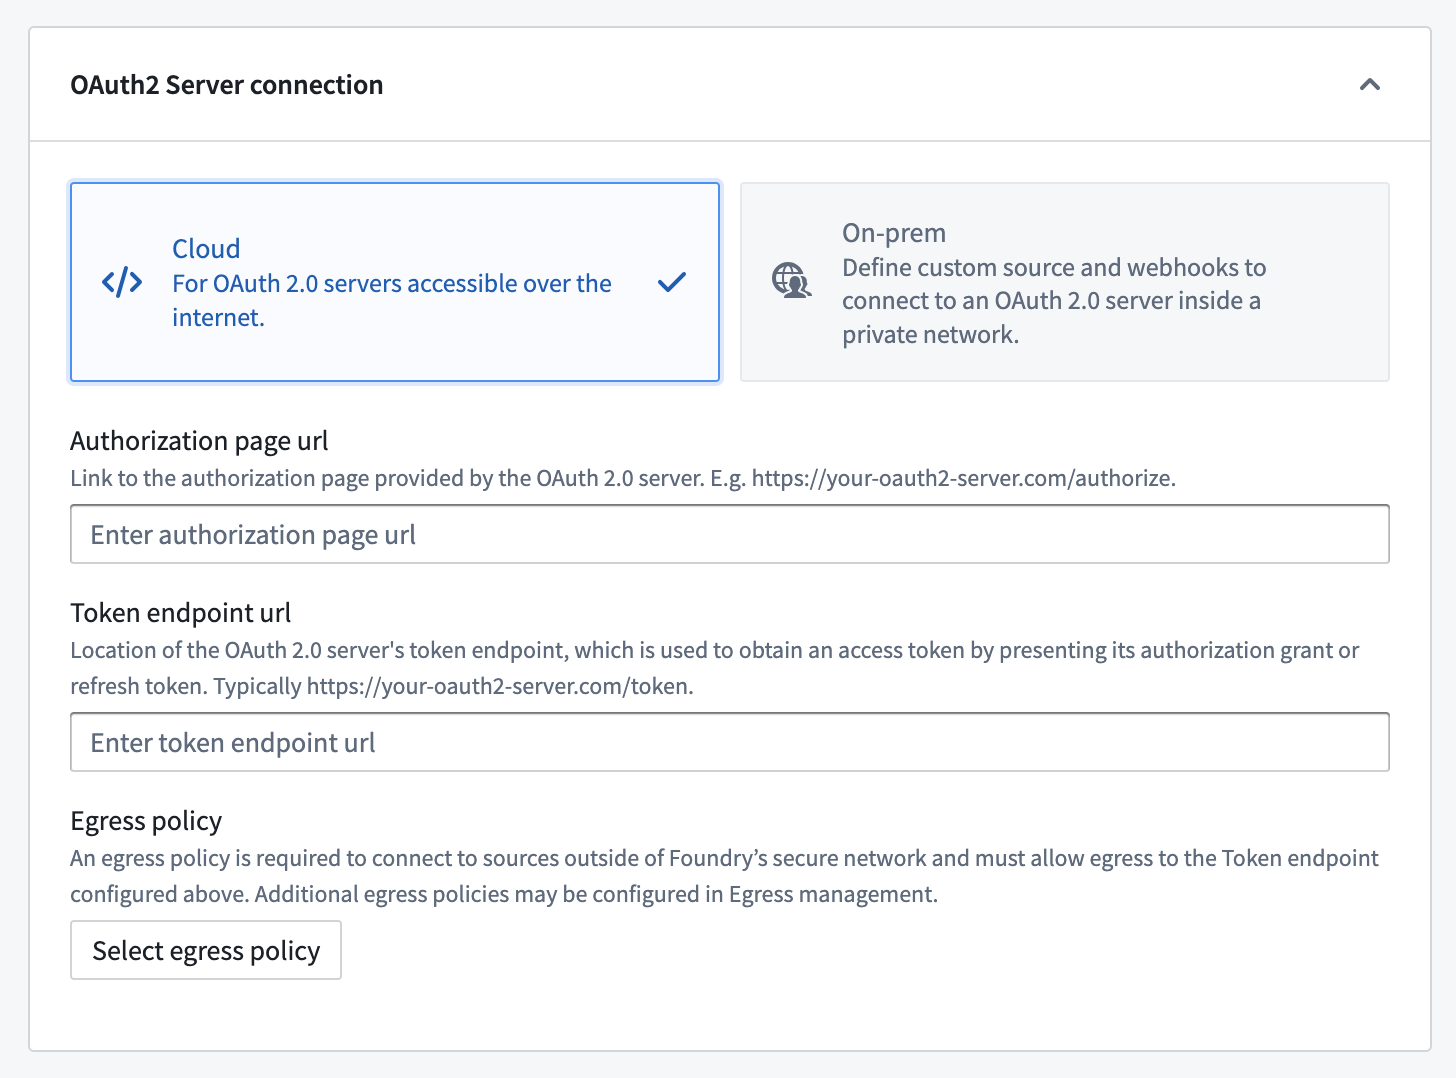
| Authorization page URL | Yes | The authorization endpoint ↗ for the OAuth 2.0 provider. Generally, this URL is similar to https://oauth2-server.com/authorize and should be available in public documentation for most SaaS offerings. |
| Token endpoint URL | Yes | The token endpoint ↗ for the OAuth 2.0 provider. Generally, this URL is similar to https://oauth2-server.com/token and should be available in public documentation for most SaaS offerings. |
| Egress policy | Yes | To connect to the OAuth 2.0 server, you must create and attach an egress policy that allows connecting to the token endpoint URL. Use a direct connection egress policy for servers accessible from Foundry's network, or an agent proxy egress policy for servers on a private network. Egress is managed per enrollment. |
| Application name | Yes | A user-facing name for this outbound application. The name is visible when selecting the outbound application in Data Connection while configuring authentication for a source. |
| Description | No | A description of the outbound application. |
| Approval prompt | Yes | This text will be displayed when using the authorization grant flow before opening a pop-up window to display the login prompt for the external OAuth 2.0 provider. |
| Client ID | Yes | The client identifier ↗ from the OAuth 2.0 provider. Note that some external systems may use a different term to refer to client ID. |
| Client secret | Yes | The client secret ↗ from the OAuth 2.0 provider. Note that some external systems may use a different term to refer to a client secret. |
| Scopes | Yes | The list of scopes configured in on the OAuth 2.0 server corresponding to the provided client ID. The list entered here must match what is listed in the administration interface for the external system. Scopes may be left blank to indicate that an empty list of scopes should be provided when authorizing with the OAuth 2.0 server. |
| Access token expiration | No | An optional access token expiration. Normally, this value is returned by the OAuth 2.0 server as part of the authorization grant flow. Any value entered here will be ignored if the server provides an access token expiration. |
| Enable PKCE | No | An optional toggle. When enabled, the outbound application will use proof key for code exchange ↗ (PKCE), an extension to the authorization code grant that protects against CSRF and authorization code injection attacks with an additional security handshake. This setting is highly recommended for public clients, and some OAuth 2.0 servers enforce it. |
We recommend using a direct connection when setting up an outbound application if the OAuth 2.0 server is reachable from Foundry directly. For cloud-hosted Foundry instances, this means a server that can be reached through a direct Internet connection.
If the OAuth 2.0 server is on a private network, you can use an agent proxy egress policy to route traffic through a Data Connection agent installed in your network. This allows Foundry to connect to the OAuth 2.0 server as if it were directly reachable.
(Legacy) Custom webhook-based OAuth 2.0 handshakes
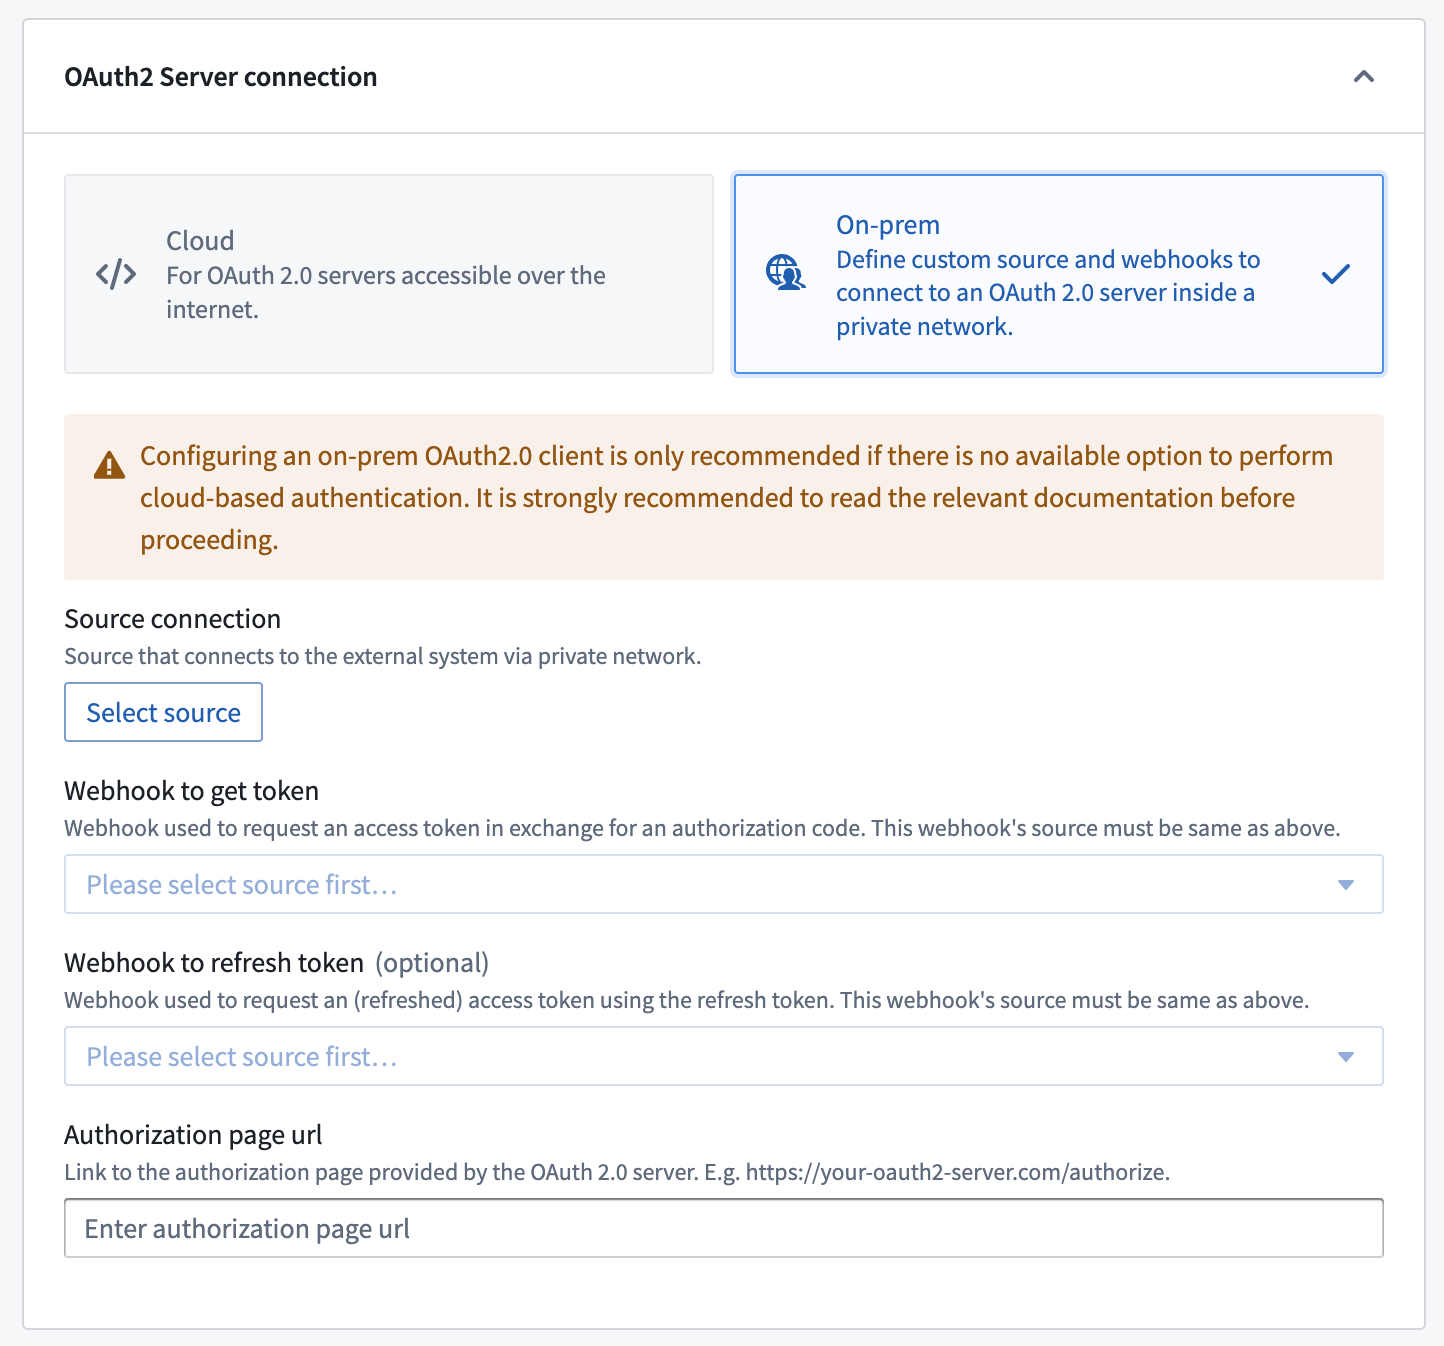
Custom webhook-based OAuth 2.0 configuration is in the legacy phase of development, and no additional development is expected. Full support remains available. This configuration may not be available on your enrollment. If the OAuth 2.0 server implements the standard Authorization Code grant flow, use the standard configuration options with a direct connection or agent proxy egress policy instead.
If the OAuth 2.0 server requires a non-standard token handshake, you can use custom webhooks to implement the OAuth 2.0 flow manually. This approach routes handshake requests through a REST API source using an agent worker to connect to the server.
| Option | Required? | Description |
|---|---|---|
| Source connection | Yes | Choose a REST API source that is configured to use an agent worker to connect to the OAuth 2.0 server inside your network. |
| Webhook to get token | Yes | A webhook that calls the token endpoint ↗ for the OAuth 2.0 server to fetch a token. See the section below for more information. |
| Webhook to get refresh token | No | A webhook that calls the token endpoint ↗ for the OAuth 2.0 server to refresh a token. See the section below for more information. |
| Authorization page URL | Yes | The authorization endpoint ↗ for the OAuth 2.0 provider. Generally, this URL is similar to https://oauth2-server.com/authorize. |
To set up a custom webhook-based handshake:
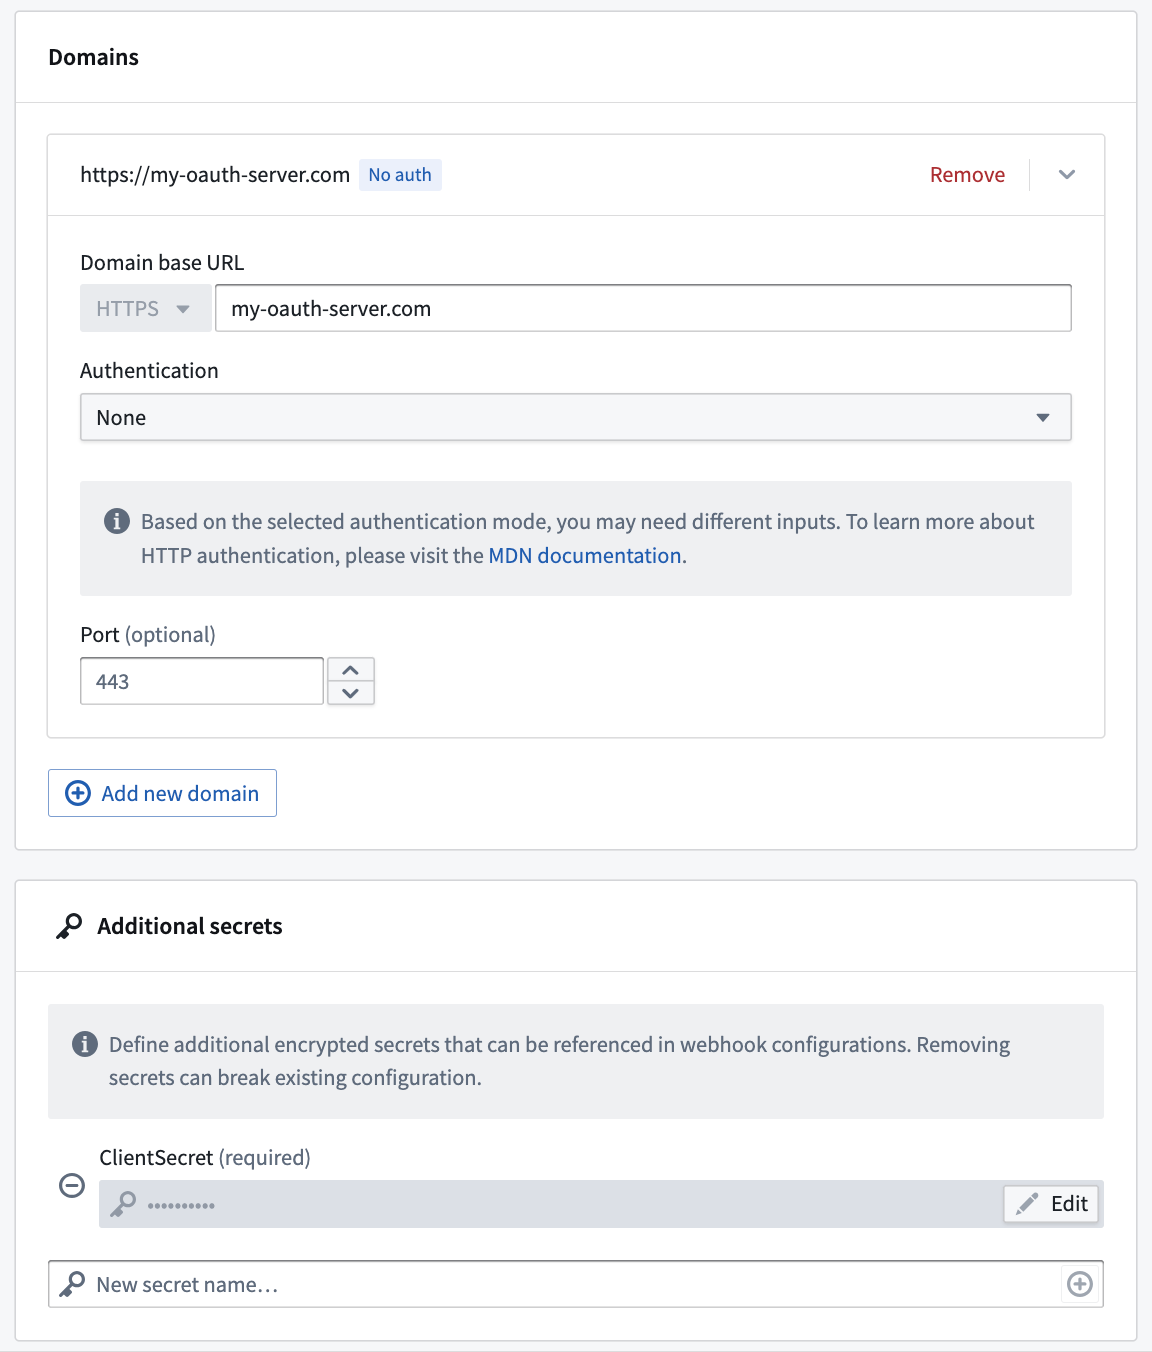
- Create a REST API source that can connect to your OAuth 2.0 server. For example, you might configure your source with the server domain and client secret:
- Create a webhook on that REST API source that calls the
/tokenendpoint of the OAuth 2.0 server. You can optionally create a second webhook for the refresh flow.
Use the instructions in the following sections to create the token and refresh token webhooks.
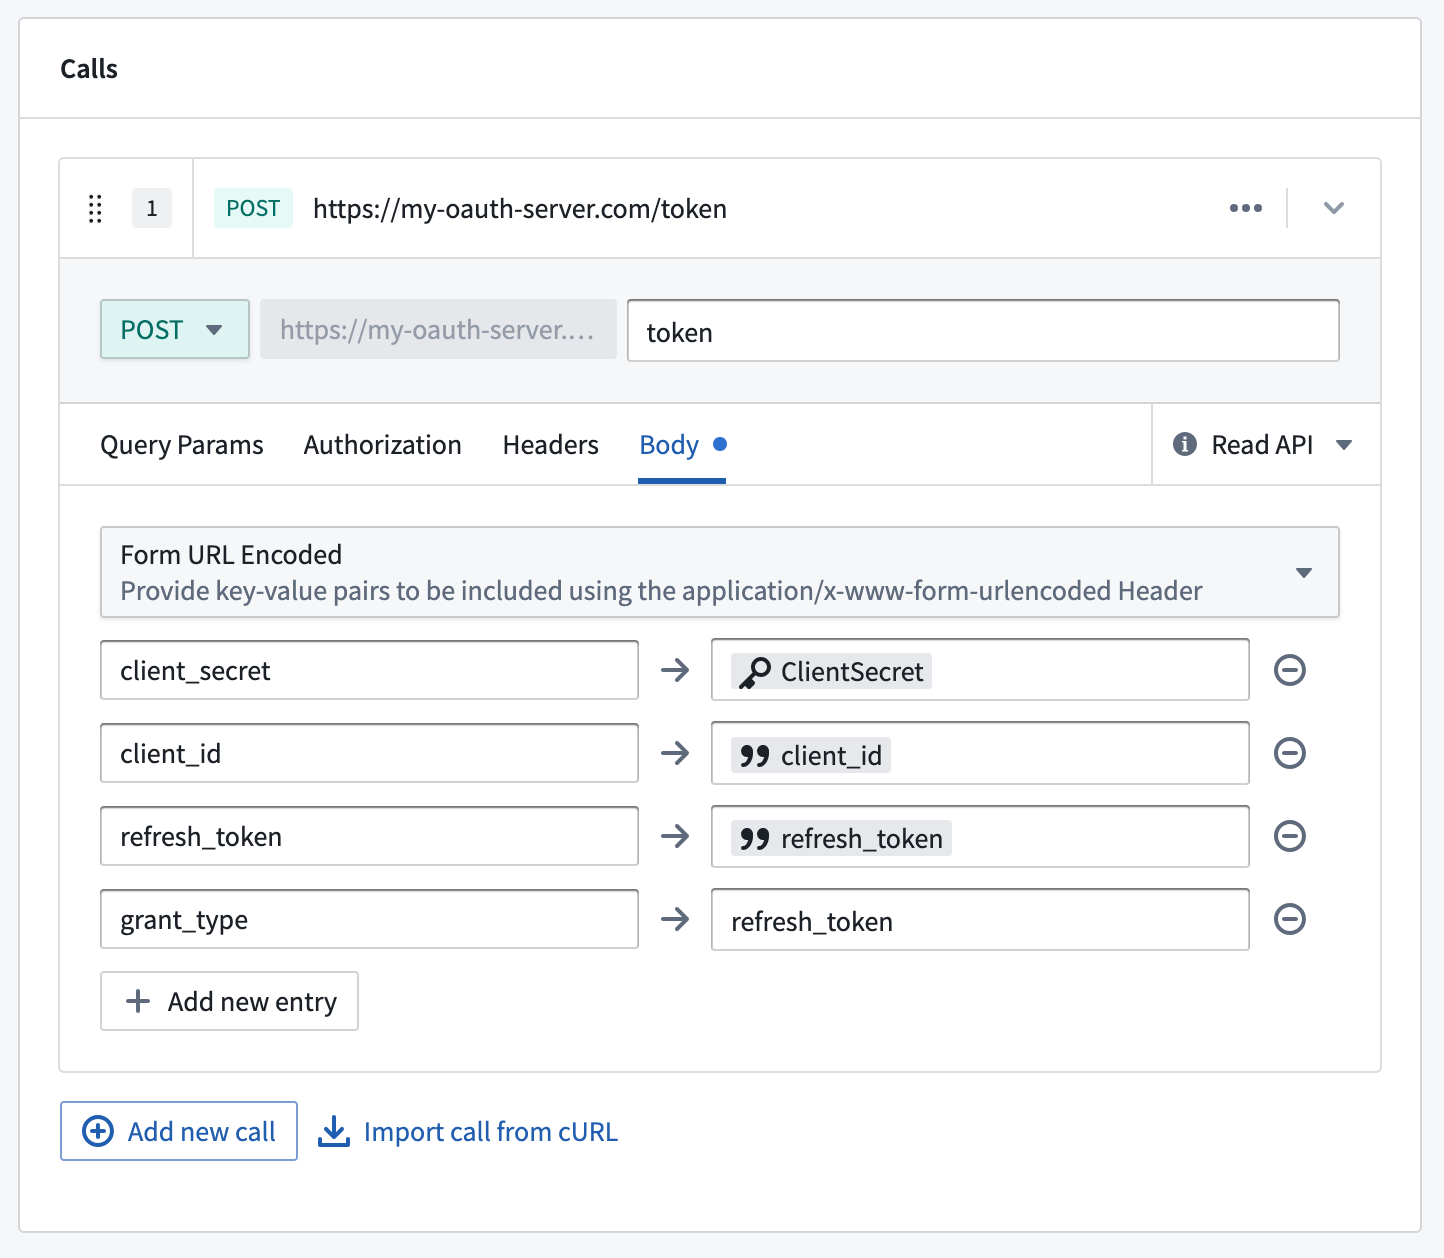
Token webhook
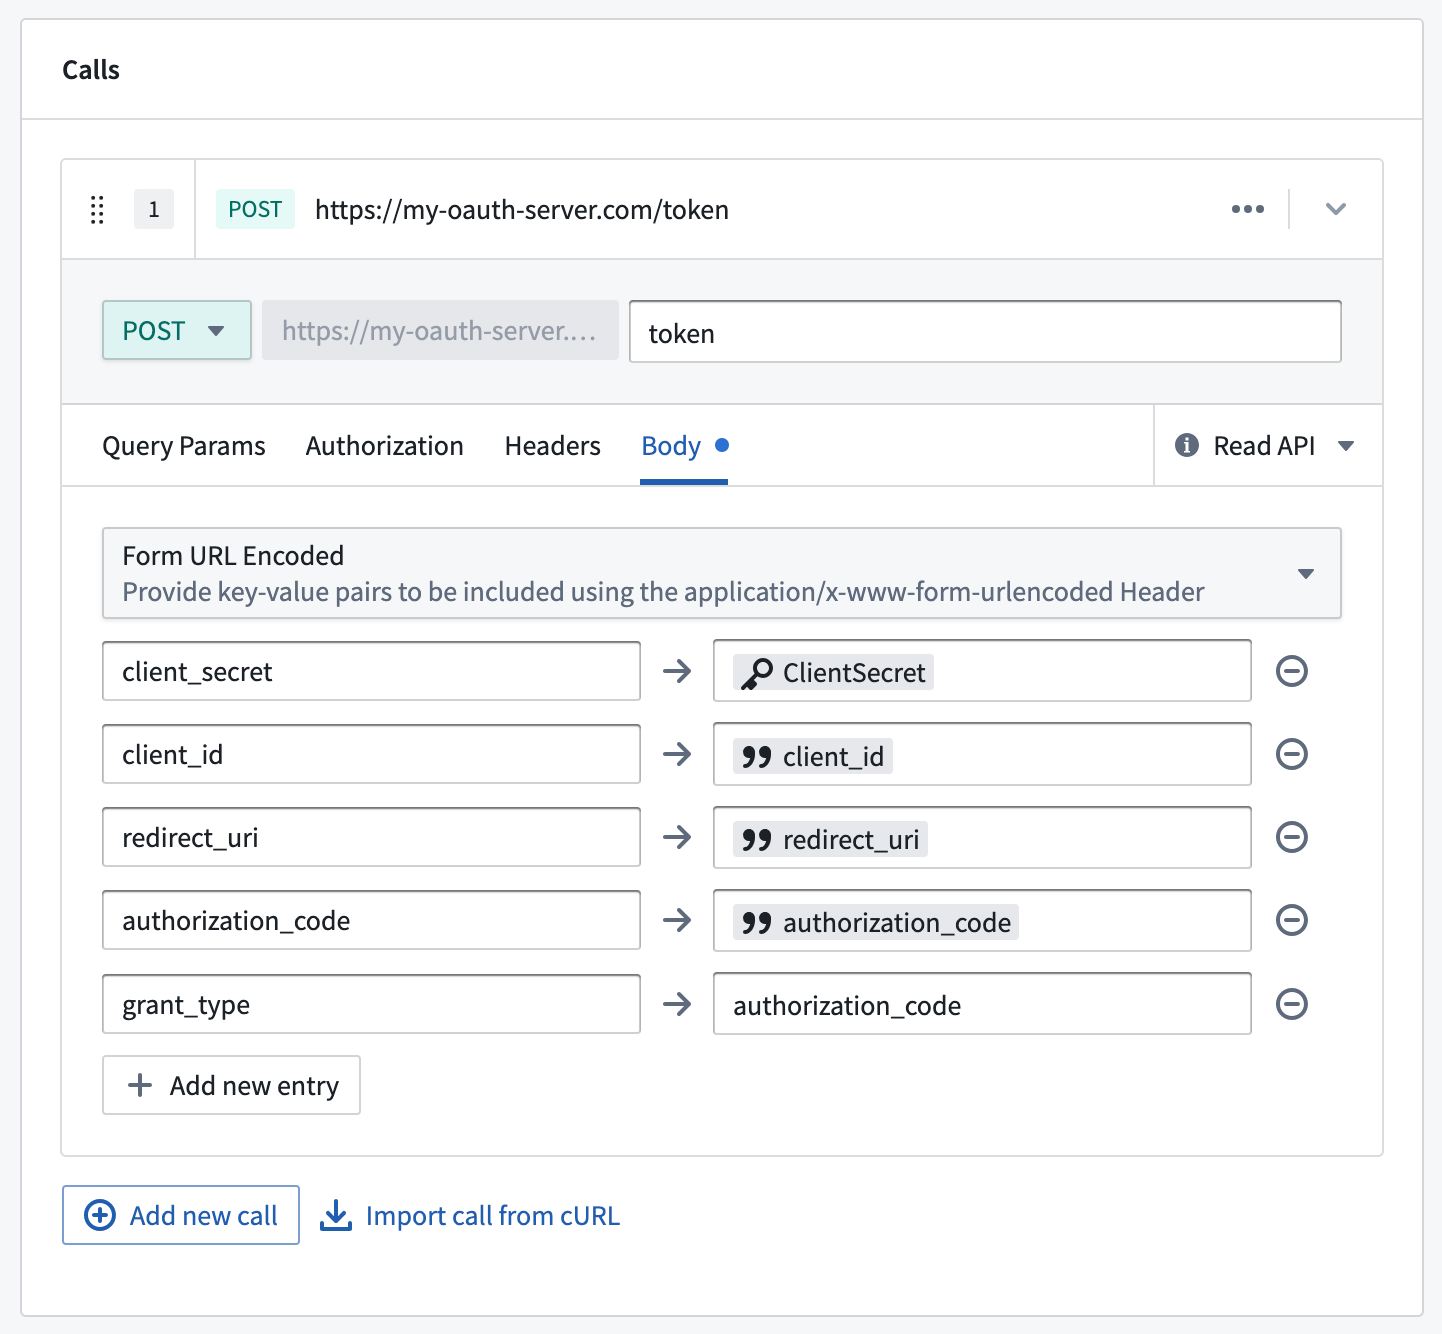
The token webhook should implement a request to the /token endpoint on the OAuth 2.0 server to fetch a valid token given a client_id, redirect_uri, and authorization_code. The token webhook must have the input and output parameters listed below. Learn more about webhook parameters.
Below is an example request configuration showing a standard OAuth 2.0 server token request:
| Input parameter | Required? | Type |
|---|---|---|
client_id | Yes | String |
redirect_uri | Yes | String |
authorization_code | Yes | String |
code_verifier | No | String |
You must also set grant_type=authorization_code as one of the entries in the webhook form body. code_verifier is required if Enable PKCE is toggled on in your outbound application. Review the documentation for your OAuth 2.0 server for additional required configurations.
| Output parameter | Required? | Type | Comments |
|---|---|---|---|
access_token | Yes | String | |
scope | Yes | String | |
refresh_token | No | String | Not all OAuth 2.0 servers or applications will be configured to allow automatic token refresh. If no refresh token is returned, users will be prompted to re-authorize the application whenever the original token expires. |
expires_in | No | String | Not all OAuth 2.0 servers will return this parameter. If this parameter is not present or a value is not returned, the access token expiration in the outbound application will be used instead. |
Refresh token webhook
After creating the token webhook, you must create a second webhook for the refresh token flow using the input and output parameters listed below. The webhook should implement a request to the /token endpoint to fetch a new token given a refresh_token and client_id.
Below is an example request configuration showing a standard OAuth 2.0 server refresh request:
| Input parameter | Required? | Type |
|---|---|---|
client_id | Yes | String |
refresh_token | Yes | String |
You must also set grant_type=refresh_token as one of the entries in the webhook form body. Review the documentation for your OAuth 2.0 server for additional required configurations.
The available output parameters are the same as the parameters for the token webhook.
| Output parameter | Required? | Type | Comments |
|---|---|---|---|
access_token | Yes | String | |
scope | Yes | String | |
refresh_token | No | String | Not all oauth servers or applications will be configured to allow automatic token refresh. If no refresh token is returned, users will be prompted to re-authorize the application whenever the original token expires. |
expires_in | No | String | Not all OAuth 2.0 servers will return this parameter. If this parameter is not present or a value is not returned, the access token expiration in the outbound application will be used instead. |
Manage outbound applications
Once you create an outbound application, it will be available to all users in that Organization to use as the authorization method for a REST API source in Data Connection. The following options are available for administrators with permisssions to manage outbound applications.
Delete an outbound application
Deleting an outbound application will permanently remove stored tokens and refresh tokens for all users who have authorized the application. The application configuration, including the client secret, will also be permanently deleted. This action cannot be reversed.
Reset an outbound application
Resetting an outbound application will permanently remove stored tokens and refresh tokens for all users who have authorized the application. This effectively returns the application to the state just after initial setup when no user has yet completed the interactive authorization flow. The next time a user attempts to perform a workflow that requires a token from this outbound application, they will be prompted to complete the authorization flow again.
Enable an outbound application
Enabling an outbound application means that users may perform the interactive authorization flow to this external system. Disabling an application will prevent any previously stored tokens and refresh tokens from being used. However, these tokens will not be deleted and may be used again after the application has been re-enabled.
New users who have not previously authorized the application will not be able to perform the interactive authorization flow while the outbound application is disabled.
Newly created applications will be enabled by default and may only be disabled after being created.
Use outbound applications in Data Connection
For details on how to use outbound applications in Functions, Actions, Workshop, and AIP agents, see Supported workflows below.
Outbound applications work with automated workflows such as Automate and scheduled Functions as long as the user has a valid token. A user must first complete the authorization flow in an interactive UI context (such as Workshop or AIP Studio). If the refresh token expires before the automated workflow runs, the user must re-authorize through an interactive workflow.
Outbound applications do not support usage by users from multiple Organizations. If users in multiple organizations need to authorize against the same OAuth 2.0 server, you must create a separate outbound application with a different REST API source for users in each Organization.
Once an outbound application is created and enabled, it may be used as the authentication method for a domain in a REST API source. When configuring a domain, select OAuth 2.0 and then select the desired outbound application from the dropdown.
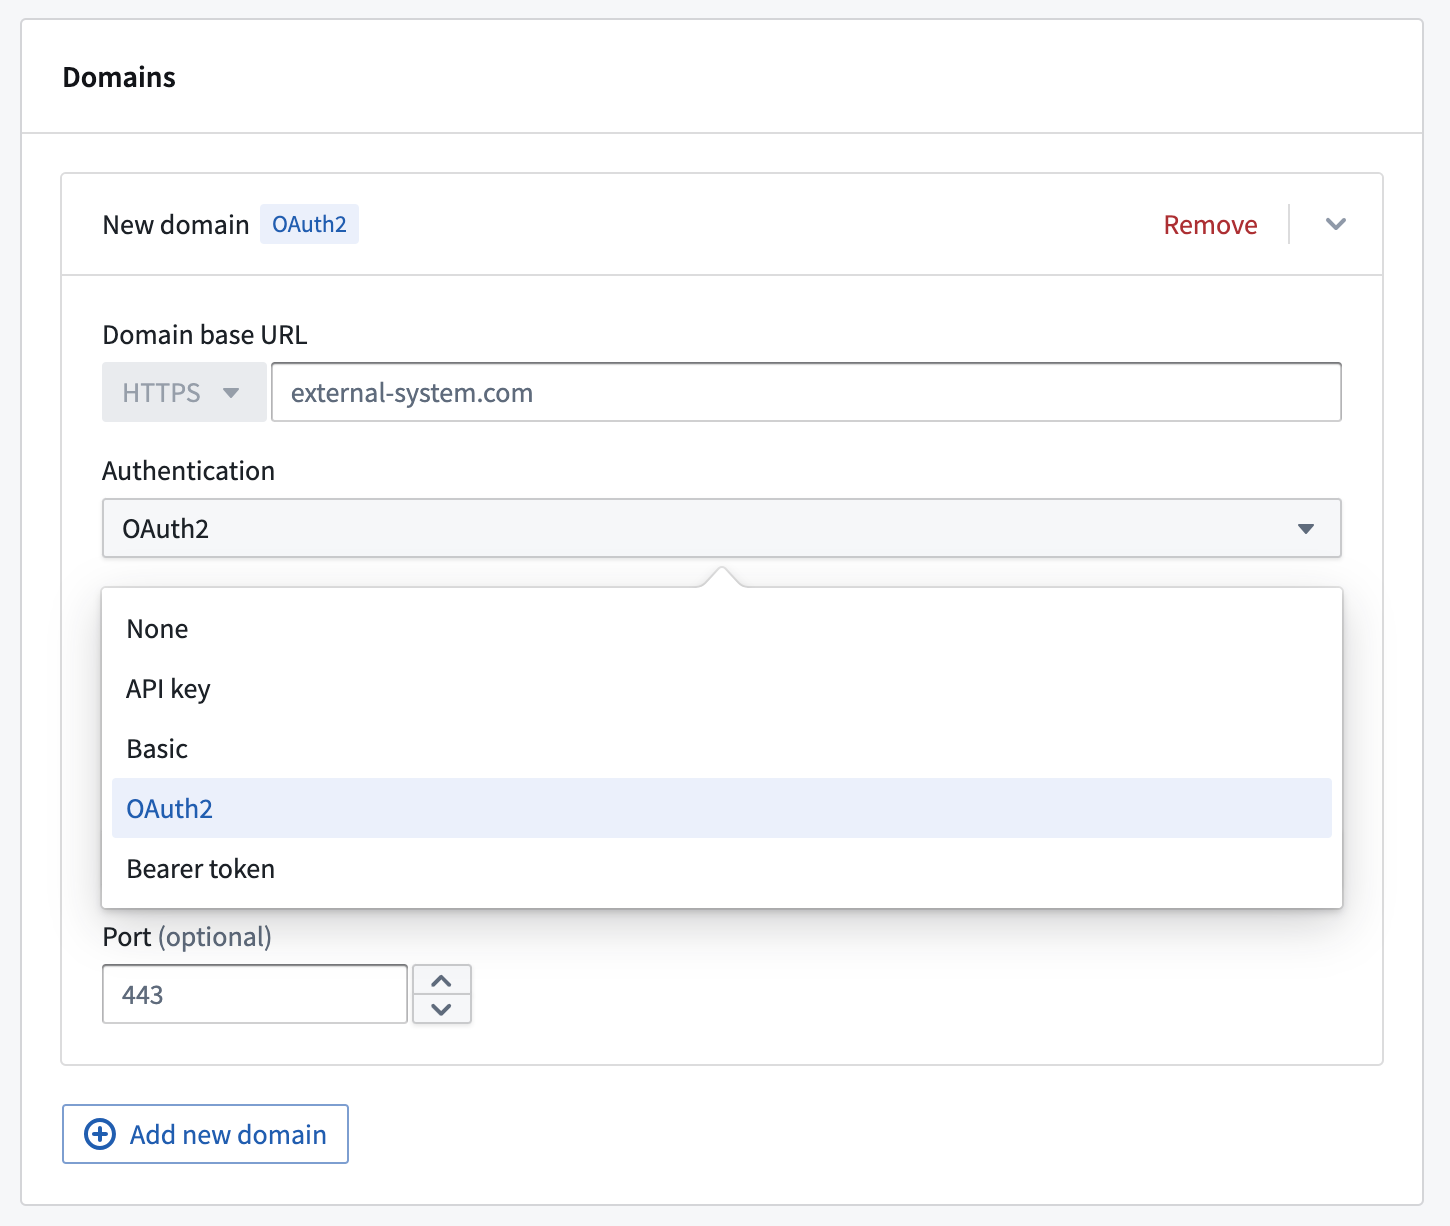
Any webhooks using a domain with OAuth 2.0 configured will result in an interactive prompt for each user the first time they attempt to run it. Webhooks are most often invoked through Actions from Workshop; in this case, when running an Action in Workshop, the user will see a pop-up window showing the authentication page of the OAuth 2.0 server, prompting them to authorize Foundry to interact with this system on their behalf.
In order to call OAuth 2.0 backed webhooks in a Function-backed Action, navigate to the rules configuration page of your Action and call the webhook directly as the first rule followed by a Function to process the webhook response. You can also configure the webhook call to take inputs from a function.
If a token refresh workflow is configured, users are unlikely to see this prompt again unless the authorization is revoked in the external system or the outbound application is reset. If no refresh workflow is configured, the end user will see the authentication pop-up anytime the resulting token expires. Tokens often expire within minutes or hours, and we encourage use of the refresh flow for a better user experience.
Supported workflows
Once a REST API source is configured with an outbound application, the OAuth token is available across the following Foundry features:
- Functions: Use OAuth tokens from your source in Python and TypeScript functions to authenticate with external systems.
- Function-backed actions: Actions whose backing functions call an OAuth-configured source pass the token automatically.
- Webhook side effects: Webhooks on an OAuth-configured REST API source include the token in outgoing requests.
- Workshop: Actions applied in Workshop that require OAuth tokens trigger an authorization prompt if no valid token exists, or work automatically if the user has already authorized.
- AIP agents: Agents that invoke OAuth-backed action tools use the same token lifecycle as other workflows.