Create Product Releases with additional details and constraints
Let’s assume you need to create a new version of your Helm chart with a Product dependency. The steps below describe how you can use the Apollo CLI to declare such a dependency by creating a Product Release from a Product Release manifest file.
Configure the Apollo CLI
The Apollo CLI can store your Apollo URL and Bearer Token as variables so that you do not need to pass them in every time. In the previous examples, the Apollo UI provided you with these variables. Since we are using a different Apollo CLI command, we will need to generate the token and add it to the CLI.
Create a Bearer Token
-
Create your Bearer Token by changing your URL in this way:
https://<yourHubUrl>/workspace/autopilot/dashboard→https://<yourHubUrl>/multipass/app/tokens -
Select Create Token. Give it a unique name, such as “apollo-cli”, and set an expiration date for a few days in the future.
-
Select Generate and save your token into a secure location for later use.
Store your Apollo URL
- Open your command line or terminal window and navigate to the directory containing your executable
apollo-cli. - Run
./apollo-cli configure(apollo-cli.exe configureon a PC). - Enter the URL for your designated Apollo Hub and hit enter.
- Paste in the Bearer Token you saved in the previous steps. If you misplaced your token, follow the instructions above to create a new one.
- If you are prompted to provide any additional fields, hit enter to skip them.
- Test your configuration by running
./apollo-cli list-environmentsto generate a JSON object containing the names of all Spoke Environments connected to your Hub. If you receive an error, retrace the instructions above to ensure you did not miss a configuration step.
Create a new Release with dependencies
- Create a compressed TAR file of your Helm chart (or the open-source Nginx one) by running the command below in your command line tool. Be sure to increment your version number by one patch version. The steps below reference
Nginxso where appropriate, replaceNginxwith your Helm chart name and the Nginx versions with your Helm chart versions.
Copied!1./apollo-cli product-release helm-chart init --as-tgz --name nginx --version 13.1.6 --repository-url https://charts.bitnami.com/bitnami --maven-coordinate com.intro.helmcharts.bitnami:nginx-${yourLastName}:13.1.6
In this command, you incremented the version number by one patch version and generated a file called nginx-${yourLastName}-13.1.6.helmchart.config.tgz.
-
Unzip the archive by running
tar -xvf nginx-${yourLastName}-13.1.6.helmchart.config.tgzin the command line. This will create a directory called/nginx-${yourLastName}-13.1.6that contains a nested directory called/deployment. -
Open the file with a text editor, such as
vim, e.g.,vim nginx-13.1.6/deployment/manifest.yml. This file contains the Helm chart metadata, including the chart name, version, and containers. We can also add Product dependencies to the manifest and use it to create a new Release to the Apollo Hub. We will add a simple dependency on WordPress 15.x.x under theextensionsblock. -
Edit the file and add the following block at the end of the
extensionsheading:Copied!1 2 3 4 5 6 7extensions: product-dependencies: - product-group: com.bitnami.repos product-name: wordpress minimum-version: 15.0.0 maximum-version: 15.x.x optional: falseThe file should now look like this:
Copied!1 2 3 4 5 6 7 8 9 10 11 12 13 14 15 16 17 18 19manifest-version: "1.0" product-group: com.intro.helmcharts.bitnami product-name: nginx-${yourLastName} product-version: 13.1.6 product-type: helm-chart.v1 extensions: artifacts: - type: oci uri: docker.io/bitnami/nginx:1.23.1-debian-11-r4 helm-chart: helm-chart-name: nginx helm-chart-version: 13.1.6 helm-repository-url: https://charts.bitnami.com/bitnami product-dependencies: - product-group: com.bitnami.repos product-name: wordpress minimum-version: 15.0.0 maximum-version: 15.x.x optional: false -
Register the new Nginx Product release (
13.1.6) with the dependency by running the following command:Copied!1./apollo-cli product-release create --manifest nginx-${yourLastName}-13.1.6/deployment/manifest.yml -
Once the Product publication is complete, navigate to Nginx's Releases tab, which now includes your new Release
13.1.6. -
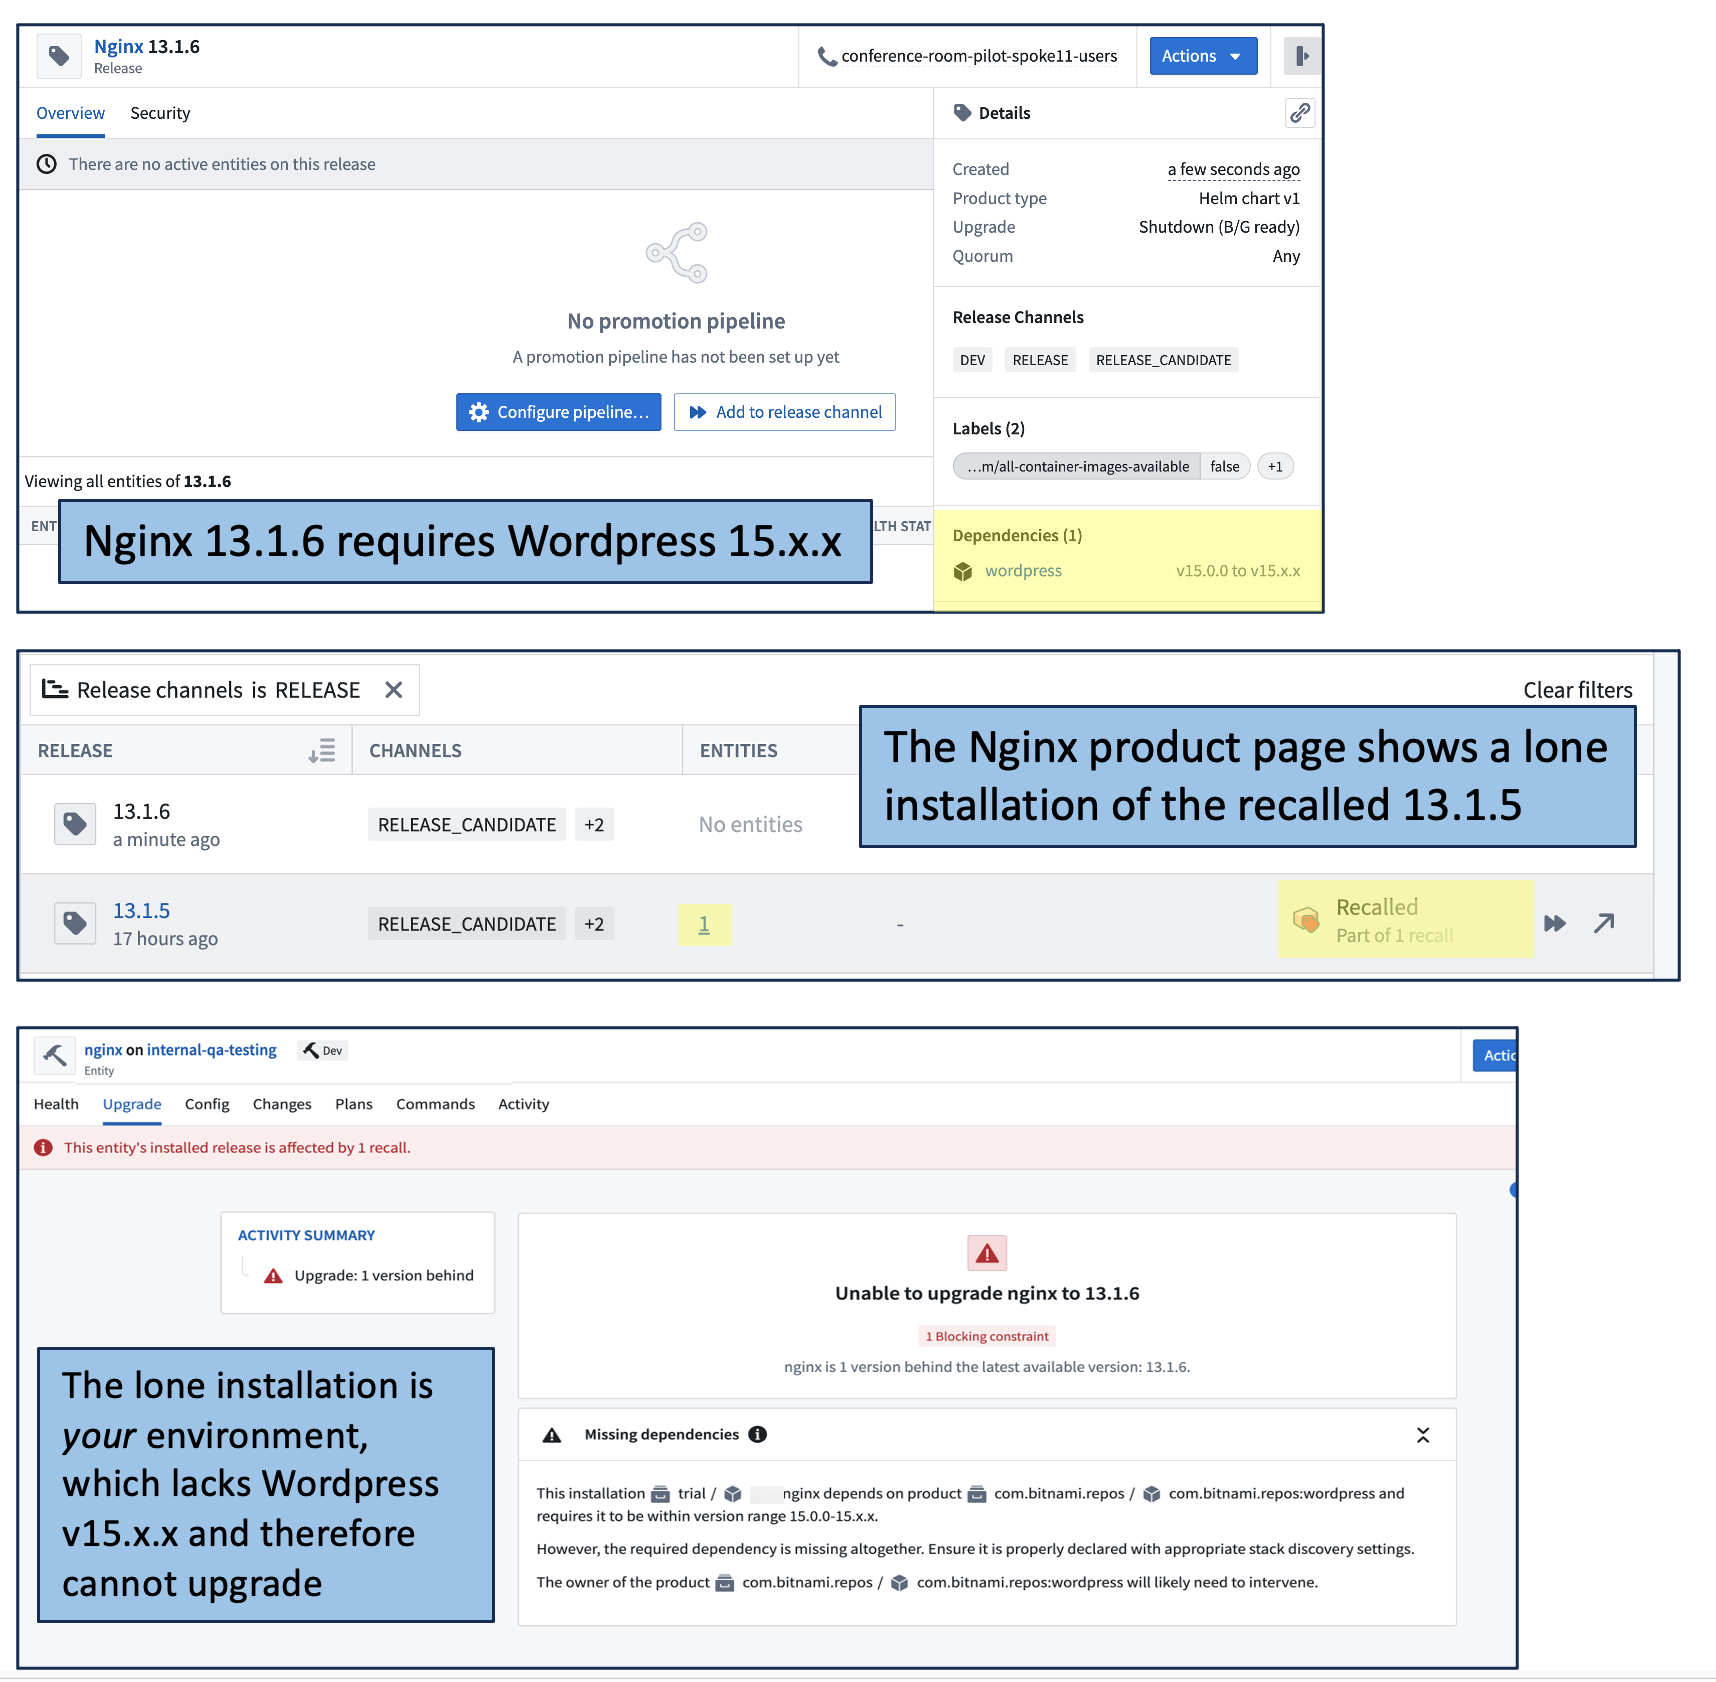
Select the
13.1.6Release. On the right side of the screen, note the declared WordPress dependency now appears in the Dependencies section.
If your Environment does not automatically upgrade, it may be because you have not installed Wordpress in your Environment. Since this is now a declared dependency for your new Release, you will need to do that first. You can install WordPress in your Environment by:
In this example you added a Product Release that declares a dependency on WordPress 15.x.x. Apollo blocked the upgrade until you installed the dependency.
Next → Recall a Product Release