注: 以下の翻訳の正確性は検証されていません。AIPを利用して英語版の原文から機械的に翻訳されたものです。
4 - 「生成」トランスフォームによる複数の出力
learn.palantir.com ↗ でも以下の内容をご覧いただけますが、アクセシビリティの観点から、ここに掲載しています。
📖 タスクの概要
アナリストチームから、個々の乗客の出身国ごとに別々の flight_alerts_joined_passengers データセットを作成し、個人情報を削除するための追加ロジックを適用するように依頼されたとしましょう。例えば、乗客が英国出身のすべての行を新しいデータセット flight_alerts_UK に送信するなどです。これをプログラムで実行する一つの方法は、 生成トランスフォーム を使用することです。これは基本的に、ユーザーの入力をユーザーのロジックに通す for ループ を使用し、出力を生成します。生成トランスフォームが実行されるたびに、例えば新しい乗客が入力に追加されたり、新しい乗客-国の組み合わせが導入されたりした場合、それは動的に新しいデータセットを追加したり作成したりします。
🔨 タスクの説明
-
Masterから新しいブランチyourName/feature/generated_transformを作成します。 -
リポジトリの Files にある
/outputフォルダーを右クリックし、新しいファイルflight_alerts_by_country.pyを追加します。 -
新しい Python トランスフォームファイルのデフォルトコードを以下のコードブロックで置き換えます。
from transforms.api import transform_df, Input, Output from pyspark.sql import functions as F """ 複数の出力データセットを作成するトランスフォームジェネレータ関数を定義する この関数は文字列の配列(国)を入力として取る """ def transform_generator(countries): # 各出力データセットごとに個別のトランスフォーム関数を保存するための空の配列を初期化する transforms = [] # 国の配列の個々の文字列をループする for country in countries: # 各国ごとに、出力データセットを作成し、その名前を flight_alerts_COUNTRY にする - 出力行の最後までスクロールしてフォーマットを確認する @transform_df( Output("/${space}/Temporary Training Artifacts/${yourName}/Data Engineering Tutorials/Transform Project: Flight Alerts by Country/data/output/flight_alerts_{country}".format(country=country)), source_df=Input("${flight_alerts_joined_passengers_RID}"), ) def filter_by_country(source_df, country=country): """ この関数のスコープに "country=country" を含めることで country 変数の値をキャプチャし、それをコード内で使用できるようにする。この場合、国の列をフィルター処理するためにそれを使用する。 注意:小文字の文字列を使用している """ filtered_df = source_df.filter(F.lower(F.col('country')) == country) # ここでは必要とされない列を削除する。例えば、機密な乗客情報 filtered_df = filtered_df.select( 'alert_display_name', 'flight_id', 'passenger_id', 'flight_date', F.col('priority').alias('alert_priority'), F.col('status').alias('alert_status'), F.col('comment').alias('alert_comment'), F.col('assignee').alias('alert_assignee'), F.col('flyer_status').alias('passenger_status'), F.col('country').alias('passenger_country'), ) # 個々のトランスフォームを完了するためにフィルター処理されたデータフレームを返す return filtered_df # 完成したトランスフォームを transforms 配列に追加し、for ループの次の項目に移る transforms.append(filter_by_country) # 実行する準備ができた transforms の配列を返す return transforms # 上で定義した transform_generator 関数にこの国のリストをフィードし、それぞれを実行する TRANSFORMS = transform_generator([ 'brazil', 'canada', 'france', 'germany', 'mexico', 'netherlands', 'uk', 'us', ]) -
コードの以下の行を置き換えます:
${space}を ユーザーの space に置き換えます${yourName}を ユーザーの/Tutorial Practice Artifactsフォルダー名に置き換えます${flight_alerts_joined_passengers_RID}を前のタスクからの 変換された 出力の RID に置き換えます(これはリポジトリのflight_alerts_joined_passengers.pyファイルにあります)。
-
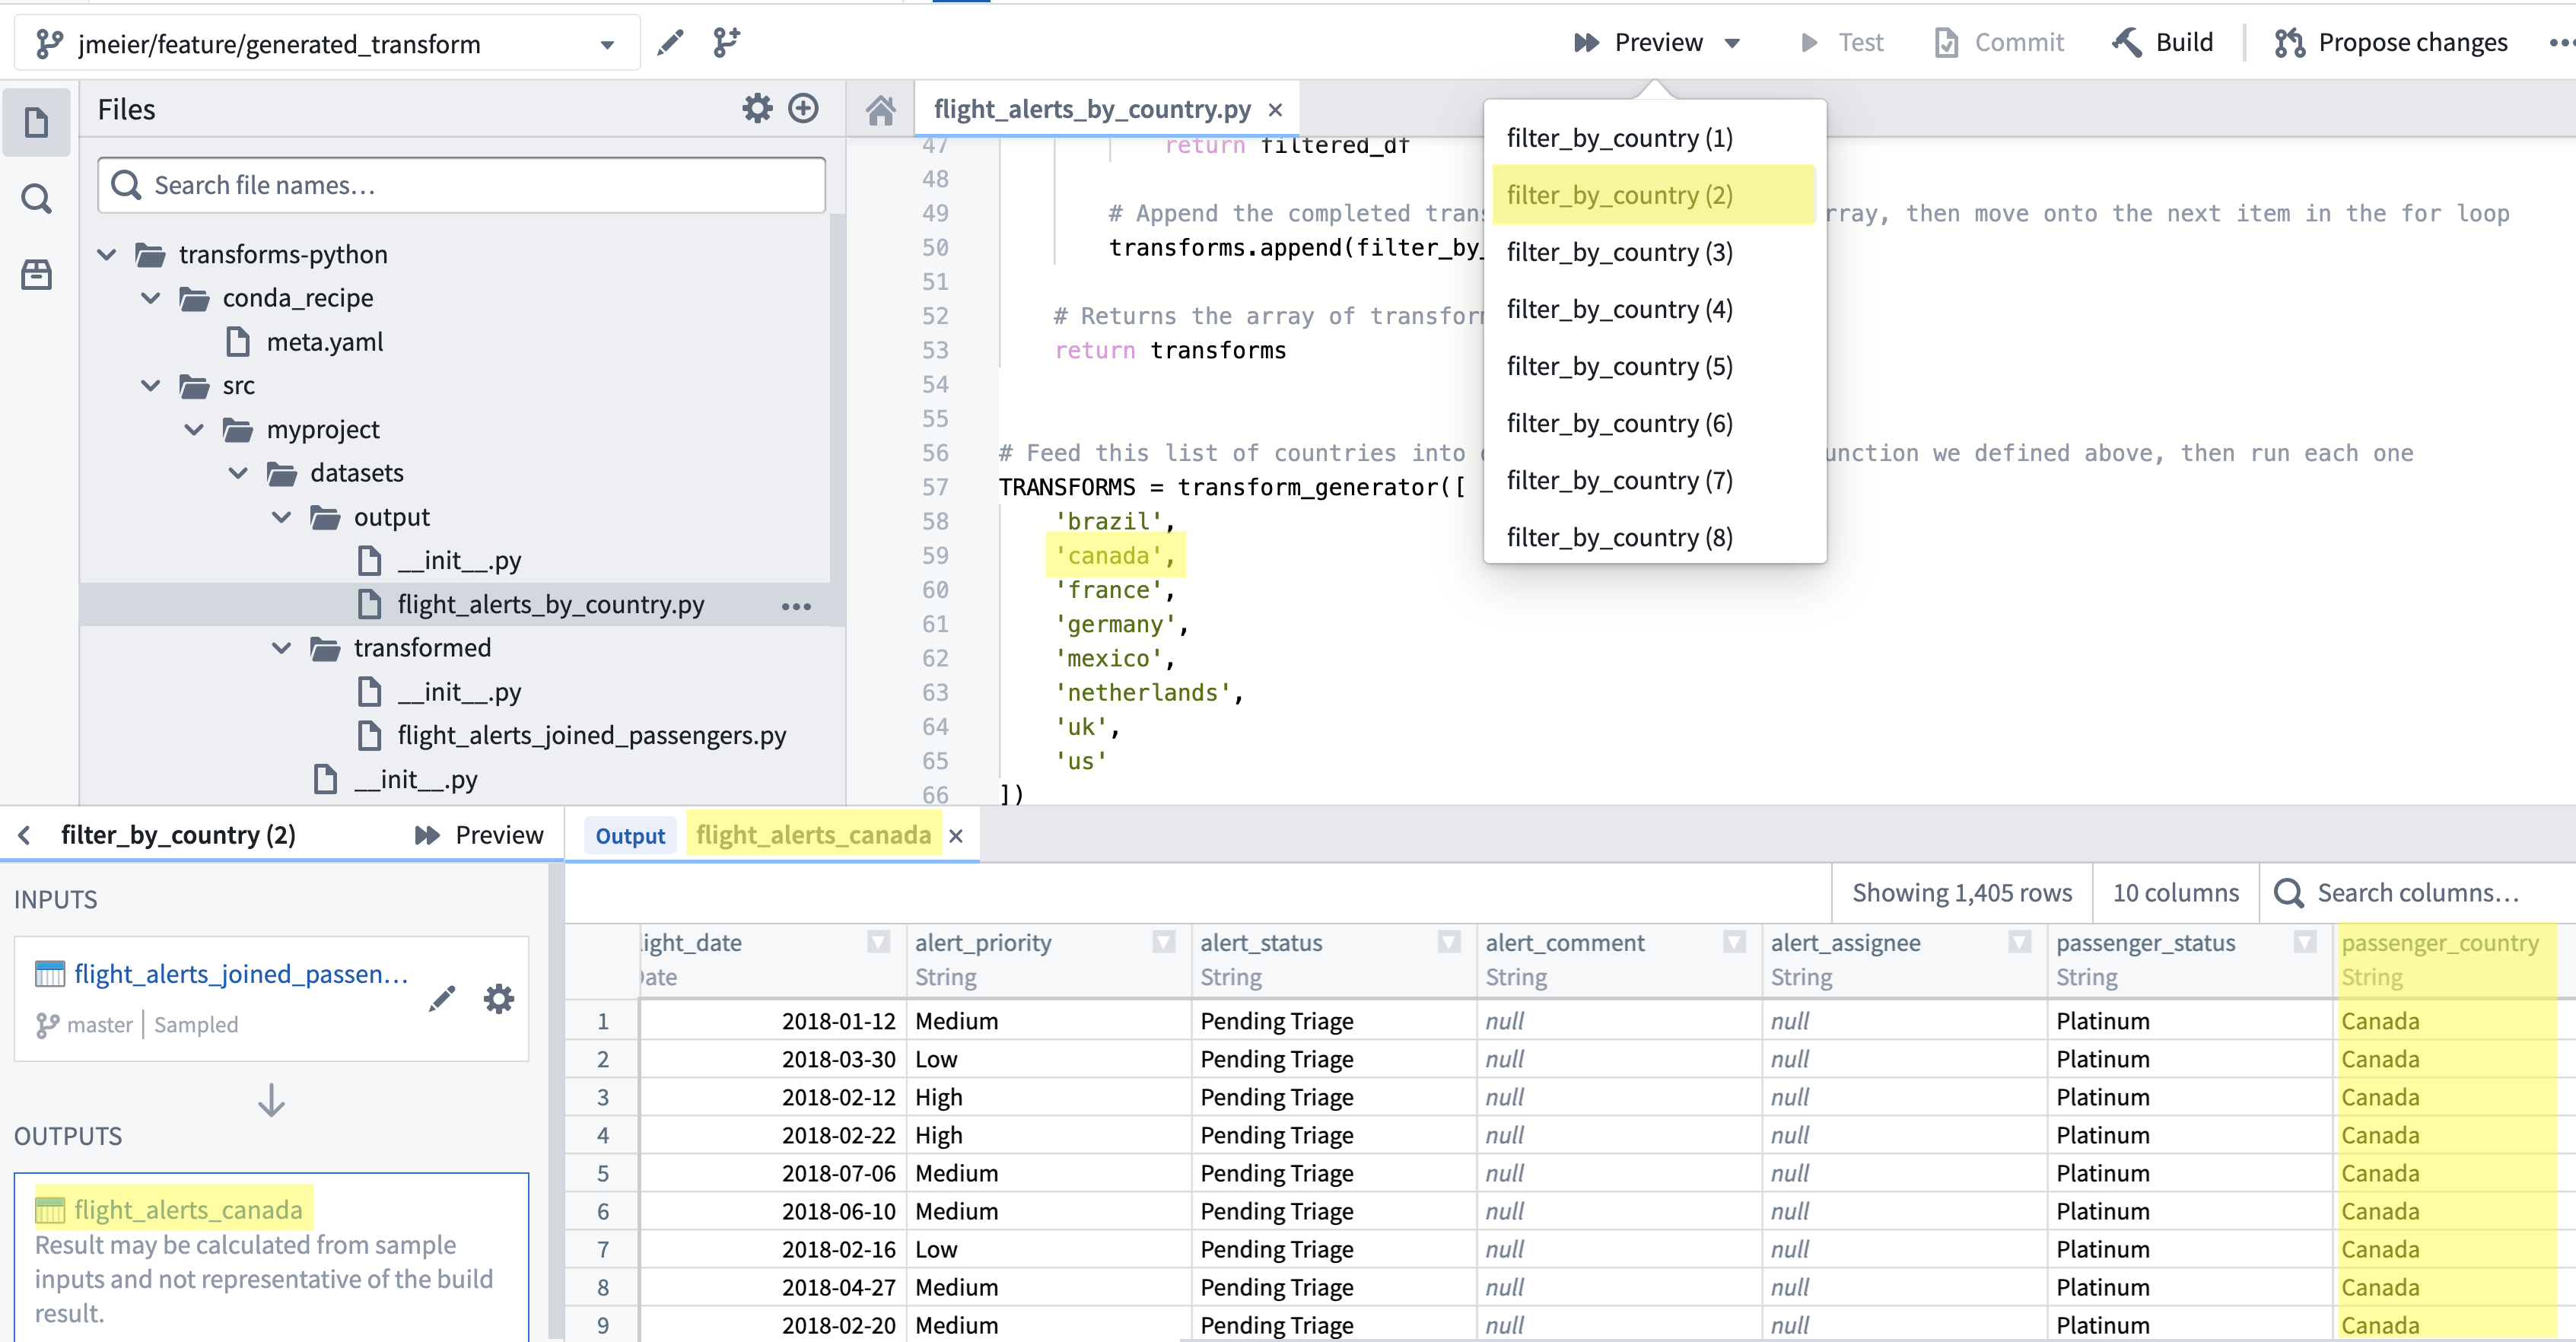
Preview ボタンをクリックします。コードの構造により、8つの可能な出力(コードの57行目の
transform_generatorで定義された8つの国)のプレビューを選択するように求められます。ドロップダウンで任意のfilter_by_country値を選択してプレビューを実行します。プレビュー結果が
passenger_countryの値が選択したfilter_by_countryの値と等しいレコードだけを含んでいることを確認します。例えば、filter_by_country (2)を選んだ場合、結果はコードの57行目のtransform_generatorにリストされている 第二 の値、つまりcanadaに対応します。ℹ️ 前のステップでは、ユーザーの 入力 が存在しないブランチでコードをプレビューしました —
yourName/feature/generated_transform。 fallback branches の概念を通じて、Foundry のビルドプロセス(およびプレビューオプション)は、現在のものに対応するブランチが見つからない場合、入力のMasterブランチに "fallback" します。リポジトリの Settings → Branches → Fallback Branches で連続的な fallback ブランチ動作を定義することもできます。fallback ブランチについては こちら を読んで詳しく学びましょう。 -
意味のあるメッセージ(例:「feature: add generated output」)でコードをコミットします。
-
ブランチ上でコードをビルドし、各国ごとに8つの別々のデータセットがユーザーの
.../Transform Project: Flight Alert Metrics/datasets/output/フォルダーに作成されることを確認します。 -
ビルドが成功した場合、PR プロセスを完了し、ブランチを
Masterにマージします(マージ後に必要であればブランチを削除できます)。 -
Masterブランチ上でコードをビルドします。

📚 推薦文献(約2分で読めます)
トランスフォーム生成は高度なトピックであり、追加のコンテキストのために関連ドキュメントを読むことを強くお勧めします。