- Capabilities
- Getting started
- Architecture center
- Platform updates
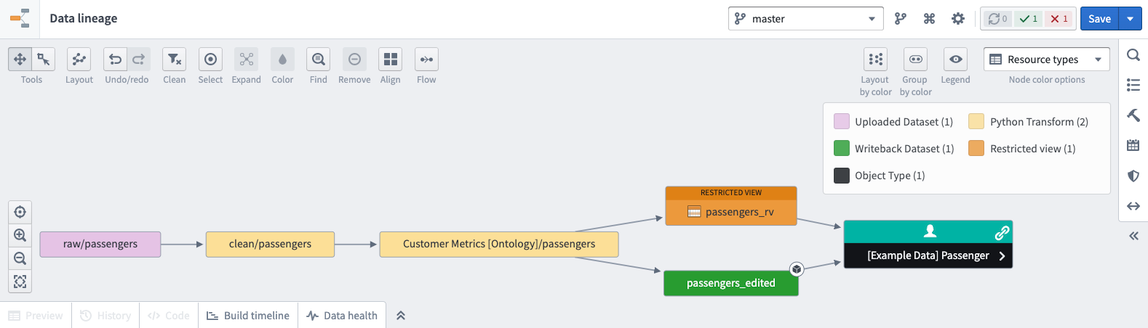
Restricted views
Markings and roles provide powerful access controls. However, some situations require more granular permissioning. For example, it may be insufficient or inappropriate to grant access to all objects of a certain type. Some object types may need to surface different objects to different users, as when a company limits sales representatives to viewing customers at their assigned branch. Restricted views can provide this additional level of access control.
Users interact with restricted view resources in Foundry, and restricted views are powered by Granular Permissions. Restricted views limit dataset access to only the rows that a user has permission to see. A restricted view is built on top of a backing dataset and cannot be used as an input for transforms. The policy for a restricted view determines the specific rows a user can see. It is typically defined by a user with the Owner role upon creation of the restricted view. After creation, the restricted view can be used as the backing data source for an object type in your Ontology. For example, if one row represents one object, the restricted view controls what objects users can see based on the object type it backs.
Restricted view policies
The policy is the core of a restricted view. Restricted view policies use granular policies to determine which rows a user can see. A granular policy is a set of rules and logical operators that compare user attributes, columns, and values.
- User attributes: Properties of the user viewing the data.
- Column name: A column in the restricted views backing dataset.
- Specific value: A string, Boolean, number, or array.
Most, if not all, policies will involve at least one term that is compared with a user attribute. At least one such term is necessary for user-based permissioning.
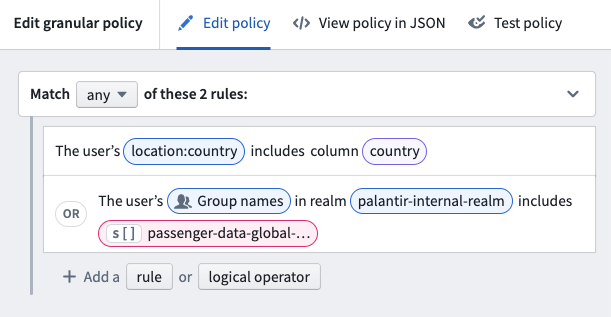
When referencing a user, group, or Organization, the policy requires the unique identifier (UUID) in both the policy column and the policy definition. Specifying names instead of IDs is not supported to prevent renaming-related issues.
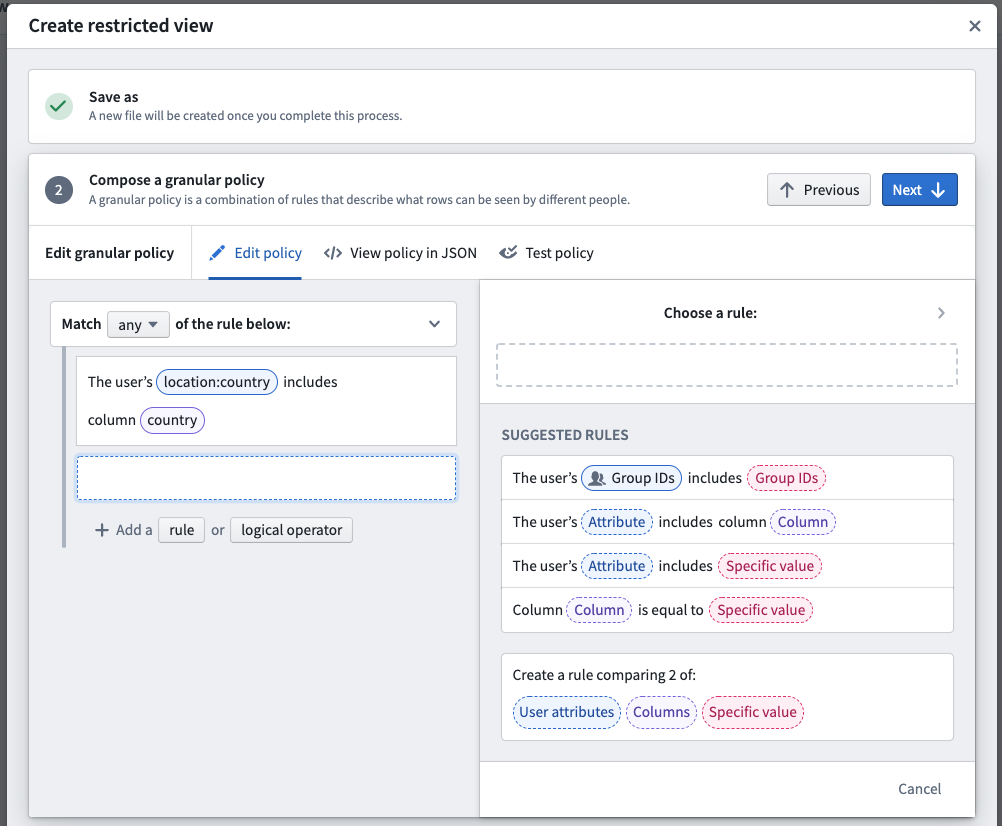
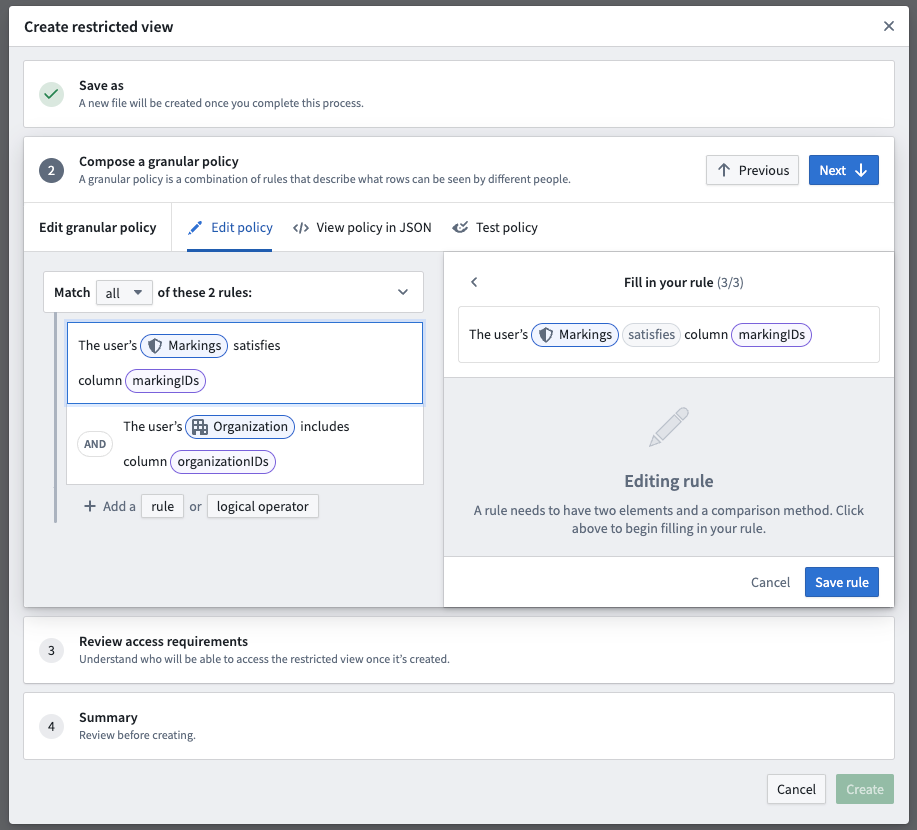
In the example below, the restricted view policy includes two rules that can be applied:
Learn more about designing granular policies, including recommendations and best practices. You can also review information on user attributes, policy comparisons, and policy limitations.
After you've determined the design of your restricted view policy, make any pipeline and Project changes needed to power it. With a restricted view policy and pipeline in place, you can move on to creating your restricted view.
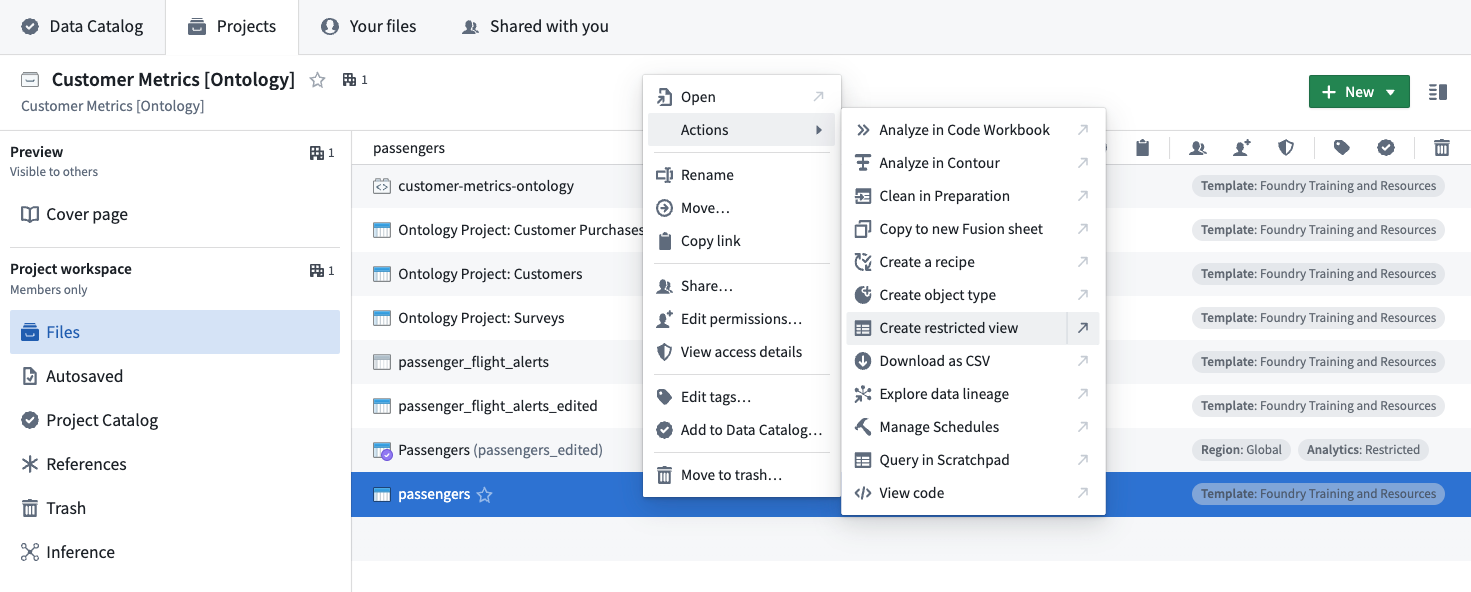
Create restricted views
Users with an Owner role or the necessary permissions can create restricted views downstream of a dataset with a right-click contextual action:
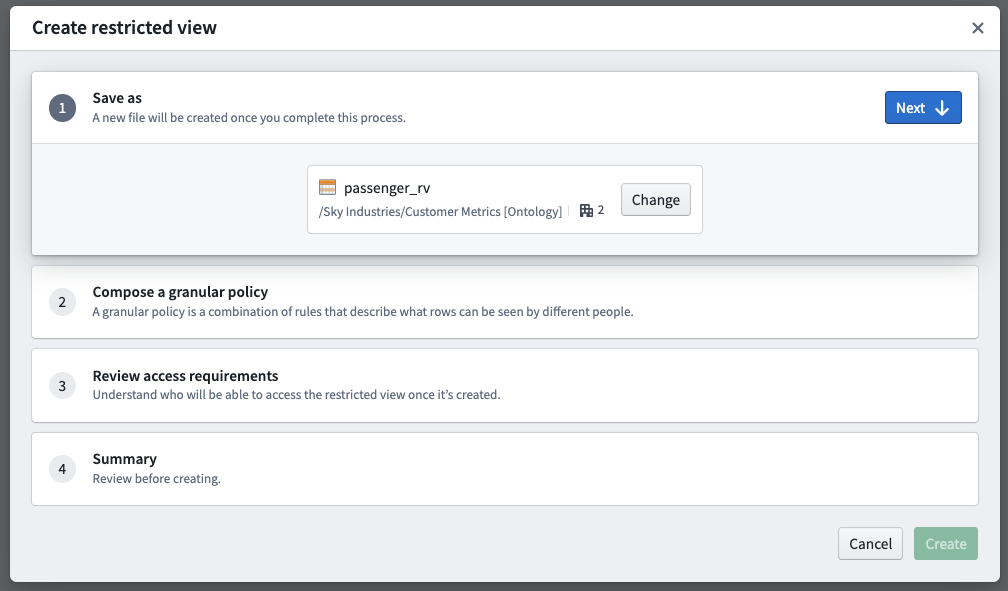
The restricted view creation dialog has the following steps:
- Save as: Choose a name and location where the restricted view will live in the file system.
- Compose a granular policy: Define the policy statements that will determine which rows or objects users are able to see when accessing the restricted view or object.
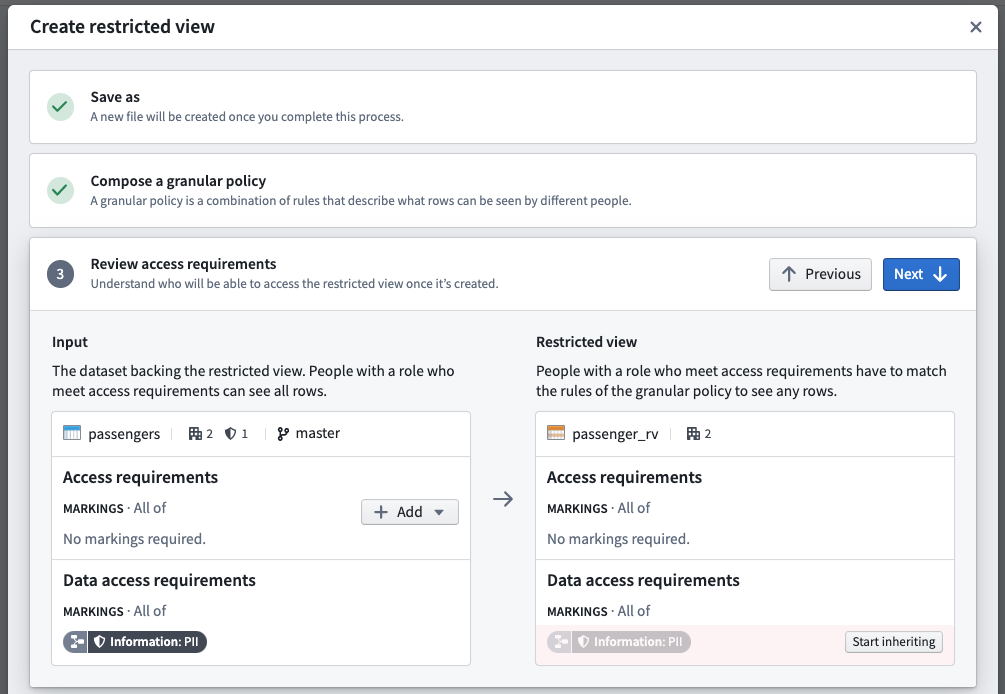
- Review access requirements: Review the existing file and transaction-level Markings on both the upstream dataset and downstream restricted view. With appropriate permissions, you can un-mark (remove) Markings from the restricted view.
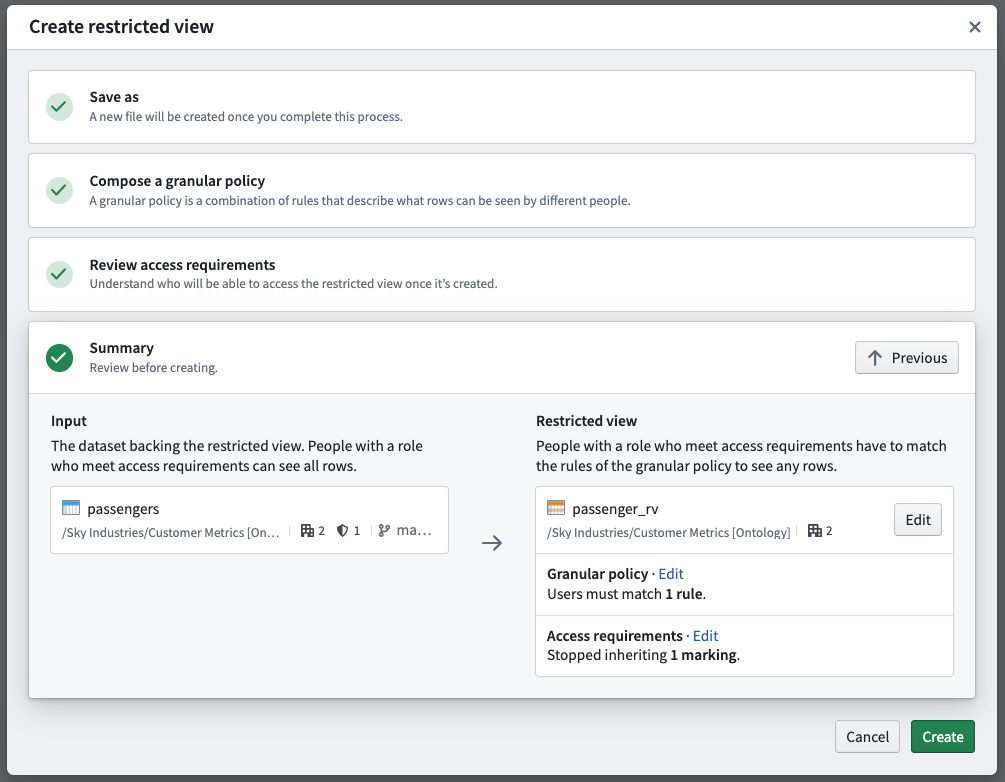
- Summary: Review your selections before the creation and initial build of the restricted view.
Save as
Name your restricted view and select a save location. Typically, you will want to save your restricted view in a different Project from the input dataset. This ensures users consuming the restricted view can have View permissions on the downstream Project. Alternatively, you can save the restricted view in the same Project as the input dataset. Use Markings to protect the input dataset.
Compose a granular policy
You can create rule-based policies using user attributes, column names, and specific values. See restricted view policies for more information.
Review access requirements
Users that should only access sensitive data through a restricted view should not have access to the upstream dataset. In this step, you can review the access requirements for both the dataset and the restricted view you are creating. If you have appropriate Marking permissions, you can remove inherited Markings from the restricted view and/or apply Markings to the upstream dataset.
Summary
The summary presents the final proposed access controls for both the dataset and the restricted view. If you are satisfied with the summary result, select Create to start an initial build of the restricted view.
When the restricted view is created, a build schedule will be automatically created in the background that will rebuild anytime the input dataset updates.
Review the management documentation on how to use restricted views to back object types.
Create marking-backed restricted views
You can create a restricted view based off of a dataset with a column of Markings. Each row will only be visible to users with the necessary Marking access. For example, in the restricted view below, a user needs both A1 and A2 to view the first row, and needs B1 to view the second row.
| Data | Markings |
|---|---|
| Row 1 | [A1, A2] |
| Row 2 | [B1] |
Follow these steps to create a Marking-backed restricted view:
- Prepare a dataset with one or more Marking columns that will be secured as a restricted view. Each cell must contain a STRING ARRAY of Marking IDs. Learn more about the expected format of the upstream dataset.
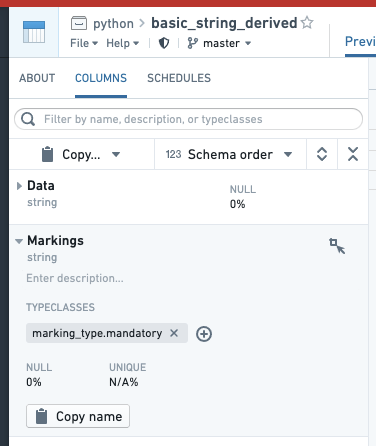
- Annotate each Marking column by going to the COLUMNS tab of the Dataset Preview interface, selecting the column, selecting "Add typeclasses", and entering marking_type.mandatory. This step is not necessary for granular permissions to work, but some interfaces in Foundry use this as a hint to render the column more appropriately.
- Create the restricted view off of the dataset. The left side of the policy rule should be “user’s Markings”. For the right side, select “Columns” and select the Marking column. If you have multiple columns, create a rule for each one and combine them with AND or OR rules as desired.
Expected format of the upstream dataset
The dataset from which a restricted view is created must contain a column of Marking IDs.
- These IDs are universally unique identifiers (UUIDs).
- The column must be of type STRING ARRAY (and contain a list of Marking IDs).
- You may have more than one column of Marking IDs.
- You may mix Markings and Organizations in the same column.
For example, this dataset contains lists of Markings. The sample CSV below can be uploaded directly to Foundry. However, you will need to manually modify the inferred schema. Go to Details > Schema and change "type": "STRING" to "type": "ARRAY, "arraySubtype": { "type": "STRING" }.
| Data | Markings |
|---|---|
| Row 1 | [ab888888-7777-6666-5555-123456789012, gh111111-2222-3333-4444-555566667777] |
| Row 2 | [cd345678-1111-2222-3333-123456789102, jk765432-1111-2222-3333-345678912345] |
Add restricted view to a Marketplace product
Use Foundry DevOps to include your restricted views in Marketplace products for other users to install and reuse. Learn how to create your first product.
Supported features
Only string and boolean constants are supported. Constants can only be compared to fields (columns) or "the user’s groups" user property. Marketplace currently does not support multiple field-constant comparison conditions using the same field.
Add restricted views to products
To add a restricted view to a product, first create a product, then add outputs. Choose the Add files option to navigate to the restricted view from within the Compass filesystem and add it to your product.
Adding a restricted view to a product packages the restricted view's policy, not the data.
Add and merge restricted views to a branch [Experimental]
Support for restricted views in branching version control is in the experimental phase of development and may not be available on your enrollment.Learn more about branching.
Add a restricted view on a branch
To add a restricted view to a branch, select the branch in the dropdown menu. Then, use the Add resource option to add the restricted view to the branch. This allows you to build or modify the policy of the restricted view by adding it as a modified resource into your branch. Note that the branch needs to exist on the backing dataset, otherwise you may receive an error.
This is a necessary step because by default, accessing a restricted view on a branch displays content from the main branch. However, if you are already on a branch and edit the restricted view’s policy or markings, then it will automatically be added to the branch with those edits. Note that builds are automatically triggered when a restricted view is added to the branch.
By default, owners and editors have the ability to add a restricted view to a branch. Owners can edit the policy and markings to add the branch restricted view, while editors can only build a restricted view. This allows editors to add the restricted view to their branched workflow and test it without needing ownership of the restricted view.
View a branched restricted view
The permissions on a branched restricted view are the same as the parent restricted view. If you can view the original restricted view, you can view its branched restricted views. Note that if the upstream dataset on a branch restricted view has different markings, then a viewer may be able to see previously restricted data.
Propagate a restricted view downstream
If the restricted view is updated on a branch, object types backed by the restricted view will need to be indexed on the branch to reflect these changes. Within Ontology Manager, use the Index object type option on the top banner to index the object on the branch. Once indexed, Workshop modules referencing these objects and Ontology Manager will reflect the restricted view changes on the branch.
Approve a restricted view change
Restricted views are currently being integrated with the Approvals application.
Changes to a branched restricted view by an owner or an editor are automatically approved. As a reminder, editors will only be able to build restricted views on branches, while owners can both build restricted views and modify their policies on branches.
Merge in a branched restricted view
The permissions for merging a restricted view on a branch are the same as branching integrations in other applications: only the creator of the branch can merge a restricted view.