10 - Naming your widgets and sections
This content is also available at learn.palantir.com ↗ and is presented here for accessibility purposes.
📖 Task Introduction
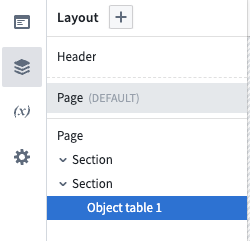
As you can see in the module contents panel on the left side of the screen, your sections and widgets have generic names like “Section” and “Object table 1.” It is a best practice to always rename these to that you can easily distinguish them in the contents panel. The naming convention suggested in this task is one of many possibilities.
🔨 Task Instructions
-
Open your Layout panel on the left side of your screen.

-
Click on the Page layer item at the top. It is the outer-most layer that nests the sections and widgets currently in your module.
- In later tutorials you'll add additional pages, so let's give this one a more distinctive name.
-
With the Page layer selected, its configuration panel appears on the far right. In the PAGE NAME field, change the value from
PagetoPage: Inbox. -
Click the second Section item in your contents panel. This is the section that contains your object table widget. In the Section Name field, change the value from
SectiontoSection: Table. -
In the Title field under Section in the right sidebar, change the value from
SectiontoFlight Alerts. In the Icon field underneath that, choose the Warning sign icon with the icon selector. Notice the name change in the top left of the section in your module. -
Click the Object table 1 item in your contents panel in the left sidebar, which opens your widget configuration on the right. At the top of your configuration panel, switch from the Widget setup tab to the Metadata one.
-
In the Widget Name field, change the value from
Object table 1toObject table: Flight Alerts.
With the exception of one of your Section items, everything in your layout panel now has a unique name for easy identification. We’ll name your other Section in the next exercise.