6 - Saving Your Ontology Changes
This content is also available at learn.palantir.com ↗ and is presented here for accessibility purposes.
You’ve made all of the changes you need at this point, and it’s time to save them to the Ontology.
🔨 Save your new object and link types
- Proceed to the top right of the screen and click the green Save button, which will open the Review edits window.
- Review the warnings but address any errors using the error details as needed. If you’ve followed the instructions here, you should not have a single warning.
- If anyone else at your organization has made changes to the ontology since you last saved, you’ll be prompted with a message at the top of the window saying: There are new updates to the Ontology that you can easily and safely merge with your own. Click the Update button to safely merge your changes with changes that other people saved in the meantime.
- Click the green Save to ontology button in the bottom right of the window.
As long as the following statements are true, the save operation should function correctly:
- You have the permissions required to edit the Ontology.
- Your backing dataset is not already being used to back another object type.
- Your primary keys are unique.
- Your primary key column contains no null values.
- Your selected object type ID is unique.
If you encounter an error, read through the displayed text which provides clues as to what may have gone wrong. Reach out to your Palantir Support team if you get stuck.
What happens when you save?
When you save your object type and the associated dataset-to-object-type mapping, you trigger two actions in the background. A good understanding of this process will help you troubleshoot any errors that may occur when editing your object type, its properties, or its links to other object types.
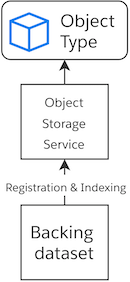
Objects in Palantir are stored in a designated object storage service. When you interact with the object layer, you do not directly touch the backing dataset; instead, you query the object storage service via the user interface to obtain details about your object. Clicking Save:
-
Registers your table in the object storage service, which locks your backing dataset to this object type.
- If you make schema changes to your backing dataset, you will need to re-register your object type using the Update button in the Datasources tab of your object in the Ontology Manager.
- If you want to delete your object type and re-use your backing dataset for another object type, you will need to first click the red Unregister button in the Datasources tab.
-
Indexes your table. When you define a dataset-object type mapping, the storage service will index the mapped properties so they can be searched from object interfaces (e.g., Workshop Modules, Object Views, Functions). The column-property mapping activities from the previous task, in particular the render hints, determine which properties are indexed and how.
From this point forward, your object type is backed by the table in the object storage service, which remains responsive to backing dataset updates. So when new rows are added to the dataset, new objects will be added to your object type. You will deepen your understanding of this storage service in a future lesson.
📚 Recommended Reading (~4 min read)
Take a moment to read more about saving your Ontology changes and troubleshooting steps.