- Capabilities
- Getting started
- Architecture center
- Platform updates
Train a model in a Jupyter® notebook
Model assets do not currently support the SparkML library. We recommend switching to a single-node machine learning framework like PyTorch, TensorFlow, XGBoost, LightGBM, or scikit-learn.
Models can be trained in a Jupyter® notebook in Code Workspaces. To train a model, complete the following steps:
- Create a Jupyter® code workspace
- Import data and write model training code
- Add a model output and implement the model adapter
- Publish the model to Foundry
- Consume the model
The supervised model training tutorial provides additional instruction on model training in Jupyter® code workspaces.
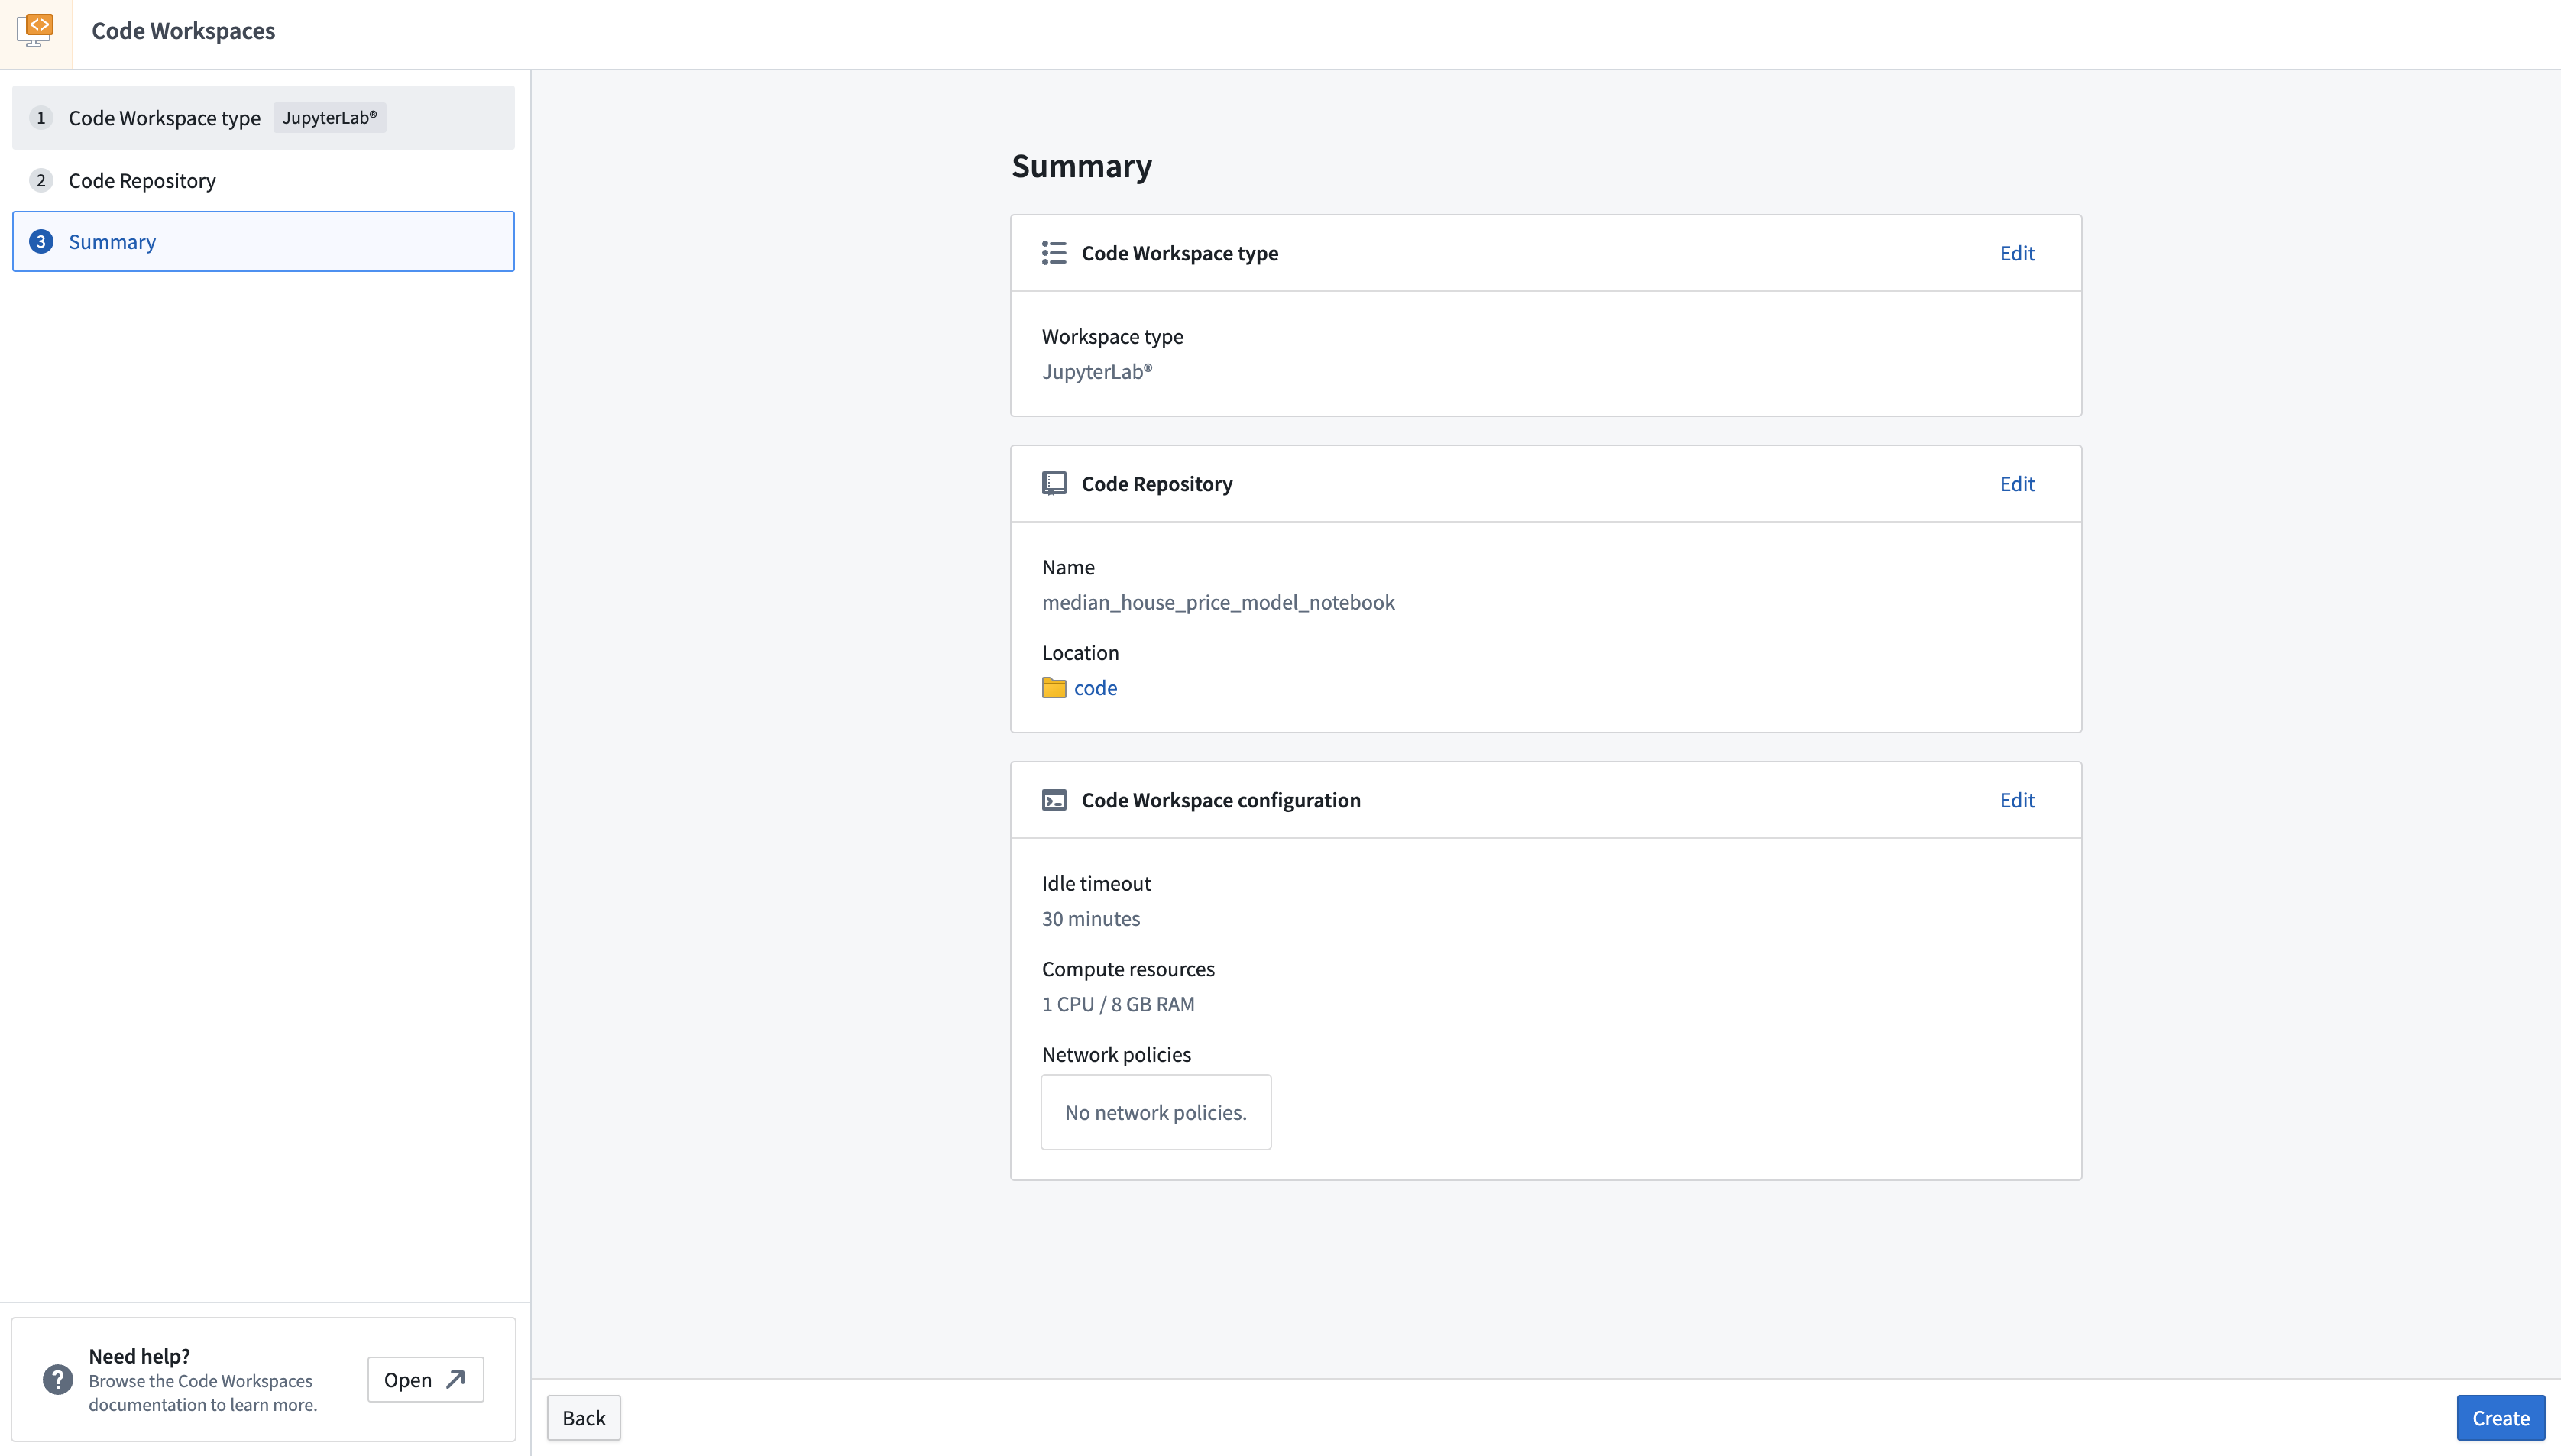
Create a Jupyter® code workspace
- To create a new Jupyter® code workspace for model training, navigate to your project folder and select + New > Jupyter® Code Workspace, or select + New code workspace in the Code Workspaces application.
- In Code Workspaces, select JupyterLab® as the workspace type, then select Continue on the bottom right.
- Name your workspace in relation to the model you are training. You can optionally configure additional settings such as the workspace's compute resources or network policies by selecting Advanced in the Code Repository step. Once you have named your notebook, Select Continue.
- Lastly, select Create to create and launch the workspace.
Import data and write model training code
After establishing a workspace, you can create a new notebook to import data and begin writing model training code.
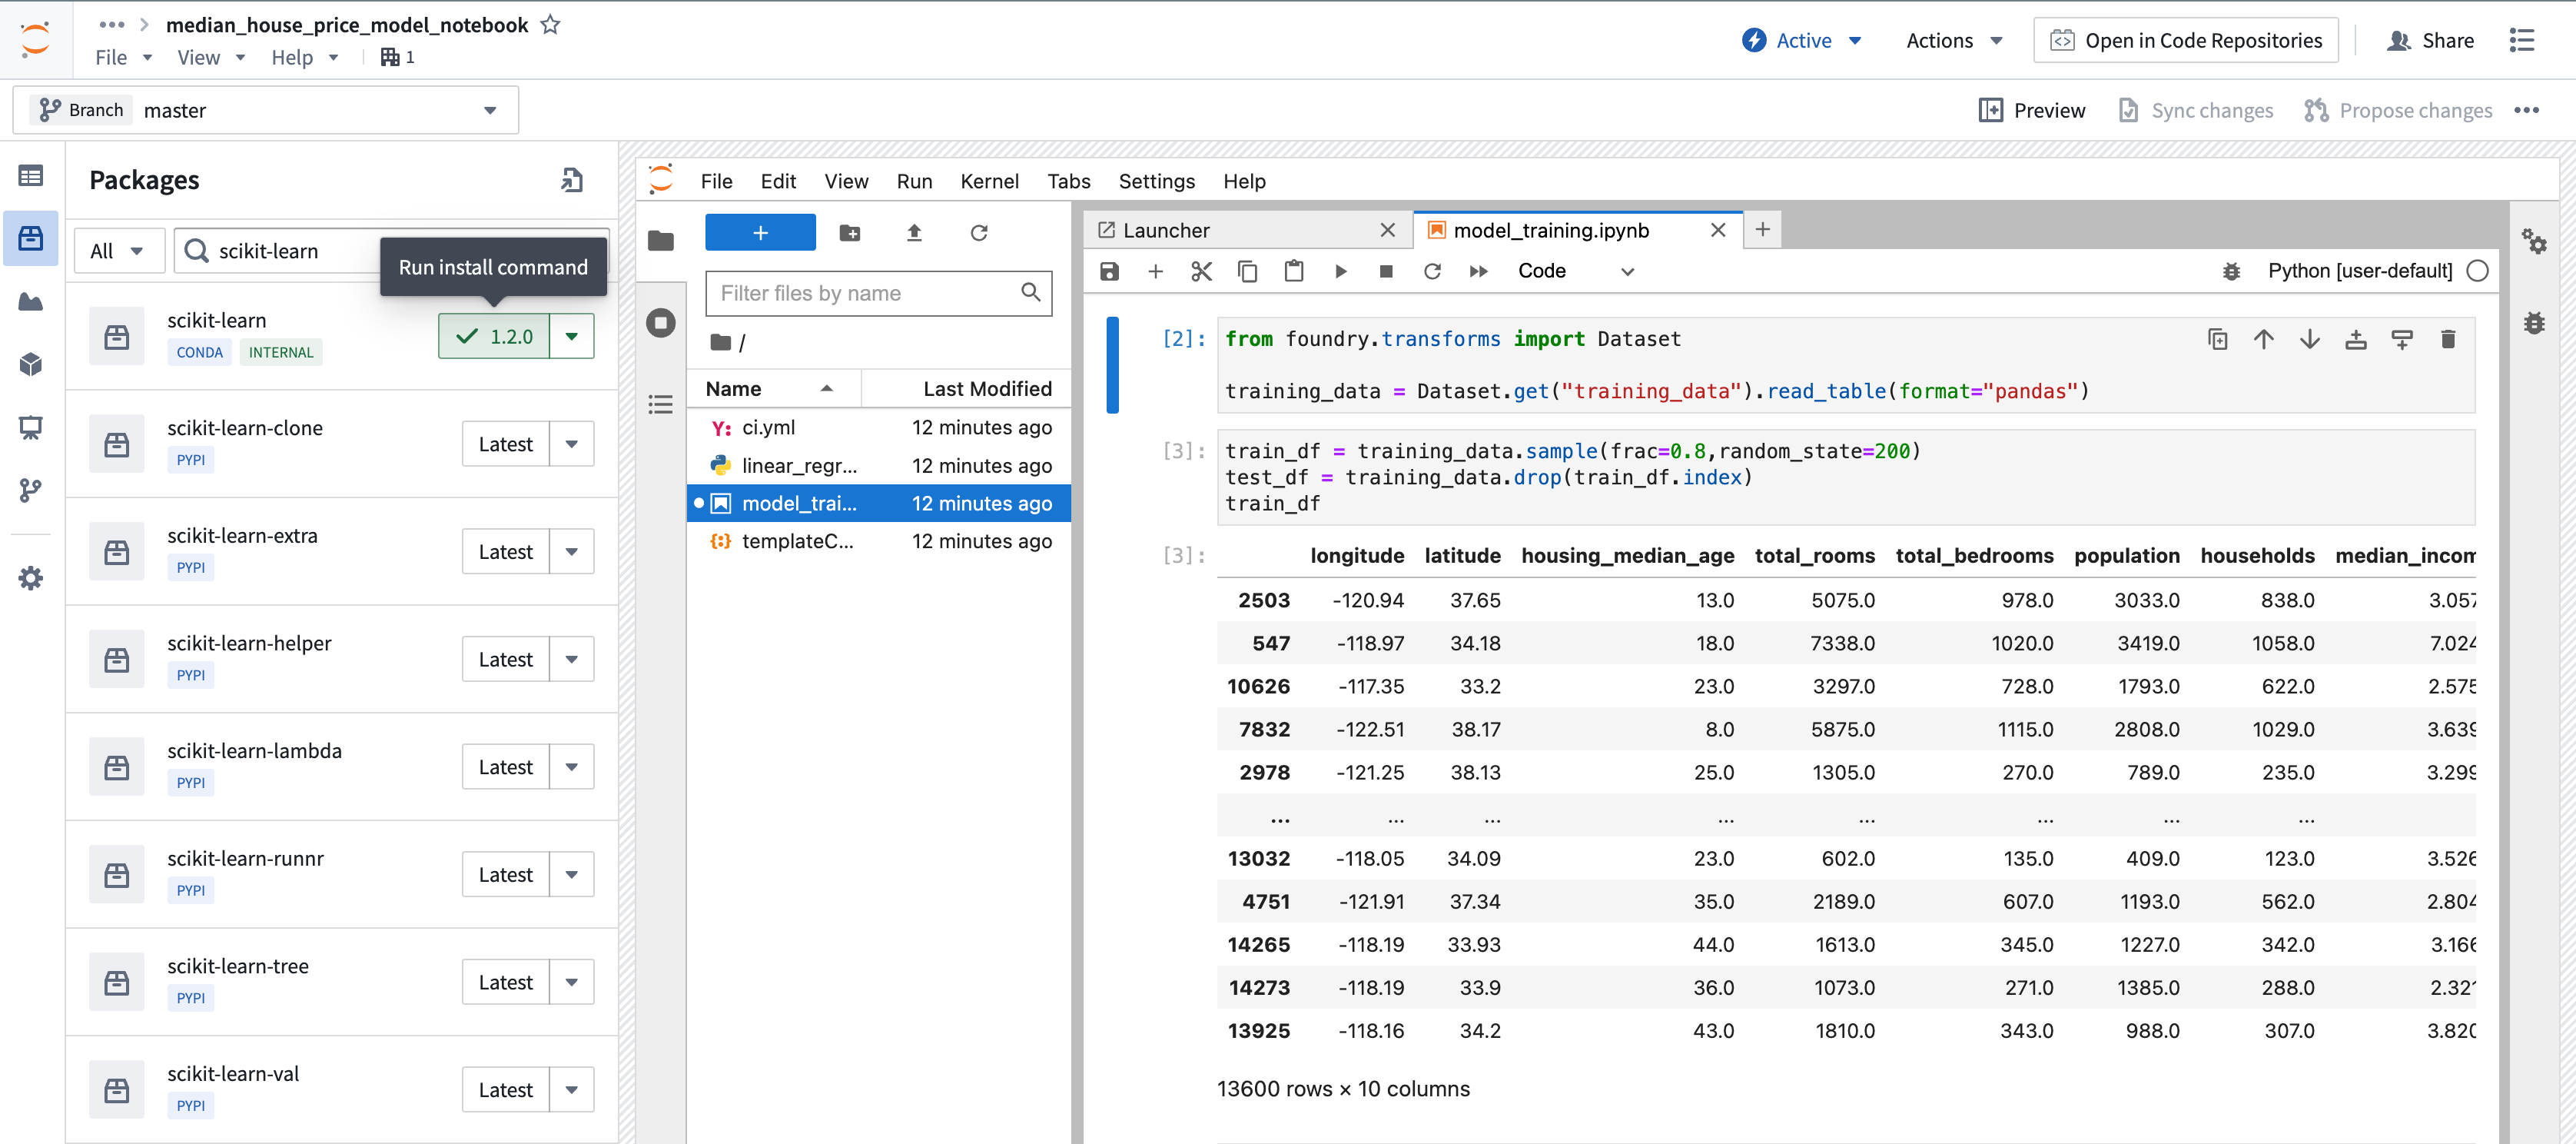
Code Workspaces grants access to packages available in other Foundry code authoring environments, such as Code Repositories. To add a new package, open the Packages tab available on the left sidebar of your workspace, search for the package you need, and select, then click on Latest or another available version to open a Terminal and run the corresponding install command.
Import data into the workspace
The Code Workspaces application enables users to import existing Foundry datasets for use as training data. Training data used in Code Workspaces will need a human-readable alias as its resource identifier.
- To import a dataset, open the Data tab at the top of the left sidebar, then select Add dataset > Read existing datasets.
- Select the dataset you want to import to your workspace, enter a dataset alias, and then select + Add dataset to complete Step 1.
- Code Workspaces will then generate a code snippet in Step 2 where you can select the dataset format, such as a
pandas DataFrame. To copy the generated code snippet into your notebook, select the clipboard icon in the upper right corner of the code snippet, then select Done. Below is an example of a code snippet generated by Code Workspaces:
Copied!1 2 3from foundry.transforms import Dataset training_data = Dataset.get("my-alias").read_table(format="pandas")
- With the code snippet copied to your clipboard, launch a Notebook from the
Launcherpanel by selecting Python [user-default], and pasting the code snippet into the first cell. - Run the code to import the dataset by selecting the "play" icon in the action toolbar or by selecting Run > Run Selected Cells in the menu bar.
Write model training code
The open source tools available for model development in Code Workspaces allow you to train your model for a wide array of analytical use cases, such as regression or classification. Below is a sample linear regression model that predicts median household income using scikit-learn.
- Install
scikit-learnin your workspace by selecting the Packages icon under Data in the left sidebar. - Choose between
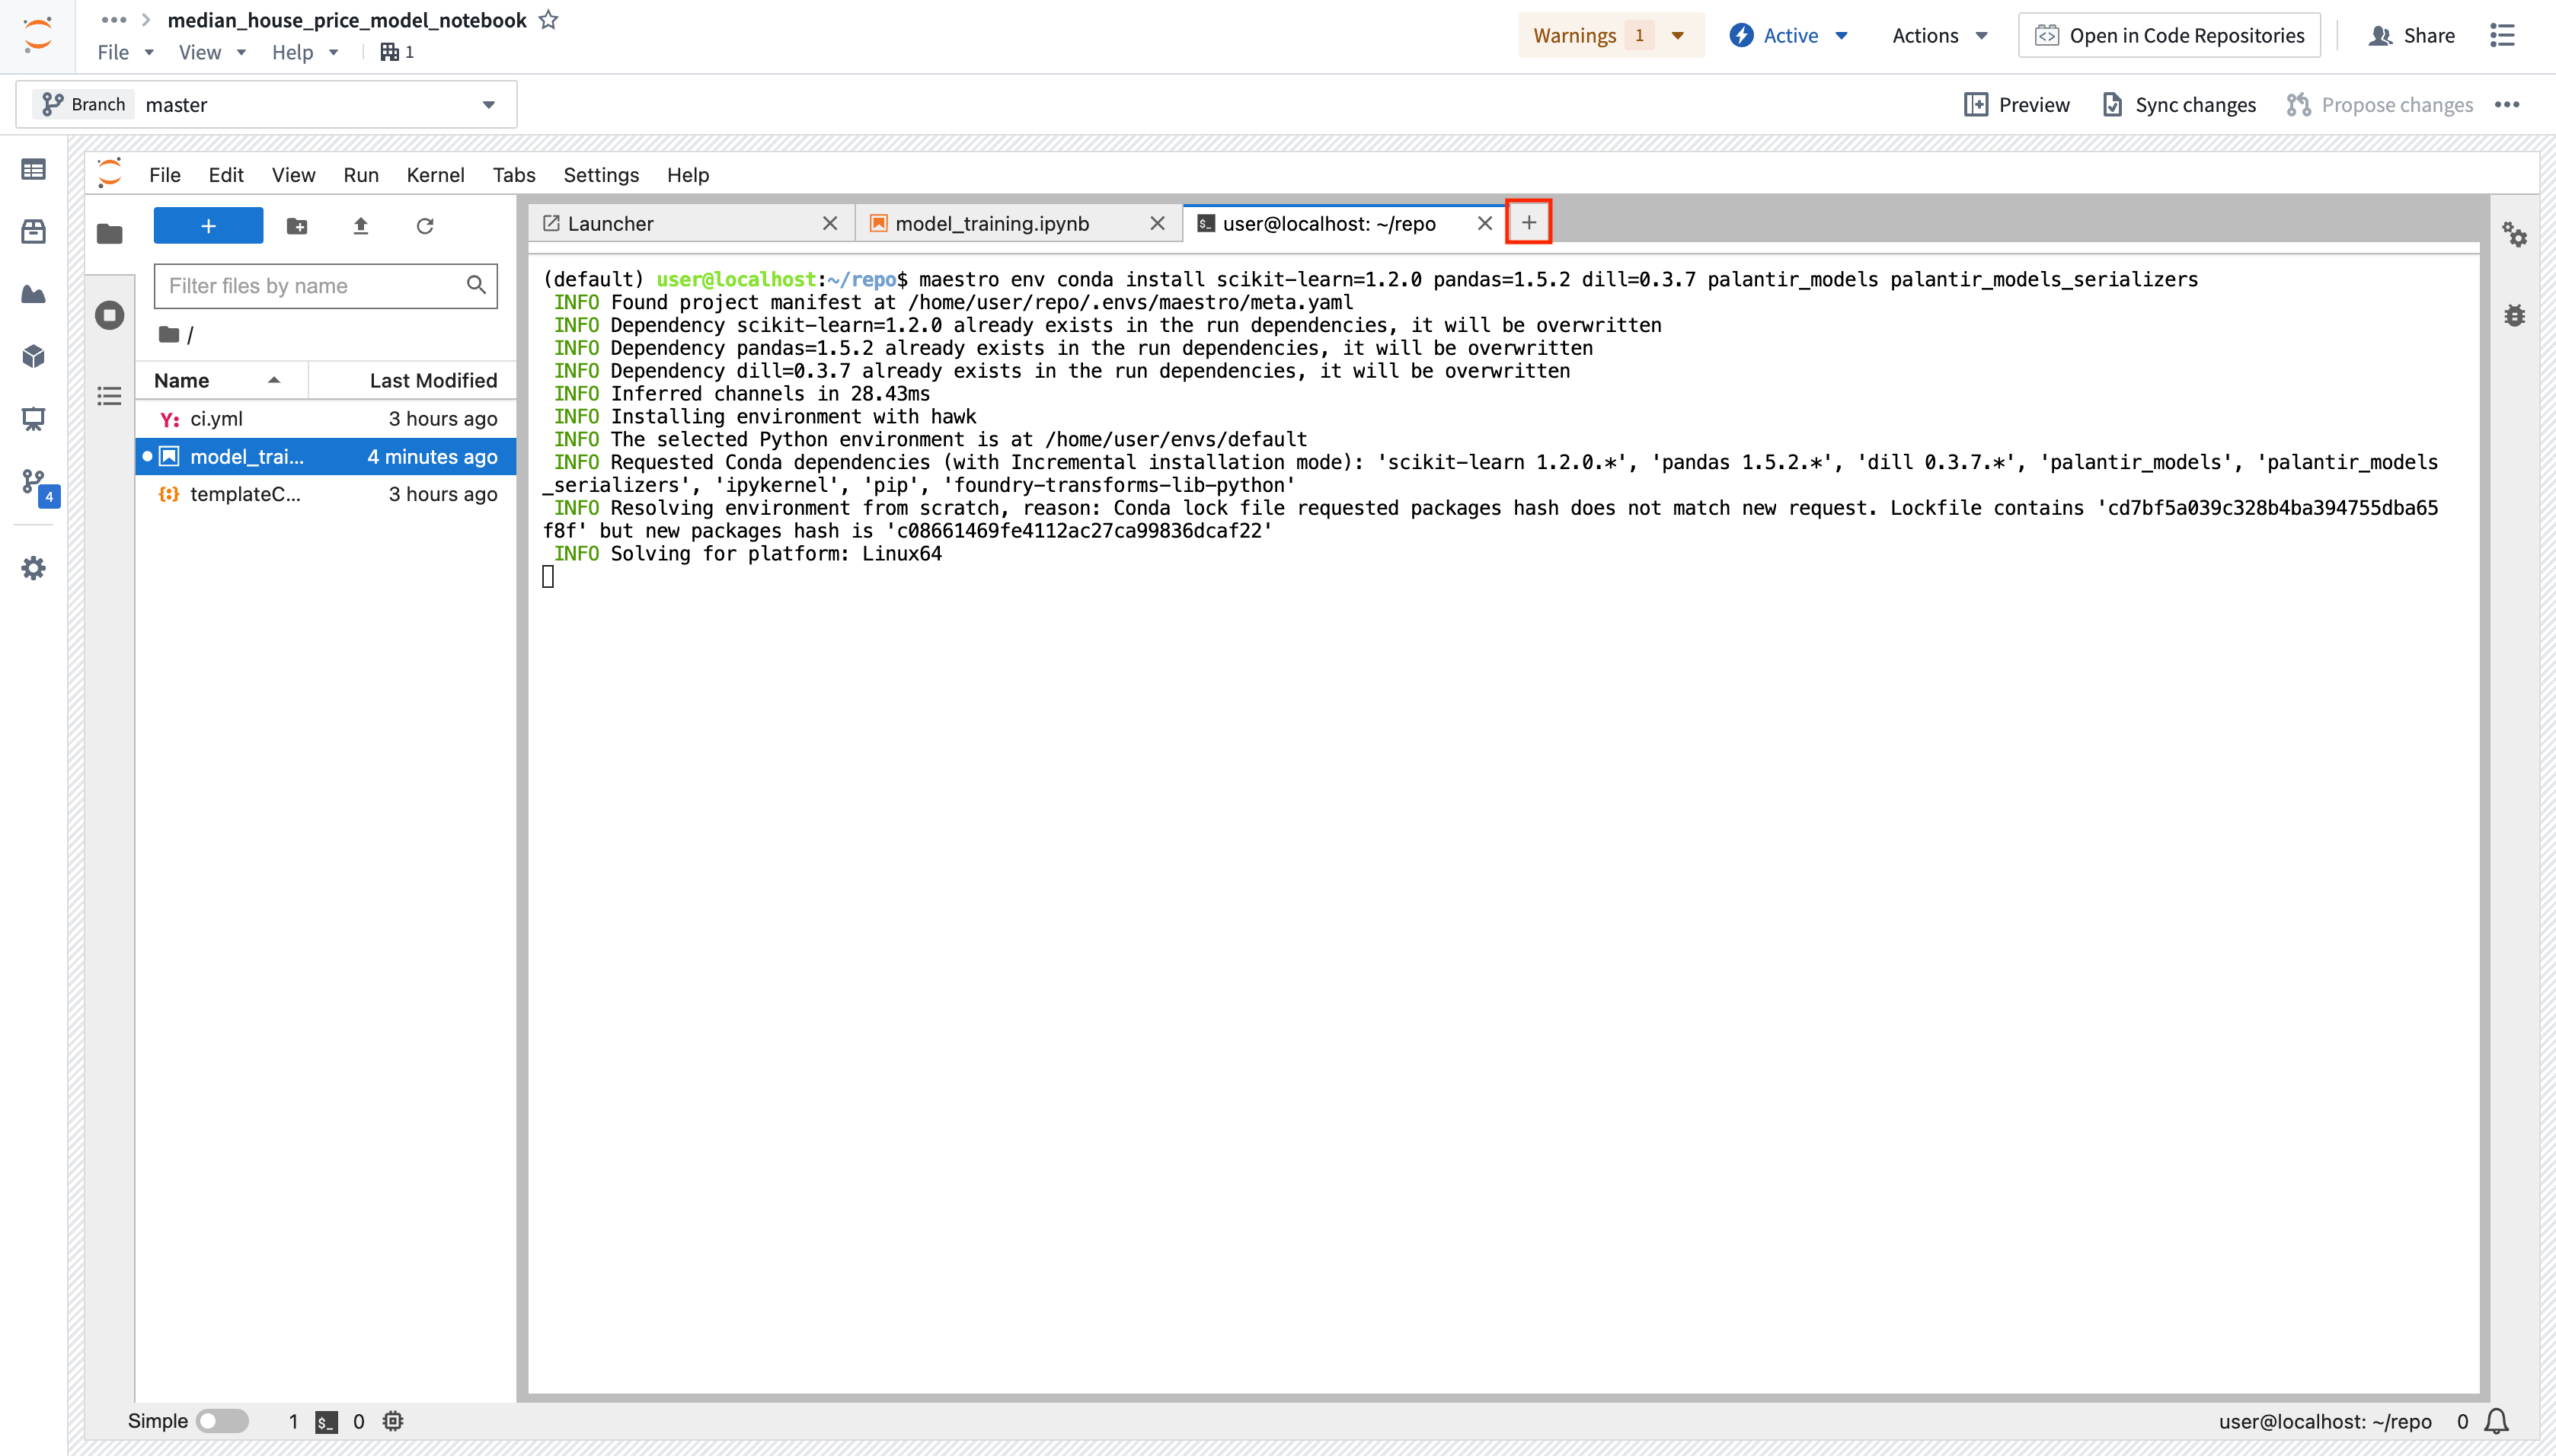
CondaorPyPimanagers in the dropdown to the left of the search bar, then search forscikit-learn. - To run the install command in the terminal, choose a package version in the drop down, then select the version button. Alternatively, you can install several packages into your managed environment at once from a terminal using the
maestro env conda installormaestro env pip installcommands.
Package installation using the sidebar:
Package installation from the terminal:
After writing and running your model in Code Workspaces, you can publish it to Foundry for integration across other applications. Below is an example of model training code:
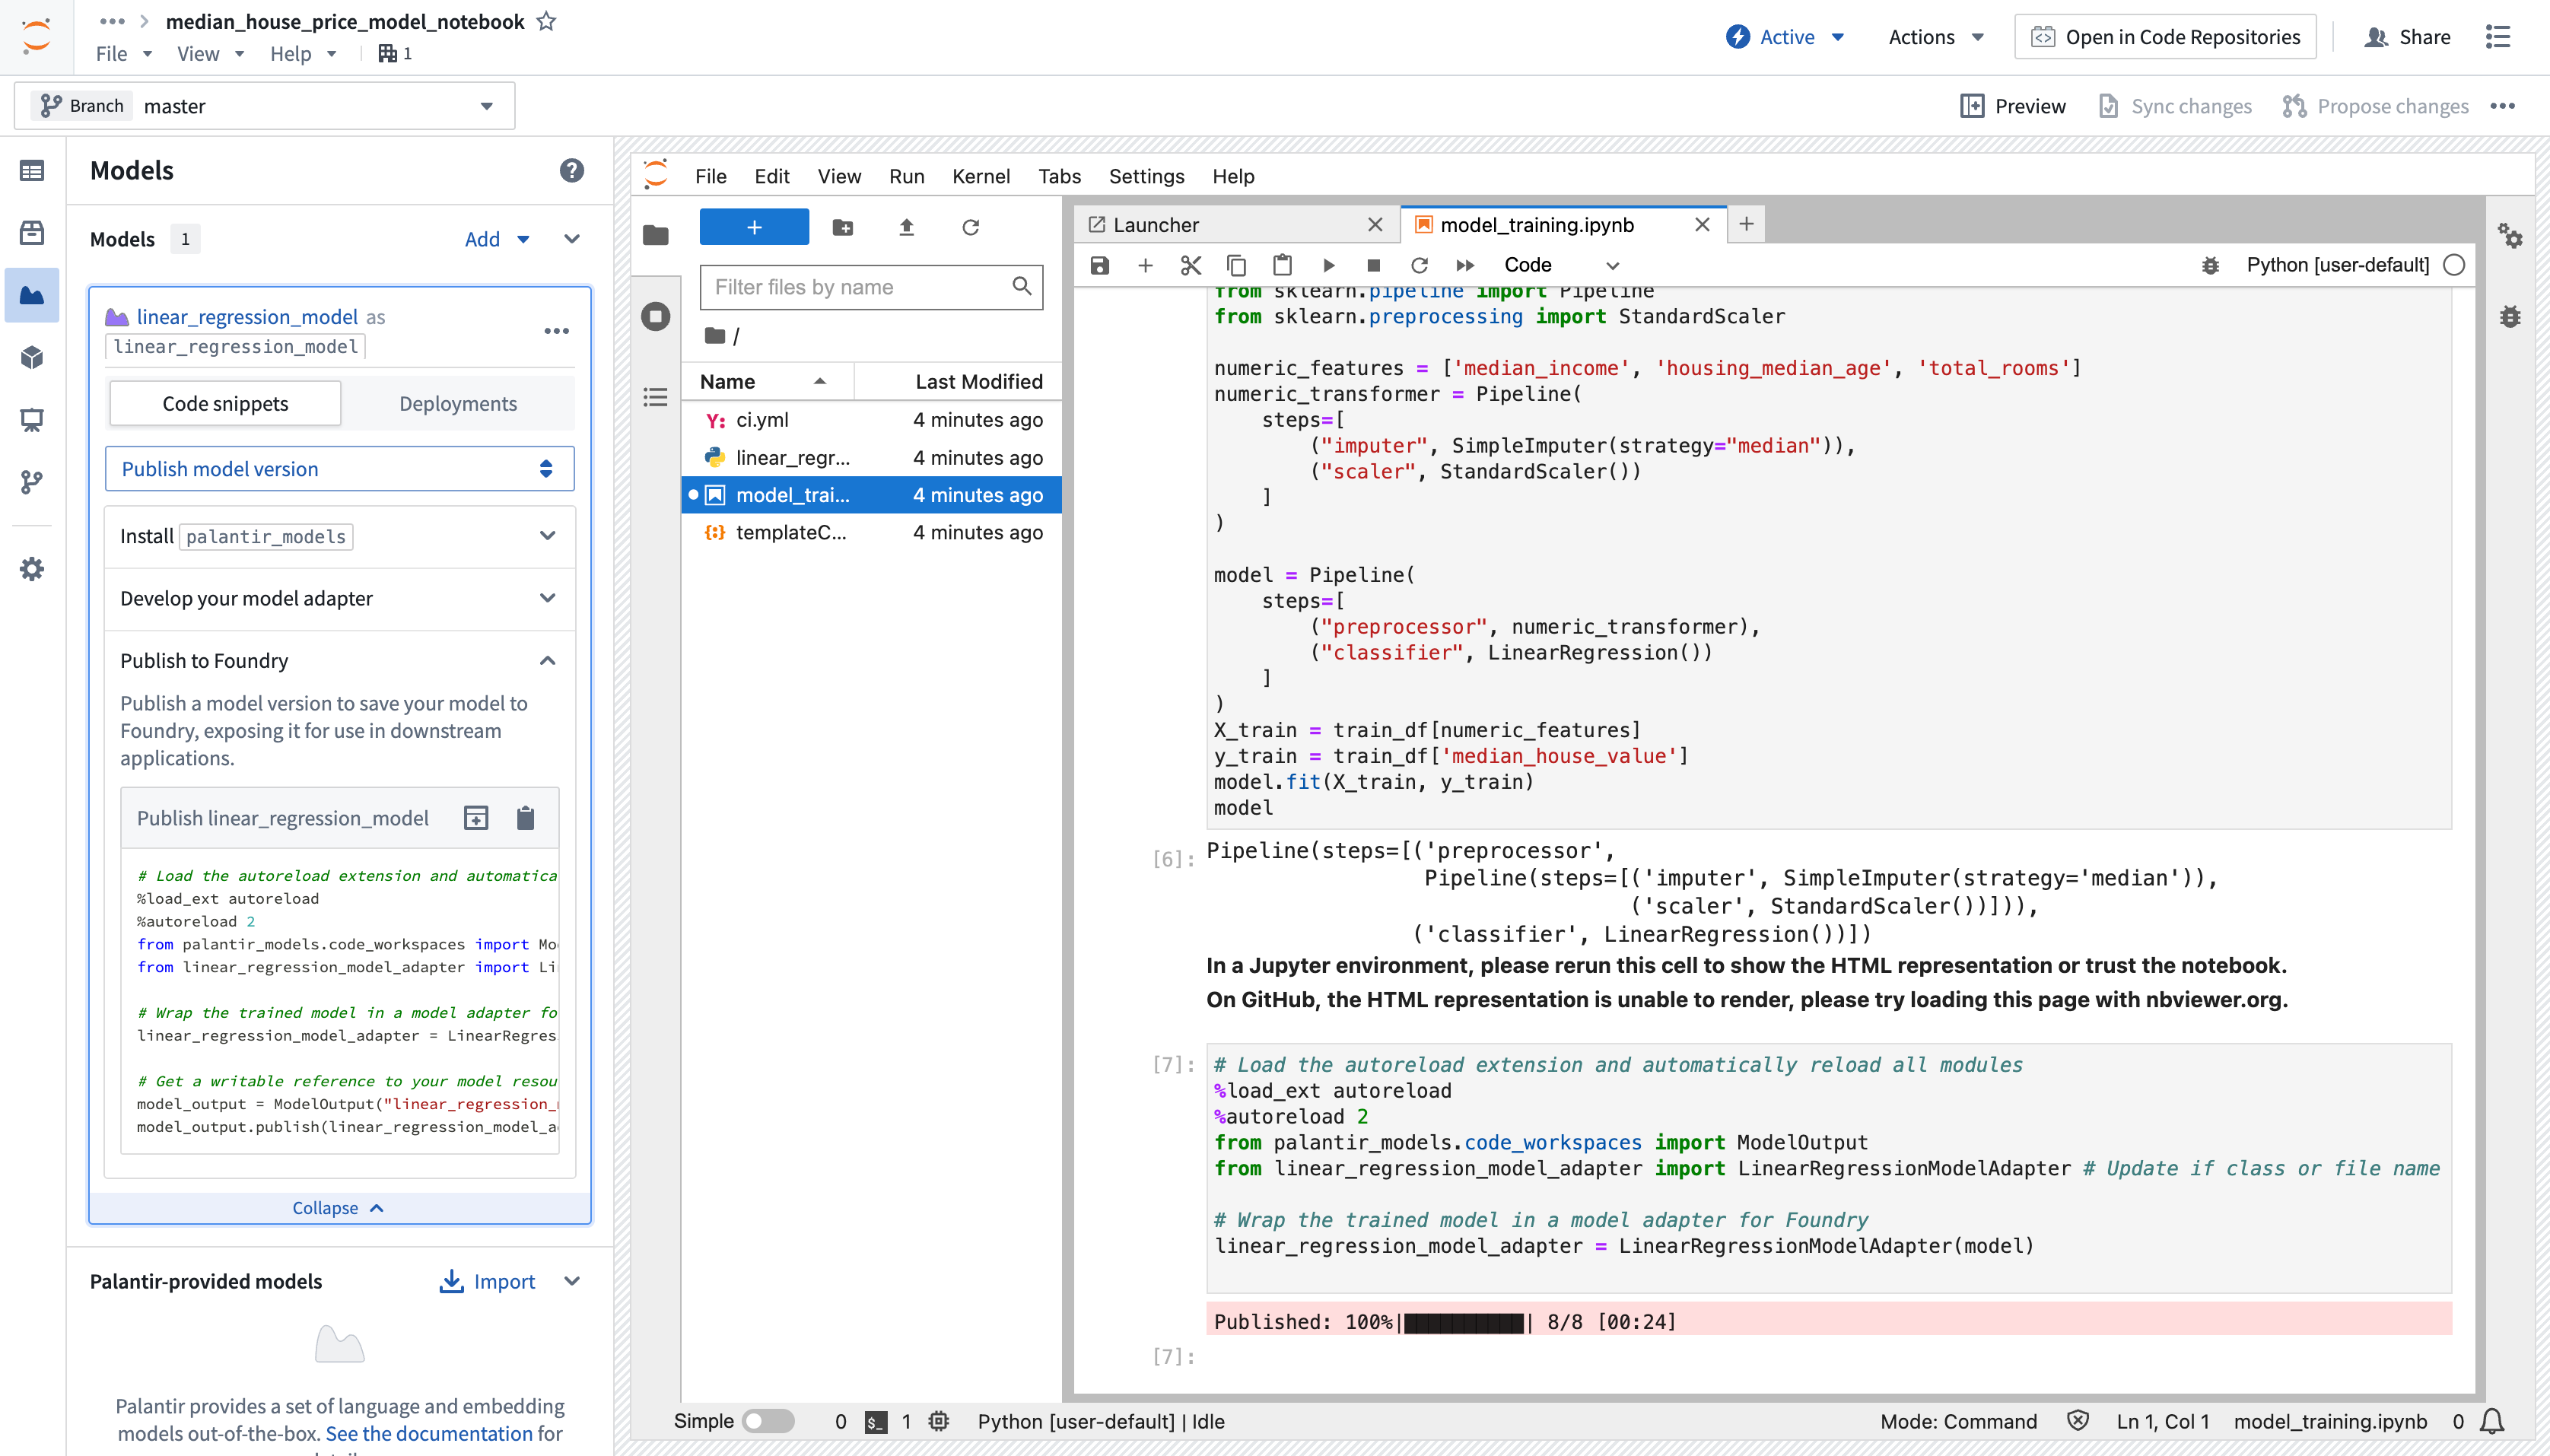
Copied!1 2 3 4 5 6 7 8 9 10 11 12 13 14 15 16 17 18 19 20 21 22from sklearn.impute import SimpleImputer from sklearn.linear_model import LinearRegression from sklearn.pipeline import Pipeline from sklearn.preprocessing import StandardScaler numeric_features = ['median_income', 'housing_median_age', 'total_rooms'] numeric_transformer = Pipeline( steps=[ ("imputer", SimpleImputer(strategy="median")), ("scaler", StandardScaler()) ] ) model = Pipeline( steps=[ ("preprocessor", numeric_transformer), ("classifier", LinearRegression()) ] ) X_train = training_dataframe[numeric_features] y_train = training_dataframe['median_house_value'] model.fit(X_train, y_train)
Add a model output and implement the model adapter
To make a model available outside of Code Workspaces, you must add a new model output to the workspace. Code Workspaces will automatically create and store a new .py file in your existing workspace after you create a new model output, which you can use to implement a model adapter. Model adapters provide a standard interface for all models in Foundry, ensuring the platform's production applications can consume models immediately after they are created. Foundry infrastructure will load the model, configure its Python dependencies, expose its API(s), and enable model interfacing.
- To add an output, open the Models tab in the left sidebar below Packages and select Add model > Create new model. Name the model and save it to a location of your choice.
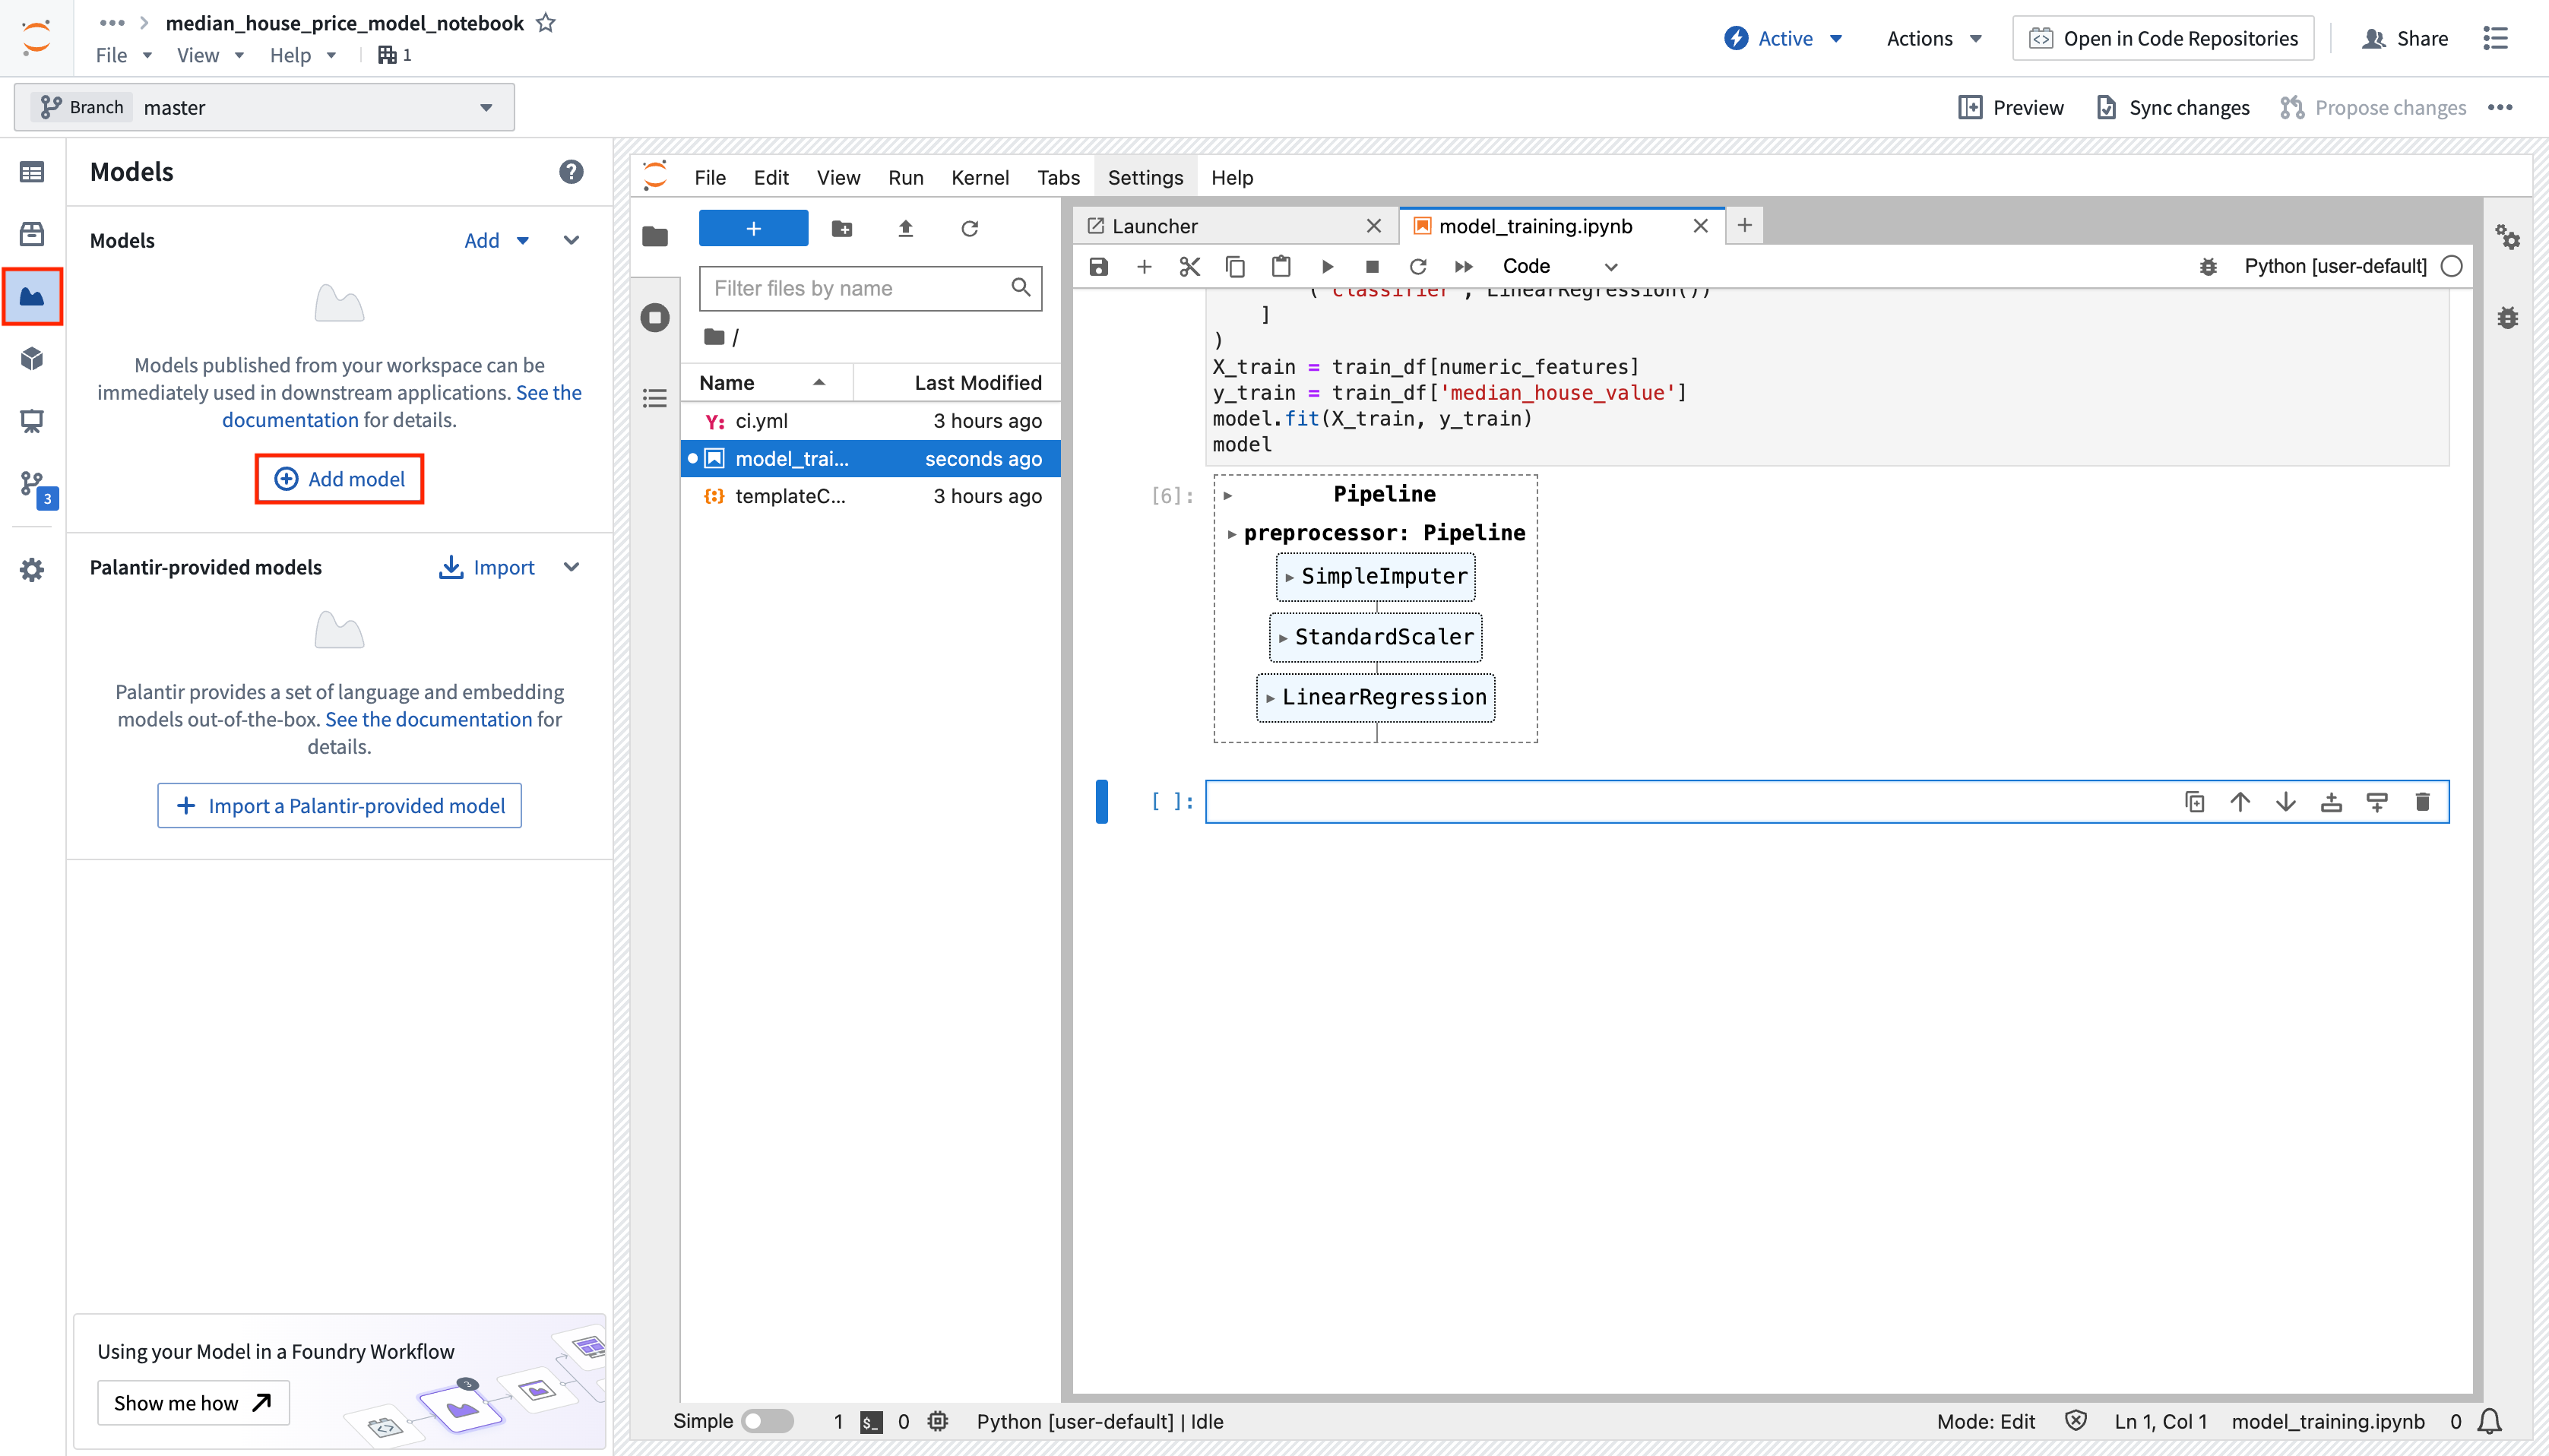
-
After you name and save your model, you will be prompted to Publish a new model in the left panel of your workspace. Complete Step 1: Install
palantir_modelsby copying the code snippet to your clipboard and running it in your original.ipynbnotebook file. -
After you successfully install
palantir_models, create and develop your model adapter in Step 2: Develop your model adapter. A model adapter must implement the following methods:saveandload: In order to reuse your model, you need to define how your model should be saved and loaded. Palantir provides default methods of serialization (saving), and in more complex cases, you can implement custom serialization logic.api: Defines the API of your model and tells Foundry what type of input data your model requires.predict: Called by Foundry to provide data to your model. This is where you can pass input data to the model and generate inferences (predictions).
Refer to the model adapter API reference for more details.
The code sample below implements the functions described above to develop an adapter for a linear regression model using scikit-learn:
Copied!1 2 3 4 5 6 7 8 9 10 11 12 13 14 15 16 17 18 19 20 21 22 23 24 25 26import palantir_models as pm from palantir_models.serializers import DillSerializer class LinearRegressionModelAdapter(pm.ModelAdapter): @pm.auto_serialize( model=DillSerializer() ) def __init__(self, model): self.model = model @classmethod def api(cls): columns = [ ('median_income', float), ('housing_median_age', float), ('total_rooms', float), ] return {"df_in": pm.Pandas(columns)}, \ {"df_out": pm.Pandas(columns + [('prediction', float)])} def predict(self, df_in): df_in['prediction'] = self.model.predict( df_in[['median_income', 'housing_median_age', 'total_rooms']] ) return df_in
Refer to the model adapter documentation for more guidance.
(Optional) Log metrics and hyperparameters to a model experiment
Model experiments is a lightweight framework for logging metrics and hyperparameters produced during a model training run, which can then be published alongside a model and persisted in the model page.
Learn more about creating and writing to experiments.
Publish the model to Foundry
To publish the model to Foundry, copy the available snippet for the model you wish to publish in the left sidebar under Step 3: Publish your model, paste it in your notebook and run the cell. Here is an example snippet to publish a linear regression model using the LinearRegressionModelAdapter written above:
Copied!1 2 3 4 5 6 7 8 9 10 11from palantir_models.code_workspaces import ModelOutput # Model adapter has been defined in linear_regression_model_adapter.py from linear_regression_model_adapter import LinearRegressionModelAdapter # sklearn_model is a model trained in another cell linear_regression_model_adapter = LinearRegressionModelAdapter(sklearn_model) # "linear_regression_model" is the alias for this example model model_output = ModelOutput("linear_regression_model") model_output.publish(linear_regression_model_adapter)
The snippet should work as is, with the exception of having to properly pass the model you trained to the adapter initialization. Once the code is ready, you can run the cell to publish the model to Foundry.
Consume the model
Models can be consumed through submission to a modeling objective. A model can be submitted to a modeling objective for:
Models can also be consumed using model deployments, which represent an alternative model hosting system beyond modeling objectives.
Jupyter®, and JupyterLab®, are trademarks or registered trademarks of NumFOCUS.
All third-party trademarks referenced remain the property of their respective owners. No affiliation or endorsement is implied.