Dataset models in Code Repositories
The foundry_ml library, which is used to produce dataset-backed models, is in the planned deprecation phase of development and will be unavailable for use starting October 31, 2025. Full support remains available until the deprecation date. At this time, you should use the palantir_models library to produce model assets. You can also learn how to migrate a model from the foundry_ml to the palantir_models framework through an example.
Contact Palantir Support if you require additional help migrating your workflows.
Dataset models can be created from Code Workbooks and Code Repositories. Whereas Code Workbooks are more interactive and come with advanced plotting features, Code Repositories support full Git functionality, PR workflows, and meta-programming.
This workflow assumes familiarity with Code Repositories and Python transforms.
Authoring models in Code Repositories
Setup
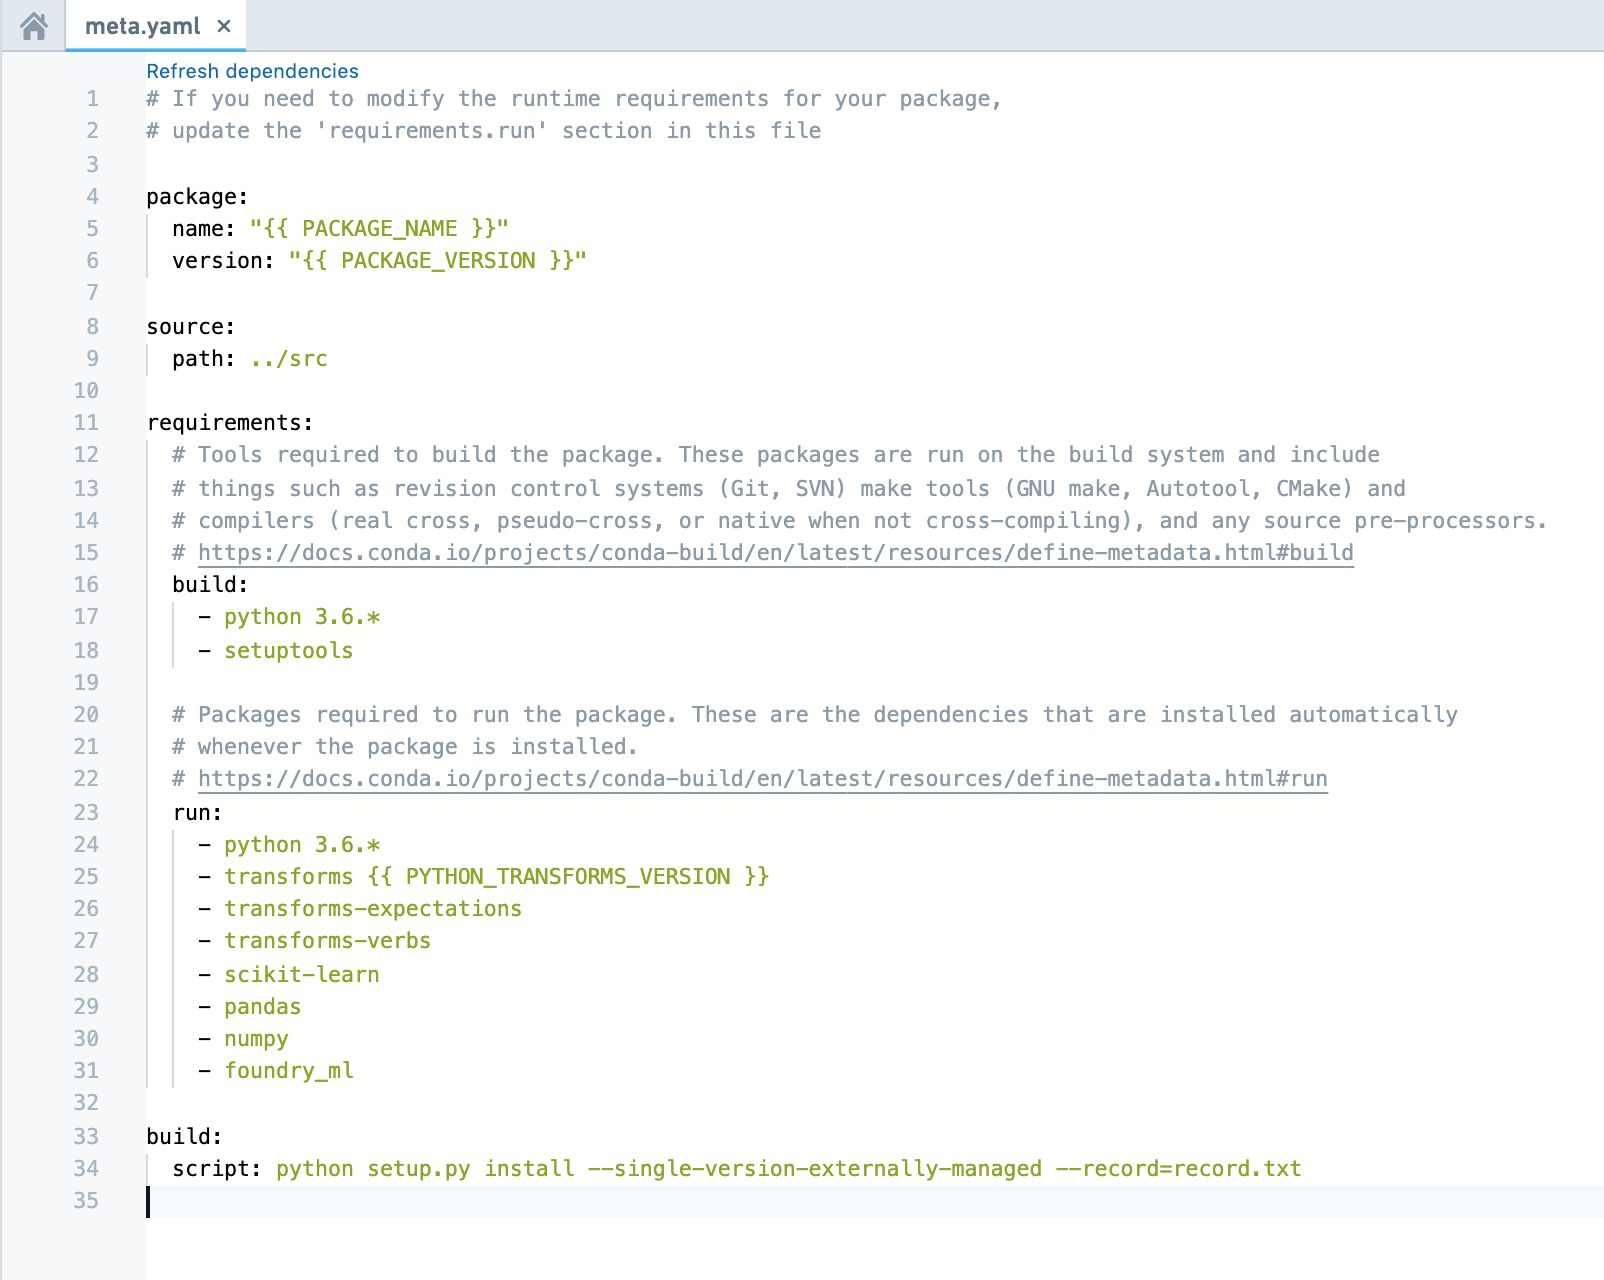
Once you've created a new repository (or opened an existing one), make sure that foundry_ml and scikit-learn are available in the conda environment. You can validate the results by inspecting the meta.yaml file. To run the code below, here is an example of the meta.yaml file you will need:
Create a logistic regression model
Use the transform decorator to save the model using the model.save(transform_output) instance-method of your Model object.
Note: In the code shown below, multiple Stage objects are created and combined into a single Model within a single transform, unlike the separately saved stages in the Code Workbook based Getting Started tutorial. Either approach works.
Copied!1 2 3 4 5 6 7 8 9 10 11 12 13 14 15 16 17 18 19 20 21 22 23 24 25 26 27 28 29 30 31 32 33 34 35 36from sklearn.compose import make_column_transformer from sklearn.linear_model import LogisticRegression from transforms.api import transform, Input, Output from foundry_ml import Model, Stage from foundry_ml_sklearn.utils import extract_matrix @transform( iris=Input("/path/to/input/iris_dataset"), out_model=Output("/path/to/output/model"), ) def create_model(iris, out_model): df = iris.dataframe().toPandas() column_transformer = make_column_transformer( ('passthrough', ['sepal_width', 'sepal_length', 'petal_width', 'petal_length']) ) # Fit the column transformer to act as a vectorizer column_transformer.fit(df[['sepal_width', 'sepal_length', 'petal_width', 'petal_length']]) # Wrap the vectorizer as a Stage to indicate this is the transformation that to be applied in the Model vectorizer = Stage(column_transformer) # Applies vectorizer to produce a dataframe with all original columns and the column of vectorized data, default name is "features" training_df = vectorizer.transform(df) # We have a helper function that can help convert column of vectors into NumPy matrix and handle sparsity X = extract_matrix(training_df, 'features') y = training_df['is_setosa'] # Train a logistic regression model - specify solver to prevent a future warning clf = LogisticRegression(solver='lbfgs') clf.fit(X, y) # Return Model object that now contains pipeline of transformations model = Model(vectorizer, Stage(clf, input_column_name='features')) # Syntax for saving down a Model model.save(out_model)
Load and use your model
Use the transform decorator to load the model using the Model.load(transform_input) class-method of the Model class.
Copied!1 2 3 4 5 6 7 8 9 10 11 12 13 14 15@transform( in_model=Input("/path/to/output/model"), test_data=Input("/path/to/data"), out_data=Output("/path/to/output/data/from/applying/model"), ) def apply_model(in_model, test_data, out_data): # Load the saved model from above model = Model.load(in_model) # Apply the model on the scoring or testing dataset pandas_df = test_data.dataframe().toPandas() output_df = model.transform(pandas_df) # the output of the transformation contains a column that is a numpy array, cast before saving it down output_df['features'] = output_df['features'].apply(lambda x: x.tolist()) # Write the results of applying the model out_data.write_pandas(output_df)
Saving and loading MetricSets
MetricSets are saved and loaded using the same syntax as a Model, i.e. metric_set.save(transform_output) and MetricSet.load(transform_input).
You can generate MetricSets from the same transform that generates a Model (e.g. training-time hold-out metrics), or from a downstream transform that loads and runs the Model.
Automatically submitting models
In Code Repositories, models can be configured to automatically submit to a modeling objective when built. When configured, this means the modeling objective will subscribe to the model and create a new submission whenever a transaction is successfully committed to that model.
Prerequisites
To use this feature, you must first:
-
Create a Python transforms Code Repository. Refer to the Python transforms tutorial for information on setting up a repository.
-
Add the
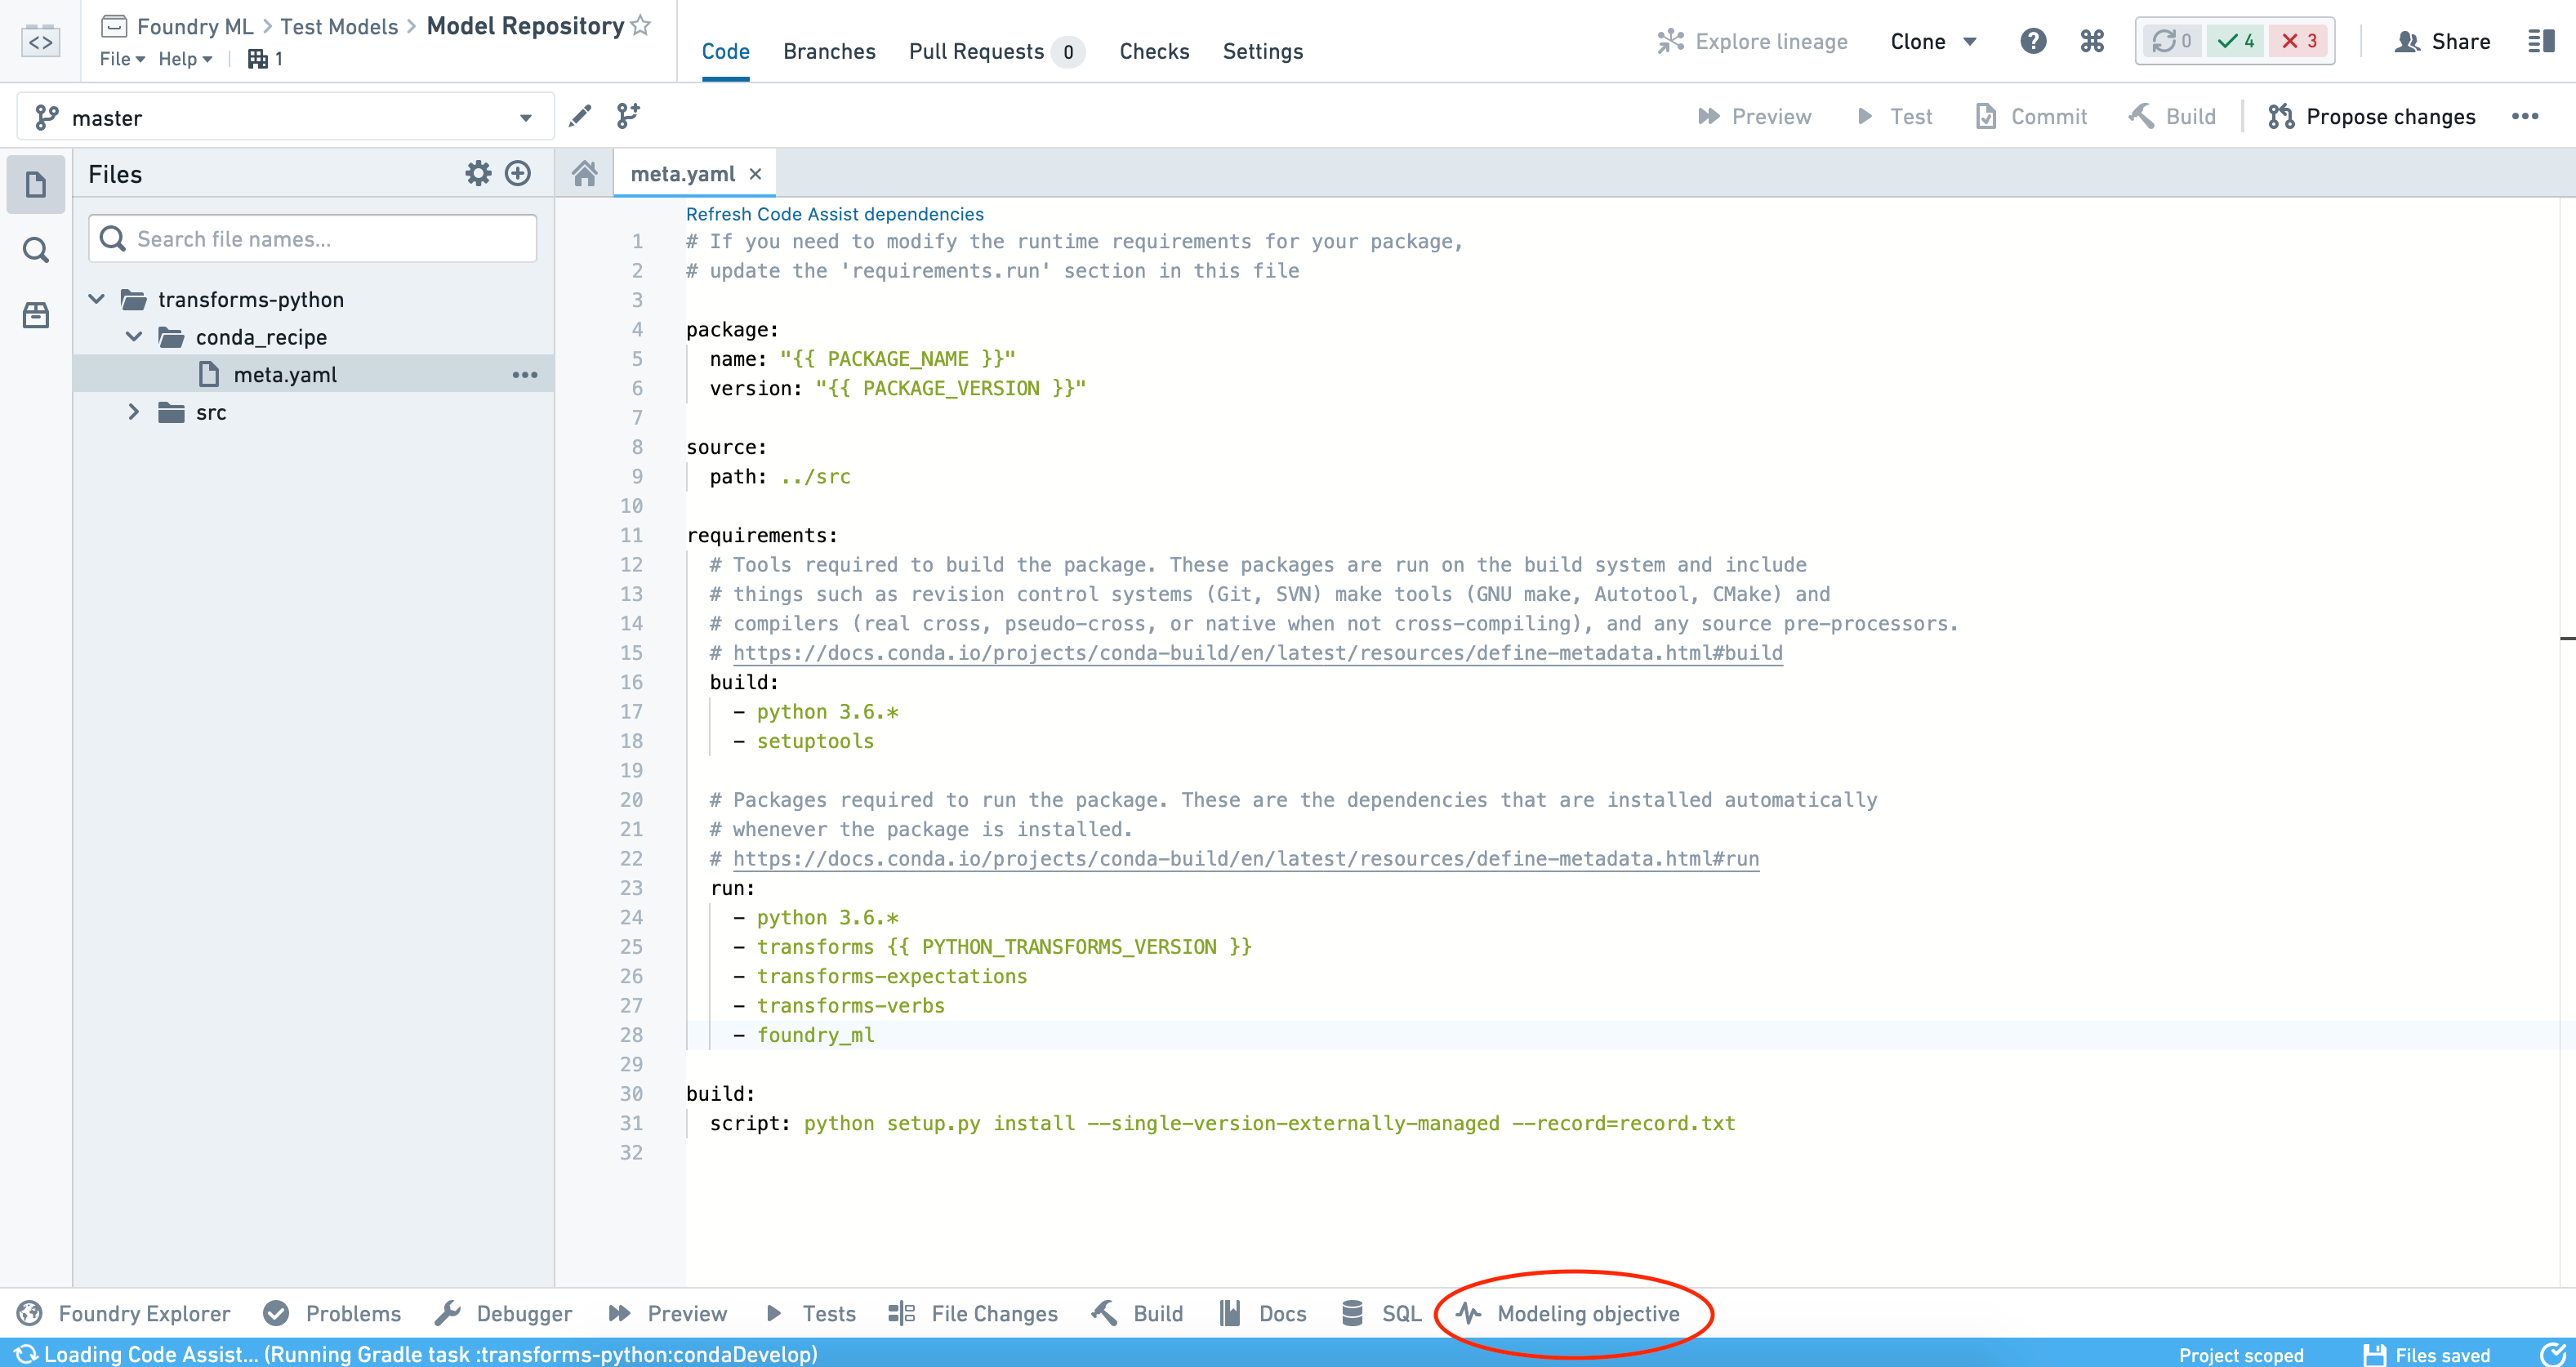
foundry_mlpackage as a runtime dependency to yourmeta.yamlfile and commit the changes. Once committed, you will see the Modeling objective helper panel alongside the other panels at the bottom of the interface, as shown in the screenshot below.
- Author transforms that output model datasets as described above.
- Build the datasets at least once. This will allow the helper panel to detect models in your repository and enable you to configure automatic submission.
Configure automatic submission
Automatic submission can only be configured for one model at a time by selecting each model individually. If multiple models are selected, you can view the list of objectives to which the models are submitting, but cannot configure automatic submission in bulk.
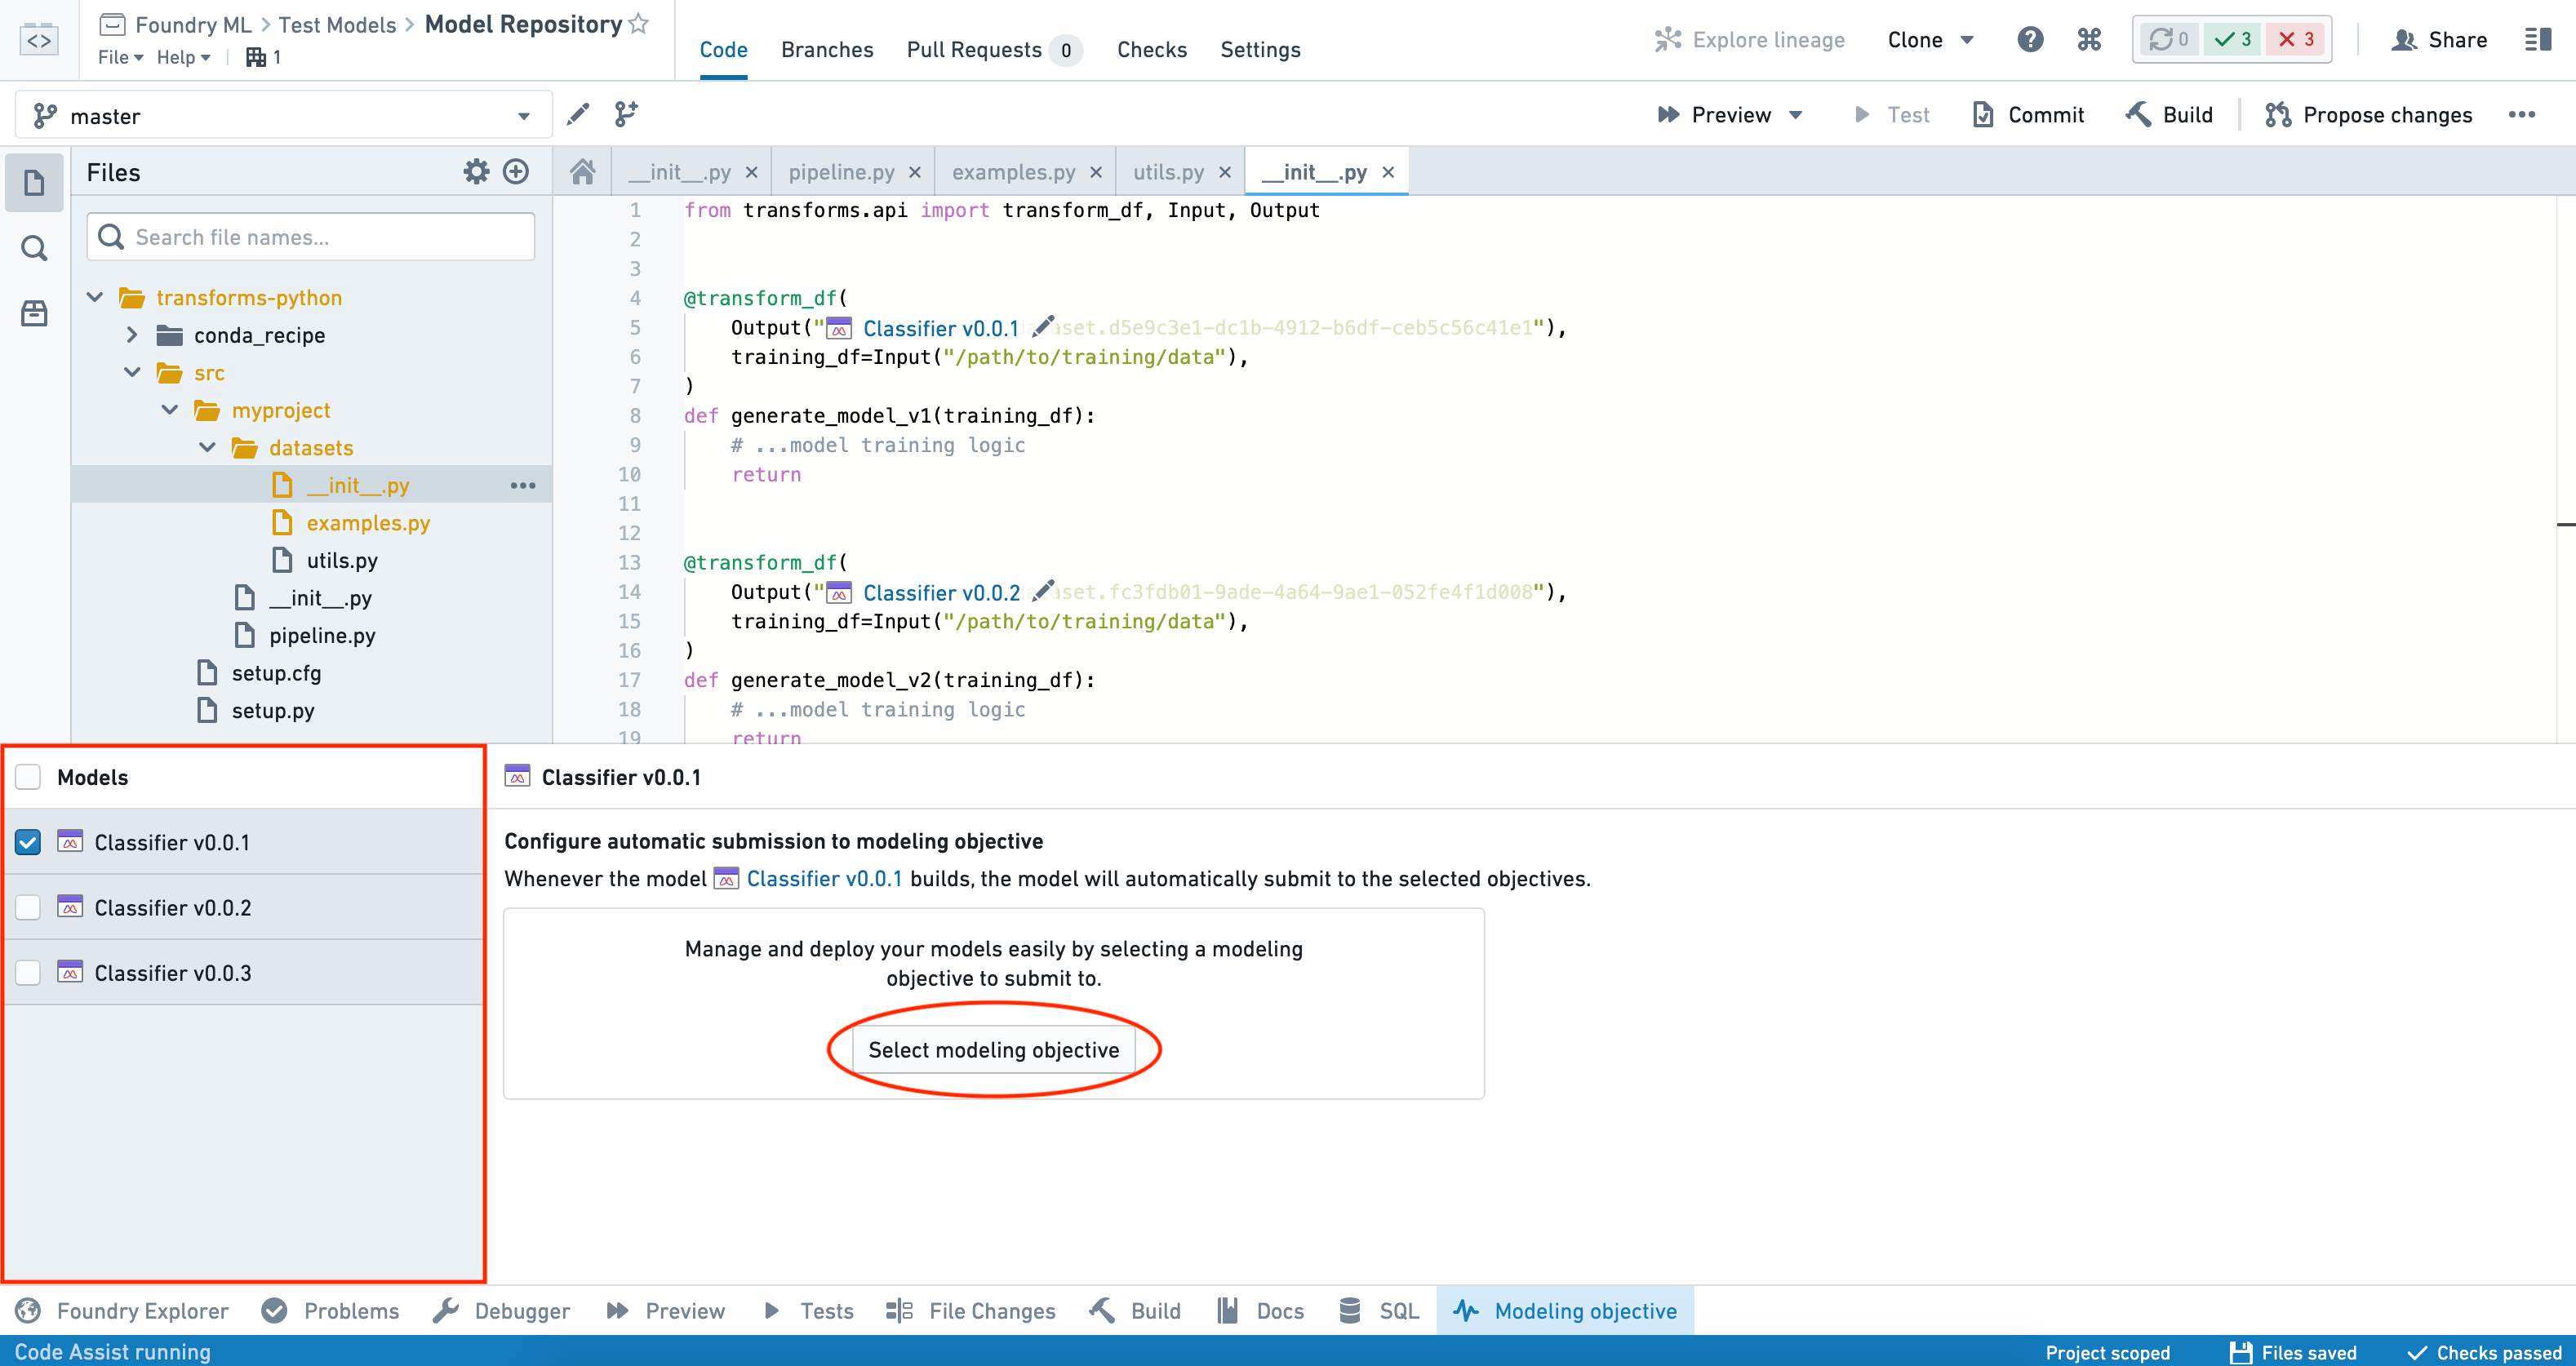
To configure automatic submission for a model, select the model from the Models panel on the left-hand side of the interface, click the Select modeling objective button, and choose the objective to which you want the model to submit.
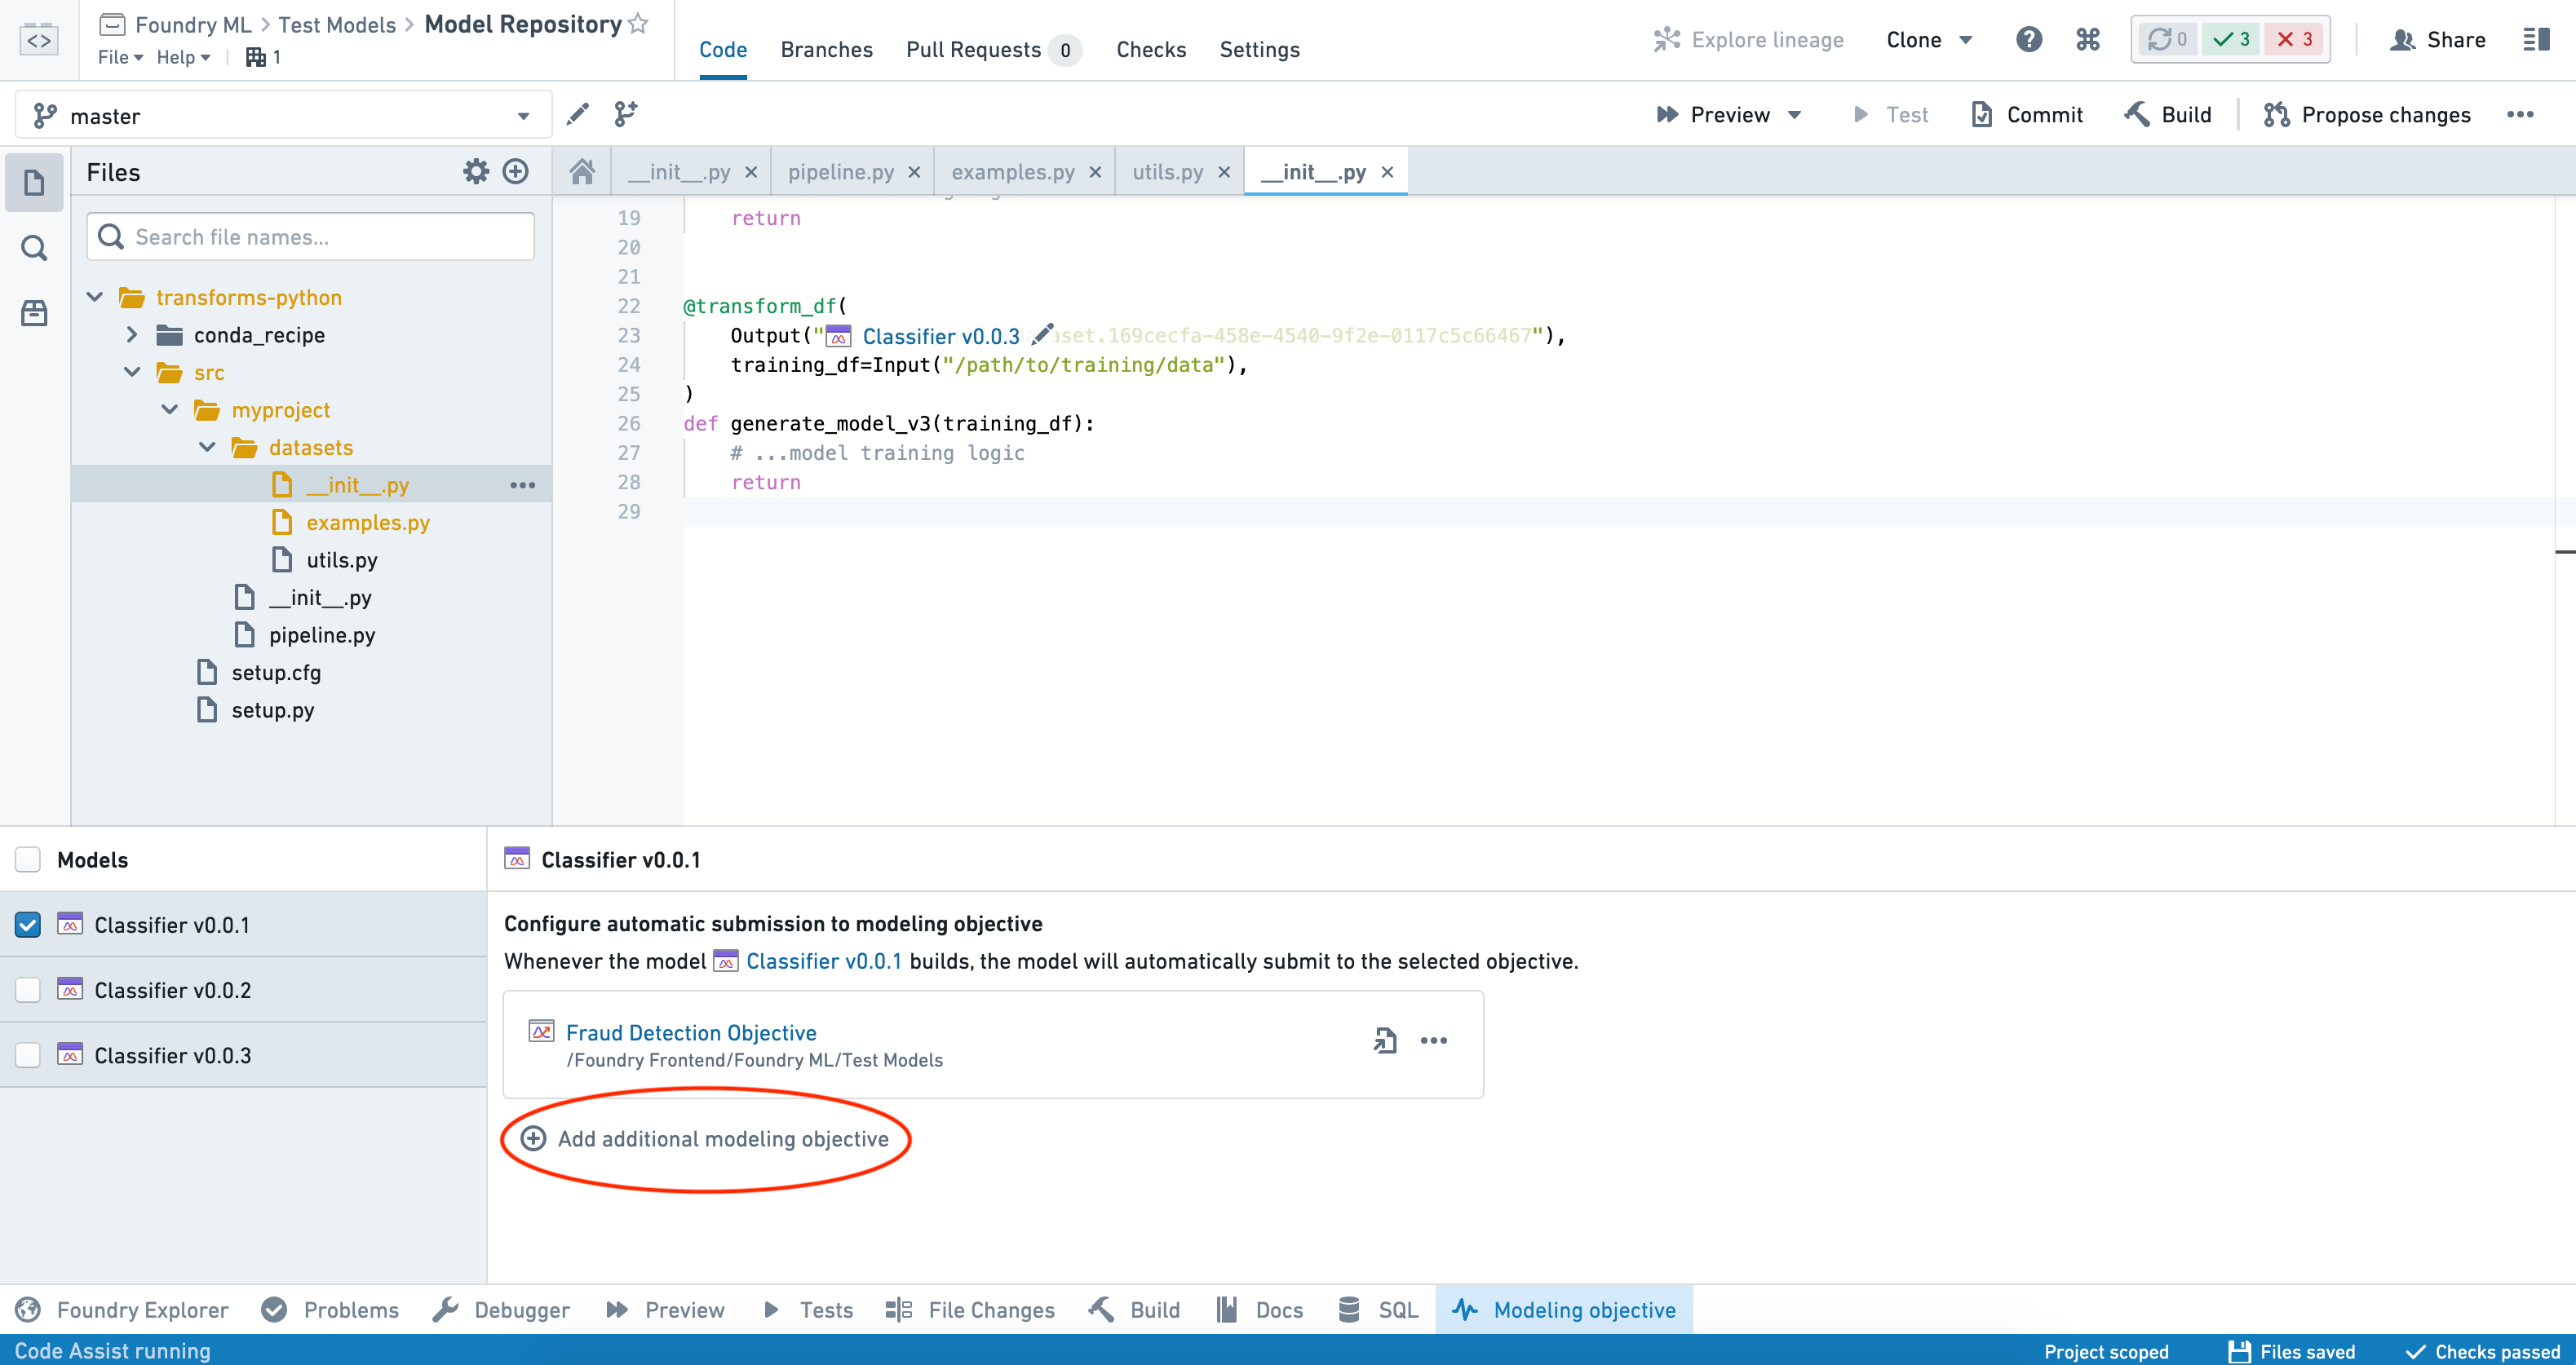
The model will now automatically submit to that objective once built. To add an additional objective to submit to, click Add additional modeling objective and repeat these steps.
Disabling automatic submission
To stop submitting a particular model to an objective, select the model from the Models panel on the left-hand side of the interface and click on the three dots (...) beside the objective that you want to remove.
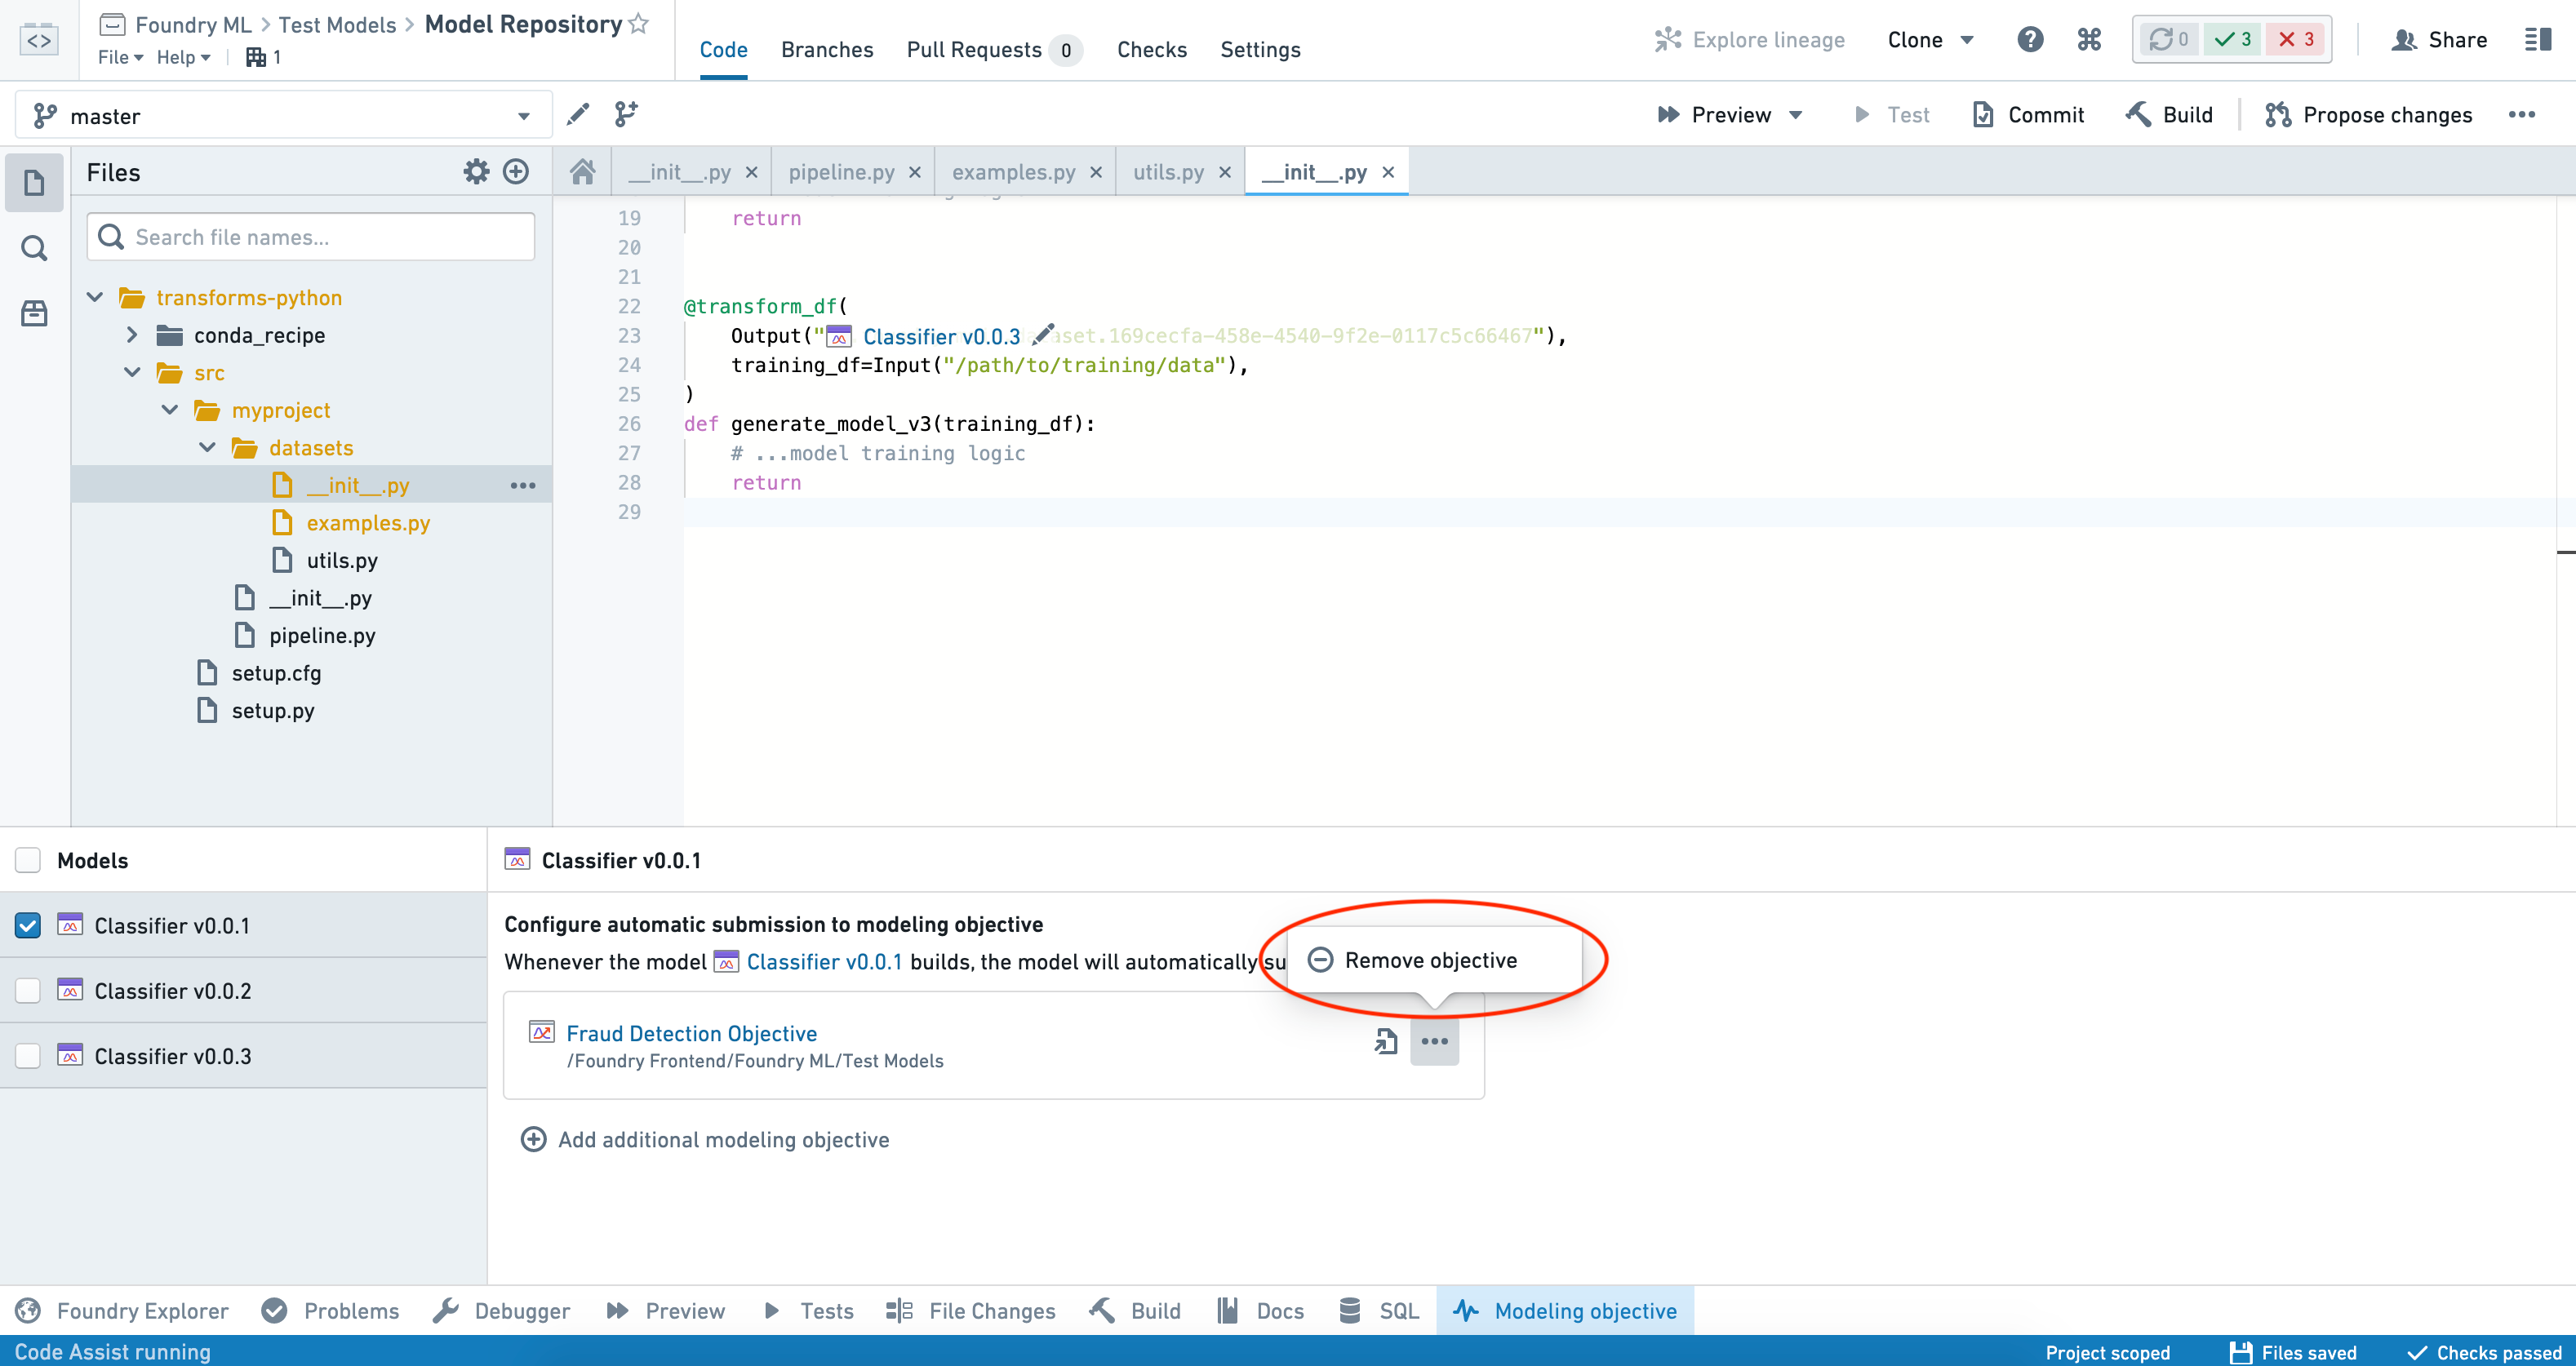
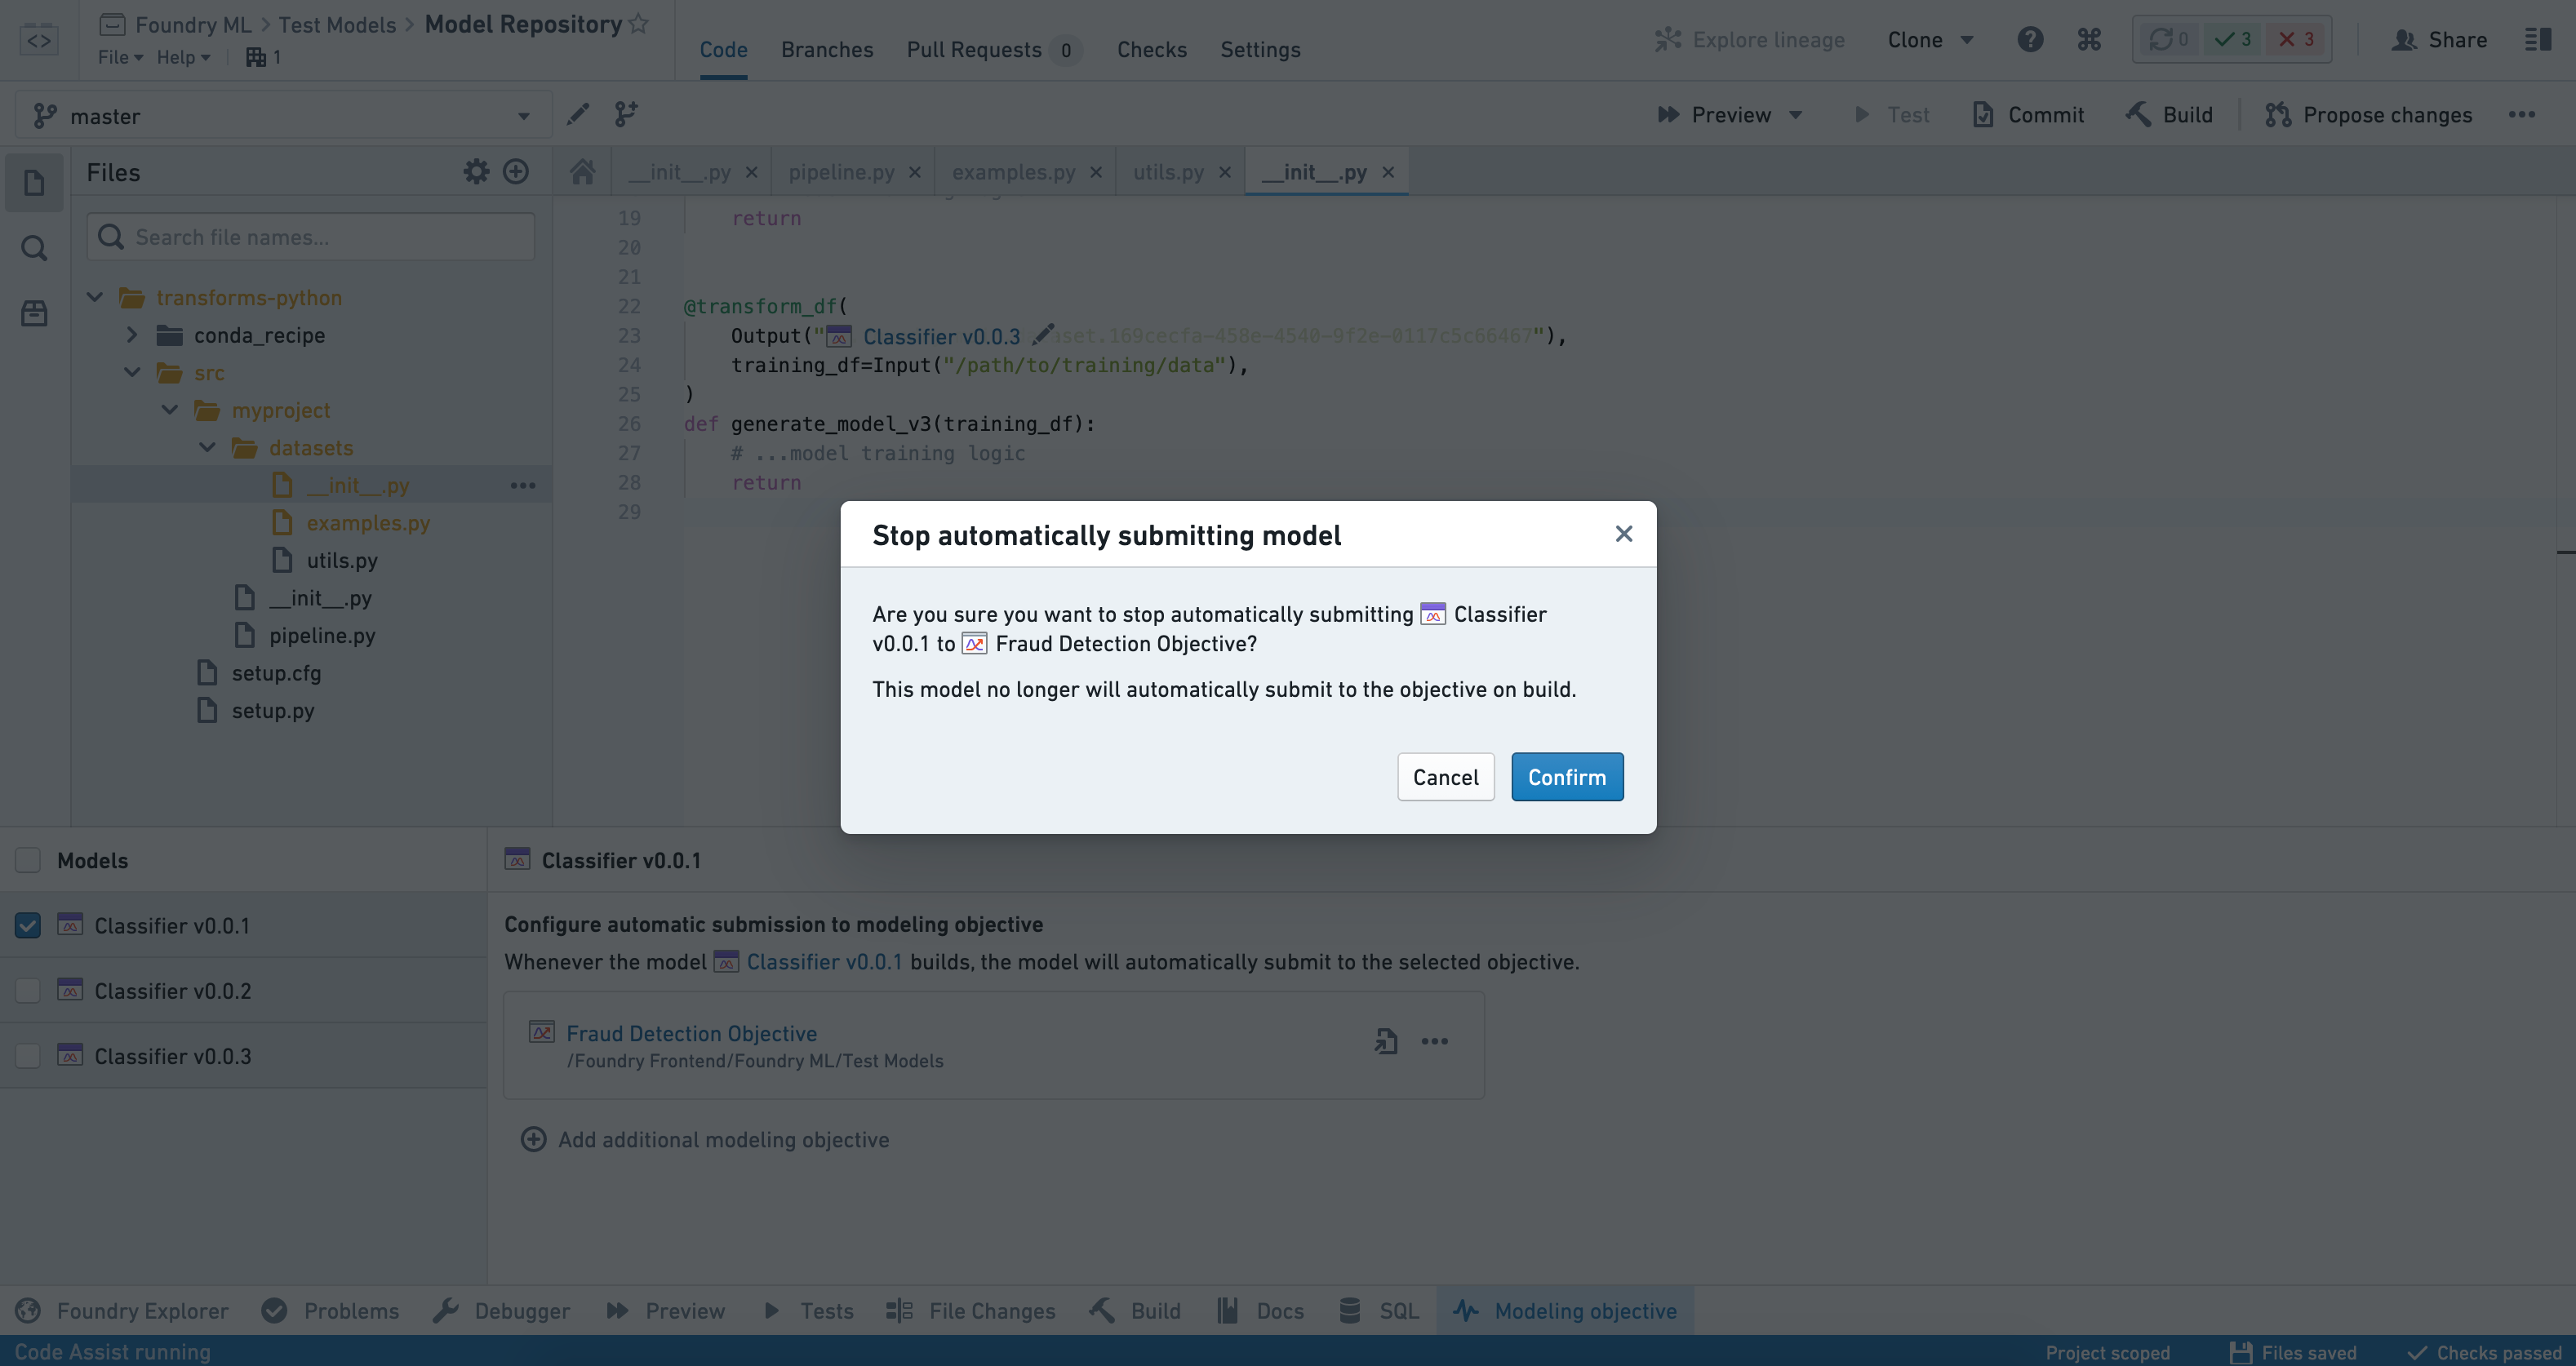
Select Remove objective and confirm your decision.
Criteria based automatic submission
If configured, a model is automatically submitted whenever a transaction is successfully committed to that model. However, as it is not always desired to resubmit a model after every retraining, a model retraining and automatic submission can be aborted based on your desired criteria.
As an example, you can stop an automatic submission after retraining if a model has lower hold-out metrics during training time than a previous submission. To do this, perform the following steps in your model retraining transform:
- Retrain your model and generate new hold-out metrics as described above.
- Using Foundry's incremental transform behavior, read previous hold-out metrics.
- Compare new hold-out metrics against previous hold-out metrics.
- If your new hold-out metrics are preferred to previous metrics, save the model with
model.save(transform_output). - If your new hold-out metrics are worse than previous metrics, abort the model training transform, which will abort model automatic submission.
- If your new hold-out metrics are preferred to previous metrics, save the model with
The above steps can be easily repurposed to perform many live checks during model retraining.
Configure automatic retraining
Automatic submission, in combination with build schedules, enables you to set up systematic model retraining.
Once you've set up automatic submission on a model, add a schedule to that same model. You can also include upstream datasets if needed. For instance:
- If the transform generating the model includes separately trained stages, you may want to include those in your schedule.
- In some cases, it may be appropriate to include the training dataset as part of the schedule.
You can now set any combination of time- and event-based triggers within your schedule.
Common configurations include:
- Purely time-based trigger (e.g. retrain every 24 hours).
- Purely event-based trigger (e.g. retrain whenever the training set updates).
- Advanced configuration with
ANDorORcombinations of the above.
Advanced retraining triggers
We recommend familiarizing yourself with incremental transforms before proceeding with advanced retraining triggers.
In some cases, such as computationally expensive training jobs, you can selectively retrain a model by configuring the model build schedule to trigger off of other datasets along the model lifecycle. This enables you to trigger retraining based on feature drift, score drift, observed model degradation, user feedback, or other indicators.
To do this, we recommend creating and scheduling an "alerts" dataset. This can use a combination of factors that are appropriate for your use case:

You can use code-based or low/no-code tools (such as Contour) to encode your logic.
Downstream of the alerting logic, generate an append-only incremental "alerts" dataset using Python transforms within a code repository. In your transforms logic, abort the transaction whenever there are no new alerts.
You can now trigger your model retraining schedule on a "Transaction committed" event-trigger.
You can also set health checks on the alerts dataset, as well as use it in a custom review application.